Leaderboard


Popular Content
Showing content with the highest reputation on 06/06/20 in all areas
-
I found the solution ? change in battle.cpp sc = status_get_sc(bl); ssc = status_get_sc(src); if (sc && sc->data[SC_WHITEIMPRISON]) return 0; // White Imprison does not reflect any damage to: sc = status_get_sc(bl); ssc = status_get_sc(src); if (sc && sc->data[SC_SAFETYWALL]) return 0; if (sc && sc->data[SC_WHITEIMPRISON]) return 0; // White Imprison does not reflect any damage Test and tell me if it worked. It worked for me.2 points
-
Version 1.0.0
305 downloads
Adding two new table and a script that help you see when the players are connected and how many. -cust_StatPlayerCo checking every hour every day how many player were actually connected. -cust_StatPlayerIpDay checking everyday how many players were actually connected. Compatible with gepard and last_unique_id (enable/disable in OnInit). There's no npc to check that in game currently, only checking in database directly. If people are interested, I could add a npc/a command that make it possible to check directly in game for gm and/or players.Free2 points -
File Name: @AutoAttack File Submitter: goddameit File Submitted: 13 Sep 2012 File Category: Source Modifications Content Author: Goddameit Idea : http://rathena.org/b...k-close-enemys/ Preview : Use this command you can turn on or off auto-attack. It will auto-search 9x9 and attack the near one if there is no monster in area, you will auto-walk randomly. Click here to download this file @AutoAttack.patch Important Note : #31 #321 point
-
Version 2.1.3
438 downloads
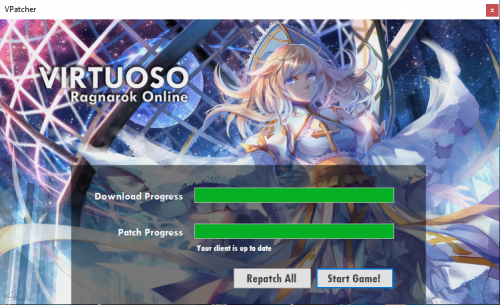
Just sharing my own Ragnarok Patcher for your server. A simple Ragnarok Client Patcher with rsumerge GRF Merge support powered by .NET Framework written in C#. INSTRUCTION 1. Serve your files using the built-in php server on the server 2. Create your new patch folder inside "patches" folder, add "list.txt" inside the newly created patch folder and enumerate all the files inside the folder with the following format: [File Name][tab][File Path]([tab][Patch Target])[newline] (parentheses indicates that the argument is optional, do not include the characters on formatting) (even though [File Path] is required, leave blank after the tab if the path is the root) Ex: RagnarokOnline.exe[tab][newline] OptionInfo.lua[tab]savedata/[newline] iteminfo.lua[tab]System/[newline] patch.grf[tab][tab]mygrf.grf[newline] Important Note: When naming your patch folders, it is important to consider its alphabetical order. With this, the last patch folder detected will override all the patches. 3. Replace the background skin of the WinForm in the Designer tabFree1 point -
Olá. Hoje vim trazer um tutorial muito simples, mas que é de grande utilidade para todos, até pelo motivo de eu não ter encontrado em nenhuma comunidade PT-BR. Tive um grande trabalho para achar um tutorial que tivesse uma línguagem mais prática e funcionasse, então devido a isso decidi postar. Utilizar multíplos iteminfo.lub/lua. Primeiro, como sabemos, os clientes mais novos estão usando itemInfo.lua / lub para substituir arquivos TXT para informações de item no lado do cliente, dentro da pasta System. Acho que grande parte dos criadores de servidores mais complexos, se depararam com a situação de adicionar algum(ns) item(ns) de outro RO como idRO, iRO, & jRO, KRO e sempre receber "Item desconhecido" e "Maçãs", e não saber o verdadeiro motivo causador disso, exceto ao trocar os arquivos itemInfo.lua/lub. Eis que surgiu uma solução! Vamos lá. Utilidade: utilizar itemInfo de outros servidores oficiais, como kRO, iRO e idRO, e fazer com que aqueles possam substituir informações não existentes de outros arquivos. Tutorial - 1º Passo: Prepare os arquivos a ser utilizado, exemplo: "itemInfo_bRO.lua" - Traduzido do BRO com todos os arquivos em PT-BR. "itemInfo_iRO.lua" Servidor internacional iRO. "itemInfo_idRO.lua". "iteminfo_custom" - Seu iteminfo customizado, com seus itens criados. "itemInfo_kRO.lua" - Servidor oficial e distribuidor do jogo RO. - 2º Passo: Faça um arquivo .lua vazio, dê o nome "itemInfo.lua". Este será o arquivo principal para ser lido pelo cliente. Edite o "itemInfo.lua", e cole este código. - 3º Passo: entre no arquivo criado iteminfo.lua, que foi colado o código e onde estiver essa parte main = function() iiFiles = { "System/itemInfo_Translation.lua", -- 1st priority "System/itemInfo_iRO.lua", -- 2nd "System/itemInfo_idRO.lua", -- 3rd "System/itemInfo_kRO.lua", -- 4th } Mude para o nome dos seus arquivos, colocando em ordem de prioridade qual arquivo deve ser lido primeiro pelo Hexed (Geralmente iniciado com o BRO). Salve e feche. - 4º Passo: Em seguida, copie o arquivo e renomeie o arquivo copiado para "iteminfo.lub". - 5º Passo: Entre em todos seus arquivos preparados no Passo 1, e verifique se ambos começam assim: tbl = { ... } Caso sim, continue no mesmo arquivo e vá para o próximo passo. - 6º Passo: Vá até o final do arquivo e remova a função principal. Geralmente estará assim. Spoiler function main() for ItemID, DESC in pairs(tbl) do result, msg = AddItem(ItemID, DESC.unidentifiedDisplayName, DESC.unidentifiedResourceName, DESC.identifiedDisplayName, DESC.identifiedResourceName, DESC.slotCount, DESC.ClassNum) if not result then return false, msg end for k, v in pairs(DESC.unidentifiedDescriptionName) do result, msg = AddItemUnidentifiedDesc(ItemID, v) if not result then return false, msg end end for k, v in pairs(DESC.identifiedDescriptionName) do result, msg = AddItemIdentifiedDesc(ItemID, v) if not result then return false, msg end end end return true, "good" end Adicione ao lugar removido o seguinte código. for ItemID,DESC in pairs(tbl) do CheckItem(ItemID,DESC) end Fim! Aprecie seus novos arquivos. Notas e Créditos. OBS¹: Apenas traduzi um tutorial já existente, no qual vou estar deixando a fonte a baixo. Mas tive que modificar praticamente todo tutorial, então os créditos são a ambos. OBS²: Não irei fornecer nenhum arquivo, isto é apenas um tutorial, não me envie pm me solicitando nada. OBS³: todos os arquivos devem ser decompilado .lua, não compilado. OBS4:Se você tiver itens com ícone vazio , isso significa que sua data não tem o sprite / textura necessária ou seus arquivos itemInfo estão com o "unidentifiedResourceName" ou "identifiedResourceName" vazio ou não preenchidos. Fonte: http://pservero.com/...iteminfo-files1 point
-
Version 1.0.0
1268 downloads
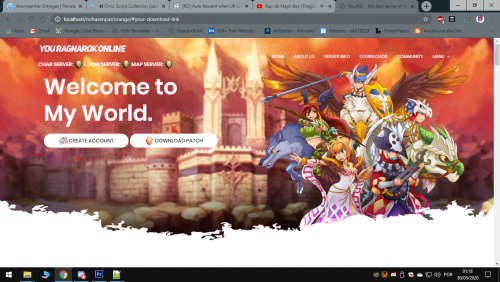
Simple Orange Website Responsive One-Page Ko-fi = Motivation. By: Mihael About: Website is made in php / html responsive one page. Demo:Free1 point -
Please read this link below. There is a problem about this project and may jeopardize your server. If you want the best you can contact @Functor Please be sure that you add him on the skype link he provided on the link below because there are tons of impersonators and seller that are not legit.1 point
-
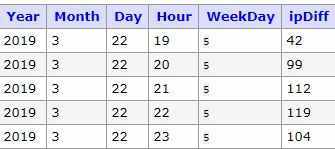
@Dev G Inc It was mostly done to be checked using sql request (I used like that), but maybe it would be interesting to have a npc in game doing the work. So yeah you'll have to create the tables in your databases. But I won't do any fluxcp release ^^'. @IsabelaFernandez You mean having exactly the id in another table to know who was connected? I mostly thought about it being just helping for stat. Like, knowing you usually have more player at 21h the friday than 21h the thursday (for event preparation) and watching the number of player (hopefully) growing. The problem is that it checks only the ip/gepard id, so you'd have to store exactly all the acc connected with the respective id/gid, it's doable. You'd like to have that possiblity what for?1 point
-
Hi @erjsanmiguel You can go to cp/config/application.php Change the config as per below:- 'BaseURI' => 'cp', //The "cp" assigned is a folder name of your control panel.1 point
-
try here data\luafiles514\lua files\quest1 point
-
No. Restarting the server is one thing, recompiling is another. If your server is already hosted, run this command on ssh. ./configure && make clean server If you are offline, you will need to use Visual Studio.1 point
-
You need to recompile the server.1 point
-
Change in skill.cpp case UNT_MAGNUS: //#ifndef RENEWAL //if (!battle_check_undead(tstatus->race,tstatus->def_ele) && tstatus->race!=RC_DEMON) // break; //#endif skill_attack(BF_MAGIC,ss,&unit->bl,bl,sg->skill_id,sg->skill_lv,tick,0); break; Change in skill_db.txt 79,9,8,2,6,0,0,10,1:2:3:4:5:6:7:8:9:10,yes,0,0,0,magic,0,0x0, PR_MAGNUS,Magnus Exorcismus I believe it is enough to solve your problem.1 point
-
@redfield It means that you use custom sprite for the mob with ID 1084.1 point
-
Version 1.0.0
274 downloads
Summary: Since i don't use them anymore. i'm willing to share this simple loading screens. i removed all the text below and above so that anyone who want to use this would be able to put text without cleaning it.Free1 point -
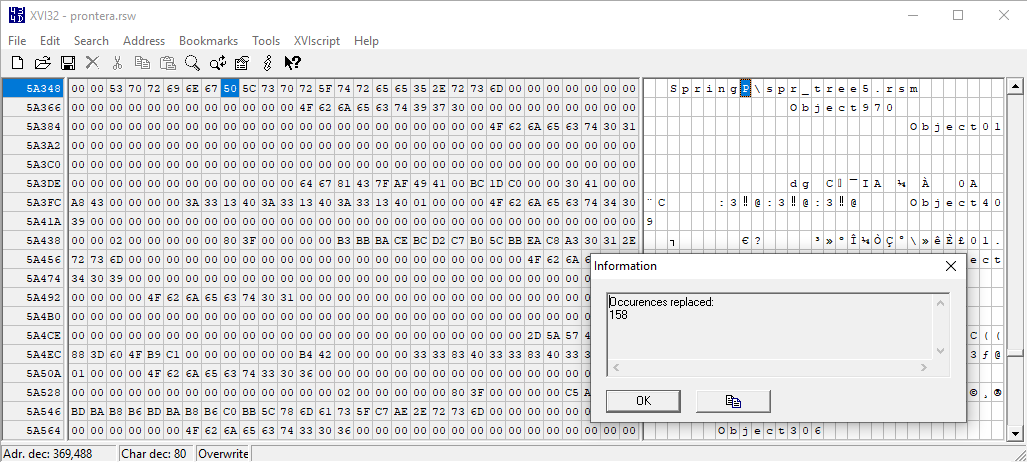
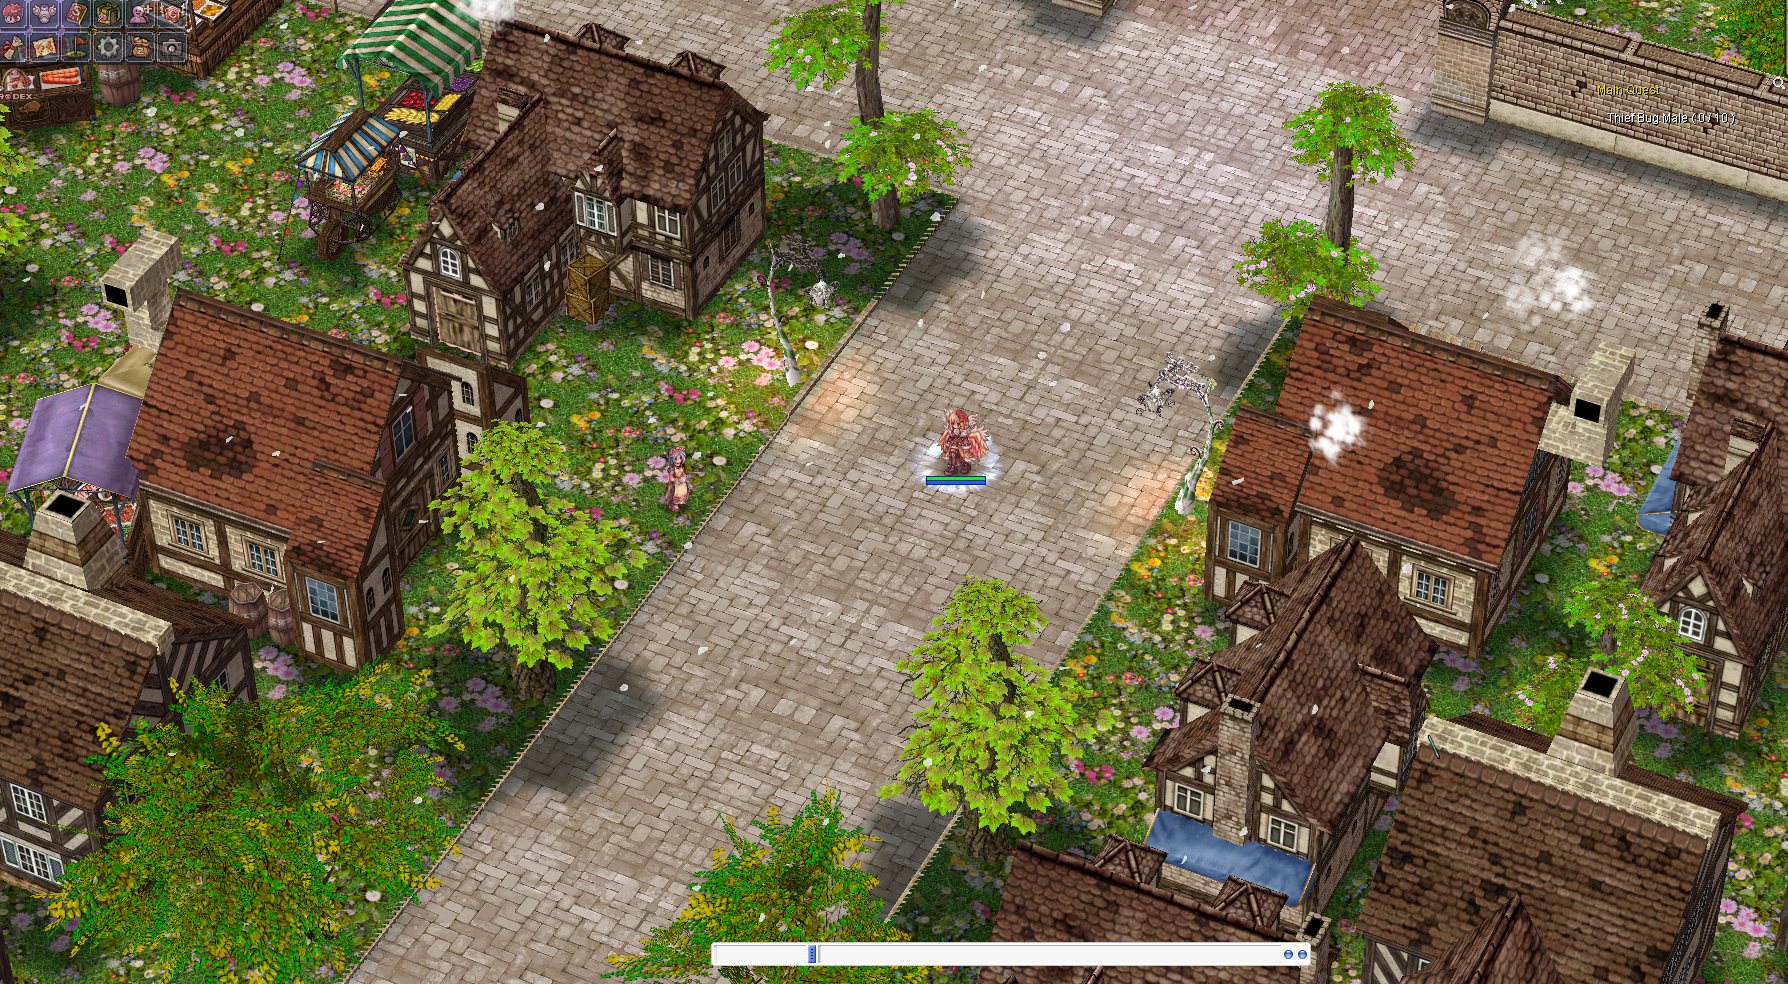
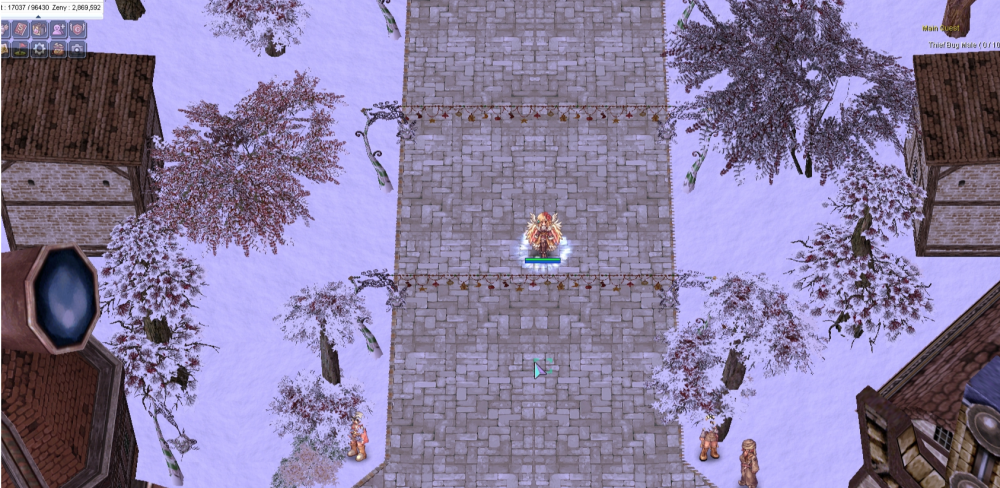
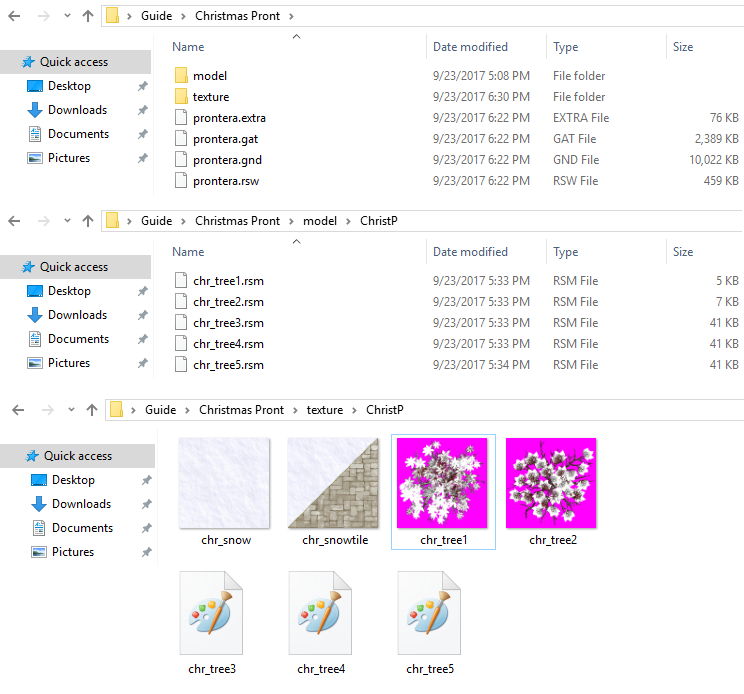
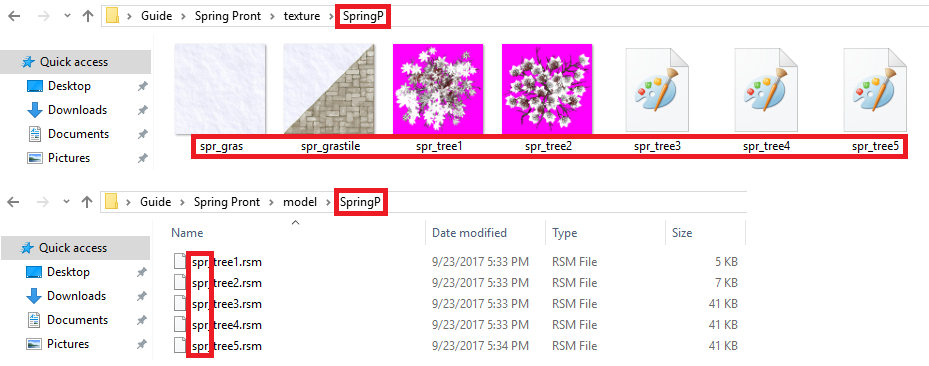
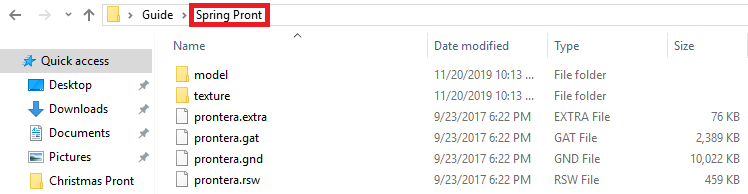
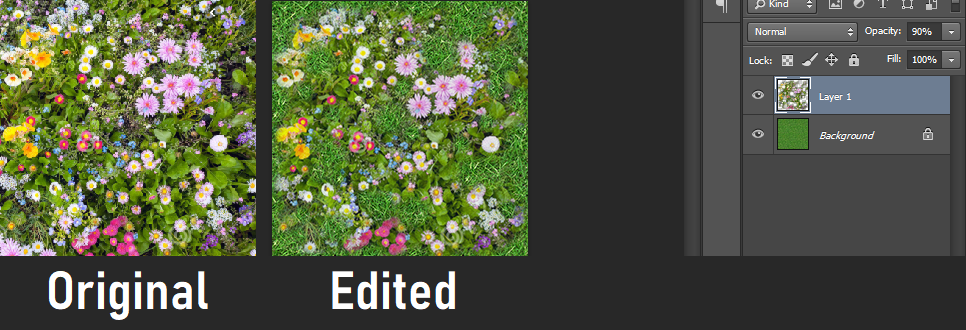
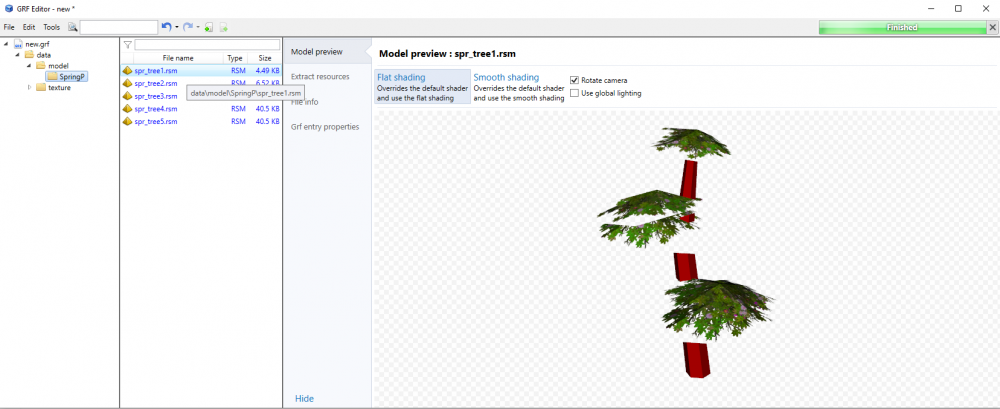
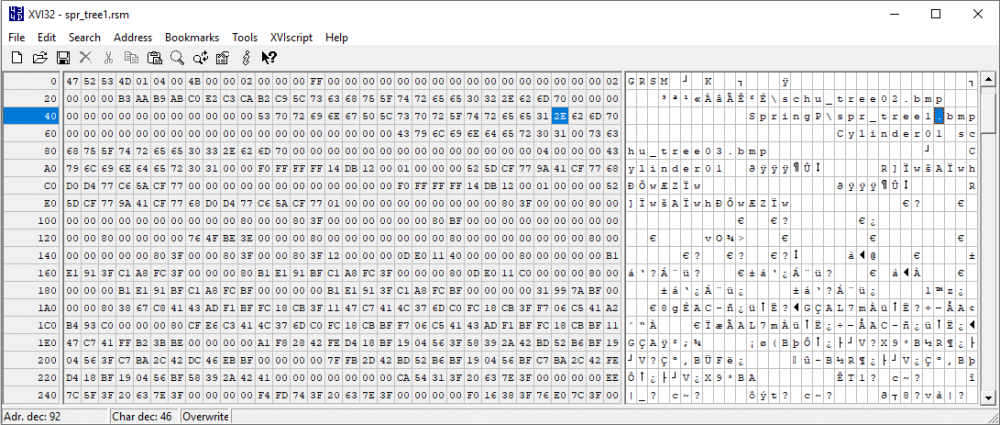
Hey all! It's been too long, hasn't it? I guess you could say I've been quite busy lately. However the other day I realized wanted to do something for the community once again (because honestly it's been forever since I contributed), hence why I'm here now. But then I wondered, what can I do? Of course there was the possibility of doing a free release, but I've done many of those already in the past. What else? Creating yet another guide how to develop maps in browedit from the ground up? Hm, we already have several amazing ones that effectively cover everything. What if I give you something different? Something - more like a neat little trick - that I've figured out through sheer exploration about two years ago. And what's that, precisely? As the title implies: Mapping through hexing. Over-hauling existing maps, without having to touch browedit. Also- This post might seem long, but rest assured it is super easy. The screenshots simply take up a lot of space. Before we start..... What is hexing? I could go the extra mile and explain it in my own words, but rAthena's GitHub gives an informative description what hexing is. As most of you may know, experts have developed tools with an user-friendly interface to make client hexing - AKA 'diffing' - even easier for us, however what the majority does not know is that hexing isn't specifically limited to .exe modifications and can be applied to many different file extensions- RO map files and models among them. Having that said, I think you have an idea in which direction I'll be heading. Okay, before anything else... I need to state that this method is recommendable to set the base design. You can in theory over-haul your entire map this way, but I highly encourage it to only be done with the repetitive textures and models (such as trees, bushes, buildings). Preferably, your map uses custom textures/models, they're easier to memorize (and thus replace) than the official gibberish components. What are the pros and cons? Pros: Once you get the hang of this, you could save yourself a lot of valuable time and make fresh layouts rapidly. No need to generate (custom textured) models through the build-in browedit RSM editor tool. We'll take a different approach. Gats remain unaltered and models will remain facing the same way. Lastly - probably the main reason what I like about this - texture and model files from your previous design will be preserved and not over-written. New ones are created which are fetched from a different texture/model directory. After implementation the only thing that will be over-written are the map files themselves (which also means less heavy patches). Cons: While you don't have to, you will likely still want to open browedit for some finishing touches. You can easily slip up and corrupt your map with a single typo. Back things up and be focused when you get to step 3! What will we need? GRF Tool (i.e GRF Editor). Hex Editor (i.e XVI32). Image Editing Software (i.e Photoshop). A custom map - seasonal/holiday themed is preferred, but not necessary. Basic ~ moderate client-side & browedit knowledge. ~~~~~~~~~~~~~~~~~~~~~~~~~~~~~~~~~~~~~~~~~~~~~~~~~~~~ Now, since we've got all that covered... Let's begin! For this guide, we're going to use my Christmas Prontera (screenshot below) map as sample, and turn it into a Spring Prontera (screenshot at the bottom of the post). - Files - We're going to need to locate the map and its contents that we're going to edit. So let's do that, here are the resources... Step #1 - Copying & Renaming What you need to do first, is go back to the main directory and copy the entire 'Christmas Pront' directory. Paste it and rename it - in this case - 'Spring Pront'. If you've done this correctly, you should now have two directories. Spring Pront and Christmas Pront, both containing files of Christmas Pront. Open the 'Spring Pront' folder and begin re-naming all the files that still contain an abbreviation of the Christmas Prontera layout. Keep it simple for yourself. For example, I recommend replacing the 'chr' and make it 'spr', like this: Note: If there's a lot to edit, consider pulling up a notepad and writing down the old texture/model/directory names and the new ones next to it. I'm telling you this, because you're going to need to check back to the old names later. Better safe than sorry. "Why does a snow texture display 'spr_gras?" - I know, it doesn't make sense yet. Disregard, you'll understand in step #2. "Can the abbreviations I choose exceed the amount of characters that the original files use? (i.e spring_grass instead of spr_gras)" - It probably could with additional steps but...Let's not for now, okay? If you've done everything as per tutorial, you will have no texture, model or directory left anymore including 'chr' or 'Christ'. Double-check in order to confirm. Step #2 - The Artsy Stuff Got a graphic artist on your team? Lucky you- because then you can simply skip this (most time-consuming) step and instruct your artist to present you with something appealing. But we're not going to do that, are we? No, we're going to pretend you're a solo developer. Go to google images and look for a square texture that you wish to replace the snow texture with. Since this is a spring themed map, I went with something green and flowery. Admittedly though, I wasn't too fond of the original image I chose because it seemed a little too crowed/clustered(?) and the borders didn't align, so I decided to look for a plain grass image and combine it with the initial flowery tile of my choice. Still a lil clustered but better. Here's the result: Okay so clearly this isn't a Photoshop guide - my Photoshop skills are far from perfect - but I think you get the idea. ;-; Seamless images are the best, however it isn't always possible to find them. Fear not, young grasshopper- You need not be an expert in Photoshop but at the very least try to edit the texture sufficiently (with the eraser tool on the top layer) for the borders to have a relatively smooth over-flow. Needless to say, if flowers are being cut off at the border of a texture, it does not exactly look attractive. Done? Resize the image(s) to 256x256 and save as 24 bit bmp. Do this with all the textures you've redesigned, your texture directory should somewhat look like this: Again, this might take a while if you're doing everything alone and aren't that familiar with Photoshop. Note: spr_tree3~5 are tga files, but they have been adjusted as well. Step #3 - Hex It! This step is the most technical one and you'll need to look back every now and then to your other layout's textures and models - in this case my Christmas Pront - as name replacement reference. Please be aware that you can screw up easily here! Yes, it's easy but you've gotta pay attention! Double check everything you do and make sure you don't typo anything or miss anything out. Map Files Let's do these first. Boot your Hex Editor software and locate 'prontera.gnd' in your 'Spring Prontera' directory. Access the replacement feature, in XVI32's case: Search > Replace... What we're going to do is ensure the .gnd file reads the new textures, alright? We don't want the map files looking for the Christmas Pront textures/models anymore because this isn't going to be a Christmas Pront. ? Replaced them all? Great. Do the exact same for the models with the .rsw file: 158 entries. Pretty sweet, right? Model Files We're almost done! The last step will be hexing the models. Open them 1 by 1 in your Hex Editor software like you did with the map files and adjust the entries accordingly so the models are no longer searching for the incorrect texture files. Like this... And that's.... basically it. To see if you err'd anywhere, just open GRF Editor and put all the resources into it. If done correctly you'll see that your map and model files have adapted to your edits made through hexing. What was previously snow-covered, now returns something else entirely. Take this lovely flowery tree for example... ? Some of you may wonder- "How is this different than just regular (existent) texture replacement/recoloring? The answer is, exactly that. You're not replacing or changing the original texture/model resources at all. Quite the contrary- You're preserving your previous theme, all while generating an entire new theme with separate contents and directories that are being read. Convenient to server owners, too. No more messing around with different texture and model directories, worrying about if you might've missed something out when adding/removing files with the patcher. Using this methods, when the time comes where you want/need to switch theme, simply patch in the new map files (prontera.rsw and prontera.gnd) and you're good to go (unless if you've made gat edits of course- in which case you'll need to add the prontera.gat as well!). Needless to say, for the first-time implementation, you do need to include all the texture/model components. But that's obvious. And now, the final result? This is how Prontera will look like~ We went from winter wonderland to a refreshing and colorful spring design~ Fair enough- you'll still see the occasional wintry lantern, and the center higher up still has a giant pine tree, fine. Light-maps intensity need to be re-considered, too. But for the most part? Your map is about 3/4 done. What's left is just the small details that will likely only take you an hour or two at most to wrap up. ? Well, I hope this makes the life easier for some of you! ♥


 1 point
 -
Hey everybody, I've mentioned wanting to produce some Browedit tutorials for a long time, so I've finally gotten around to starting. These will be posted/updated a a little infrequently- Basically whenever I have the free time and have come up with a good idea. It's noted in the introduction, but my tutorials will focus more on how to make your maps look good rather than being highly technical explanations of how different edit modes work, or how to use third-party programs. There will be some technical stuff, but again, this will be more about style and design rather than technical things. You can post in this thread to offer feedback on what I've written so far, or suggest topics you would like to see me cover. My tutorials are written in publicly accessible Google Docs- It's a nice, easy to use format and lets me make adjustments, edits, and updates easily. Sage's Browedit Tutorials Introduction How To Make Lightmaps Stop Looking Bad In this first post, I'll also write down a few vague ideas I have for future tutorials. Don't take any of these as promises- They might become part of bigger tutorials, or I might come up with a different way to present the ideas, or whatever. I may come up with something completely different, too. Anyway, here are some tutorials I'm considering writing: Retexturing Models - Syouji's video guides explain how to do this, but I think I could probably make a non-video based guide on how to do this that's a little clearer and easier to follow. Making Town Maps - I see a lot of town maps with similar problems that result in them not being very good- Mismatched models and textures, boring and repetitive streets, etc. Global Height Edit - This is a nifty tool with a couple fun/creative applications. Not sure if there's enough to make up its own guide, however. Custom Models are for Suckers - There are a lot of cool 'custom' models you can make by just arranging existing RO models together to form particular shapes. I have a few fun ones I can share to maybe inspire people. Interior Maps - A tutorial on making RO-style interiors in isometric form, and some style ideas for different settings: Homes, castles, abandoned buildings, etc. You're also free to treat this thread as an 'ask me anything' sorta deal, in case you want a quick answer from me on anything regarding mapping or my process or just about anything. yeet1 point
-
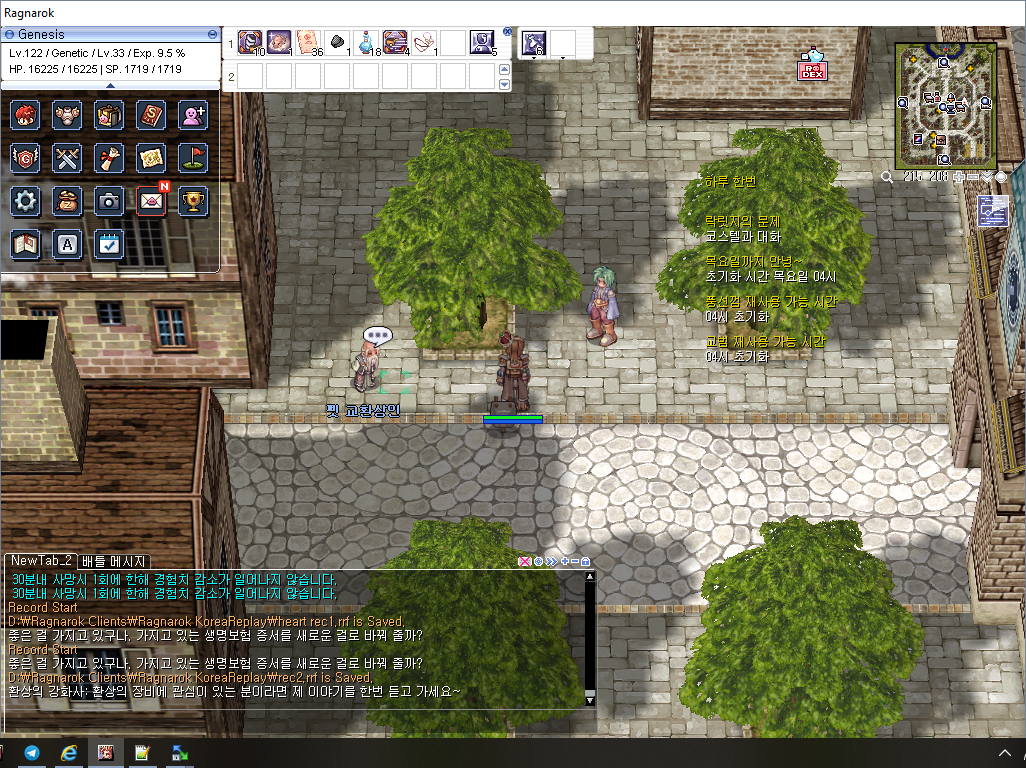
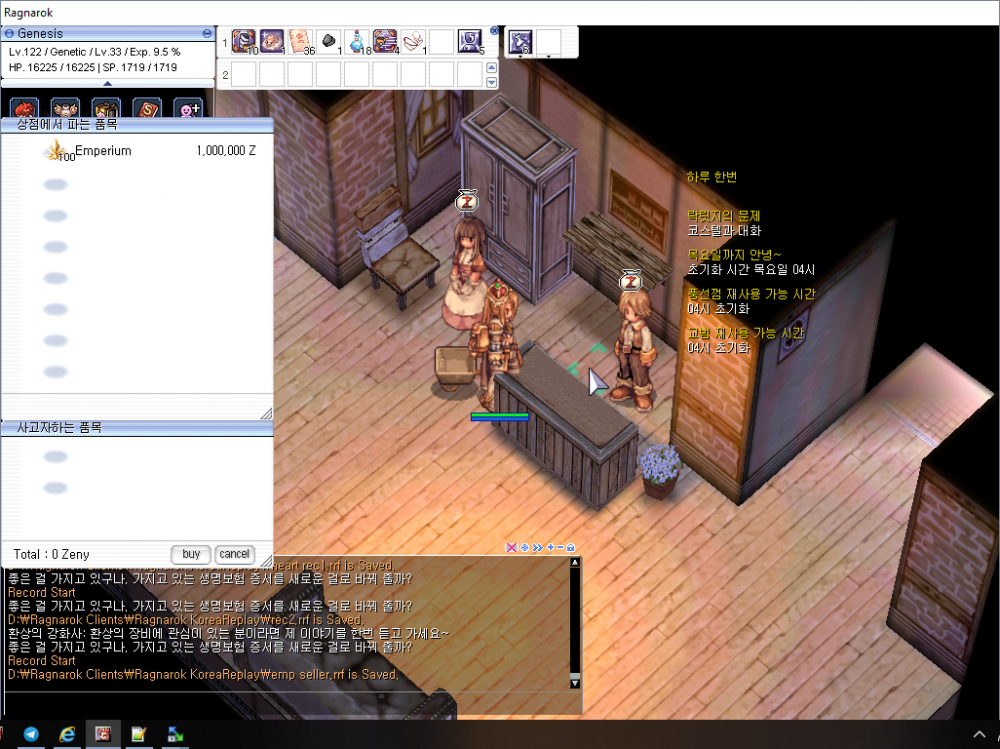
Hi guys! Maybe someone translate it and pull to our git ? Recently, there are requests for missing NPCs and I decided to help the project a bit with updating the NPCs like this issue: Issue: 3916, Issue: 3681, Issue: 3772, Issue: 3498 Not all scripts are complited yet, but i will update it when I find more information/test it in kRo. Missed shop with hats prt_in,117,79,5 shop 장난감상인#prt 715,2239:-1,2201:-1,2243:-1,2212:-1,2242:-1,2241:-1 Character Position Change Coupon seller prt_in,211,173,3 script 슬롯 이동 카드 판매#slo 4_F_01,{ // 885 mes "[판매원]"; mes "안녕하세요."; mes "<ITEM>[슬롯 이동 카드]<INFO>12786</INFO></ITEM>를 판매하고 있습니다."; mes "^4d4dff카드를 사용한 캐릭터의 슬롯 위치를 변경^000000할 수 있습니다."; next; mes "[판매원]"; mes "매 주 한정 수량으로 판매하고 있으므로, 아무것도 보이지 않는다면"; mes "물품이 모두 소진 된 것이니 다음에 다시 와주세요."; close2; callshop "change_slot#slo"; end; OnClock0000: if (gettime(DT_DAYOFWEEK) == 1) npcshopupdate "change_slot#slo",12786,0,9999; end; } - marketshop change_slot#slo FAKE_NPC,12786:100000:9999 Emperium seller prt_in,212,169,3 script 길드 사무직원 4_M_04,{ // 1890 if (gettime(DT_DAYOFWEEK) >= 1 && gettime(DT_DAYOFWEEK) <= 6 && gettime(DT_HOUR) >= 18 && gettime(DT_HOUR) <= 23) { mes "[길드 사무직원]"; mes "길드 사무소에 오늘 하루 배포될 엠펠리움이 도착했습니다. 구매를 원하시면 원하는 만큼 담아주세요~"; next; mes "[길드 사무직원]"; mes "오늘은 왠지 엠펠리움을 찾는분들이 많을 것 같군요. 그냥 개인적인 기분입니다."; close2; callshop "emp_seller#slo"; end; } mes "[길드 사무직원]"; mes "저희 길드 사무소에서는 모험가님들의 원활한 모임을 적극 지지합니다"; next; mes "[길드 사무직원]"; mes "그 일환으로 ^0000ff월요일~토요일^000000"; mes "매일 100개 한정수량의 <ITEM>엠펠리움<INFO>714</INFO></ITEM>을"; mes "오후 ^0000ff18:00~23:59^000000 까지 판매하고 있습니다."; next; mes "[길드 사무직원]"; mes "이외의 시간에는 저희 길드사무소도 엠펠리움 수급을 위해서 뛰어다녀야 하기 때문에 판매를 하지 않으니 참고하십시오."; close; OnClock0000: if (gettime(DT_DAYOFWEEK) == 1) npcshopupdate "emp_seller#slo",714,0,100; end; } - marketshop emp_seller#slo FAKE_NPC,714:1000000:100 // Need to check item price Wedding shop dealer (changed coordinate & added ring for sell) link prt_in,211,169,0 shop Wedding Shop Dealer#prt 71,744:-1,745:-1,2338:-1,2206:-1,7170:-1 changed to: prt_in,285,169,0 shop Wedding Shop Dealer#prt 71,744:-1,745:-1,2338:-1,2206:-1,7170:-1,2613:-1 Family relationship guide - in progress prt_in,285,167,3 script 인지와 반지각인#we 4_DR_F_01,{ // 1936 mes "[에밀리]"; mes "안녕하십니까, 선생님. 무엇을 도와드릴까요?"; next; switch(select("여기선 뭘 하나요??:인지 구입:반지에 이름을 새겨 주세요.")) { case 1: mes "[디탈리]"; mes "어떤 것에 대한 안내가 필요하십니까?"; next; switch(select("인지:반지에 각인:안내는 필요 없어요.")) { case 1: mes "[디탈리]"; mes "이곳에서는 인지가 부착된 혼인 서약서와 독립 인증서를 발급하고 있습니다."; next; mes "[디탈리]"; mes "^0000cd결혼식에는 혼인 서약서^000000가, ^0000cd세대 분리에는 독립 인증서^000000를 소지하고 있어야 민원이 진행됩니다."; next; mes "[디탈리]"; mes "필요하신 증서를 확인하신 후에 저에게 신청을 하시면 인지가 부착된 증서를 드립니다."; next; mes "[디탈리]"; mes "어떤 것에 대한 안내가 필요하십니까?"; close; case 2: mes "[디탈리]"; mes "결혼식을 마치고 정식으로 부부가 되신 분들이 나눠 끼신 ^0000cd결혼 반지^000000를 가지고 오시면 ^0000cd소정의 비용만^000000을 받고 ^0000cd배우자분의 이름^000000을 새겨드립니다."; next; mes "[디탈리]"; mes "평생을 간직할 소중한 추억이 되실 겁니다."; next; mes "[디탈리]"; mes "어떤 것에 대한 안내가 필요하십니까?"; close; case 3: mes "[디탈리]"; mes "도움이 필요하면 언제든지 찾아 주시길 바랍니다."; close; } case 2: mes "[디탈리]"; mes "어떤 인지의 구매를 도와드릴까요?"; next; switch(select("혼인 서약서:독립 인증서")) { case 1: mes "[디탈리]"; mes "죄송하지만 소지하신 금액이 부족합니다."; next; mes "[디탈리]"; mes "인지가 부착된 혼인 서약서의 가격은 ^0000cd1,500,000제니^000000입니다."; next; mes "[디탈리]"; mes "소지금을 확인하신 후 다시 이용해 주십시오."; close; case 2: mes "[디탈리]"; mes "죄송하지만 독립 인증서는 자녀분이 있는 ^0000cd부모^000000이거나 독립 대상자인 ^0000cd베이비^000000인 경우에만 구입하실 수 있습니다."; close; } case 3: mes "[디탈리]"; mes "죄송합니다. 결혼반지에 이름을 새겨드리는 서비스는 ^0000cd기혼자를 대상^000000으로 합니다."; close; } } Written Oath Of Marriage prt_in,285,167,3 script 인지와 반지각인#we 4_DR_F_01,{ // 1936 mes "[에밀리]"; mes "안녕하십니까, 선생님. 무엇을 도와드릴까요?"; next; switch(select("여기선 뭘 하나요??:인지 구입:반지에 이름을 새겨 주세요.")) { case 1: mes "[디탈리]"; mes "어떤 것에 대한 안내가 필요하십니까?"; next; switch(select("인지:반지에 각인:안내는 필요 없어요.")) { case 1: mes "[디탈리]"; mes "이곳에서는 인지가 부착된 혼인 서약서와 독립 인증서를 발급하고 있습니다."; next; mes "[디탈리]"; mes "^0000cd결혼식에는 혼인 서약서^000000가, ^0000cd세대 분리에는 독립 인증서^000000를 소지하고 있어야 민원이 진행됩니다."; next; mes "[디탈리]"; mes "필요하신 증서를 확인하신 후에 저에게 신청을 하시면 인지가 부착된 증서를 드립니다."; next; mes "[디탈리]"; mes "어떤 것에 대한 안내가 필요하십니까?"; close; case 2: mes "[디탈리]"; mes "결혼식을 마치고 정식으로 부부가 되신 분들이 나눠 끼신 ^0000cd결혼 반지^000000를 가지고 오시면 ^0000cd소정의 비용만^000000을 받고 ^0000cd배우자분의 이름^000000을 새겨드립니다."; next; mes "[디탈리]"; mes "평생을 간직할 소중한 추억이 되실 겁니다."; next; mes "[디탈리]"; mes "어떤 것에 대한 안내가 필요하십니까?"; close; case 3: mes "[디탈리]"; mes "도움이 필요하면 언제든지 찾아 주시길 바랍니다."; close; } case 2: mes "[디탈리]"; mes "어떤 인지의 구매를 도와드릴까요?"; next; switch(select("혼인 서약서:독립 인증서")) { case 1: mes "[디탈리]"; mes "죄송하지만 소지하신 금액이 부족합니다."; next; mes "[디탈리]"; mes "인지가 부착된 혼인 서약서의 가격은 ^0000cd1,500,000제니^000000입니다."; next; mes "[디탈리]"; mes "소지금을 확인하신 후 다시 이용해 주십시오."; close; case 2: mes "[디탈리]"; mes "죄송하지만 독립 인증서는 자녀분이 있는 ^0000cd부모^000000이거나 독립 대상자인 ^0000cd베이비^000000인 경우에만 구입하실 수 있습니다."; close; } case 3: mes "[디탈리]"; mes "죄송합니다. 결혼반지에 이름을 새겨드리는 서비스는 ^0000cd기혼자를 대상^000000으로 합니다."; close; } } Divirce information prt_in,285,165,5 script 이혼 안내#wedd 1_M_SIGNART,{ // 1935 mes "[노튼]"; mes "결혼도 안 한 사람이 이혼에 먼저 관심을 가지면 어떡하나요?"; close; } Insurance heart changer, item: 계약의 심장 its working like Life Insurance but it is etc item and no need to use it, item disappears when the character dies and its duration time is unlimited. prt_in,82,108,5 script 심장 상인#life01 4_M_NFDEADMAN2,5,5,{ // 884 mes "[심장 상인]"; mes "안녕하신가! 심장을 배 밖으로 내놓고, 대륙 곳곳을 누비며 위험천만한 스릴을 만끽하시는 모험가!"; next; mes "[심장 상인]"; mes "혹시 가지고 있는 <ITEM>["+getitemname(12209)+"]<INFO>12209</INFO></ITEM>를 더 좋은 물건으로 바꿀 생각 없어? 이를테면... <ITEM>["+getitemname(6413)+"]<INFO>6413</INFO></ITEM> 같은 걸로. 어때?"; next; switch(select("그게 뭔데요?:교환해 주세요!:관심 없어요.")) { case 1: mes "[심장 상인]"; mes "<ITEM>["+getitemname(12209)+"]<INFO>12209</INFO></ITEM>는 너희 산 자들이 사용 후 30분간 1회에 한해 사망시 경험치 감소를 받지 않게 해주는 물건이었지."; next; mes "[심장 상인]"; mes "하지만 많은 사람들이 시간에 대한 부분을 아쉬워 하더라? 그래서 내가 그걸 보고 <ITEM>["+getitemname(6413)+"]<INFO>6413</INFO></ITEM>을 준비했지."; next; mes "[심장 상인]"; mes "이 <ITEM>["+getitemname(6413)+"]<INFO>6413</INFO></ITEM>은 ^EE0000시간에 상관 없이 소지하는 것만으로도^000000 1회에 한해 사망시 경험치 감소를 받지 않게 해주는 물건이야. 물론 사망 후에 계약의 심장은 사라지지만 말이야."; next; select("왜 바꿔 주시나요?"); mes "[심장 상인]"; mes "그런게 궁금해? 나는 상인이야. 죽어서도 살아서도 물건을 사고 파는 것이 숙명이지. 돈이 될 일이 생겼는데 이런 기회를 내가 놓치겠어? 나는 돈을 벌고, 산 자들은 죽음의 고통에서 조금이라도 벗어나고. 좋은 거래잖아?"; next; mes "[심장 상인]"; mes "이쯤에서 궁금한 거 있지? 교환 비율 말이야. <ITEM>["+getitemname(12209)+"]<INFO>12209</INFO></ITEM> 5장당 <ITEM>["+getitemname(6413)+"]<INFO>6413</INFO></ITEM> 1개로 바꿔 줄게."; next; mes "[심장 상인]"; mes "어때? 손해 보는 조건은 아니잖아? 굳이 시간에 신경 쓸 필요 있어? 아찔짜릿한 모험을 즐기는 모험가라면 필수로 갖춰야 하는 물건 이지. 암~"; close; case 2: mes "[심장 상인]"; mes "그래, 그래. 잘 생각했어. 이왕 가지고 있는 걸 더 좋은 물건으로 교환하는 것이 낫지. 안그래?"; next; mes "[심장 상인]"; mes "^0000cd기존 증서 5장으로 계약의 심장 1개로^000000 바꿀 수 있어."; next; mes "[심장 상인]"; mes "다만 ^EE0000[비매품]생명보험 증서는 교환 대상에서 제외^000000되니까 그걸 가지고 와서 바꿔 달라고 해도 소용 없어."; next; mes "[심장 상인]"; mes "그럼 이제 교환해 볼까?"; next; switch(select("교환해 주세요!:교환 안할래요.")) { case 1: mes "[심장 상인]"; mes "몇 장 교환하고 싶어? ^0000cd한 번에 최대 10장까지 교환 가능^000000한데."; next; input .@amount; if (.@amount == 0) { mes "[심장 상인]"; mes "음? 별로 관심 없나? 이거 정말 좋은 물건인데, 정말 좋은데. 그치만 살 사람이 싫다면 나도 강요는 안해."; close; } else if (.@amount > 10) { mes "[심장 상인]"; mes "^0000cd한 번에 최대 10장^000000까지 바꿀 수 있댔잖아. 수량을 다시 확인해 봐."; close; } else { if (countitem(12209) < (.@amount*5)) { mes "[심장 상인]"; mes "음, 저기... 네가 가진 생명보험 증서가 부족한데? <ITEM>[생명보험 증서]<INFO>12209</INFO></ITEM> 5장당 <ITEM>[계약의 심장]<INFO>6413</INFO></ITEM> 1개야. 수량을 확인해 봐."; close; } mes "[심장 상인]"; mes "자, 이걸로 네가 가지고 있던 ^0000cd생명보험 증서^000000를 ^EE0000계약의 심장^000000으로 교환했다!! 좋은 거래였지, 그치? 다음에 증서가 생기면 또 찾아 오라고!"; delitem 12209,.@amount*5; getitem 6413,.@amount; close; } case 2: mes "[심장 상인]"; mes "이거 정말 좋은 조건인데! 모험가, 너처럼 이 위험천만한 곳에서 모험을 즐기려면 반드시 필요한 물건이라고!"; next; mes "[심장 상인]"; mes "나중에라도 관심이 생기면 꼭 교환하러 오기야. 알았지?"; close; } case 3: mes "[심장 상인]"; mes "이거 정말 좋은 조건인데! 모험가, 너처럼 이 위험천만한 곳에서 모험을 즐기려면 반드시 필요한 물건이라고!"; next; mes "[심장 상인]"; mes "나중에라도 관심이 생기면 꼭 교환하러 오기야. 알았지?"; close; } OnTouch: npctalk "좋은 걸 가지고 있구나. 가지고 있는 생명보험 증서를 새로운 걸로 바꿔 줄까?", "", bc_self; end; } need to modify src code: add to itemdb.hpp ITEMID_INSURANCE_HEART = 6413, // Custom name pc.cpp int pc_dead(struct map_session_data *sd,struct block_list *src) line 7917 change from if (base_penalty || job_penalty) pc_lostexp(sd, base_penalty, job_penalty); to if (base_penalty || job_penalty) { short item_position = pc_search_inventory(sd, ITEMID_INSURANCE_HEART); if (item_position < 0) pc_lostexp(sd, base_penalty, job_penalty); else pc_delitem(sd, item_position, 1, 0, 1, LOG_TYPE_CONSUME); } Pet coupons changer // Need to change coupons check function Issue: 3498 prontera,210,209,5 script 펫 교환상인#wanderman 4_M_JPNOJI,{ mes "[펫 교환상인]"; mes "장사란 건 정말 쉬운일이 아니야."; mes "나는 멀미가 심한데 이번에는 오는 길에 풍랑까지 만났지 뭔가!"; next; mes "[펫 교환상인]"; mes "아찔한 경험이었지. 덕분에 아직까지도 속이 좋지 않아. 크으……"; next; mes "[펫 교환상인]"; mes "그 보다 자네 큐펫이 필요해서 온 겐가?"; mes "티켓은 가지고 있겠지?"; next; switch(select("소유한 티켓을 검사:취소")) { case 1: // custom simple dialogs and function setarray .@alloweditems[0],6116, 6117, 6118, 6129, 6130, 6131, 6132, 6133, 6134, 6135, 6136, 6137, 6138, 6139, 6140, 6141, 6142, 6143, 6157, 6158, 6159, 6160, 6161, 6162, 6163, 6164, 6165, 6166, 6167, 6168, 6169, 6170, 6171, 6172, 6173, 6174, 6175, 6176, 6177, 6178, 6179, 6180, 6181, 6182, 6183, 6184, 6185, 7550, 7551, 7552, 7581, 7588, 7775; setarray .@allowedipets[0],9055, 9056, 9030, 9054, 9042, 9046, 9052, 9048, 9045, 9047, 9050, 9051, 9043, 9041, 9049, 9044, 9053, 9040, 9001, 9002, 9003, 9004, 9005, 9014, 9009, 9012, 9013, 9006, 9007, 9022, 9023, 9021, 9015, 9019, 9010, 9016, 9020, 9011, 9008, 9017, 9024, 9018, 9025, 9029, 9028, 9026, 9027, 9037, 9036, 9098, 9034, 9032, 9031; getinventorylist; // Need to change funktion to check for what coupons player have for(.@i = 0;.@i < @inventorylist_count;.@i++){ if (compare(getitemname(@inventorylist_id[.@i])," Pet ")) { .@menu$ = .@menu$ + getitemname(@inventorylist_id[.@i])+":"; .@new_id[.@count] = @inventorylist_id[.@i]; .@count++; } } if (!.@count) { mes "[펫 교환상인]"; mes "내가 원하는 물건은 없는 것 같네."; close; } mes "[펫 교환상인]"; mes "What coupon you want to change?"; next; .@select = select(.@menu$ + "Cancel") - 1; if (.@new_id[.@select] == 0) { mes "[펫 교환상인]"; mes "Good luck!"; close; } mes "[펫 교환상인]"; mes "Great!"; mes getitemname(.@allowedipets[inarray(.@alloweditems[0], .@new_id[.@select])]); mes "Are you shure to want this pet?"; next; if (select("Yes:No") == 2) close; mes "[펫 교환상인]"; mes "Here your pet~"; if (countitem(.@new_id[.@select]) < 1) close; delitem .@alloweditems[inarray(.@alloweditems[0], .@new_id[.@select])],1; getitem .@allowedipets[inarray(.@alloweditems[0], .@new_id[.@select])],1; close; case 2: mes "[펫 교환상인]"; mes "바다 건너 얘기라도 듣고 싶은 모양이네만 속이 영 좋지 않구먼."; close; } } Sorry if i post it in wrong section >_<"

 1 point
 -
Item Bound System r17351 adds in a new feature which allows characters to have specific items bounded to their account, guild, or party. Suggestion topic: http://rathena.org/board/topic/70372-item-account-bound-proposal/ Features: Items can be bounded 3 different ways. New script commands 'getitembound' and 'getitembound2' creates bounded items. New script command 'countbound' counts number of bounded items, also placing them automatically into an array. New at commands @itembound and @itembound2 used to create bounded items on the fly. Account bound items can be stored in account storage and in cart. Guild bound items can be stored in guild storage and traded to other guild members.When a character leaves or is expelled from the guild, these bounded items are automatically returned to guild storage. Party bound items cannot be stored but only traded to other party members. These are temporary and will be deleted on party deletion or when leaving the party. Credits to Xantara for the initial diff and Lighta for helping with the guild bound system. Please report all issues/bugs in the proper bug report section. Don't forget to update your SQL tables with upgrade_svn17351.sql!1 point

_full.2703107.thumb.jpg.01260ed3d9db9fc2812da4fb47f8aad4.jpg)