Leaderboard


Popular Content
Showing content with the highest reputation since 06/28/25 in all areas
-
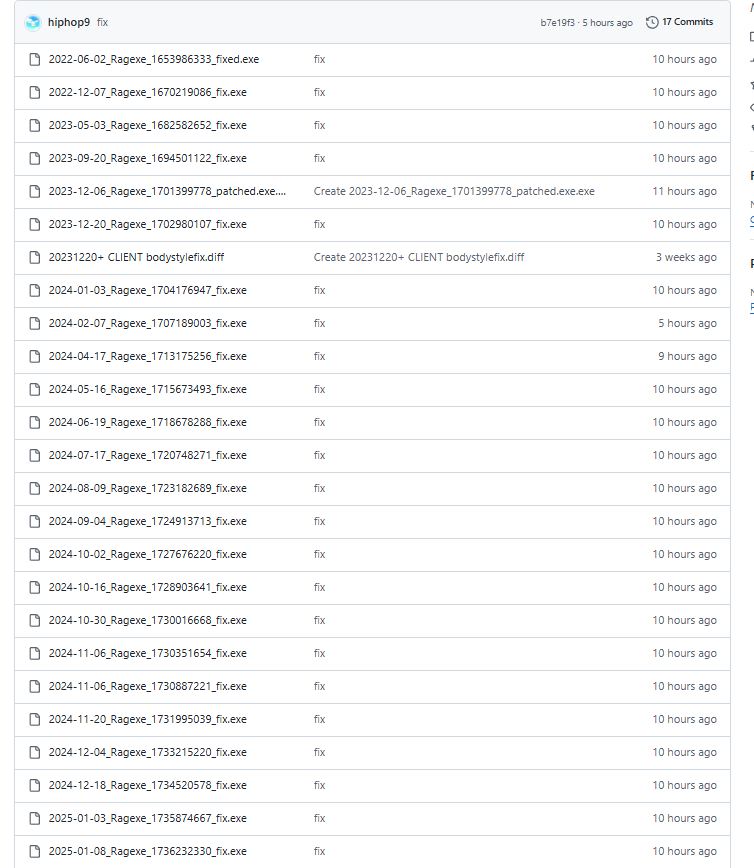
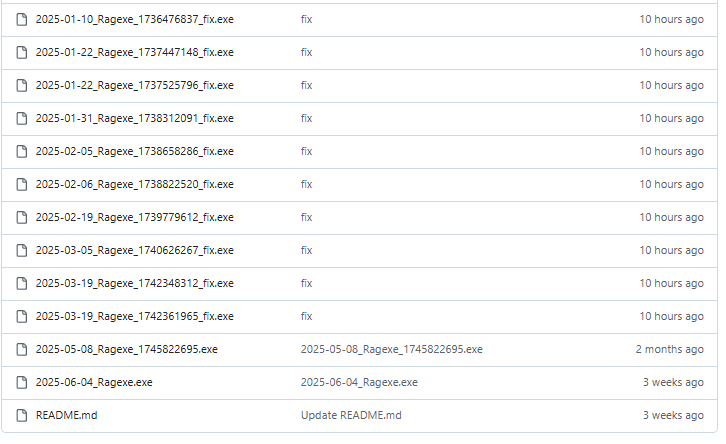
As shown on the screen, the fix files are clean, unpacked client files. You can apply WARP patches using these files, but some patches may not be supported. In such cases, you must modify the client manually — please do not contact me for support regarding this. Commercial use is strictly prohibited. Example:As of the 2023-10-xx client, WARP can no longer patch the clientinfo.xml file. You will need to modify it manually. Also, CPS is not included in clients released after 2024-05-16. In addition: 2023-12-06_Ragexe_1701399778_patched.exe (Restore clientinfo.xml, externalsettings Korea patch) — This file includes additional patches that I applied manually. 2025-05-08_Ragexe.exe and 2025-06-04_Ragexe.exe — These files have also been modified with additional patches and are distributed in a compressed state. They cannot be edited further.
 4 points
 -
Hello Ziu, I have just logged in as well after hibernating for several years2 points
-
The 2023+ clients use new job IDs for the jRO costumes: JOB_RUNE_KNIGHT_2ND = 4332, JOB_MECHANIC_2ND = 4333, JOB_GUILLOTINE_CROSS_2ND = 4334, JOB_WARLOCK_2ND = 4335, JOB_ARCHBISHOP_2ND = 4336, JOB_RANGER_2ND = 4337, JOB_ROYAL_GUARD_2ND = 4338, JOB_GENETIC_2ND = 4339, JOB_SHADOW_CHASER_2ND = 4340, JOB_SORCERER_2ND = 4341, JOB_SURA_2ND = 4342, JOB_MINSTREL_2ND = 4343, JOB_WANDERER_2ND = 4344, You need to add them in the source. Open file \src\common\mmo.hpp. Find JOB_SKY_EMPEROR2 = 4316, then add the following code below it: JOB_RUNE_KNIGHT_2ND = 4332, JOB_MECHANIC_2ND, JOB_GUILLOTINE_CROSS_2ND, JOB_WARLOCK_2ND, JOB_ARCHBISHOP_2ND, JOB_RANGER_2ND, JOB_ROYAL_GUARD_2ND, JOB_GENETIC_2ND, JOB_SHADOW_CHASER_2ND, JOB_SORCERER_2ND, JOB_SURA_2ND, JOB_MINSTREL_2ND, JOB_WANDERER_2ND, Save the file then recompile the server. I've updated the example script for you: // callfunc "F_JobSuit",<Job ID>; //Change to specific sprite // callfunc "F_JobSuit",-1; //Change to 2nd job // callfunc "F_JobSuit",-2; //Change to transcendent 2nd job // callfunc "F_JobSuit",-3; //Change to 3rd job // callfunc "F_JobSuit",-4; //Change to 4th job // callfunc "F_JobSuit",-5; //Change to alternative third class costume // callfunc "F_JobSuit"; //Return to default sprite function script F_JobSuit { .@block_expanded_jobs = false; //Disable changing for expanded job player (true/false) if (getargcount() == 0) { if (PACKETVER >= 20231220) setlook LOOK_BODY2,Class; else if (JobSuit_id > 4331 && JobSuit_id < 4345) setlook LOOK_BODY2,0; else changebase Class; JobSuit_active = false; JobSuit_id = 0; end; } if (getarg(0) > -1) { if (jobname(getarg(0)) == "Unknown Job") { dispbottom "Unknown Job"; end; } callsub S_OK,getarg(0),1; } if (.@block_expanded_jobs && (BaseClass == Job_Novice || BaseClass == Job_Summoner || BaseClass == Job_Gunslinger || BaseClass == Job_Ninja || BaseClass == Job_Taekwon)) end; if (BaseClass == Job_Summoner) { if (Upper) callsub S_OK,Job_Summoner; else callsub S_OK,Job_Spirit_Handler; } else if (BaseClass == Job_Gunslinger) { switch(getarg(0)) { case -1: callsub S_OK,Job_Gunslinger; case -2: case -3: callsub S_OK,Job_Rebellion; case -4: case -5: default: callsub S_OK,Job_Night_Watch; } } else if (BaseClass == Job_Ninja) { switch(getarg(0)) { case -1: callsub S_OK,Job_Ninja; case -2: case -3: callsub S_OK,(Sex ? Job_Kagerou : Job_Oboro); case -4: case -5: default: callsub S_OK,(Sex ? Job_Shinkiro : Job_Shiranui); } } else if (BaseClass == Job_Novice) { switch(getarg(0)) { case -1: callsub S_OK,Job_Novice,1; case -2: case -3: callsub S_OK,Job_Super_Novice; case -4: case -5: default: callsub S_OK,Job_Hyper_Novice; } } else if (BaseJob == Job_Soul_Linker) { switch(getarg(0)) { case -1: case -2: callsub S_OK,Job_Soul_Linker; case -3: callsub S_OK,Job_Soul_Reaper; case -4: case -5: default: callsub S_OK,Job_Soul_Ascetic; } } else if (BaseJob == Job_Star_Gladiator) { switch(getarg(0)) { case -1: callsub S_OK,Job_Taekwon; case -2: callsub S_OK,Job_Star_Gladiator; case -3: callsub S_OK,Job_Star_Emperor; case -4: case -5: default: callsub S_OK,Job_Sky_Emperor; } } switch(getarg(0)) { case -1: callsub S_OK,roclass(eaclass()&EAJ_UPPERMASK); case -2: callsub S_OK,roclass(eaclass()&EAJ_UPPERMASK|EAJL_UPPER); case -3: callsub S_OK,roclass(eaclass()&EAJ_THIRDMASK|EAJL_THIRD); case -4: .@job = roclass(eaclass()&EAJ_THIRDMASK|EAJL_THIRD); callsub S_OK,roclass(eaclass(.@job)|EAJL_FOURTH|EAJL_UPPER); case -5: .@job = roclass(eaclass()&EAJ_THIRDMASK|EAJL_THIRD); if (.@job > 0) callsub S_OK,roclass(eaclass(.@job)|EAJL_FOURTH|EAJL_UPPER)+80; } S_OK: .@c = getarg(0); if (.@c < 1 && getarg(1,0) == 0) end; if (PACKETVER >= 20231220) setlook LOOK_BODY2,.@c; else if (.@c > 4331 && .@c < 4345) setlook LOOK_BODY2,1; else changebase .@c; JobSuit_active = true; JobSuit_id = .@c; end; } - script #JobSuitOnLogin -1,{ OnPCLoginEvent: if (JobSuit_active) F_JobSuit(JobSuit_id); end; }2 points
-
Hello, I don't see the variable being set in your item script. You can use OnPCLoginEvent on a NPC to reapply the appearance. Replace changebase with setlook LOOK_BODY2. Example using a function: Script: | callfunc "F_JobSuit"; UnEquipScript: | callfunc "F_JobSuit",-1; // callfunc "F_JobSuit"; //Change to evolution sprite // callfunc "F_JobSuit",<Job ID>; //Change to specific sprite // callfunc "F_JobSuit",-1; //Return to default sprite function script F_JobSuit { if (getarg(0,0) != -1) { if (jobname(getarg(0,-1)) != "Unknown Job") .@c = getarg(0); else if (BaseJob == Job_Priest) .@c = JOB_ARCH_BISHOP; else if (BaseJob == Job_Wizard) .@c = JOB_WARLOCK; else if (BaseJob == Job_Blacksmith) .@c = JOB_MECHANIC; else if (BaseJob == Job_Hunter) .@c = JOB_RANGER; else if (BaseJob == Job_Assassin) .@c = JOB_GUILLOTINE_CROSS; else if (BaseJob == Job_Crusader) .@c = JOB_ROYAL_GUARD; else if (BaseJob == Job_Monk) .@c = JOB_SURA; else if (BaseJob == Job_Sage) .@c = JOB_SORCERER; else if (BaseJob == Job_Rogue) .@c = JOB_SHADOW_CHASER; else if (BaseJob == Job_Alchemist) .@c = JOB_GENETIC; else if (BaseJob == Job_Bard) .@c = JOB_MINSTREL; else if (BaseJob == Job_Dancer) .@c = JOB_WANDERER; if (PACKETVER >= 20231220) setlook LOOK_BODY2,.@c; else changebase .@c; JobSuit_active = true; JobSuit_id = .@c; end; } if (PACKETVER >= 20231220) setlook LOOK_BODY2,Class; else changebase Class; JobSuit_active = false; JobSuit_id = 0; end; } - script #JobSuitOnLogin -1,{ OnPCLoginEvent: if (JobSuit_active) F_JobSuit(JobSuit_id); end; }2 points
-
Hexadecimal = BB8 (Decimal = 3000) max 64000 = FA00
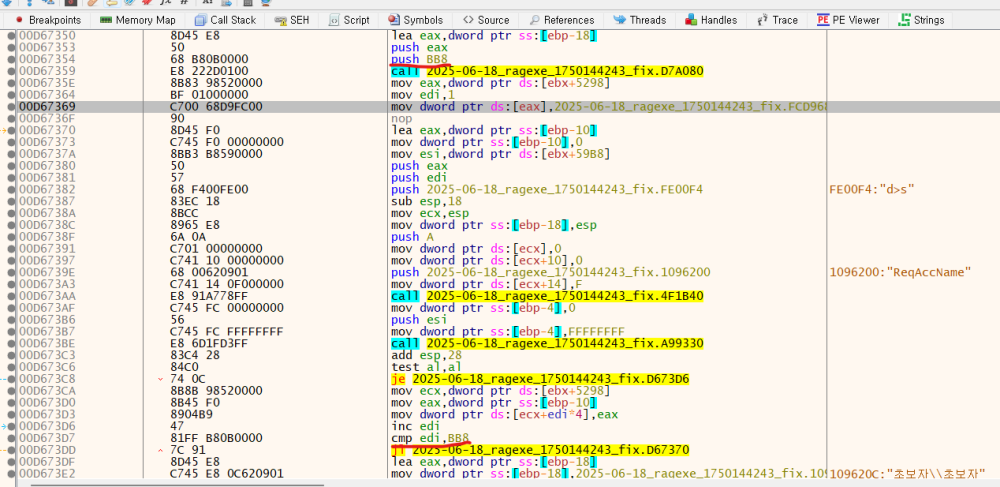 2 points
 -
Version 1.0.0
182 downloads
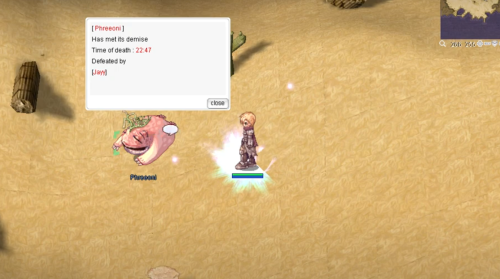
Since someone is claiming that they are the only one who has the right to come up with this idea, and it's become an issue - to be honest, I didn't know that something like this had already been released here. So, I've decided to share this work for free so that everyone can benefit from it. Just to clarify: this is entirely my own work. I didn’t copy any code from the person claiming they are the only one entitled to ideas like this. As for the monster GRF, I manually edited each one to extract only the dead sprite actions. Whenever an MVP dies on the map, a tombstone will appear at the spot where it died — but instead of just saying "Tomb", it now shows the MVP’s name like **"Phreeoni"**, **"Baphomet"**, or **"Ifrit"** Instantly see which MVP was killed Great for MVP hunters and competitive players Makes the game world feel more immersive Works with any MVP across the server Example: When **Phreeoni** is defeated, a tombstone labeled **"Phreeoni"** appears where it died — no more guessing!Free2 points -
It's been many years since I last visited the forum. After the death of eathena.ws (closed) a few years ago, TT thought rathena had also followed the same path. But I'm glad to know you're still alive. Niceeeeeeeeeeeeeeeeeee1 point
-
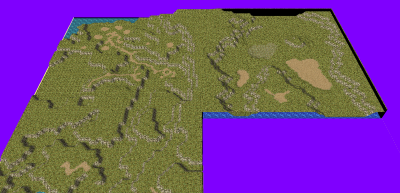
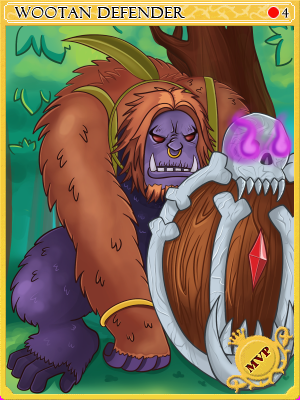
This map belongs to the game universe expansion series. Made with attention to detail and inspired by the original! .•°'°•.•°'°•.•°'°•.•°'°•.•°'°•.•°'°•.•°'°•.•°'°•.•°'°•.•°'°•.•°'°•.•°'°•.•°'°•.•°'°•.•°'°•.•°'°•.•°'°•.•°'°•.•°'°•.•°'°•.•°'°•.•°'°•.•°'°•.•°'°•.•°'°•.•°'°•.•°'°•. um_fild05 Now you can visit the new part of the Hoomga Jungle! The map is a continuation of the Umbala Field 04 location and repeats its main features. The landscape also follows the outlines of the original art design of the location on the world map. The map seamlessly connects with neighboring levels. This map is also supposed to be the home of the MVP Wootan Defender, who was never featured in the original game. However, an ancient version of this MVP was added as a boss in Illusion of Luanda, but for some reason lived in the Comodo North Cave mixed with other monsters and even with another MVP Ancient Tao Gunka instead of in the forest area. Now you can fight its regular version in its native jungle zone and get a unique custom item. I asked the artist to draw a card and a custom shield for this MVP. MVP Wootan Defender MVP Wootan Defender Card Special Loot Wootan's Token - ID 25633 Wootan Defender's Shield Piece - ID 25634 Wootan Defender's Shield [1] - Custom All images and sprites can be downloaded in this topic: https://rathena.org/board/files/file/3844-w0w_custom_collection/ or here: Wootan Defender Card+Shield.zip P.S. You may not have noticed in the video but all the gorillas are doubled in size. In their normal size they look very weak the same height as the player. But they have good pixel art that does not lose its beauty when enlarged. It also allows you to double their HP stats and experience to make their farming at least a little more interesting. P.S.S. Also fixed the neighboring location um_fild04: 1) Removed official inaccessible gat points 168,137 and 185,138 2) Added seamless passage to the new location um_fild05 Please rate it if the map is good enough ~~ This map can be downloaded here https://rathena.org/board/files/file/4487-w0w_map_collection/


 1 point
 -
Zuku, I'm not finding the files to download the custom sprites for the items of the MvP.. is there any link to them? Thanks in advance!1 point
-
Hi bro care to share1 point
-
These are banners I've previously made for private RO servers I've played.


 1 point
 -
KRO : https://github.com/hiphop9/ROClient_en 2025-06-04_Ragexe.exe -PATH- @ Bug Fix(Recommended) Add Close Button Custom Window Title Disable 1rag1 Params(Recommended) Disalbe Filename Check(Recommended) Disable Help Message Enable DNS Suport Enable Multiple GRF(Recommended) Fix NPC Dialog Scroll Increase Zoom Out 75% Read Data Folder First(Recommended) Remove Hard Coded Address & Port(Recommended) Restore Clientinfo.xml(Recommended) Restore Old Login Packet(Recommended) externalsettings Korea patch Skip License Screen Translations client EnableWho EnableShowName AlwaysAscii CallKoreaClientInfo PlainTextDesc HideBuildInfo TranslateClient NoGGuard CustomItemInfoLub CustomAchieveLub CustomTownInfoLub CustomTipboxLub Customspopuplub CustomMapInfoLub CustomOngQuestInfoLub CustomRcmdQuestInfoLub Customachievementslub CustomQuestClassificationInfolub NoNagle OpenToServiceSelect GuildBrackets NoGravityAds NoGravityLogo FixLatestNCWin Restore model culling Headgears viewID 64000 ExtendCashShopPreview EnableProxySupport IncreaseMapQuality rAthena 2025-06-14 (66a4a2ab68ce85d781514c3c000433f981d6842f) https://github.com/hiphop9/rathena20250614 - emotion ui update for 20230925 clients - 20231220+ CLIENT bodystylefix - macro user report packet This is distributed for testing purposes only. Please do not request additional patches!! I am not a seller!! Therefore, if you plan to operate or commercialize a server, do not contact me!!
 1 point
 -
Update: Working on the latest rathena version as of the date I'm typing this. // SERVER SIDE 1. Open src/map/status.cpp find and add after case SC_JEXPBOOST: case SC_EXPBOOST: case SC_JEXPBOOST: case SC_VIPSTATE: // VIP Status Icon case SC_PERIOD_RECEIVEITEM_2ND: case SC_PERIOD_PLUSEXP_2ND: 2. Open src/map/status.hpp find and add before SC_MAX, SC_OVERCOMING_CRISIS, SC_VIPSTATE = 2000, // VIP Status Icon SC_MAX, //Automatically updated max, used in for's to check we are within bounds. find and add before EFST_MAX, /// Do not modify code above this, since it will be automatically generated by the API again EFST_VIPSTATE = 2000, // VIP Status Icon EFST_MAX, 3. Open src/map/script_constants.hpp find and add after export_constant(SC_OVERCOMING_CRISIS); export_constant(SC_CONTENTS_20); export_constant(SC_OVERCOMING_CRISIS); export_constant(SC_VIPSTATE); // VIP Status Icon /// Do not modify code below this, until the end of the API hook, since it will be automatically generated again find and add after export_constant(EFST_C_BUFF_9); export_constant(EFST_C_BUFF_9); export_constant(EFST_VIPSTATE); // VIP Status Icon /// @APIHOOK_END 4. Open db/import/status.yml copy and paste (your status.yml should look like this if you haven't added any custom sc_status) Header: Type: STATUS_DB Version: 4 Body: - Status: Vipstate Icon: EFST_VIPSTATE Flags: NoRemoveOnDead: true NoDispell: true NoBanishingBuster: true NoClearance: true 5. Open db/import/item_db.yml or db/pre-re/item_db_usable.yml (up to you) - Id: 30000 AegisName: Vip_Card_3D Name: VIP Card 3D Type: Cash Buy: 20 Weight: 10 Trade: NoDrop: true NoSell: true NoGuildStorage: true NoMail: true NoAuction: true Script: | if (vip_status(VIP_STATUS_ACTIVE)) { dispbottom "You have extended your VIP duration."; } else { dispbottom "You have successfully become a VIP member."; sc_start SC_VIPSTATE,-1,1; } vip_time 4320; - Id: 30001 AegisName: Vip_Card_7D Name: VIP Card 7D Type: Cash Buy: 20 Weight: 10 Trade: NoDrop: true NoSell: true NoGuildStorage: true NoMail: true NoAuction: true Script: | if (vip_status(VIP_STATUS_ACTIVE)) { dispbottom "You have extended your VIP duration."; } else { dispbottom "You have successfully become a VIP member."; sc_start SC_VIPSTATE,-1,1; } vip_time 10080; - Id: 30002 AegisName: Vip_Card_30D Name: VIP Card 30D Type: Cash Buy: 20 Weight: 10 Trade: NoDrop: true NoSell: true NoGuildStorage: true NoMail: true NoAuction: true Script: | if (vip_status(VIP_STATUS_ACTIVE)) { dispbottom "You have extended your VIP duration."; } else { dispbottom "You have successfully become a VIP member."; sc_start SC_VIPSTATE,-1,1; } vip_time 43200; 6. Open npc/custom and add a text file named vip_system.txt copy and paste - script VIP_TIME -1,{ OnPCLoginEvent: if (vip_status(1)) { .@remain = vip_status(VIP_STATUS_REMAINING); // seconds dispbottom "Remaining VIP duration: " + Time2Str(vip_status(VIP_STATUS_REMAINING) + gettimetick(2)); sc_start SC_VIPSTATE, .@remain * 1000, 1; end; } OnPCLogoutEvent: if (vip_status(1)) { sc_end SC_VIPSTATE; // remove the buff to update the timer on login } end; } 7. Open npc/scripts_custom.conf add to the last line npc: npc/custom/vip_system.txt 8. Recompile your server // CLIENT SIDE 1. You need four files from your RO GRF. Locate and extract them first from luafiles514/lua files/stateicon/ efstids.lub stateiconimginfo.lub stateiconinfo.lub stateiconinfo_f.lub // I'm not sure if this one is necessary but I decided to include it anyway xD 2. Edit efstids.lub Scroll down last line and add. EFST_VIPSTATE = 2000, 3. Edit stateiconimginfo.lub Scroll down last line and add. Edit to your liking. StateIconList[EFST_IDs.EFST_VIPSTATE] = { haveTimeLimit = 1, posTimeLimitStr = 2, descript = { { "VIP", COLOR_TITLE_BUFF }, { "%s", COLOR_TIME }, { "Base EXP Rate +50%" }, { "Job EXP Rate +50%" }, { "Drop Rate +50%" }, { "Additional 300 Storage Slot" }, { "Ignore gemstone requirement for skills" }, { "Max character limit increase" }, { "Auto Attack Feature" }, } } 4. Edit stateiconinfo.lub Scroll down last line and add. [EFST_IDs.EFST_VIPSTATE] = "vipicon.tga", 5. Edit stateiconinfo_f.lub Scroll down last line and add. EFST_IDs.EFST_VIPSTATE, Done! Congratulations! Free VIP Icon from here. Put it inside your grf - data\texture\effect Note: The timer on the VIP status icon will not be displayed if the duration exceeds 24 days and 19 hours. Unfortunately, I don't know how to make this possible either.1 point
-
I think it should be working, as usual dont try it at town since maybe some dev might try at prontera/town with @pvp or something. U can try with the 4 example given (if im not mistaken) and see the damage. Try at any field/dungeon.1 point
-
I just tried it and it's working fine for me. Please share what you put in the file and how you tested it.1 point
-
Put in import folder1 point
-
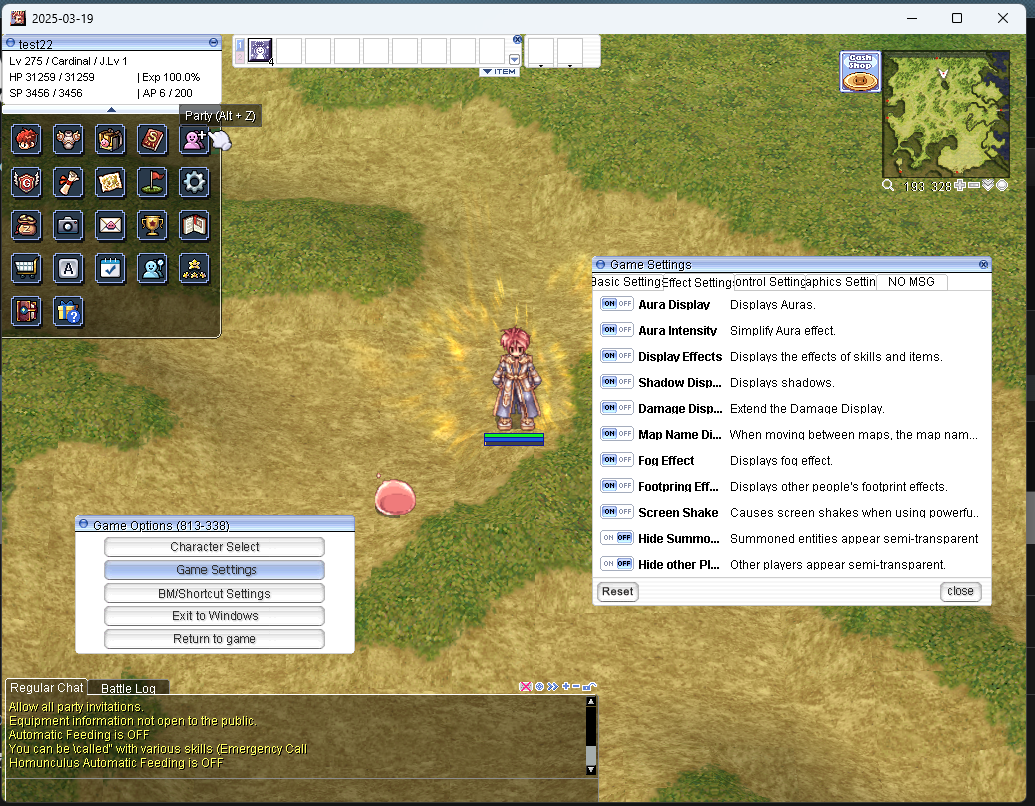
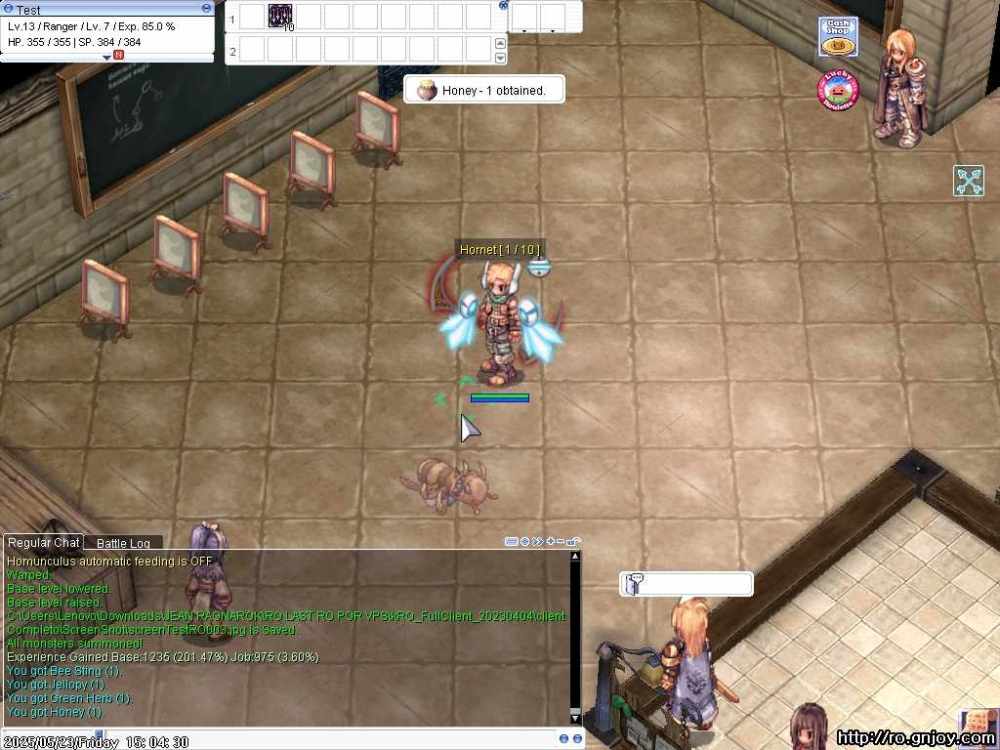
Bueno sin ofender a Euphy creador de este npc de cazeria, ° Quisiera que me ayudaran a encontrar y elegir los monstruos a cazar, debido que están al azar. ° También una opción de % probabilidad similar a la probabilidad de drop de cartas, ejemplo: Usuario: THOMY a matado 1000 Zombies sin embargo por la probabilidad de drop kill de un 50%, solo lleva 500 kill en conteo. ya que cada kill tiene 50%. ° Finalmente si me ayudan agregar el conteo, como está visiblemte en la imagen, "el conteo arriba en el personaje (Honet [1/10])", está en color amarillo. monster_hunting_euphy.txt
 1 point
 -
@Racaae puede hacer lo de @JASHI11?1 point
-
Hi Guys, I'm passing to expose my map RPD - Raccoon City Police Department City Topic for detail: https://rathena.org/board/topic/122711-showcase-rpd-raccoon-city-police-department/ Topic for detail: https://rathena.org/board/topic/119586-showcase-survival-the-infected-city/ Summoner's Rift in Ragnarok Online Topic for detail: https://rathena.org/board/topic/115996-showcase-summoners-rift/ PVP map Topic for detail: https://rathena.org/board/topic/117391-showcase-map-the-sacred-blood/ Dark Endless Tower map Gaia Village Topic for detail: https://rathena.org/board/topic/117689-showcase-gaia-the-enchanted-village/ Gaia PVP Pokemon Map Cerulean Market Under Market DUEL PVP MAP New City - Center Karin Dome Enmadaioh Map Training Island - Start Map Lobby Map1 point
-
We added: -> Ripple XRP to payments gateway -> Solana to payments gateway get the updates here https://github.com/xpayapi/FluxCP-Addons If you have any inquiries, please let us know1 point
-
Los scripts de Euphy y tr0n usan variables con OnNPCKillEvent y el color del texto es fijo. Para mostrar los números de muertes en color amarillo, necesitarás usar el sistema oficial de misiones (setquest / checkquest / erasequest), donde cada muerte cuenta para los miembros del grupo, pero la probabilidad siempre es del 100%. Para agregar una nueva misión personalizada, abre el archivo: import/quest_db.yml (o import/quest_db.txt si tu rAthena está desactualizado). Ejemplo: - Id: 7148 Title: The training course 'conquer the orc village!' - A real battle 1 Targets: - Mob: ORC_BABY Count: 10 Y el archivo en tu carpeta del cliente: System/OngoingQuestInfoList (o data/questid2display.txt si tu ejecutable del cliente es antiguo). Ejemplo: [7148] = { Title = "¡Conquista el Pueblo de los Orcos!", Description = { "Pueden ser crías, pero se convierten en feroces Guerreros orco. Caza 10 Bebés orco en el Pueblo de los Orcos." }, Summary = "" }, Luego, usa el ID de la misión en el NPC. Ejemplo: prontera,150,150,4 script Cazador Simple 123,{ if(checkquest(7148) == -1) { // Misión no iniciada mes "[Cazador Simple]"; mes "¡Necesito ayuda cazando monstruos!"; mes "¿Puedes cazar 10 Bebés orco para mí?"; next; if(select("Aceptar:Rechazar") == 1) { mes "[Cazador Simple]"; mes "¡Genial! Regresa cuando hayas terminado."; setquest 7148; close; } mes "[Cazador Simple]"; mes "Tal vez la próxima vez entonces."; close; } else if(checkquest(7148,HUNTING) == 2) { // Caza completada mes "[Cazador Simple]"; mes "¡Excelente trabajo! Aquí tienes tu recompensa."; getexp 5000,0; erasequest 7148; close; } else if(checkquest(7148) == 1) { // Misión activa pero no completada mes "[Cazador Simple]"; mes "¡Sigue cazando! Aún no has terminado."; close; } } moc_para01,39,36,5 script Gestor de Misiones#2024 732,{ mes "[^FF7700Gestor de Misiones^000000]"; mes "Hola, por favor selecciona una misión"; while (true) { switch(select((.hunting)?" ~ Misión de Cacería":"", (.collection)?" ~ Misión de Recolección":"")) { case 1: set .@huntmenu$, ""; for(set .@i,0; .@i < .huntingquestcount; set .@i,.@i+1){ if (.@i) set .@huntmenu$,.@huntmenu$ + ":"; if (gettimetick(2) < getd((.@i+1) + "_hunting_delay")) .@c$ = "^808080"; else .@c$ = "^000000"; set .@huntmenu$, .@huntmenu$ + .@c$ + "[Nv " + getd("." +(.@i+1)+"_huntingmin") + "-" + getd("." +(.@i+1)+"_huntingmax") + "] " + getd("." + (.@i+1) + "_huntingname$"); } set @selection,select(.@huntmenu$); clear; if (.quest_repeat == true) { if(gettimetick(2) < getd(@selection + "_hunting_delay")){ mes "[^FF7700Gestor de Misiones^000000]"; mes "¡Lo siento, debes esperar 24 horas antes de repetir esta misión!"; mes "Por favor espera hasta ^0000FF"+Time2Str(getd(@selection + "_hunting_delay"))+"^000000."; close; } } else { if (getd(@selection + "_hunting_repeat") == true){ mes "[^FF7700Gestor de Misiones^000000]"; mes "Ya completaste esta misión."; mes "Por favor elige otra."; close; } } mes "[^FF7700Gestor de Misiones^000000]"; .@size = getarraysize(getd("."+ @selection + "_huntingmob")); if (.@size == 2) mes "Por favor caza y elimina a ^FF0000"+getd("."+@selection+"_huntingmob[1]")+" " + getmonsterinfo(getd("."+@selection+"_huntingmob[0]"),MOB_NAME)+"^000000."; else { mes "Por favor caza y elimina los siguientes monstruos:"; for(set .@j, 0; .@j < .@size; set .@j,.@j+2) mes "- ^FF0000"+getd("."+@selection+"_huntingmob["+(.@j+1)+"]")+" " + getmonsterinfo(getd("."+@selection+"_huntingmob["+.@j+"]"),MOB_NAME)+"^000000"; } next; mes "[^FF7700Gestor de Misiones^000000]"; mes "Recompensas:"; if (getd("." +@selection+"_huntingexp[0]")) mes "^0000FF" + F_InsertComma(getd("." +@selection+"_huntingexp[0]"))+" EXP Base^000000"; if (getd("." +@selection+"_huntingexp[1]")) mes "^0000FF" + F_InsertComma(getd("." +@selection+"_huntingexp[1]"))+" EXP de Clase^000000"; if (getd("." +@selection+"_huntingzeny")) mes "Zeny: ^0000FF"+getd("." +@selection+"_huntingzeny")+"^000000"; if (getd("." +@selection+"_huntingprize[0]")) { for(.@i = 0; .@i < getarraysize(getd("." +@selection+"_huntingprize")); .@i++) mes getd("." +@selection+"_huntingamount") + " " + getitemname((getd("." +@selection+"_huntingprize["+.@i+"]"))); } switch(select("- Aceptar Misión", "- Entregar Misión Completada", "- Cancelar")) { case 1: clear; if (isbegin_quest(getd("." + @selection+"_huntingid"))) goto havetaken; if (BaseLevel >= getd("." +@selection+"_huntingmin") && BaseLevel <= getd("." +@selection+"_huntingmax")){ mes "[^FF7700Gestor de Misiones^000000]"; mes "Misión aceptada."; set h_run, true; set currentquest$, @selection; setquest getd("." + @selection+"_huntingid"); close; } else{ mes "[^FF7700Gestor de Misiones^000000]"; mes "No cumples con el nivel requerido para esta misión."; close; } case 2: clear; switch(checkquest(getd("." +@selection+"_huntingid"),HUNTING)) { case -1: goto nottaken; case 2: mes "[^FF7700Gestor de Misiones^000000]"; mes "¡Bien hecho!"; mes "Aquí están tus recompensas."; if(getd("." +@selection+"_huntingprize[0]")) { for(.@i = 0; .@i < getarraysize(getd("." +@selection+"_huntingprize")); .@i++) getitem(getd("." +@selection+"_huntingprize["+.@i+"]"),getd("." +@selection+"_huntingamount")); } set Zeny, Zeny+getd("." +@selection+"_huntingzeny"); getexp getd("." +@selection+"_huntingexp[0]"),getd("." +@selection+"_huntingexp[1]"); erasequest getd("." +@selection+"_huntingid"); setd(@selection + "_hunting_delay"),gettimetick(2)+.quest_delay; setd(@selection + "_hunting_repeat"),true; set @selection, ""; set h_run, false; end; default: mes "[^FF7700Gestor de Misiones^000000]"; mes "Aún no has derrotado a todos los monstruos."; close; } case 3: end; } case 2: clear; mes "[^FF7700Gestor de Misiones^000000]"; mes "El gremio siempre necesita más recursos."; mes "Por favor, selecciona el área en la que deseas ayudar hoy."; set .@collectmenu$, ""; for( set .@i,0; .@i < .collectionquestcount; set .@i,.@i+1){ if (.@i) set .@collectmenu$,.@collectmenu$ + ":"; if (gettimetick(2) < getd((.@i+1) + "_collection_delay")) .@c$ = "^808080"; else .@c$ = "^000000"; set .@collectmenu$, .@collectmenu$ + .@c$ + "[Nv " + getd("." +(.@i+1)+"_collectionmin") + "-" + getd("." +(.@i+1)+"_collectionmax") + "] " + getd("." + (.@i+1) + "_collectionname$"); } set @selection,select(.@collectmenu$); clear; if(.quest_repeat == true){ if(gettimetick(2) < getd(@selection + "_collection_delay")){ mes "[^FF7700Gestor de Misiones^000000]"; mes "¡Lo siento, debes esperar 24 horas antes de repetir esta misión!"; mes "Por favor espera hasta ^0000FF"+Time2Str(getd(@selection + "_collection_delay"))+"^000000."; close; } } else{ if(getd(@selection + "_collection_repeat") == true){ mes "[^FF7700Gestor de Misiones^000000]"; mes "Ya completaste esta misión."; mes "Por favor elige otra."; close; } } mes "[^FF7700Gestor de Misiones^000000]"; mes "Necesitamos lo siguiente:"; set .@size, getarraysize(getd("."+ @selection + "_collectionitem")); for( set .@j, 0; .@j < .@size; set .@j,.@j+2){ .@a = countitem(getd("."+@selection+"_collectionitem["+.@j+"]")); if (.@a < getd("."+@selection+"_collectionitem["+(.@j+1)+"]")) .@c$ = "^FF0000"; else .@c$ = ""; mes .@c$ + getd("."+@selection+"_collectionitem["+(.@j+1)+"]") + " " + getitemname(getd("."+@selection+"_collectionitem["+.@j+"]")) + ": " + "(" + .@a + "/"+getd("."+@selection+"_collectionitem["+(.@j+1)+"]") + ")^000000"; } next; mes "[^FF7700Gestor de Misiones^000000]"; mes "Recompensa:"; if (getd("." +@selection+"_collectionexp["+0+"]")) mes "^0000FF" + F_InsertComma(getd("." +@selection+"_collectionexp["+0+"]")) + " EXP Base^000000"; if (getd("." +@selection+"_collectionexp["+1+"]")) mes "^0000FF" + F_InsertComma(getd("." +@selection+"_collectionexp["+1+"]")) + " EXP de Clase^000000"; if (getd("." +@selection+"_collectionzeny")) mes "Zeny: ^0000FF"+getd("." +@selection+"_collectionzeny")+"^000000"; if (getd("." +@selection+"_collectionprize[0]")) { for(.@i = 0; .@i < getarraysize(getd("." +@selection+"_collectionprize")); .@i++) mes getd("." +@selection+"_collectionamount") + " " + getitemname((getd("." +@selection+"_collectionprize["+.@i+"]"))); } if (BaseLevel < getd("." +@selection+"_collectionmin") || BaseLevel > getd("." +@selection+"_collectionmax")) { next; mes "[^FF7700Gestor de Misiones^000000]"; mes "No cumples con el nivel requerido para esta misión."; } else { if(select("- Entregar objetos", "- Volver") == 1) { clear; set .@size, getarraysize(getd("."+@selection + "_collectionitem")); for( set .@k,0; .@k < .@size; set .@k,.@k+2) { if(countitem(getd("."+@selection+"_collectionitem["+.@k+"]"))>=getd("."+@selection+"_collectionitem["+(.@k+1)+"]")){ set .@checkitem,.@checkitem+2; } } if(.@checkitem<.@size){ mes "[^FF7700Gestor de Misiones^000000]"; mes "No tienes todos los objetos necesarios."; mes F_Rand("¿Olvidaste el objeto en el almacenamiento?","Tal vez intenta con otra misión.",""); break; } for( set .@delcount,0; .@delcount < .@size; set .@delcount,.@delcount+2){ delitem getd("."+@selection+"_collectionitem["+.@delcount+"]"),getd("."+@selection+"_collectionitem["+(.@delcount+1)+"]"); } mes "[^FF7700Gestor de Misiones^000000]"; mes "¡Bien hecho!"; mes "Aquí están tus recompensas."; if(getd("." +@selection+"_collectionprize[0]")) { for(.@i = 0; .@i < getarraysize(getd("." +@selection+"_collectionprize")); .@i++) getitem(getd("." +@selection+"_collectionprize["+.@i+"]"),getd("." +@selection+"_collectionamount")); } set Zeny,Zeny+getd("." +@selection+"_collectionzeny"); getexp getd("." +@selection+"_collectionexp["+0+"]"),getd("." +@selection+"_collectionexp["+1+"]"); setd(@selection + "_collection_delay"),gettimetick(2)+.quest_delay; setd(@selection + "_collection_repeat"),true; set @selection, ""; close; } else { clear; mes "[^FF7700Gestor de Misiones^000000]"; mes F_Rand("¿No fue de tu agrado?","¿Solo estás mirando?","¡Vamos a encontrar la misión adecuada para ti!"); } } break; case 3: close; } if (rand(3) == 1) mes "¿Qué tal una misión de " + F_Rand("cacería","recolección","aventura","ayuda") + " hoy?"; } OnInit: function AddCollection; function AddHunting; questinfo QTYPE_DAILYQUEST, QMARK_NONE; //Activate/Deactivate quest categories (true/1 - activated, false/0 - deactivated) set .collection, true; set .hunting, true; //Quest Delay (seconds) //24 hours = 86400 seconds set .quest_delay, 120; //Activate/Deactivate repeatable quests (true/1 - activated, false/0 - deactivated) set .quest_repeat, true; //Activate/Deactivate party support (true/1 - activated, false/0 - deactivated) set .party_support, true; //Max range for party support (+- x & y coordinations) set .party_range, 25; //Checks if quests are loaded (prevents out of index) if(.questsloaded==true) end; set .questsloaded, true; //Add Hunting Quests here (You can add as many required mobs as you want) //AddHunting("<Quest Name>",<Quest ID>,<Min Lvl>,<Max Lvl>,<Reward|Item ID>,<Reward|Item Amount>,<Zeny Reward>,<Base EXP>,<Job EXP>,<Monster ID>,<Monster Amount>,...); AddHunting("Prontera Field 01",11340,1,21,"608|609|501|502",1,0,2100,2100,1063,10); AddHunting("Prontera Field 02",11341,1,51,"610",1,0,27300,14700,1063,3,1113,3,1031,3); AddHunting("Descendencia de los orcos",7148,30,99,"610",1,0,27300,14700,1686,10); //Add Collection Quests here (You can add as many required items as you want) //AddCollection("<Quest Name>",<Min Lvl>,<Max Lvl>,<Reward|Item ID>,<Reward|Item Amount>,<Zeny Reward>,<Base EXP>,<Job EXP>,<Item ID>,<Item Amount>,...); AddCollection("Foliage Gathering",1,11,"502",1,0,2100,2100,705,10,707,10,7100,10,706,1); AddCollection("Herb Gathering",1,21,"611|612|613|614",1,0,2100,2100,507,8,508,8,509,8,510,8,511,8,621,3); AddCollection("Flower Gathering",1,31,"607",1,0,2100,2100,704,10,708,10,703,10,709,10); AddCollection("Vegetable Gathering",1,41,"607",1,0,2100,2100,515,10,516,10,535,10); end; function AddCollection{ set .collectionquestcount,.collectionquestcount+1; setd ("." +.collectionquestcount+"_collectionname$", getarg(0)); setd ("." +.collectionquestcount+"_collectionmin", getarg(1)); setd ("." +.collectionquestcount+"_collectionmax", getarg(2)); explode(getd(".@" +.collectionquestcount+"_collectionprize$"), getarg(3) + "", "|"); for(.@i = 0; .@i < getarraysize(getd(".@" +.collectionquestcount+"_collectionprize$")); .@i++) setd ("."+.collectionquestcount+"_collectionprize["+.@i+"]",atoi(getd(".@" +.collectionquestcount+"_collectionprize$["+.@i+"]"))); //setd ("." +.collectionquestcount+"_collectionprize", getarg(3)); setd ("." +.collectionquestcount+"_collectionamount", getarg(4)); setd ("." +.collectionquestcount+"_collectionzeny", getarg(5)); set .@argcount, 6; set .@size, getarraysize(getd("."+ .collectionquestcount + "_collectionexp")); setd ("." +.collectionquestcount+"_collectionexp["+.@size+"]",getarg(.@argcount)); setd ("." +.collectionquestcount+"_collectionexp["+(.@size+1)+"]",getarg(.@argcount+1)); set .@argcount, .@argcount+2; set .@size, getarraysize(getd("."+ .collectionquestcount + "_collectionitem")); while(getarg(.@argcount,-1)!=-1 && getarg(.@argcount+1,-1)!=-1){ setd ("."+.collectionquestcount+"_collectionitem["+.@size+"]",getarg(.@argcount)); setd ("."+.collectionquestcount+"_collectionitem["+(.@size+1)+"]",getarg(.@argcount+1)); set .@argcount,.@argcount+2; set .@size, .@size+2; } return; } function AddHunting{ set .huntingquestcount,.huntingquestcount+1; setd ("." +.huntingquestcount+"_huntingname$", getarg(0)); setd ("." +.huntingquestcount+"_huntingid", getarg(1)); setd ("." +.huntingquestcount+"_huntingmin", getarg(2)); setd ("." +.huntingquestcount+"_huntingmax", getarg(3)); explode(getd(".@" +.huntingquestcount+"_huntingprize$"), getarg(4) + "", "|"); for(.@i = 0; .@i < getarraysize(getd(".@" +.huntingquestcount+"_huntingprize$")); .@i++) setd ("."+.huntingquestcount+"_huntingprize["+.@i+"]",atoi(getd(".@" +.huntingquestcount+"_huntingprize$["+.@i+"]"))); setd ("." +.huntingquestcount+"_huntingamount", getarg(5)); setd ("." +.huntingquestcount+"_huntingzeny", getarg(6)); set .@size, getarraysize(getd("."+ .huntingquestcount + "_huntingexp")); set .@argcount, 7; setd ("." +.huntingquestcount+"_huntingexp["+.@size+"]",getarg(.@argcount)); setd ("." +.huntingquestcount+"_huntingexp["+(.@size+1)+"]",getarg(.@argcount+1)); set .@argcount, .@argcount+2; set .@size, getarraysize(getd("."+ .huntingquestcount + "_huntingmob")); while(getarg(.@argcount,-1)!=-1 && getarg(.@argcount+1,-1)!=-1){ setd ("."+.huntingquestcount+"_huntingmob["+.@size+"]",getarg(.@argcount)); setd ("."+.huntingquestcount+"_huntingmob["+(.@size+1)+"]",getarg(.@argcount+1)); set .@argcount, .@argcount+2; set .@size, .@size+2; } return; } havetaken: clear; mes "[^FF7700Gestor de Misiones^000000]"; mes "Lo siento, ya tienes esta misión activa."; close; nottaken: clear; mes "[^FF7700Gestor de Misiones^000000]"; mes "Parece que aún no has aceptado esta misión."; close; }1 point
-
Hey everyone, I wanted to showcase a custom MVP mechanic system I've been developing for Ragnarok Online using rAthena. The idea is to bring more dynamic, thematic, and visually appealing mechanics to MVP encounters — moving beyond the usual tank-and-spank format. DISCORD Takechiii#8303 DISCORD Takechiii#8303 🛠 What does this system do? Allows MVPs to execute custom attack patterns on specific map coordinates. Works on an 11x11 grid centered around the MVP (6x6 coordinate) to trigger precise damage zones. Each MVP’s behavior can be thematically tailored (e.g., feline patterns for Moonlight Flower, curses for Osiris, etc.). Easily reusable and expandable for other bosses or PvE events. This system is inspired by raid-style battles. It’s ideal for: Custom instances MVP events with multiple phases Progressive PvE challenges I’m still refining the system and adding new mechanics and visual effects. I’m open to feedback, suggestions, or even collaborations!
.gif.e7839edf2de6bc4096258197f4507b38.gif)
.gif.8116413800d3cae296a78fd1068d19c9.gif)
.gif.46462875b4da6c4a88731f9035c1007f.gif)
.gif.9bf900762d1b3ea51bb7933478481a46.gif)
.gif.cc8056b60036454c9e7bcc4a0f2a7cc9.gif)
.gif.6936da3e740a05d833f841152aeddb44.gif) 1 point
1 point -
I have updated it to be compatible with the latest rAthena version https://github.com/hiphop9/rathena202506141 point
-
does it read any files in the ragnarok folder? for example if there is a file added, GarudaHS automatically eliminates the file I'll try to save the page first, and I'll try it in the future. thanks for this GameGuard1 point
-
latest revision of rathena give error at line 47.
 1 point
 -
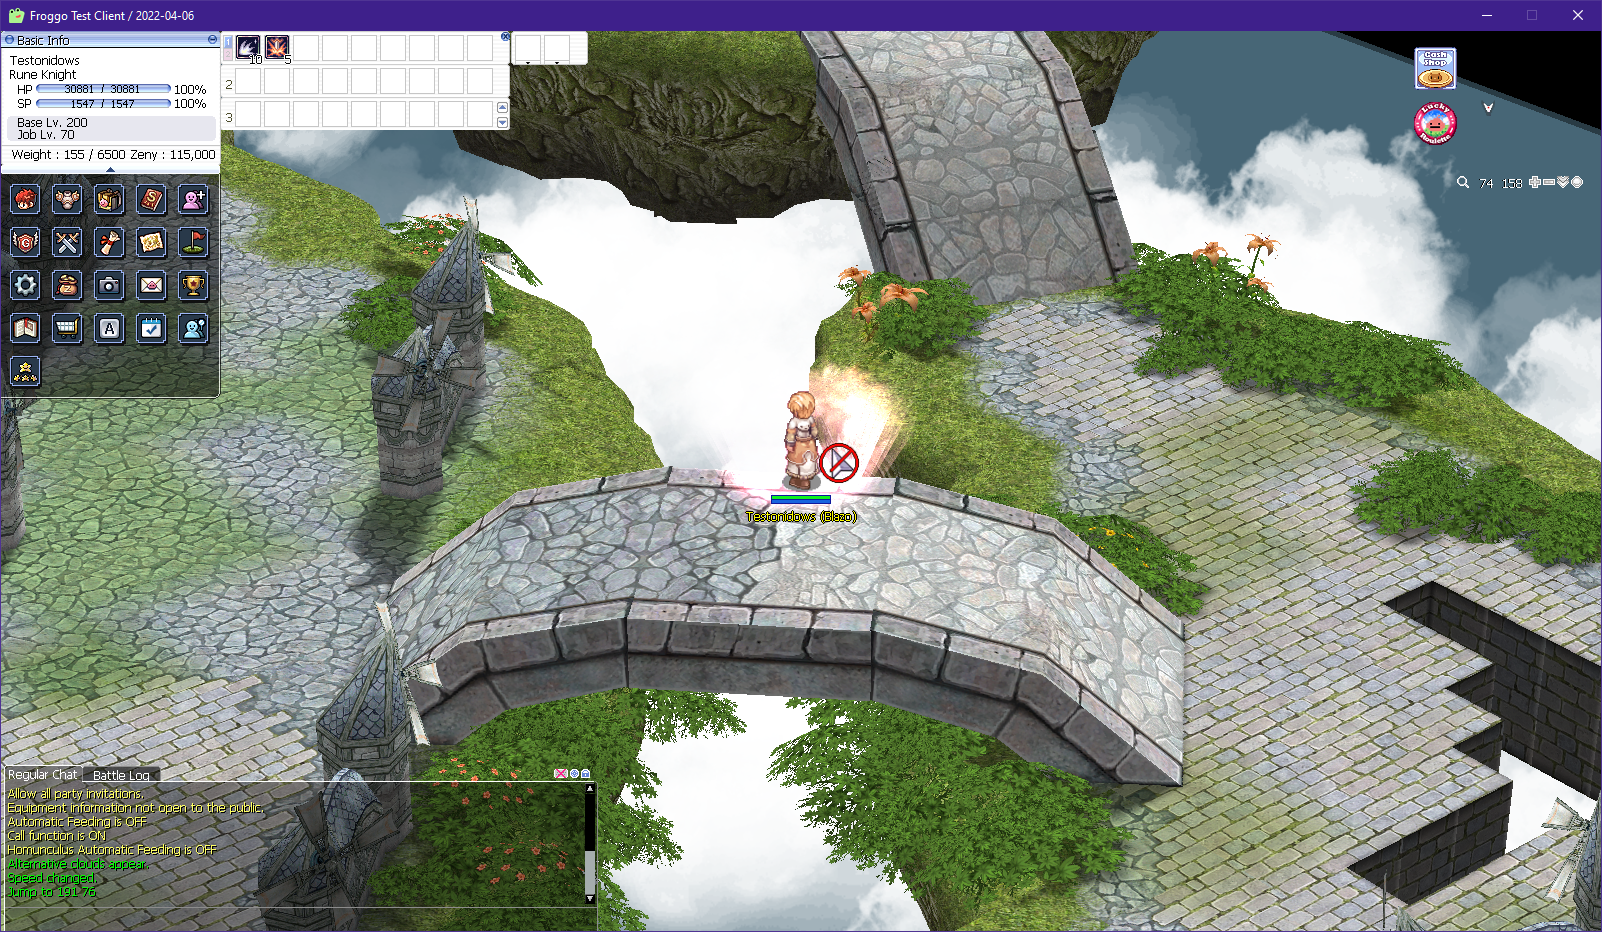
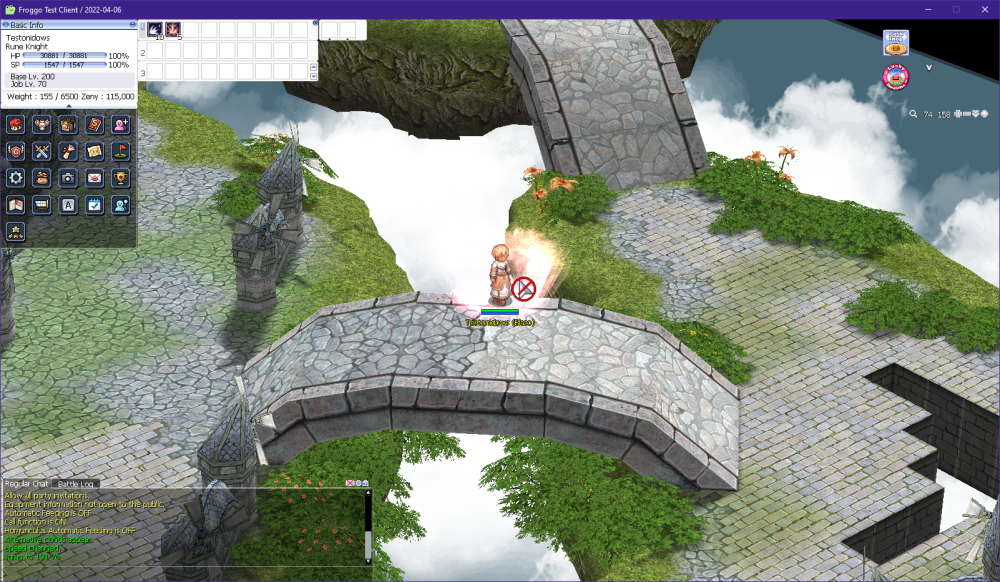
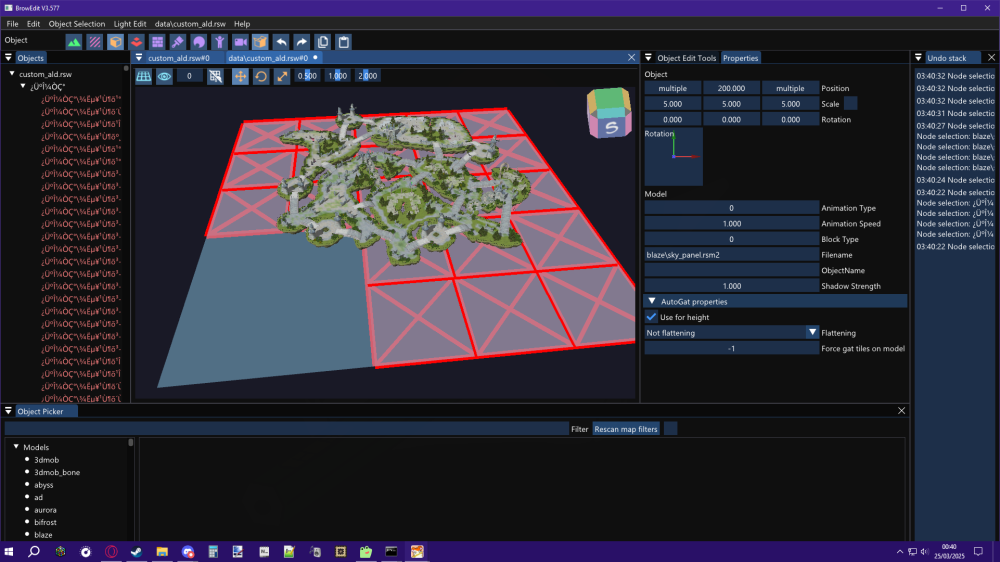
BIG EDIT: If your client supports it (~2022+), just use data\luafiles514\lua files\mapskydata. I found out about this a bit too late, but better late than never. So, here's the basic concept of how to make RGB skyboxes that don't rely on hardcoded skyboxes. I don't see enough people talking about it, so I decided to bring the concept up, as I just did it for two of my custom maps. You can have flat 3D models ~200 units under the main map with a texture, tiled to form a large square, and they'll effectively work as a customizable skybox, going alongside with "clouds2" (or "clouds") mapflag. Pros: Can use any texture/color Can be animated (in theory) Customizable Can be used in any map Not hardcoded/doesn't need to replace any map or skybox Cons: Horizontal camera angles might expose black edges Minor effort editing the map to add the new models Tips: Works well with clouds2 mapflag greywolf/illusion water rsm models are a good base for this, if you don't know how to make a custom model. You will need to change the bottom square texture to be invisible (or the upper one to be opaque), and preferably hex the path to be a new texture so you don't have to replace their textures. Don't use Scale over 5 on the model size (e.g. in Browedit). The tiles will stop rendering properly in some angles if they're too big. Usually a 5x5 grid of 5 Scale models of retextured "ilusion" water at y=200 is enough and produces some of the best results. It's what was used on the images below: I intentionally exposed a small black corner on the image to show it. 90% of the time or if you lock the camera, you can't see the black corners, though.
 1 point
 -
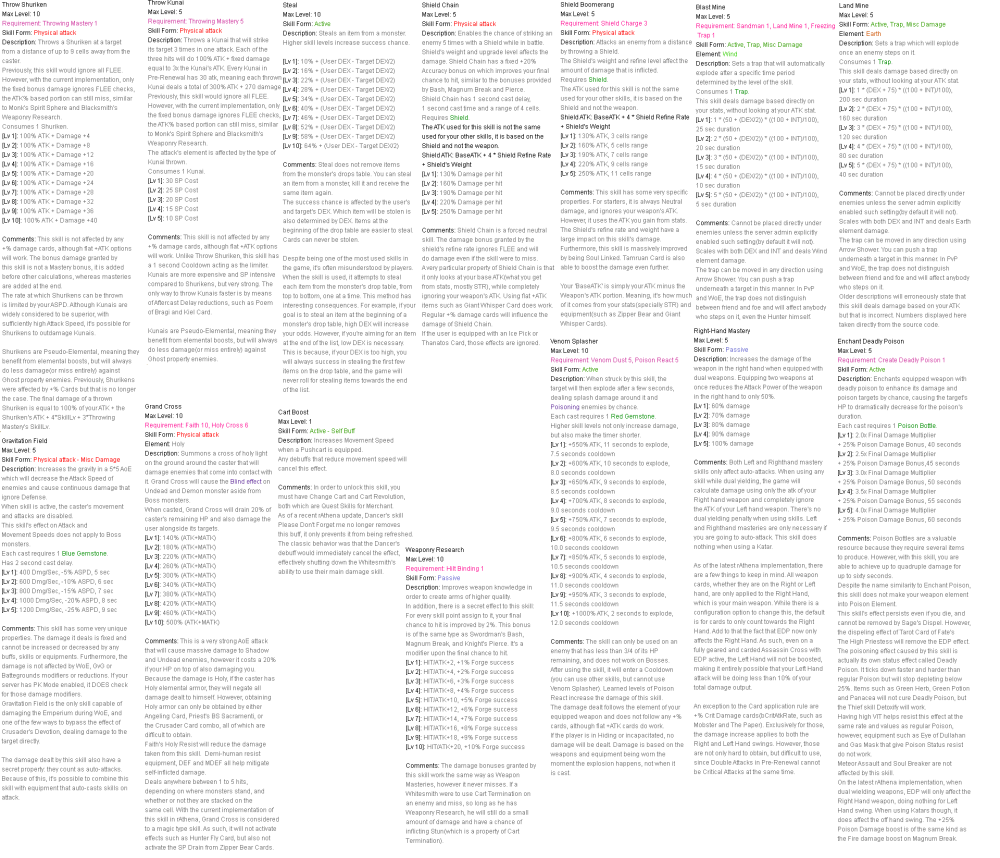
It's been a while since my initial release of those descriptions, and a lot of things need to be changed. A few mistakes here and there, but also plenty of mechanics changed on rAthena whose descriptions need to match that. Yes, I'm looking at you, Enchant Deadly Poison. Let's not drag this too long, yeah? Here's some patch notes: Typos fixed on the following skills: Shield Chain, Cart Boost, Cart Termination, Watery Evasion/Suiton Updated Cart Boost to account for the new interaction between this skill and Please Don't Forget Me(it no longer cancels the effect) Weaponry Research: Includes information about the Hidden Bonus(battle.cpp, line 3269) Raid: The debuff only applies in Renewal Venom Splasher: The timer information was completely wrong. Corrected and now also includes cooldown, additional information added on comments Jupitel Thunder: Was missing any information regarding damage Explosion Spirits/Critical Explosion: Corrected information, the SP recovery is disabled, not halved Blitz Beat: Corrected damage on information, improved wording Head Crush: Corrected ambiguous information about bleeding Shield Boomerang: Information about damage calculation Shield Chain: Massively expanded on the information and comments, including comparisons between this skill and Shield Boomerang Dispel: Clarification on the fact that MDEF reducing the chance is a myth that never existed Land Mine: Damage information completely wrong, fixed now including Mercenary version Freezing Trap: Added information on damage and scaling Blast Mine: Damage informationm missing, durations wrong too, fixed now Claymore Trap: Damage information missing, fixed now Gravitation Field: Included information about the secret property of the skill, where damage ticks count as auto attacks Throw Zeny: Accurate information about reduction versus players and bosses Final Strike: Added a a note, pointing out that Hercules uses a stronger formula for the skill Grand Cross: Greatly improved description Throw Kunai: Changed to reflect changes on rAthena(no longer misses, pseudo elemental) Throw Shuriken: Same as above(even more nerfed than kunais, why did you guys ever do this?) Steal: Massively improved description with more information and insight on High DEX/Low DEX Envenom: Improved damage descriptions Left/Right Hand Mastery: Recent information about the skill's inner workings Enchant Deadly Poison: Updated to the latest details of the skill, post the recent rework Next update I'll include the monster skills that were requested. I'd also like to expand upon this by adding quick reference pages in-game, containing information such as Status Effects, monster skills, etc. I updated the first post to have the latest version, but I'll leave it here as well just in case. skilldescript.lub
 1 point
 -
short description There are 3 different generations of laboratory monsters: 1. Egnigem, Wickebine, Laurell, Errende, Josephina, Kavach, Armeyer 2. Seyren, Eremes, Kathryne, Margaretha, Cecil, Howard 3. Randel, Gertie, Celia, Chen, Trentini, Alphoccio, Flamel I collect them, correct mistakes, add every possible class to each monster, recolor them in 3 official color sets and improve their aura. As a basis, I took the logic of the first implemented sprites at lhz_dun01-03 If you compare the following kRO sprites with corrections in the changelog you will notice that the logic has ceased to be respected and the sprites do not even have sounds! LINK TO FILE: https://mega.nz/file/tGFCxRSL#y5S8uLWw0cMCrLt059ycmZSeeFY1oLYTSVJwa0BoEWs [DONE] 1st class 2nd class advanced class 3rd class 3rd japan edition class 4th class latest expanded classes previous versions of some classes custom extended classes The total number of sprites in the pack: all classes from novice to 4th class (with different types of weapons) x 3 official color sets = 600 sprites changelog: (!) Below are the non-clean gifs recorded using GifCam.exe over the Act Editor (!) So these can brake or accelerate and do not serve as an accurate image. These gifs are added just for reference For clarity, the background of the laboratory is taken, and the sprites are shown in transparent blue 969F9EE7 and with improved aura Seyren Windsor Eremes Guile Kathryne Keyron Margaretha Sorin Cecil Damon Howard Alt-Eisen Randel Lawrence Gertie Wie Celia Alde Chen Lio Trentini Ilaria Alphoccio Basil Flamel Emure Egnigem Chenia Wickebine Tres Laurell Weinder Errende Ebecee Josephina Kavach Icarus Armeyer Dinze1 point
-
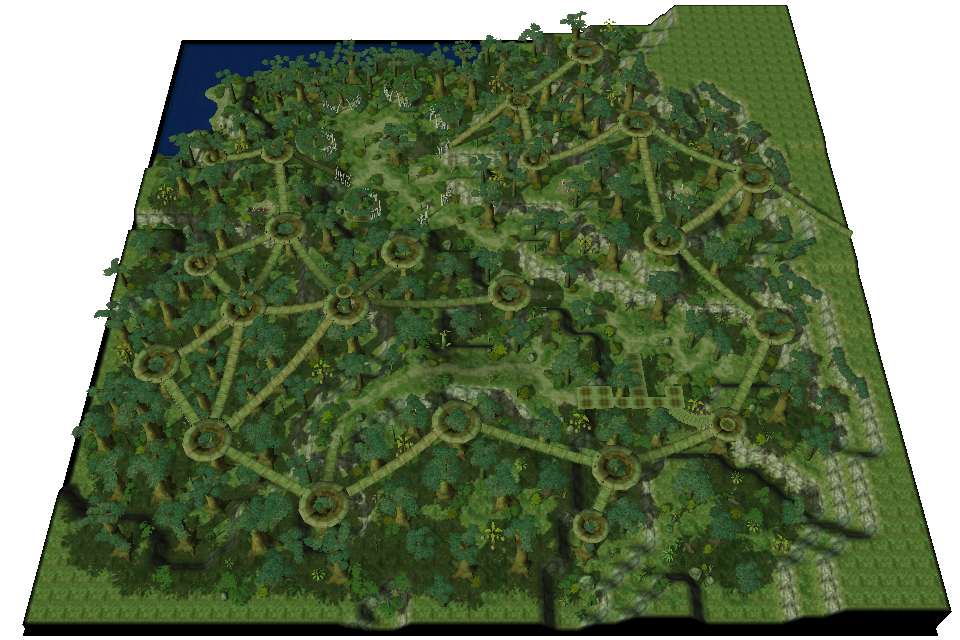
Original idea - Alice Hello, community! I'm glad to show you one of the locations that I've been working on since the beginning of the year! The task was ambitious, 3D modeling was applied, a lot of time was spent on correcting the overall look but it totally worthed it. .•°'°•.•°'°•.•°'°•.•°'°•.•°'°•.•°'°•.•°'°•.•°'°•.•°'°•.•°'°•.•°'°•.•°'°•.•°'°•.•°'°•.•°'°•.•°'°•.•°'°•.•°'°•.•°'°•.•°'°•.•°'°•.•°'°•.•°'°•.•°'°•.•°'°•.•°'°•.•°'°•. crimea Please rate it if the map is good enough ~~ This map can be downloaded here https://rathena.org/board/files/file/4487-w0w_map_collection/
 1 point
 -

Version 1.0.1
209 downloads
// ========================================================= // World Boss System, scripted by Akkarin // ========================================================= // In this script's original state, a "World Boss" will // spawn in a random location after 10,000 monster kills // every 4 minutes past the hour. // // This script imitates the old World Boss mechanic from an // MMO called TERA. // // The location and MVP are selected at random from arrays. // =========================================================2.00 USD1 point -
A mysterious frozen lake in the midst of forests and mountains in the sunshine. .•°'°•.•°'°•.•°'°•.•°'°•.•°'°•.•°'°•.•°'°•.•°'°•.•°'°•.•°'°•.•°'°•.•°'°•.•°'°•.•°'°•.•°'°•.•°'°•.•°'°•.•°'°•.•°'°•.•°'°•.•°'°•.•°'°•.•°'°•.•°'°•.•°'°•.•°'°•.•°'°•. ice2xlake Please rate it if the map is good enough ~~ This map can be downloaded here https://rathena.org/board/files/file/4487-w0w_map_collection/1 point
-
You know, I just could not take and not make the full version of the map ja_yavin01 released earlier. So look and be surprised .•°'°•.•°'°•.•°'°•.•°'°•.•°'°•.•°'°•.•°'°•.•°'°•.•°'°•.•°'°•.•°'°•.•°'°•.•°'°•.•°'°•.•°'°•.•°'°•.•°'°•.•°'°•.•°'°•.•°'°•.•°'°•.•°'°•.•°'°•.•°'°•.•°'°•.•°'°•.•°'°•. yavin1b Please rate it if the map is good enough ~~ This map can be downloaded here https://rathena.org/board/files/file/4487-w0w_map_collection/1 point