Leaderboard


Popular Content
Showing content with the highest reputation since 06/01/25 in all areas
-
Version 1.0.0
169 downloads
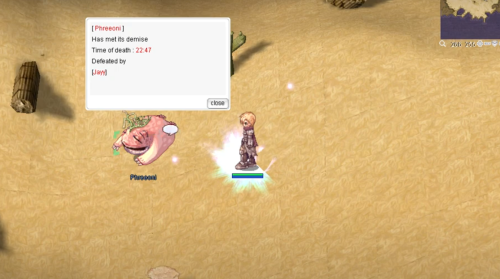
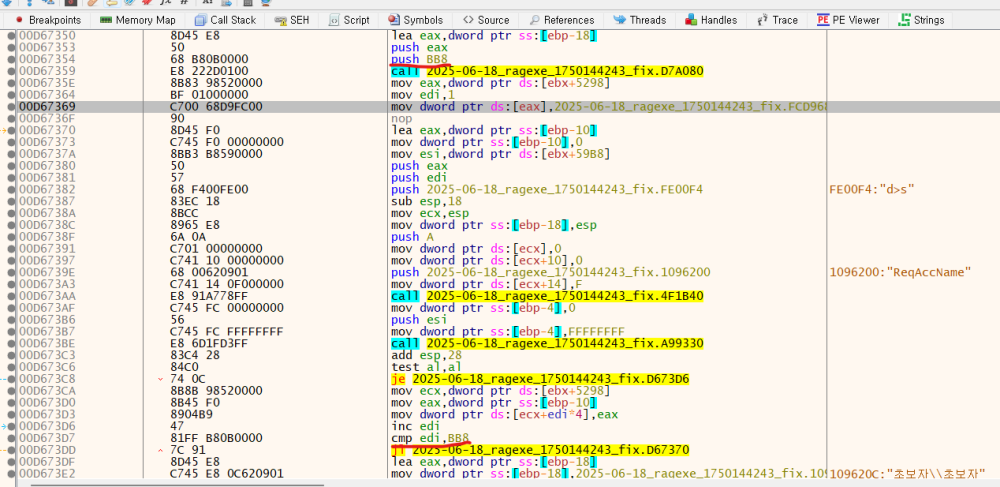
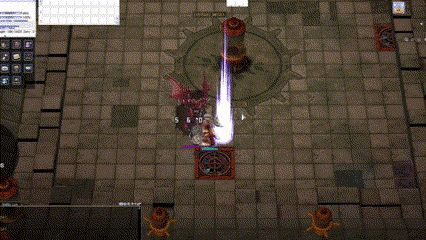
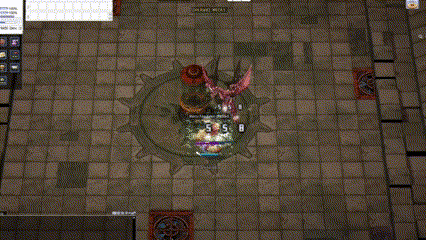
Since someone is claiming that they are the only one who has the right to come up with this idea, and it's become an issue - to be honest, I didn't know that something like this had already been released here. So, I've decided to share this work for free so that everyone can benefit from it. Just to clarify: this is entirely my own work. I didn’t copy any code from the person claiming they are the only one entitled to ideas like this. As for the monster GRF, I manually edited each one to extract only the dead sprite actions. Whenever an MVP dies on the map, a tombstone will appear at the spot where it died — but instead of just saying "Tomb", it now shows the MVP’s name like **"Phreeoni"**, **"Baphomet"**, or **"Ifrit"** Instantly see which MVP was killed Great for MVP hunters and competitive players Makes the game world feel more immersive Works with any MVP across the server Example: When **Phreeoni** is defeated, a tombstone labeled **"Phreeoni"** appears where it died — no more guessing!Free11 points -
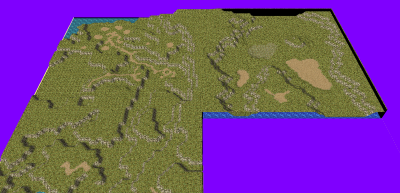
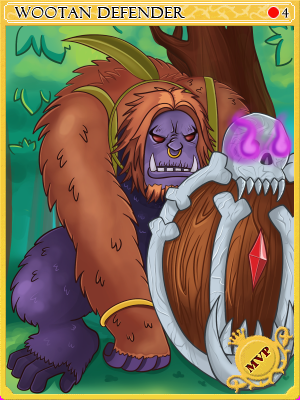
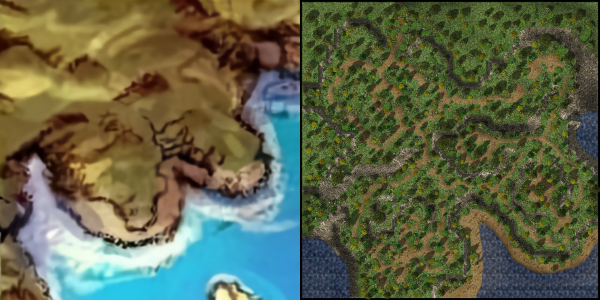
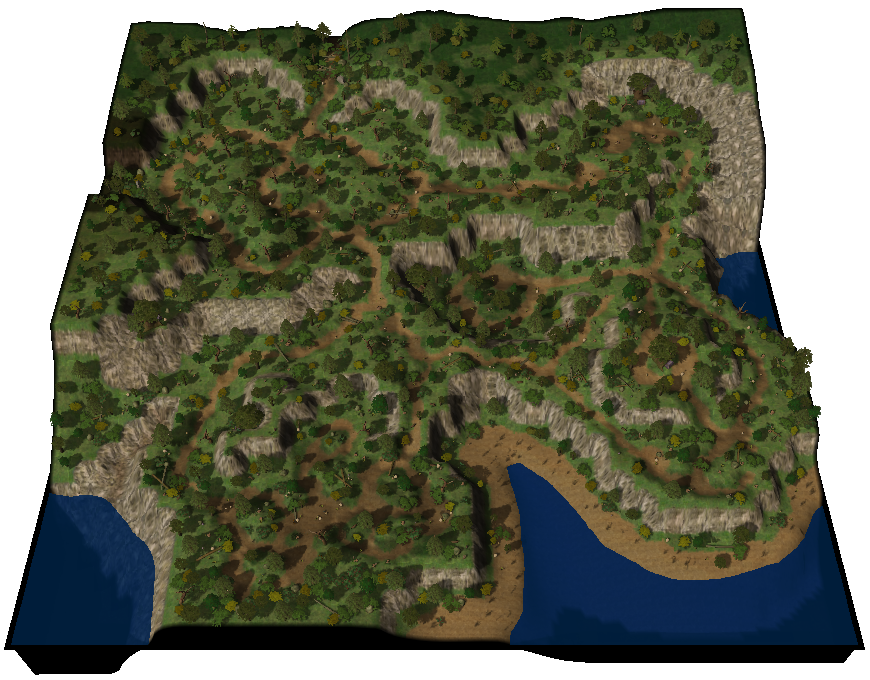
This map belongs to the game universe expansion series. Made with attention to detail and inspired by the original! .•°'°•.•°'°•.•°'°•.•°'°•.•°'°•.•°'°•.•°'°•.•°'°•.•°'°•.•°'°•.•°'°•.•°'°•.•°'°•.•°'°•.•°'°•.•°'°•.•°'°•.•°'°•.•°'°•.•°'°•.•°'°•.•°'°•.•°'°•.•°'°•.•°'°•.•°'°•.•°'°•. um_fild05 Now you can visit the new part of the Hoomga Jungle! The map is a continuation of the Umbala Field 04 location and repeats its main features. The landscape also follows the outlines of the original art design of the location on the world map. The map seamlessly connects with neighboring levels. This map is also supposed to be the home of the MVP Wootan Defender, who was never featured in the original game. However, an ancient version of this MVP was added as a boss in Illusion of Luanda, but for some reason lived in the Comodo North Cave mixed with other monsters and even with another MVP Ancient Tao Gunka instead of in the forest area. Now you can fight its regular version in its native jungle zone and get a unique custom item. I asked the artist to draw a card and a custom shield for this MVP. MVP Wootan Defender MVP Wootan Defender Card Special Loot Wootan's Token - ID 25633 Wootan Defender's Shield Piece - ID 25634 Wootan Defender's Shield [1] - Custom All images and sprites can be downloaded in this topic: https://rathena.org/board/files/file/3844-w0w_custom_collection/ P.S. You may not have noticed in the video but all the gorillas are doubled in size. In their normal size they look very weak the same height as the player. But they have good pixel art that does not lose its beauty when enlarged. It also allows you to double their HP stats and experience to make their farming at least a little more interesting. P.S.S. Also fixed the neighboring location um_fild04: 1) Removed official inaccessible gat points 168,137 and 185,138 2) Added seamless passage to the new location um_fild05 Please rate it if the map is good enough ~~ This map can be downloaded here https://rathena.org/board/files/file/4487-w0w_map_collection/


 8 points
 -
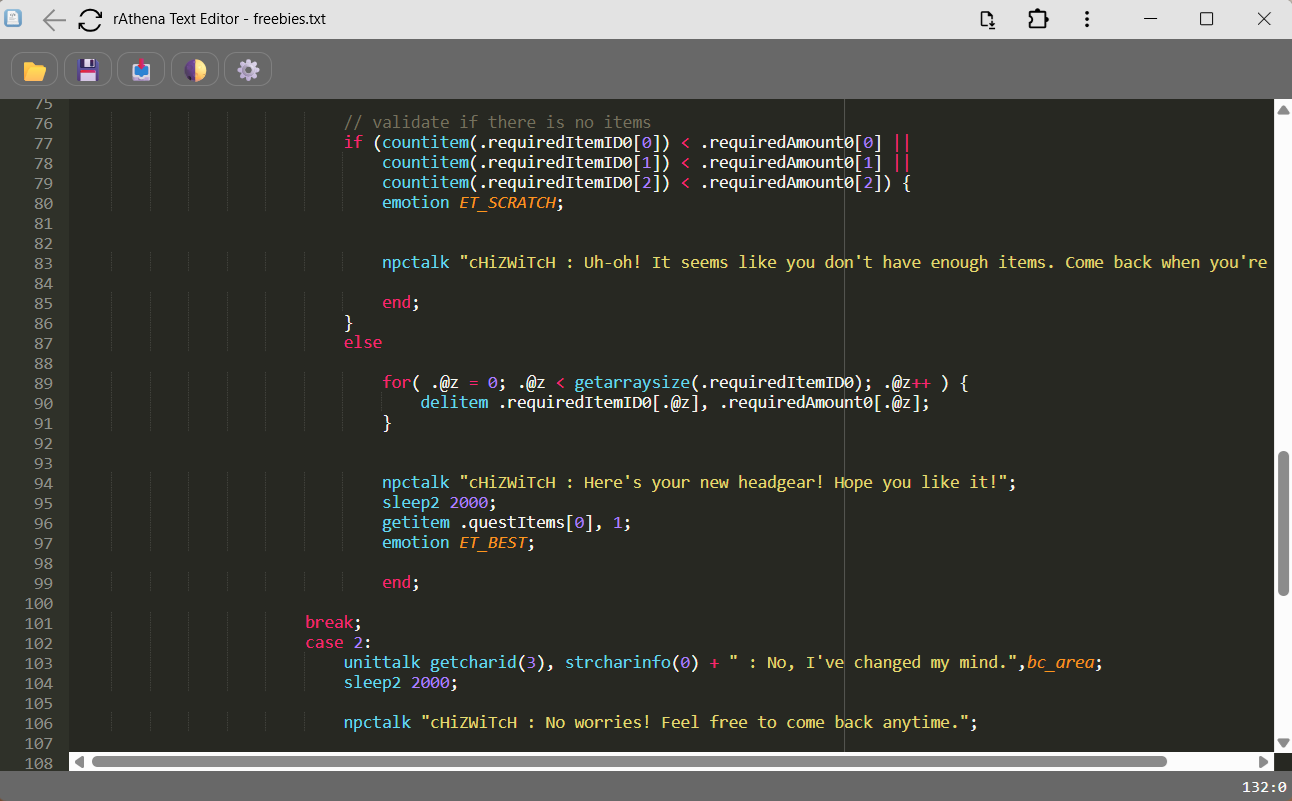
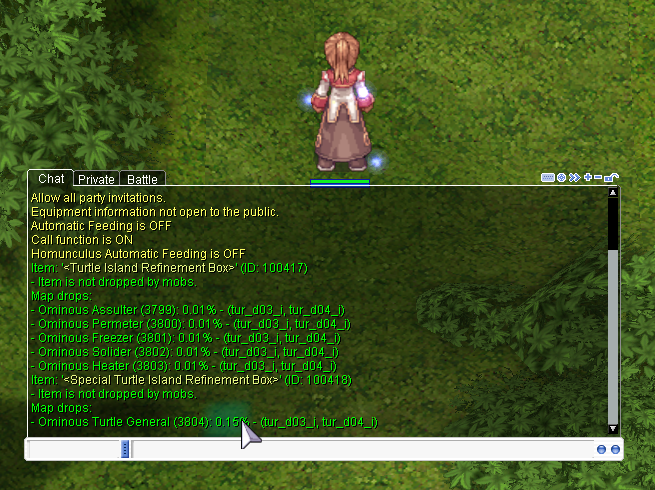
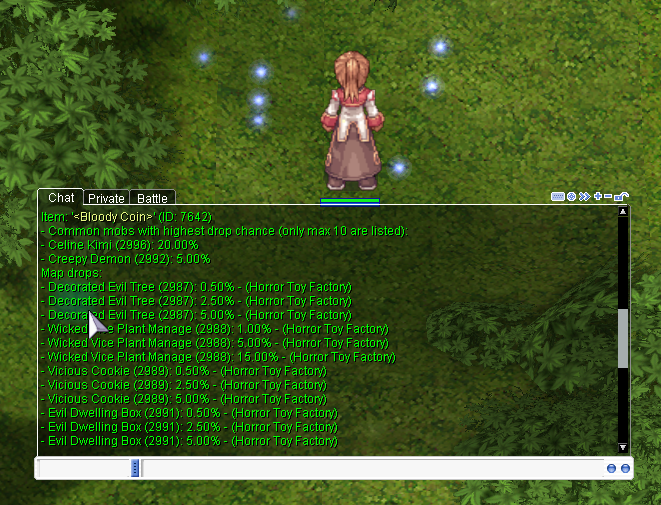
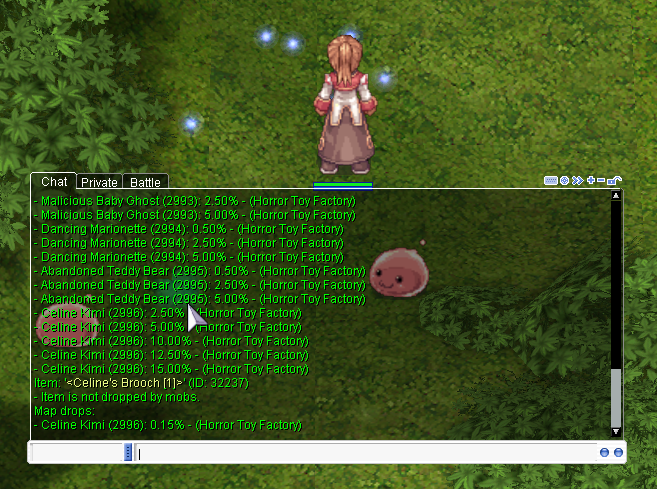
This is a request from Extend whodrops command to include map drops #8017 I'm only enhancing @whodrops command. I've included map_drops.yml in the command extern MapDropDatabase map_drop_db; extern InstanceDatabase instance_db; sprintf(atcmd_output, "Map drops:"); clif_displaymessage(fd, atcmd_output); std::map<std::pair<uint16, double>, std::vector<std::string>> map_drop_groups; bool found_map_drops = false; for (const auto& map_entry : map_drop_db) { std::shared_ptr<s_map_drops> mapdrops = map_entry.second; std::string map_name = map_mapid2mapname(map_entry.first); std::string display_name = map_name; if (map_name.find("@") != std::string::npos) { for (const auto& instance_entry : instance_db) { std::shared_ptr<s_instance_db> instance = instance_entry.second; if (strcmp(map_mapid2mapname(instance->enter.map), map_name.c_str()) == 0) { display_name = instance->name; break; } for (const auto& additional_map : instance->maplist) { if (strcmp(map_mapid2mapname(additional_map), map_name.c_str()) == 0) { display_name = instance->name; break; } } if (display_name != map_name) break; } } for (const auto& global_drop : mapdrops->globals) { if (global_drop.second->nameid == id->nameid) { double rate_percent = (global_drop.second->rate * 100.0) / 100000.0; std::pair<uint16, double> key = std::make_pair(0, rate_percent); map_drop_groups[key].push_back(display_name); found_map_drops = true; } } for (const auto& specific_entry : mapdrops->specific) { uint16 mob_id = specific_entry.first; for (const auto& drop : specific_entry.second) { if (drop.second->nameid == id->nameid) { double rate_percent = (drop.second->rate * 100.0) / 100000.0; std::pair<uint16, double> key = std::make_pair(mob_id, rate_percent); map_drop_groups[key].push_back(display_name); found_map_drops = true; } } } } if (!found_map_drops) { sprintf(atcmd_output, " - Item is not dropped by map-specific drops."); clif_displaymessage(fd, atcmd_output); } else { for (const auto& group : map_drop_groups) { uint16 mob_id = group.first.first; double rate = group.first.second; const std::vector<std::string>& maps = group.second; std::string map_list = ""; for (size_t i = 0; i < maps.size(); ++i) { if (i > 0) map_list += ", "; map_list += maps[i]; } if (mob_id == 0) { sprintf(atcmd_output, "- All monsters: %.2f%% - (%s)", rate, map_list.c_str()); } else { std::shared_ptr<s_mob_db> mob = mob_db.find(mob_id); if (mob) { sprintf(atcmd_output, "- %s (%d): %.2f%% - (%s)", mob->jname.c_str(), mob_id, rate, map_list.c_str()); } } clif_displaymessage(fd, atcmd_output); } } Screenshot: Extend whodrops command to include map drops (#8017).diff
 5 points
 -
Link: https://github.com/TBlazeWarriorT/TBlazeWarriorT-Utility-Scripts/tree/main/NP%2B%2B rAthena Autocomplete Screenshots:
 5 points
 -
KRO : https://github.com/hiphop9/ROClient_en 2025-06-04_Ragexe.exe -PATH- @ Bug Fix(Recommended) Add Close Button Custom Window Title Disable 1rag1 Params(Recommended) Disalbe Filename Check(Recommended) Disable Help Message Enable DNS Suport Enable Multiple GRF(Recommended) Fix NPC Dialog Scroll Increase Zoom Out 75% Read Data Folder First(Recommended) Remove Hard Coded Address & Port(Recommended) Restore Clientinfo.xml(Recommended) Restore Old Login Packet(Recommended) externalsettings Korea patch Skip License Screen Translations client EnableWho EnableShowName AlwaysAscii CallKoreaClientInfo PlainTextDesc HideBuildInfo TranslateClient NoGGuard CustomItemInfoLub CustomAchieveLub CustomTownInfoLub CustomTipboxLub Customspopuplub CustomMapInfoLub CustomOngQuestInfoLub CustomRcmdQuestInfoLub Customachievementslub CustomQuestClassificationInfolub NoNagle OpenToServiceSelect GuildBrackets NoGravityAds NoGravityLogo FixLatestNCWin Restore model culling Headgears viewID 64000 ExtendCashShopPreview EnableProxySupport IncreaseMapQuality rAthena 2025-06-14 (66a4a2ab68ce85d781514c3c000433f981d6842f) https://github.com/hiphop9/rathena20250614 - emotion ui update for 20230925 clients - 20231220+ CLIENT bodystylefix - macro user report packet This is distributed for testing purposes only. Please do not request additional patches!! I am not a seller!! Therefore, if you plan to operate or commercialize a server, do not contact me!!
 3 points
 -
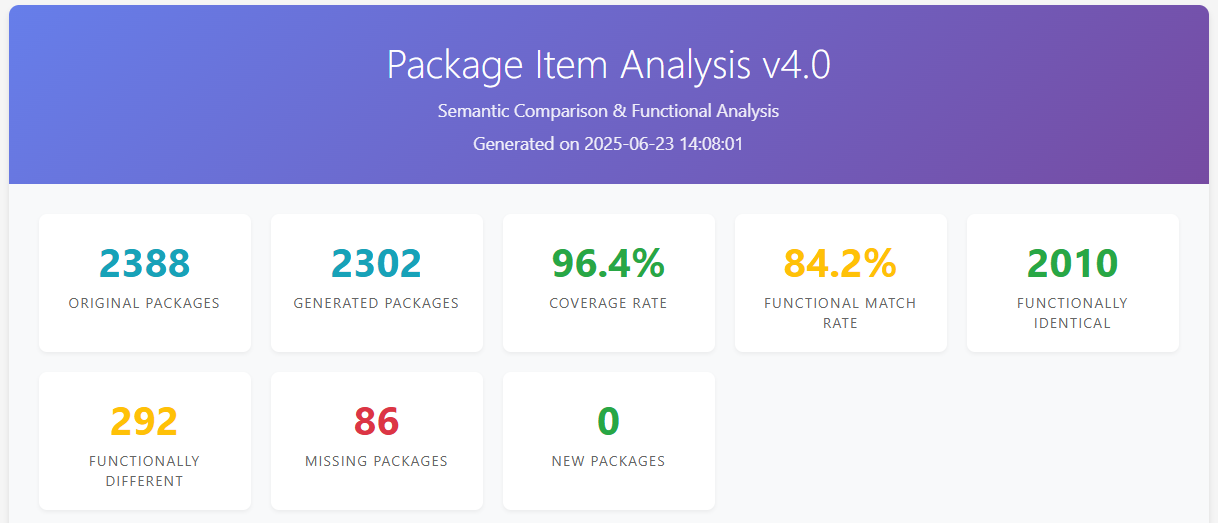
Within this few days I've tried to see how packageitem.lub structure and is it possible to create generator for that. Yes, possible but I wont share the generator here, because Ive tried for renewal it takes around 15 minutes or more because of too much of groups in item_group_db (2777 groups) and also a lot of items. Btw, I'm using latest rAthena and latest ROTP by Chris to date (24 June 2025), maybe ill update this post if needed but since its for Pre-RE, I don't think there will be much changes then. I've tried to use AI to analyze data generated from my generator with ROTP latest packageitem.lub and below is the result for Renewal data. As you can see, the generator covered 96.4% packages for Renewal compare to latest packageitem ROTP and 86 of missing packages is because of unknown itemID and non existing group. I need to filter some group in rAthena item_group_db.yml because of some groups thats are not even in official packageitem.lub, so thats why the new packages is 0. There are 292 functionally different because of different prob/rates and also the item data inside that specific group compare to official one. Below is latest packageitem.lub from ROTP as default which is Renewal. And below is the generated one for Pre-Renewal by using ROTP Pre-RE iteminfo.lua data Since there isn't any released as I'm aware of for Pre-Renewal packageitem.lub so I'll share it here and you could try it. The data is generated by using ROTP Pre-Renewal iteminfo.lua and rAthena Pre-Renewal files. If the probability info didn't shown, recheck packageitem.lub does it have that itemID existing, and if yes but still not showing, try to add the itemID in the list in simplecashshopscript.lub. If there is any inaccuracy compare to rAthena you can let me know and I'll try to update it ASAP. packageitem.lubsimplecashshopscript.lub
 3 points
 -
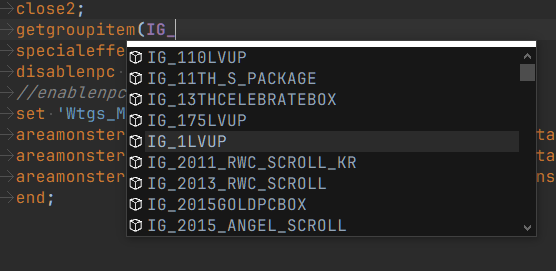
Hexadecimal = BB8 (Decimal = 3000) max 64000 = FA00
 3 points
 -
This feature enhances the standard MVP death mechanic by replacing the generic "Tomb" label with the **actual name of the MVP** that was defeated. When an MVP dies on the map, a tombstone NPC appears at the exact spot of death, and instead of showing a generic label, it dynamically displays the **name of the boss** (e.g., "Phreeoni", "Ifrit", "Baphomet"). **How it works for players:** - When an MVP is killed, a tombstone spawns on the map. - The tomb now shows the name of the MVP, not just “Tomb”. - This helps MVP hunters and players identify what boss was recently defeated, even if they arrived late. - It improves both visual clarity and overall immersion in the game. I created a demo video showcasing how this behaves in-game. **Note to fellow developers:** After completing this feature, I discovered that someone had already created a similar concept before me. However, I had no knowledge of that existing implementation during development and did not reference or use any of their code. This version was built independently from scratch based on how I personally wanted it to function. While the **concept is similar**, the **implementation and behavior may differ** between our versions. I still believe this showcases a useful quality-of-life addition for MVP-related mechanics, and I hope it can serve as inspiration or a base for others who wish to implement their own version. Feel free to check out the demo video and let me know your thoughts!3 points
-
i would like to share my winter snow EN skin winter snow EN.rar
 3 points
 -
Disable GM sprite - hex Search for: C4 04 84 C0 0F 84 C3 00 00 00 Two matches For both occurrences, replace with: C4 04 84 C0 90 E9 C3 00 00 00 Restore model culling hex Search for: 80 BE 54 01 00 00 01 You will find two matches. In both cases, look at the following bytes: 80 BE 54 01 00 00 01 75 1D 80 BE 54 01 00 00 01 75 45 Replace the 75 1D and 75 45 parts with 90 903 points
-
The 2023+ clients use new job IDs for the jRO costumes: JOB_RUNE_KNIGHT_2ND = 4332, JOB_MECHANIC_2ND = 4333, JOB_GUILLOTINE_CROSS_2ND = 4334, JOB_WARLOCK_2ND = 4335, JOB_ARCHBISHOP_2ND = 4336, JOB_RANGER_2ND = 4337, JOB_ROYAL_GUARD_2ND = 4338, JOB_GENETIC_2ND = 4339, JOB_SHADOW_CHASER_2ND = 4340, JOB_SORCERER_2ND = 4341, JOB_SURA_2ND = 4342, JOB_MINSTREL_2ND = 4343, JOB_WANDERER_2ND = 4344, You need to add them in the source. Open file \src\common\mmo.hpp. Find JOB_SKY_EMPEROR2 = 4316, then add the following code below it: JOB_RUNE_KNIGHT_2ND = 4332, JOB_MECHANIC_2ND, JOB_GUILLOTINE_CROSS_2ND, JOB_WARLOCK_2ND, JOB_ARCHBISHOP_2ND, JOB_RANGER_2ND, JOB_ROYAL_GUARD_2ND, JOB_GENETIC_2ND, JOB_SHADOW_CHASER_2ND, JOB_SORCERER_2ND, JOB_SURA_2ND, JOB_MINSTREL_2ND, JOB_WANDERER_2ND, Save the file then recompile the server. I've updated the example script for you: // callfunc "F_JobSuit",<Job ID>; //Change to specific sprite // callfunc "F_JobSuit",-1; //Change to 2nd job // callfunc "F_JobSuit",-2; //Change to transcendent 2nd job // callfunc "F_JobSuit",-3; //Change to 3rd job // callfunc "F_JobSuit",-4; //Change to 4th job // callfunc "F_JobSuit",-5; //Change to alternative third class costume // callfunc "F_JobSuit"; //Return to default sprite function script F_JobSuit { .@block_expanded_jobs = false; //Disable changing for expanded job player (true/false) if (getargcount() == 0) { if (PACKETVER >= 20231220) setlook LOOK_BODY2,Class; else if (JobSuit_id > 4331 && JobSuit_id < 4345) setlook LOOK_BODY2,0; else changebase Class; JobSuit_active = false; JobSuit_id = 0; end; } if (getarg(0) > -1) { if (jobname(getarg(0)) == "Unknown Job") { dispbottom "Unknown Job"; end; } callsub S_OK,getarg(0),1; } if (.@block_expanded_jobs && (BaseClass == Job_Novice || BaseClass == Job_Summoner || BaseClass == Job_Gunslinger || BaseClass == Job_Ninja || BaseClass == Job_Taekwon)) end; if (BaseClass == Job_Summoner) { if (Upper) callsub S_OK,Job_Summoner; else callsub S_OK,Job_Spirit_Handler; } else if (BaseClass == Job_Gunslinger) { switch(getarg(0)) { case -1: callsub S_OK,Job_Gunslinger; case -2: case -3: callsub S_OK,Job_Rebellion; case -4: case -5: default: callsub S_OK,Job_Night_Watch; } } else if (BaseClass == Job_Ninja) { switch(getarg(0)) { case -1: callsub S_OK,Job_Ninja; case -2: case -3: callsub S_OK,(Sex ? Job_Kagerou : Job_Oboro); case -4: case -5: default: callsub S_OK,(Sex ? Job_Shinkiro : Job_Shiranui); } } else if (BaseClass == Job_Novice) { switch(getarg(0)) { case -1: callsub S_OK,Job_Novice,1; case -2: case -3: callsub S_OK,Job_Super_Novice; case -4: case -5: default: callsub S_OK,Job_Hyper_Novice; } } else if (BaseJob == Job_Soul_Linker) { switch(getarg(0)) { case -1: case -2: callsub S_OK,Job_Soul_Linker; case -3: callsub S_OK,Job_Soul_Reaper; case -4: case -5: default: callsub S_OK,Job_Soul_Ascetic; } } else if (BaseJob == Job_Star_Gladiator) { switch(getarg(0)) { case -1: callsub S_OK,Job_Taekwon; case -2: callsub S_OK,Job_Star_Gladiator; case -3: callsub S_OK,Job_Star_Emperor; case -4: case -5: default: callsub S_OK,Job_Sky_Emperor; } } switch(getarg(0)) { case -1: callsub S_OK,roclass(eaclass()&EAJ_UPPERMASK); case -2: callsub S_OK,roclass(eaclass()&EAJ_UPPERMASK|EAJL_UPPER); case -3: callsub S_OK,roclass(eaclass()&EAJ_THIRDMASK|EAJL_THIRD); case -4: .@job = roclass(eaclass()&EAJ_THIRDMASK|EAJL_THIRD); callsub S_OK,roclass(eaclass(.@job)|EAJL_FOURTH|EAJL_UPPER); case -5: .@job = roclass(eaclass()&EAJ_THIRDMASK|EAJL_THIRD); if (.@job > 0) callsub S_OK,roclass(eaclass(.@job)|EAJL_FOURTH|EAJL_UPPER)+80; } S_OK: .@c = getarg(0); if (.@c < 1 && getarg(1,0) == 0) end; if (PACKETVER >= 20231220) setlook LOOK_BODY2,.@c; else if (.@c > 4331 && .@c < 4345) setlook LOOK_BODY2,1; else changebase .@c; JobSuit_active = true; JobSuit_id = .@c; end; } - script #JobSuitOnLogin -1,{ OnPCLoginEvent: if (JobSuit_active) F_JobSuit(JobSuit_id); end; }2 points
-
Hello, I don't see the variable being set in your item script. You can use OnPCLoginEvent on a NPC to reapply the appearance. Replace changebase with setlook LOOK_BODY2. Example using a function: Script: | callfunc "F_JobSuit"; UnEquipScript: | callfunc "F_JobSuit",-1; // callfunc "F_JobSuit"; //Change to evolution sprite // callfunc "F_JobSuit",<Job ID>; //Change to specific sprite // callfunc "F_JobSuit",-1; //Return to default sprite function script F_JobSuit { if (getarg(0,0) != -1) { if (jobname(getarg(0,-1)) != "Unknown Job") .@c = getarg(0); else if (BaseJob == Job_Priest) .@c = JOB_ARCH_BISHOP; else if (BaseJob == Job_Wizard) .@c = JOB_WARLOCK; else if (BaseJob == Job_Blacksmith) .@c = JOB_MECHANIC; else if (BaseJob == Job_Hunter) .@c = JOB_RANGER; else if (BaseJob == Job_Assassin) .@c = JOB_GUILLOTINE_CROSS; else if (BaseJob == Job_Crusader) .@c = JOB_ROYAL_GUARD; else if (BaseJob == Job_Monk) .@c = JOB_SURA; else if (BaseJob == Job_Sage) .@c = JOB_SORCERER; else if (BaseJob == Job_Rogue) .@c = JOB_SHADOW_CHASER; else if (BaseJob == Job_Alchemist) .@c = JOB_GENETIC; else if (BaseJob == Job_Bard) .@c = JOB_MINSTREL; else if (BaseJob == Job_Dancer) .@c = JOB_WANDERER; if (PACKETVER >= 20231220) setlook LOOK_BODY2,.@c; else changebase .@c; JobSuit_active = true; JobSuit_id = .@c; end; } if (PACKETVER >= 20231220) setlook LOOK_BODY2,Class; else changebase Class; JobSuit_active = false; JobSuit_id = 0; end; } - script #JobSuitOnLogin -1,{ OnPCLoginEvent: if (JobSuit_active) F_JobSuit(JobSuit_id); end; }2 points
-
Version 1.0.0
773 downloads
The size of attachments (30mb) on rAthena does not allow to add map resources. You can find the full materials here: https://mega.nz/folder/8atXmYgC#yJEL_ssWj8D8XwmpgInYiQ Map list: um_fild05 https://rathena.org/board/topic/145721-showcase-umbala-field-05/ ve_fild08 https://rathena.org/board/topic/144005-showcase-veins-field-08/ mosk_dun04 https://rathena.org/board/topic/143959-showcase-moscovia-dungeon-lvl-4/ ttmoon https://rathena.org/board/topic/116150-showcase-ttmoon/ navayo (+nav_beach, nav_in01, nav_in02) https://rathena.org/board/topic/116200-showcase-navayo/ anrydrago https://rathena.org/board/topic/124265-showcase-miniquest-anry-dragon/ x_base https://rathena.org/board/topic/140494-showcase-x-base/ crimea https://rathena.org/board/topic/132870-showcase-crimea/ barcode https://rathena.org/board/topic/116040-showcase-barcode/ ice2xlake https://rathena.org/board/topic/124194-showcase-ice-twice-lake/ lv_beach https://rathena.org/board/topic/116553-showcase-love-beach/ yavin1b https://rathena.org/board/topic/116300-showcase-yavin1b/ mystvil https://rathena.org/board/topic/117187-showcase-mystical-vil/ crystal https://rathena.org/board/topic/116079-showcase-crystal/ 1@scp087 https://rathena.org/board/topic/116223-showcase-scp-087/ mag_dun03_ https://rathena.org/board/topic/127185-showcase-magma-dungeon-lvl-3/ b_book(1,2,3,4) https://rathena.org/board/topic/116491-showcase-four-battle-books/ ~ Keep calm and use it on your server ~ ~ Don't claim my work as yours please and etc ~ ~ Any requests/reports - https://rathena.org/board/profile/47250-w0wzukubg/ Thanks, Zuku ~Free2 points -
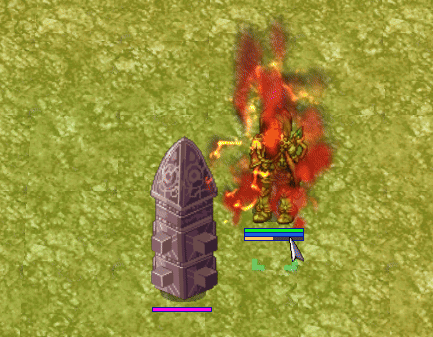
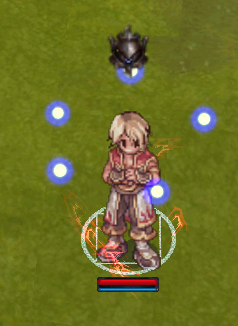
Hey everyone, I wanted to showcase a custom MVP mechanic system I've been developing for Ragnarok Online using rAthena. The idea is to bring more dynamic, thematic, and visually appealing mechanics to MVP encounters — moving beyond the usual tank-and-spank format. DISCORD Takechiii#8303 🛠 What does this system do? Allows MVPs to execute custom attack patterns on specific map coordinates. Works on an 11x11 grid centered around the MVP (6x6 coordinate) to trigger precise damage zones. Each MVP’s behavior can be thematically tailored (e.g., feline patterns for Moonlight Flower, curses for Osiris, etc.). Easily reusable and expandable for other bosses or PvE events. This system is inspired by raid-style battles. It’s ideal for: Custom instances MVP events with multiple phases Progressive PvE challenges I’m still refining the system and adding new mechanics and visual effects. I’m open to feedback, suggestions, or even collaborations!Thanks for watching and reading! Video Preview:
 2 points
 -
Version 1.0.0
166 downloads
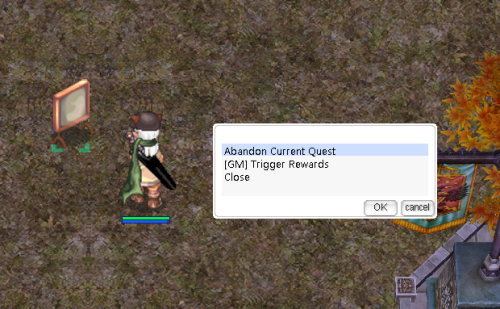
Author: Nyani Version 1.0 ---------------------------------------------- Features - Unlimited Chain Quest (Randomized Kill/Collection Quest) - Automatic Quest submission - unless Collection Quest (Must turn in) - Automatic Quest Acquisition - Does not repeat previous quest (shuffles the quest provided) - Cancel Current Quest (Must talk to NPC) - Monthly Ranking - Automated Monthly Reward distribution - Chance to obtain rewards for quest submissions - Milestone Rewards every 100 quests finished ---------------------------------------------- Changelogs v1.0 - Initial Release Notice: No support will be provided - unless it is a bug on the current script Config // ========================== // CONFIGURATION // ========================== // 0 = NPC Claim Mode, 1 = RoDEX Mode .reward_mode = 1; // Mob and kill amounts setarray .MobList[0], 1002,1004,1010; setarray .MobAmount[0], 30,40,50; setarray .ItemList[0], 705, // Orcish Voucher 1015, // Garlet 1021, // Tooth of Bat 719, // Bear’s Footskin 729, // Coal 744, // Witherless Rose 746, // Evil Horn 728, // Cyfar 938, // Golem Fragment 1058, // Cactus Needle 1009, // Claw of Desert Wolf 1038, // Emveretarcon 1042, // Worm Peelings 1044, // Flame Heart 1046, // Mystic Frozen 1047, // Great Nature 1049; // Red Blood setarray .ItemAmount[0], 5,5,5,5,5,5,5,5,5,5, 5,5,5,5,5,5,5; // Completion reward pool setarray .RewardList[0], 607, 608, 609; setarray .RewardAmount[0], 1, 2, 1; // 100-completion reward pool setarray .SpecialRewardList[0], 7711, 7712; setarray .SpecialRewardAmount[0], 1, 1; // Monthly rewards for top 10 setarray .MonthlyReward[0], 607, 501, 504, 505, 506,909,910; setarray .MonthlyRewardAmount[0], 5, 2, 1, 3, 2,5,10; // Reward chance settings (1-10000 scale) .RewardChance = 10000; // 100% chance by default .SpecialRewardChance = 10000; // 100% for 100-completion Make sure to run SQL queries! No support provided, unless it's a bug in the script's core features.Free2 points -
Version 1.0.0
404 downloads
This script has NPC shops that sell all available costume items in rAthena as of March 2025. Costumes are categorized based on their equipment slot (Upper, Middle, Lower and Garment) and distributed across multiple shops (150 item per shop), Ensuring a well-organized and accessible shopping experience. The item list is filtered to include only valid costumes from latest iteminfo_EN.lua (English Translation), preventing missing or invalid entries. if you remove the commented shops it will sell all costumes available in the database (item_equip_db.yml). Ideal for servers looking to provide a complete costume collection for players!Free2 points -
@Racaae puede hacer lo de @JASHI11?1 point
-
con el permiso de no ofender al autor del script, quisiera que me ayudaran a colocarle un comando como el del archivo adjunto que seria fusión. - actualmente se le habla al npc pero quisiera que se le agregara la opción @claim, para tener dialogo desde el comando con el script de codigo de canje. - el archivo andjunto es otro script que ya tiene el @claim por lo cuál quienes me ayuden lo podrian sacar de allí, en realidad yo lo intente pero no lo logre. - si es posible también modificar la opción de que el administrador pueda crear la clave de código en el chat de gm. //--- Coupon NPC 1.1.2 -------------------------------------------// //----------------------------------------------------------------// // ttt 000000000 // ttt 000 000 // ttttttttt rrrrrrrrr 000 000 nnnnnnnnn // ttt rrr 000 000 nnn nnn // ttt rrr 000 000 nnn nnn // ttt rrr 000 000 nnn nnn // ttttt rrr 000000000 nnn nnn //----------------------------------------------------------------// //--- Changelogs: ------------------------------------------------// // 1.0.0 Release // 1.1.0 Added code type feature (normal|md5-hash) // 1.1.0 Added prevention for typing 0 into Item ID or Amount // 1.1.0 Added a feature for gms to see available coupons // 1.1.0 Minor bug fixes // 1.1.1 Fixed a bug that caused duplicating items // 1.1.2 Added announce if player got a item //----------------------------------------------------------------// //--- Main Script ------------------------------------------------// prontera,146,173,5 script Coupon Jack 807,{ //Set code type (0 = normal | 1 = MD5-Hash) set .code_type, 0; //Set code length set .code_length, 16; //Set Min. GM Level to add new coupons set .code_gmlvl, 99; setarray .coupon_code$[0],"a","b","c","d","e","f","g","h","i","j","k","l", "m","n","o","p","q","r","s","t","u","v","w","x", "y","z","0","1","2","3","4","5","6","7","8","9"; if(getgmlevel() >= .code_gmlvl) { mes "[^FF7700Coupon Jack^000000]"; mes "Welcome " + strcharinfo(0) + "."; next; switch(select("Add Coupon:Show Coupons:Exit")) { case 1: mes "[^FF7700Coupon Jack^000000]"; mes "Enter Item ID:"; input @coupon_item; next; if(@coupon_item <= 0) goto L_error; mes "[^FF7700Coupon Jack^000000]"; mes "Enter Item Amount:"; input @coupon_amount; next; if(@coupon_amount <= 0) goto L_error; for(set @i, 0; @i < .code_length; set @i, @i+1) { set @random_char, rand(0,(getarraysize(.coupon_code$)-1)); set @new_coupon$, @new_coupon$ + .coupon_code$[@random_char]; } if(.code_type==1) { set @new_coupon$, md5(@new_coupon$); } mes "[^FF7700Coupon Jack^000000]"; mes "Coupon added."; query_sql "INSERT INTO `coupons` (`code`, `item_id`, `item_amount`) VALUES ('"+@new_coupon$+"', "+@coupon_item+", "+@coupon_amount+")"; set @new_coupon$, ""; close; case 2: mes "[^FF7700Coupon Jack^000000]"; mes "--------------------------------"; query_sql "SELECT `code`, `item_id`, `item_amount` FROM `coupons`", .@available_code$, .@available_item, .@available_amount; for(set @i, 0; @i < getarraysize(.@available_code$); set @i, @i+1) { mes "Item: " + getitemname(.@available_item[@i]); mes "Amount: " + .@available_amount[@i]; mes "Code: " + .@available_code$[@i]; mes "--------------------------------"; } close; case 3: mes "[^FF7700Coupon Jack^000000]"; mes "Have a nice day."; close; } } mes "[^FF7700Coupon Jack^000000]"; mes "Welcome to the Coupon Codes System. How can I help you?"; next; switch(Select("Submit Coupon:Exit")) { case 1: mes "[^FF7700Coupon Jack^000000]"; mes "Please enter your Coupon Code:"; input @my_code$; next; query_sql "SELECT `code`, `item_id`, `item_amount` FROM `coupons`", .@available_code$, .@available_item, .@available_amount; for (set @i, 0; @i < getarraysize(.@available_code$); set @i, @i+1) { if(@my_code$==.@available_code$[@i]) { mes "[^FF7700Coupon Jack^000000]"; mes "You get ^0000FF" + getitemname(.@available_item[@i]) + " - " + .@available_amount[@i] + " ea.^000000"; query_sql "DELETE FROM `coupons` WHERE `code`='"+@my_code$+"'"; getitem .@available_item[@i],.@available_amount[@i]; //announce "Coupon Jack: " + strcharinfo(0) + " got " + .@available_amount[@i] + getitemname(.@available_item[@i]) + "(s).",0; close; } } mes "[^FF7700Coupon Jack^000000]"; mes "This Coupon Code doesn't exist."; close; case 2: mes "[^FF7700Coupon Jack^000000]"; mes "Have a nice day."; close; } L_error: mes "[^FF7700Coupon Jack^000000]"; mes "Invalid Number"; close; OnInit: query_sql "CREATE TABLE IF NOT EXISTS `coupons` (`code` TINYTEXT NOT NULL, `item_id` INT NOT NULL, `item_amount` INT NOT NULL, INDEX `code` (`code`(32)) ) ENGINE=MyISAM"; } npc de tron.txt npc_LIL TROLL.txt1 point
-
Updates Supported up to 26 June 2025 items. I did split into 2 files to prevent file size over 4GB.1 point
-
View File MVP Tombstone Shows Boss Sprite and Name! Since someone is claiming that they are the only one who has the right to come up with this idea, and it's become an issue - to be honest, I didn't know that something like this had already been released here. So, I've decided to share this work for free so that everyone can benefit from it. Just to clarify: this is entirely my own work. I didn’t copy any code from the person claiming they are the only one entitled to ideas like this. As for the monster GRF, I manually edited each one to extract only the dead sprite actions. Whenever an MVP dies on the map, a tombstone will appear at the spot where it died — but instead of just saying "Tomb", it now shows the MVP’s name like **"Phreeoni"**, **"Baphomet"**, or **"Ifrit"** Instantly see which MVP was killed Great for MVP hunters and competitive players Makes the game world feel more immersive Works with any MVP across the server Example: When **Phreeoni** is defeated, a tombstone labeled **"Phreeoni"** appears where it died — no more guessing! Submitter Mice Submitted 06/18/25 Category Source Modifications Video https://youtu.be/RUD2VJigr88 Content Author xJayx - A.K.A. Mice1 point
-
I'll review this and re-extract the dead body from the sprites. Thank you very much.1 point
-
Hey everyone, I wanted to showcase a custom MVP mechanic system I've been developing for Ragnarok Online using rAthena. The idea is to bring more dynamic, thematic, and visually appealing mechanics to MVP encounters — moving beyond the usual tank-and-spank format. DISCORD Takechiii#8303 DISCORD Takechiii#8303 🛠 What does this system do? Allows MVPs to execute custom attack patterns on specific map coordinates. Works on an 11x11 grid centered around the MVP (6x6 coordinate) to trigger precise damage zones. Each MVP’s behavior can be thematically tailored (e.g., feline patterns for Moonlight Flower, curses for Osiris, etc.). Easily reusable and expandable for other bosses or PvE events. This system is inspired by raid-style battles. It’s ideal for: Custom instances MVP events with multiple phases Progressive PvE challenges I’m still refining the system and adding new mechanics and visual effects. I’m open to feedback, suggestions, or even collaborations!
.gif.e7839edf2de6bc4096258197f4507b38.gif)
.gif.8116413800d3cae296a78fd1068d19c9.gif)
.gif.46462875b4da6c4a88731f9035c1007f.gif)
.gif.9bf900762d1b3ea51bb7933478481a46.gif)
.gif.cc8056b60036454c9e7bcc4a0f2a7cc9.gif)
.gif.6936da3e740a05d833f841152aeddb44.gif) 1 point
1 point -
Hello, may I ask if this is function are able for selling? Wanna have this.1 point
-
This looks AMAZING, it reminds me of raids in FFXIV1 point
-
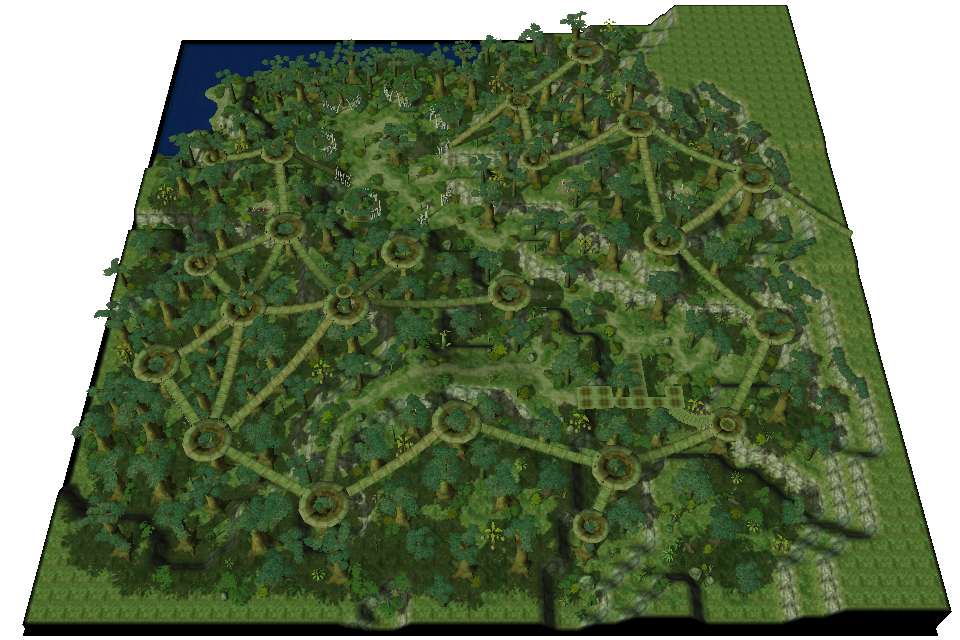
This map belongs to the game universe expansion series. Made with attention to detail and inspired by the original! .•°'°•.•°'°•.•°'°•.•°'°•.•°'°•.•°'°•.•°'°•.•°'°•.•°'°•.•°'°•.•°'°•.•°'°•.•°'°•.•°'°•.•°'°•.•°'°•.•°'°•.•°'°•.•°'°•.•°'°•.•°'°•.•°'°•.•°'°•.•°'°•.•°'°•.•°'°•.•°'°•. mosk_dun04 The map completely repeats all the patterns and elements of levels 1 and 2 of the Moscovia dungeon. I tried to use design elements from the official painted representation as much as possible. The map seamlessly connects with neighboring levels. Excellent for placing low-level monsters without a place to live: Woodie > and < Domovoi Woodie already has its own card with an image and effect, but Domovoi still hasn’t, so I’m glad to show you and suggest using this art for Domovoi card! (Without the use of AI. It is initially a pencil drawing on paper) Please download Domovoi_Card.BMP: Domovoi_Card.bmp P.S. In the Slavic religious tradition, Domovoy is the household spirit of a given kin. Please rate it if the map is good enough ~~ This map can be downloaded here https://rathena.org/board/files/file/4487-w0w_map_collection/


 1 point
 -
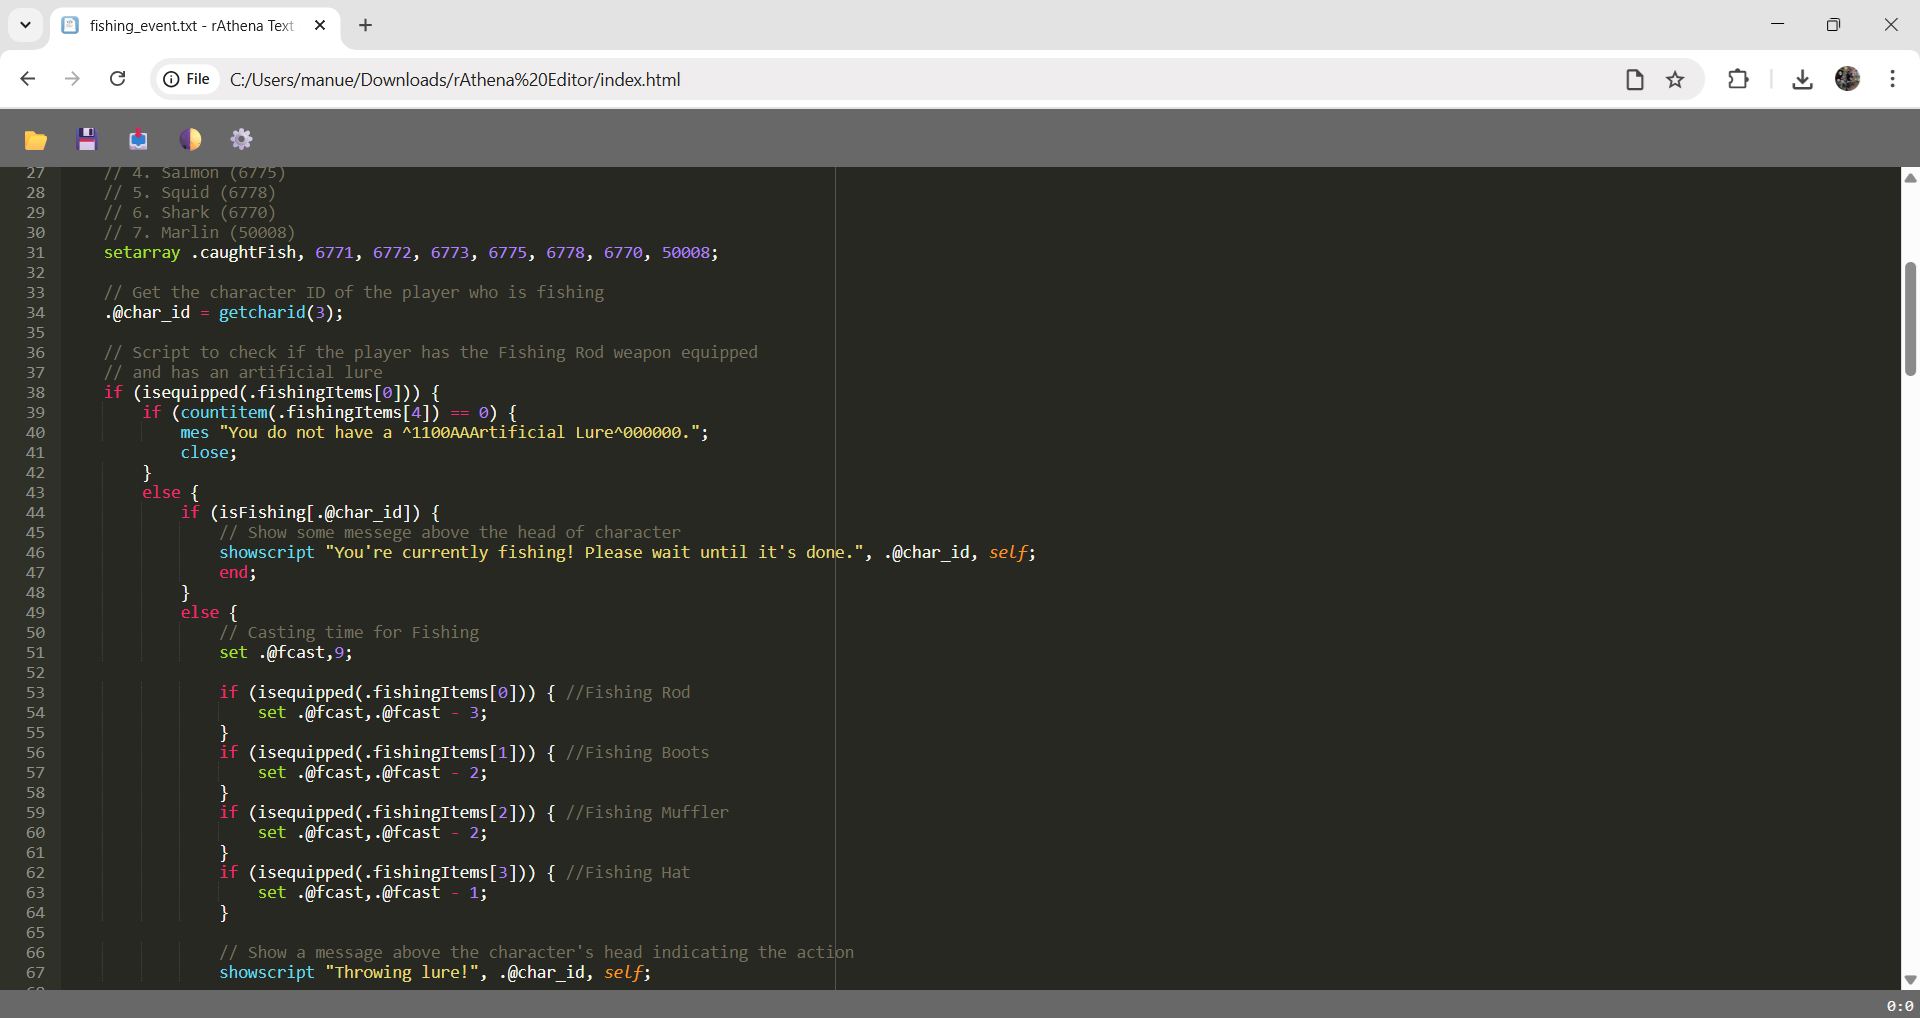
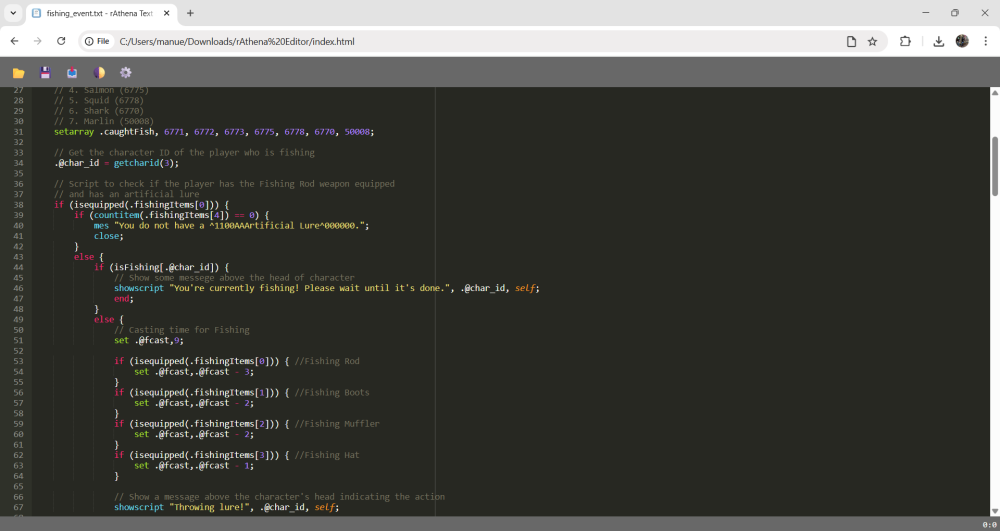
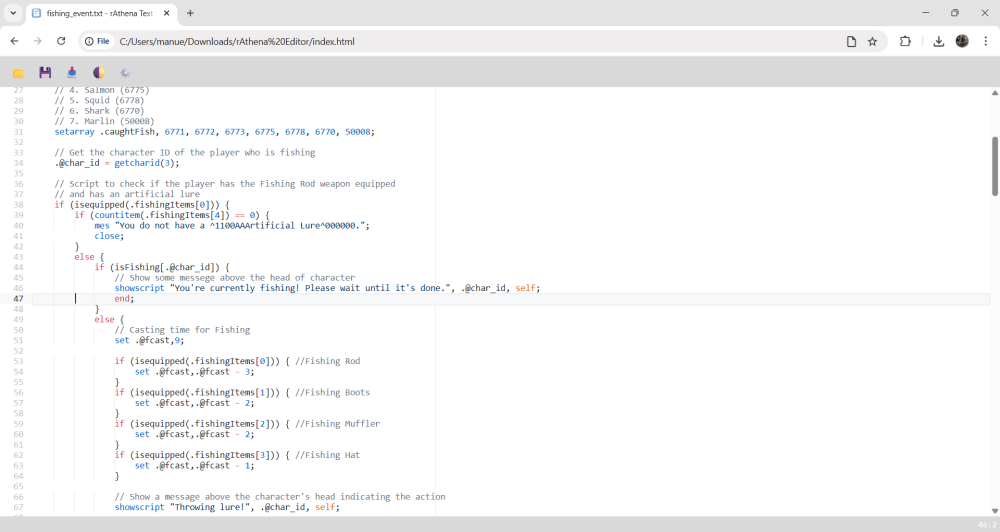
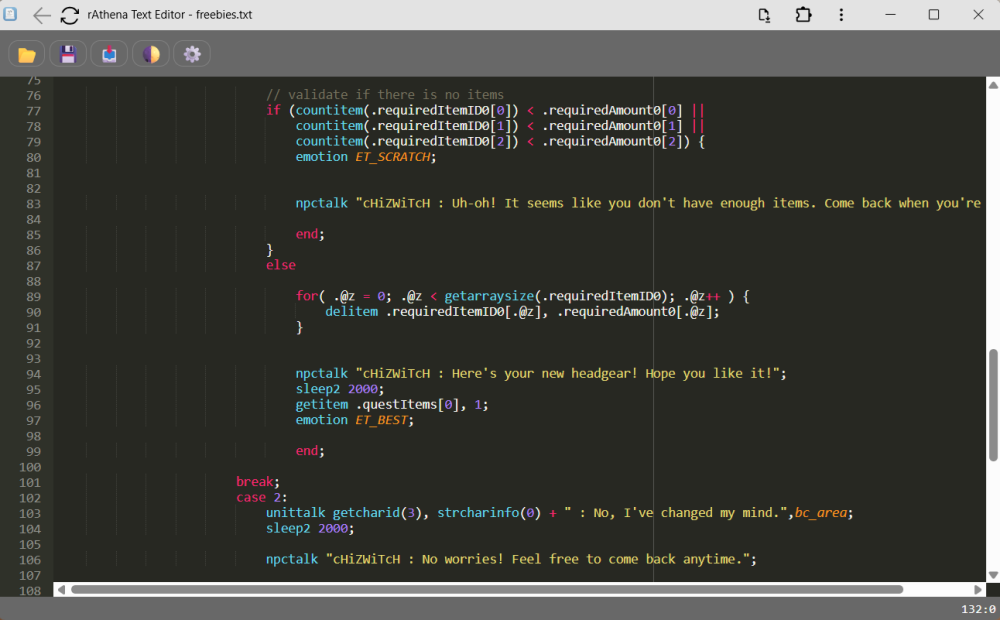
Hello guys, this is my rAthena Text Editor (Offline), a lightweight, browser-based tool I created for editing rAthena scripts (syntax highlight) without needing any installation or internet connection. Features: NOW, integrated with the Gemini Chatbot API for the Editor! Just ask it, and it will provide code for you directly in rAthena Text Editor. Simply provide your Gemini API key. We're using the latest and fastest Gemini model: "gemini-2.5-flash-preview-05-20". Edit your scripts directly in your browser Download your code as a .txt file after you're done Open existing .txt files to continue editing Toggle between Dark Mode and Light Mode for better readability Autocomplete suggestions Added a CTRL+S feature and SAVE button. The tab title now updates based on the file you open or created/saved as. Drag and drop .txt files to get the data of txt file Works on mobile but on Chrome and Edge only. Added some rathena scripting keywords to highlight. <-- this is most tiring xD Works 100% offline – no installation, no internet, no hassle This is a simple tool made for convenience, especially for fellow scripters who want to work quickly without setting up a full IDE. Feel free to check it out, use it, or suggest improvements. Thanks and happy scripting! Screenshots:
 1 point
 -
I created a new command for the game's visual effects. There's already /effect, which allows us to no longer see any visual effects in the game. My command lets us choose which effects we no longer want to see. Example: "@nofx 89 on" will disable the storm gust effect. The command works very well. I'd like to know how to make my modifications available so that if the community finds it useful, it can be integrated into a future update.1 point
-
Its because these two most recent Client versions are still encrypted, not unpacked. What your Anti-Virus software can't parse, it will sometimes mark as a dangerous file. Anyway, I recommend anyone using resources from this thread that were posted by @Skylove to use client version 2025-03-19 for now, it's the only the one posted that allows patches to be applied to it via WARP. The 2 most recent released clients ( 2025-05-08 and 2025-06-04) are not that too different from what 2025-03-19 functionally provides. This also goes without saying, for future clients that will be further released, exercise caution and patience.1 point
-
File Name: itemoption File Submitter: keitenai File Submitted: 21 Nov 2016 File Category: Utilities Content Author: keitenai @ command itemoption Script Information: This script allows you to apply random option on a selected equipped item. The Option types can be found in const.txt : LINK!! The Value is the rate of the option type effect. eg: `10` = 10% bonus attack Index location is the Option Slot location. 0 = First item option slot 1 = Second item option slot 2 = Third item option slot 3 = Fourth item option slot 4 = Fifth item option slot NOTE that you will not see the Option type's description (Client Side) if the Option Slots are not filled by sequence (missed a slot). With this i added a security check that if you missed/jump an index slot, the script will automatically fix it for you. @ itemoption makes it easier to apply random option in your item quite easily. Compatible with : rAthena 633a642 Download : itemoption.txt Hope you find this useful itemoption.txt
 1 point
 -
Functor, are you okay? I don't know if Gepard Shield 3.0 is still alive. I need its service. Thank you. Please contact me, your internal message can't be sent. Discord can't add you either. I heard that you are in Ukraine, I don't know if you are safe, I sincerely wish the war will end soon, long live world peace!1 point
-
Ill forward this to him, hope it goes well to both of you.1 point
-
I'm planning not to upload it because I don't want it to spread and end up with resellers. But yes, someday I’d like to sell it if someone is interested. My intention is to make them custom, tailored to all tastes — it could be one based on Bio Labs or Thor Volcano, for example. If you're interested in the project, feel free to message me on Discord!1 point
-
great features, kinda reminds of diablo haha, will this be release to the public?1 point
-
Good day! Just want to share the script that i made so far, it's called city investment, this quest is from Kro. The quest is to hunt or to deliver things to npc. devided into 3 clases, A, B, C quest. and the quest will be randomly given every day at 4 am. each day only be able to do 1 quest delivery and 1 hunting boss quest. Hunting boss quest will be reset every wednesday 4 am, after you done quest, you will gain achievement point. the more you do quest your level of alliance will be increase, and you can do higher rank of delivery quest and get more token. The token can be trade to union gear. for full detail you can read it here City Investment & Union Gears [Hazy Forest] or watch my video . This script i made it based on playing Kro.1 point
-
Version 1.0.0
39 downloads
Original RO damage fonts are so low-res and blurry, so here's my HD font for the Hangul Damage Font Place the files inside data/sprite/이팩트/ folder in your GRF. Please note that your RO client needs to have the additional damage fonts feature. The font used is TDTD온명조Free1 point -
Edit: Drive link removed - msg me on discord Skylove Github mirror, download while its up I included the bodystyle fix diff. Msg me on discord for others. chainflex#5343 Help each other out and don't gatekeep or else the sellers win.1 point
-
Hi, I'm working on a ranking system inspired by League of Legends, and I decided to create these files to apply it to the players I'm new to editing this kind of stuff. I wish a professional could review it and give it a proper cleanup, but anyway, it doesn't seem too bad for now. How do use it: 1) Download League of Legends Rank File. 2) Put into your GRF. 3) Go to your hateffectinfo.lub (data/luafiles514/hateeffectinfo) 4) Search or something Similar. HAT_EF_NightSkyOfRutie = 225, 5) Put this: -- Ranks Lol Tag by Scanty -- HAT_IRON_RANK = 231, HAT_BRONCE_RANK = 232, HAT_PLATA_RANK = 233, HAT_ORO_RANK = 234, HAT_PLATINO_RANK = 235, HAT_ESMERALDA_RANK = 236, HAT_DIAMANTE_RANK = 237, HAT_MAESTRO_RANK = 238, HAT_GM_RANK = 239, HAT_RETADOR_RANK = 240, 6) Now, Search for [HatEFID.HAT_EF_NightSkyOfRutie] = { resourceFileName = "efst_NightSkyOfRutie\\christmasx3.str", hatEffectPos = -11, hatEffectPosX = -0.3, isRenderBeforeCharacter = true, isAdjustPositionWhenShrinkState = true, isAdjustSizeWhenShrinkState = true }, 7) After that --- Inician Rangos de Lol - By Scanty --- [HatEFID.HAT_IRON_RANK] = { resourceFileName = "custom\\rangos_lol\\iron_RANK.str",hatEffectPos = 6, isIgnoreRiding = false, isRenderBeforeCharacter = false, isAttachedHead = true, isAdjustPositionWhenShrinkState = true, isAdjustSizeWhenShrinkState = true}, [HatEFID.HAT_BRONCE_RANK] = { resourceFileName = "custom\\rangos_lol\\bronce_RANK.str",hatEffectPos = 6, isIgnoreRiding = false, isRenderBeforeCharacter = false, isAttachedHead = true, isAdjustPositionWhenShrinkState = true, isAdjustSizeWhenShrinkState = true}, [HatEFID.HAT_PLATA_RANK] = { resourceFileName = "custom\\rangos_lol\\plata_RANK.str",hatEffectPos = 6, isIgnoreRiding = false, isRenderBeforeCharacter = false, isAttachedHead = true, isAdjustPositionWhenShrinkState = true, isAdjustSizeWhenShrinkState = true}, [HatEFID.HAT_ORO_RANK] = { resourceFileName = "custom\\rangos_lol\\oro_RANK.str",hatEffectPos = 6, isIgnoreRiding = false, isRenderBeforeCharacter = false, isAttachedHead = true, isAdjustPositionWhenShrinkState = true, isAdjustSizeWhenShrinkState = true}, [HatEFID.HAT_PLATINO_RANK] = { resourceFileName = "custom\\rangos_lol\\platino_RANK.str",hatEffectPos = 6, isIgnoreRiding = false, isRenderBeforeCharacter = false, isAttachedHead = true, isAdjustPositionWhenShrinkState = true, isAdjustSizeWhenShrinkState = true}, [HatEFID.HAT_ESMERALDA_RANK] = { resourceFileName = "custom\\rangos_lol\\esmeralda_RANK.str",hatEffectPos = 6, isIgnoreRiding = false, isRenderBeforeCharacter = false, isAttachedHead = true, isAdjustPositionWhenShrinkState = true, isAdjustSizeWhenShrinkState = true}, [HatEFID.HAT_DIAMANTE_RANK] = { resourceFileName = "custom\\rangos_lol\\diamante_RANK.str",hatEffectPos = 6, isIgnoreRiding = false, isRenderBeforeCharacter = false, isAttachedHead = true, isAdjustPositionWhenShrinkState = true, isAdjustSizeWhenShrinkState = true}, [HatEFID.HAT_MAESTRO_RANK] = { resourceFileName = "custom\\rangos_lol\\maestro_RANK.str",hatEffectPos = 6, isIgnoreRiding = false, isRenderBeforeCharacter = false, isAttachedHead = true, isAdjustPositionWhenShrinkState = true, isAdjustSizeWhenShrinkState = true}, [HatEFID.HAT_GM_RANK] = { resourceFileName = "custom\\rangos_lol\\GM_RANK.str",hatEffectPos = 6, isIgnoreRiding = false, isRenderBeforeCharacter = false, isAttachedHead = true, isAdjustPositionWhenShrinkState = true, isAdjustSizeWhenShrinkState = true}, [HatEFID.HAT_RETADOR_RANK] = { resourceFileName = "custom\\rangos_lol\\Retador_RANK.str",hatEffectPos = 6, isIgnoreRiding = false, isRenderBeforeCharacter = false, isAttachedHead = true, isAdjustPositionWhenShrinkState = true, isAdjustSizeWhenShrinkState = true} 8 ) Create a script to test. you need to use this: hateffect 240, true; *hateffect(<Hat Effect ID>,<State>); This will set a Hat Effect onto the player. The state field allows you to enable (true) or disable (false) the effect on the player. The Hat Effect constants can be found in 'src/map/script_constants.hpp' starting with HAT_EF_*. Requires client 2015-05-13aRagEXE or newer. League of Legends Rank.rar
 1 point
 -
Hello rAthena Board, I saw that a lot of People were requesting iRO Daily Quest Scripts,so I started making them. I already finished 3 of them and I'm going to script the other 3 ,too if the rAthena users want me to. ALL CREDITS FOR THE QUEST IDEAS ARE GOING TO iRO! CREDITS FOR SCRIPTING THEM'RE GOING TO ME. DO NOT STEAL THIS WORK AND CLAIM IT AS YOURS!! Thank you for a really nice Server for testing the Scripts The Server Owner,knows that I mean him. Thank you for testing them! All the iRO Daily Quests here in 1 txt document Information about the Quests : http://www.ragnarok-guide.com/ragnarok-daily-quest/#.T4I_Qftzpz5 View the Script : // = ALL iRO DAILY QUESTS in this file,100 % Working // = MADE BY RIKIMARU on rAthena.org // = Profile Link : // = http://rathena.org/board/user/434-rikimaru/ // = ENJOY THIS SCRIPT! //=================================================================================== // //=====// /==/ /==/ /==/ // // // /==/ /==/ /=/ /==/ // //=====// /==/ /=/ /==============/ /========/ /==//===/ /==/ /==/ // //=////// /==/ /==//=/ /==/ /==/==/==/==/==/ / / / /==/ /==/ /==/ // // == /==/ /==//=/ /==/ /==/ /==/ /==/ ======/ / /==/ /==/ /==/ // // == /==/ /==/ /=/ /==/ /==/ /==/ /==/ / /===/ / /==/ /==/ /==/ // // == /==/ /==/ /=/ /==/ /==/ /==/ /==/ / /===/ / /==/ /==/=====/==/ // // == /==/ /==/ /=/ /==/ /==/ /==/ /==/ /========/ /==/ /==///////==/ // ================ rAthena Script ================================================== // ============== Information ======================================================= // = iRO Daily Quest : Alberta Cargo // = Made by : // = Rikimaru //===== Current Version: =============================================== //= 1.1 //===== Compatible With: =============================================== //= any rAthena SVN //===== Description: =================================================== //= The iRO Daily Quest : Alberta Cargo //= Usefull for having fun in a Server with a Mini Quest //= Has a counter of 24 Hours until the Players can do the Quest agian. //===== Additional Comments: =========================================== //= 1.0 Finished Scripting the Quest [Rikimaru] //= 1.1 Fixed a little Bug [Rikimaru] //====================================================================== //============== DO NOT REMOVE MY CREDITS AND CLAIM MY WORK AS YOURS === alberta,105,52,3 script [Quest] Port Manager 855,{ set .@npcname$,"^0000FF[ [Quest] Port Manager ]^000000"; if(gettimetick(2) - carfingor < (60 * 60 * 24)) { mes .@npcname$; mes "I'm sorry but you have to wait"; mes "24 Hours until you can do the Quest again!"; close; } if(qcargo6==1) { mes .@npcname$; mes "Congrats!"; getitem 501,20; getitem 502,5; getitem 503,10; getitem 504,10; getitem 505,10; getitem 608,1; set BaseExp,+1046821; set cquest,0; set carfingor,gettimetick(2); set qcargo6,0; close; } if(qcargo5==1) { mes .@npcname$; mes "Congrats!"; getitem 501,20; getitem 502,5; getitem 503,10; getitem 504,10; getitem 505,10; set BaseExp,+565471; set cquest,0; set carfingor,gettimetick(2); set qcargo5,0; close; } if(qcargo4==1) { mes .@npcname$; mes "Congrats!"; getitem 501,20; getitem 502,5; getitem 503,10; getitem 504,10; set BaseExp,+178601; set cquest,0; set carfingor,gettimetick(2); set qcargo4,0; close; } if(qcargo3==1) { mes .@npcname$; mes "Congrats!"; getitem 501,20; getitem 502,5; getitem 503,10; set BaseExp,+18293; set cquest,0; set carfingor,gettimetick(2); set qcargo3,0; close; } if(qcargo2==1) { mes .@npcname$; mes "Congrats!"; getitem 501,20; getitem 502,5; set BaseExp,+1642; set cquest,0; set carfingor,gettimetick(2); set qcargo2,0; close; } if(qcargo1==1) { mes .@npcname$; mes "Congrats!"; getitem 501,20; set BaseExp,+142; set cquest,0; set carfingor,gettimetick(2); set qcargo1,0; close; } if(BaseLevel >= 98) { mes .@npcname$; mes "Hello "+strcharinfo(0)+","; mes "do you want to accept the Job?"; next; switch(select("Yes,sure:No,sorry:Cancel")) { case 1: mes .@npcname$; mes "Awesome,find the Deadly Cargo [6]"; mes "and bring it to me,and you'll"; mes "get a reward."; next; mes .@npcname$; mes "The Deadly Cargo [6] is somewhere"; set cquest,1; mes "here in Alberta!"; close; case 2: mes .@npcname$; mes "Okay goodbye!"; close; case 3: close; } } if(BaseLevel >= 81 && BaseLevel <=97) { mes .@npcname$; mes "Hello "+strcharinfo(0)+","; mes "do you want to accept the Job?"; next; switch(select("Yes,sure:No,sorry:Cancel")) { case 1: mes .@npcname$; mes "Awesome,find the Deadly Cargo [5]"; mes "and bring it to me,and you'll"; mes "get a reward."; next; mes .@npcname$; mes "The Deadly Cargo [5] is somewhere"; set cquest,1; mes "here in Alberta!"; close; case 2: mes .@npcname$; mes "Okay goodbye!"; close; case 3: close; } } if(BaseLevel >= 61 && BaseLevel <=80) { mes .@npcname$; mes "Hello "+strcharinfo(0)+","; mes "do you want to accept the Job?"; next; switch(select("Yes,sure:No,sorry:Cancel")) { case 1: mes .@npcname$; mes "Awesome,find the Deadly Cargo [4]"; mes "and bring it to me,and you'll"; mes "get a reward."; next; mes .@npcname$; mes "The Deadly Cargo [4] is somewhere"; set cquest,1; mes "here in Alberta!"; close; case 2: mes .@npcname$; mes "Okay goodbye!"; close; case 3: close; } } if(BaseLevel >= 41 && BaseLevel <=60) { mes .@npcname$; mes "Hello "+strcharinfo(0)+","; mes "do you want to accept the Job?"; next; switch(select("Yes,sure:No,sorry:Cancel")) { case 1: mes .@npcname$; mes "Awesome,find the Deadly Cargo [3]"; mes "and bring it to me,and you'll"; mes "get a reward."; next; mes .@npcname$; mes "The Deadly Cargo [3] is somewhere"; set cquest,1; mes "here in Alberta!"; close; case 2: mes .@npcname$; mes "Okay goodbye!"; close; case 3: close; } } if(BaseLevel >= 21 && BaseLevel <=40) { mes .@npcname$; mes "Hello "+strcharinfo(0)+","; mes "do you want to accept the Job?"; next; switch(select("Yes,sure:No,sorry:Cancel")) { case 1: mes .@npcname$; mes "Awesome,find the Deadly Cargo [2]"; mes "and bring it to me,and you'll"; mes "get a reward."; next; mes .@npcname$; mes "The Deadly Cargo [2] is somewhere"; set cquest,1; mes "here in Alberta!"; close; case 2: mes .@npcname$; mes "Okay goodbye!"; close; case 3: close; } } if(BaseLevel >= 1 && BaseLevel <=20) { mes .@npcname$; mes "Hello "+strcharinfo(0)+","; mes "do you want to accept the Job?"; next; switch(select("Yes,sure:No,sorry:Cancel")) { case 1: mes .@npcname$; mes "Awesome,find the Deadly Cargo [1]"; mes "and bring it to me,and you'll"; mes "get a reward."; next; mes .@npcname$; mes "The Deadly Cargo [1] is somewhere"; set cquest,1; mes "here in Alberta!"; close; case 2: mes .@npcname$; mes "Okay goodbye!"; close; case 3: close; } } mes .@npcname$; mes "........"; close; } // ========================= End of the first NPC ================================================= alberta,186,174,3 script Deadly Cargo [1] 1191,{ set .@npcname$,"^FF0000[ Deadly Cargo [1] ]^000000"; if(cquest==1) { mes .@npcname$; mes "Go back to the Port Manager!"; set qcargo1,1; close; } mes .@npcname$; mes "........"; close; } alberta,232,103,3 script Deadly Cargo [2] 1191,{ set .@npcname$,"^FF0000[ Deadly Cargo [2] ]^000000"; if(cquest==1) { mes .@npcname$; mes "Go back to the Port Manager!"; set qcargo2,1; close; } mes .@npcname$; mes "........"; close; } alberta,247,90,3 script Deadly Cargo [3] 1191,{ set .@npcname$,"^FF0000[ Deadly Cargo [3] ]^000000"; if(cquest==1) { mes .@npcname$; mes "Go back to the Port Manager!"; set qcargo3,1; close; } mes .@npcname$; mes "........"; close; } alberta,247,67,3 script Deadly Cargo [4] 1191,{ set .@npcname$,"^FF0000[ Deadly Cargo [4] ]^000000"; if(cquest==1) { mes .@npcname$; mes "Go back to the Port Manager!"; set qcargo4,1; close; } mes .@npcname$; mes "........"; close; } alberta,245,43,3 script Deadly Cargo [5] 1191,{ set .@npcname$,"^FF0000[ Deadly Cargo [5] ]^000000"; if(cquest==1) { mes .@npcname$; mes "Go back to the Port Manager!"; set qcargo5,1; close; } mes .@npcname$; mes "........"; close; } alberta,123,227,3 script Deadly Cargo [6] 1191,{ set .@npcname$,"^FF0000[ Deadly Cargo [6] ]^000000"; if(cquest==1) { mes .@npcname$; mes "Go back to the Port Manager!"; set qcargo6,1; close; } mes .@npcname$; mes "........"; close; } // =============================== End of all the NPC's ========================================= // ====================== Have fun with this Script. Yours ~ Rikimaru =========================== // //=====// /==/ /==/ /==/ // // // /==/ /==/ /=/ /==/ // //=====// /==/ /=/ /==============/ /========/ /==//===/ /==/ /==/ // //=////// /==/ /==//=/ /==/ /==/==/==/==/==/ / / / /==/ /==/ /==/ // // == /==/ /==//=/ /==/ /==/ /==/ /==/ ======/ / /==/ /==/ /==/ // // == /==/ /==/ /=/ /==/ /==/ /==/ /==/ / /===/ / /==/ /==/ /==/ // // == /==/ /==/ /=/ /==/ /==/ /==/ /==/ / /===/ / /==/ /==/=====/==/ // // == /==/ /==/ /=/ /==/ /==/ /==/ /==/ /========/ /==/ /==///////==/ // ================ rAthena Script ================================================== // ============== Information ======================================================= // = iRO Daily Quest : Army Supply // = Made by : // = Rikimaru //===== Current Version: =============================================== //= 2.4 //===== Compatible With: =============================================== //= any rAthena SVN //===== Description: =================================================== //= The iRO Daily Quest : Army Supply //= Usefull for having fun in a Server with a Mini Quest //= Has a counter of 20 Hours until the Players can do the Quest agian. //===== Additional Comments: =========================================== //= 1.9 Fixed the Injured Recruit NPC [Rikimaru] //= 2.0 Added the NPC Display from Injured to Revived [Rikimaru] //= 2.1 Added the 2nd and 3rd Army Soldiers [Rikimaru] //= 2.2 Fixed a few Bugs in the NPC's [Rikimaru] //= 2.3 Added the 20 Hours Timer and fixed the Script Description [Rikimaru] //= 2.4 Fixed the 20 Hours Timer [Rikimaru] //====================================================================== //============== DO NOT REMOVE MY CREDITS AND CLAIM MY WORK AS YOURS === prontera,146,187,5 script [Quest] Army Officer 105,{ set .@npcname$,"^0000FF[ [Quest] Army Officer]^000000"; if(armyquest==1) { mes .@npcname$; mes "There are a few"; mes "Soldiers,waiting for"; mes "help in Morocc!"; next; mes .@npcname$; mes "From Baselevel 61-80 you"; mes "have to help the"; mes "Injured Recruit."; next; mes .@npcname$; mes "From Baselevel 81-97 you"; mes "have to help the"; mes "Injured Veteran"; next; mes .@npcname$; mes "From Baselevel 98 or higher"; mes "you'll have to help the Injured Elite"; next; mes .@npcname$; mes "Bring them White Potions"; mes "or bring them Yggdrasil"; mes "Berries. Thank you for"; mes "your Help!"; close; } if(BaseLevel >= 61) { mes .@npcname$; mes "Hello "+strcharinfo(0)+",I'm"; mes "the Army Officer!"; next; mes .@npcname$; mes "There are a few"; mes "Soldiers,waiting for"; mes "help in Morocc!"; next; mes .@npcname$; mes "From Baselevel 61-80 you"; mes "have to help the"; mes "Injured Recruit."; next; mes .@npcname$; mes "From Baselevel 81-97 you"; mes "have to help the"; mes "Injured Veteran"; next; mes .@npcname$; mes "From Baselevel 98 or higher"; mes "you'll have to help the Injured Elite"; next; mes .@npcname$; mes "Bring them White Potions"; mes "or bring them Yggdrasil"; mes "Berries. Thank you for"; mes "your Help!"; set armyquest,1; close; } mes .@npcname$; mes "Hello "+strcharinfo(0)+",get"; mes "a Higher Baselevel please."; mes "You have to be Baselevel"; mes "61 or Higher!"; close; } // ======================= End of 1st NPC ====================================== // ===================== other NPC's coming now ================================ morocc,172,68,5 script Injured Recruit 849,{ set .@npcname$,"^0000FF[ Injured Recruit ]^000000"; if(gettimetick(2) - helped1 < (60 * 60 * 20)) { mes .@npcname$; mes "Sorry but you have to wait"; mes "Until 20 Hours are over!"; close; } if(armyquest==1 && BaseLevel <= 80 && BaseLevel >= 61) { mes .@npcname$; mes "... Uggh ..."; mes "Help me ...."; mes "with some...."; mes "healing stuff. Please..."; next; switch(select("-Yggdrasil Berries:-White Potion:-Cancel")) { case 1: if(countitem(607) <1) goto l_noitem; delitem 607,1; next; mes .@npcname$; mes "Wooooow..."; setnpcdisplay("Injured Recruit","Revived Recruit",813); sleep2 5000; next; mes .@npcname$; mes "Thank you for the Help."; set BaseExp,+160000; set JobExp,+100000; set helped1,gettimetick(2); setnpcdisplay("Revived Recruit","Injured Recruit",849); close; case 2: if(countitem(504) <1) goto l_noitem; delitem 504,1; next; mes .@npcname$; mes "Wooooow..."; setnpcdisplay("Injured Recruit","Revived Recruit",813); sleep2 5000; next; mes .@npcname$; mes "Thank you for the Help."; set BaseExp,+80000; set JobExp,+50000; set helped1,gettimetick(2); setnpcdisplay("Revived Recruit","Injured Recruit",849); close; case 3: close; } l_noitem: mes .@npcname$; mes "You don't have the item...Get it fast please."; close; } mes .@npcname$; mes "... Uggh..."; close; } // ====================== End of 2nd NPC ====================================== // =================== Beginning of 3rd NPC =================================== morocc,174,68,5 script Injured Veteran 849,{ set .@npcname$,"^0000FF[ Injured Veteran ]^000000"; if(gettimetick(2) - helped2 < (60 * 60 * 20)) { mes .@npcname$; mes "Sorry but you have to wait"; mes "Until 20 Hours are over!"; close; } if(armyquest==1 && BaseLevel <= 97 && BaseLevel >= 81) { mes .@npcname$; mes "... Uggh ..."; mes "Help me ...."; mes "with some...."; mes "healing stuff. Please..."; next; switch(select("-Yggdrasil Berries:-White Potion:-Cancel")) { case 1: if(countitem(607) <1) goto l_noitem; delitem 607,1; next; mes .@npcname$; mes "Wooooow..."; setnpcdisplay("Injured Veteran","Revived Veteran",813); sleep2 5000; next; mes .@npcname$; mes "Thank you for the Help."; set BaseExp,+500000; set JobExp,+150000; set helped2,gettimetick(2); setnpcdisplay("Revived Veteran","Injured Veteran",849); close; case 2: if(countitem(504) <1) goto l_noitem; delitem 504,1; next; mes .@npcname$; mes "Wooooow..."; setnpcdisplay("Injured Veteran","Revived Veteran",813); sleep2 5000; next; mes .@npcname$; mes "Thank you for the Help."; set BaseExp,+200000; set JobExp,+80000; set helped2,gettimetick(2); setnpcdisplay("Revived Veteran","Injured Veteran",849); close; case 3: close; } l_noitem: mes .@npcname$; mes "You don't have the item...Get it fast please."; close; } mes .@npcname$; mes "... Uggh..."; close; } // ====================== End of 3rd NPC ====================================== // =================== Beginning of 4th NPC =================================== morocc,176,68,5 script Injured Elite 849,{ set .@npcname$,"^0000FF[ Injured Elite ]^000000"; if(gettimetick(2) - helped3 < (60 * 60 * 20)) { mes .@npcname$; mes "Sorry but you have to wait"; mes "Until 20 Hours are over!"; close; } if(armyquest==1 && BaseLevel <= 98) { mes .@npcname$; mes "... Uggh ..."; mes "Help me ...."; mes "with some...."; mes "healing stuff. Please..."; next; switch(select("-Yggdrasil Berries:-White Potion:-Cancel")) { case 1: if(countitem(607) <1) goto l_noitem; delitem 607,1; next; mes .@npcname$; mes "Wooooow..."; setnpcdisplay("Injured Elite","Revived Elite",813); sleep2 5000; next; mes .@npcname$; mes "Thank you for the Help."; set BaseExp,+1046821; set JobExp,+300000; set helped3,gettimetick(2); setnpcdisplay("Revived Elite","Injured Elite",849); close; case 2: if(countitem(504) <1) goto l_noitem; delitem 504,1; next; mes .@npcname$; mes "Wooooow..."; setnpcdisplay("Injured Elite","Revived Elite",813); sleep2 5000; next; mes .@npcname$; mes "Thank you for the Help."; set BaseExp,+200000; set JobExp,+80000; set helped3,gettimetick(2); setnpcdisplay("Revived Elite","Injured Elite",849); close; case 3: close; } l_noitem: mes .@npcname$; mes "You don't have the item...Get it fast please."; close; } mes .@npcname$; mes "... Uggh..."; close; } // =========================== End of 4th NPC Script ================================ // ====================== End of the whole Daily Quest ============================== // ================= Have fun with this Script. Yours Rikimaru ====================== // //=====// /==/ /==/ /==/ // // // /==/ /==/ /=/ /==/ // //=====// /==/ /=/ /==============/ /========/ /==//===/ /==/ /==/ // //=////// /==/ /==//=/ /==/ /==/==/==/==/==/ / / / /==/ /==/ /==/ // // == /==/ /==//=/ /==/ /==/ /==/ /==/ ======/ / /==/ /==/ /==/ // // == /==/ /==/ /=/ /==/ /==/ /==/ /==/ / /===/ / /==/ /==/ /==/ // // == /==/ /==/ /=/ /==/ /==/ /==/ /==/ / /===/ / /==/ /==/=====/==/ // // == /==/ /==/ /=/ /==/ /==/ /==/ /==/ /========/ /==/ /==///////==/ // ================ rAthena Script ================================================== // ============== Information ======================================================= // = iRO Daily Quest : Church Donation // = Made by : // = Rikimaru //===== Current Version: =============================================== //= 1.2 //===== Compatible With: =============================================== //= any rAthena SVN //===== Description: =================================================== //= The iRO Daily Quest : Church Donation //= Usefull for having fun in a Server with a Mini Quest //= Has a counter of 24 Hours until the Players can do the Quest agian. //===== Additional Comments: =========================================== //= 1.1 Finished adding the stats food effects. [Rikimaru] //= 1.2 Fixed a few Bugs in the Script [Rikimaru] //====================================================================== //============== DO NOT REMOVE MY CREDITS AND CLAIM MY WORK AS YOURS === prontera,165,191,3 script [Quest] Church Worker 790,{ set .@npcname$,"^0000FF[ [Quest] Church Worker ]^000000"; if(gettimetick(2) - donatedalready < (60 * 60 * 24)) { mes .@npcname$; mes "Sorry,but you have to wait 24 Hours,before you"; mes "can do the Quest again!"; close; } if(BaseLevel >= 60 && BaseLevel <= 80) { mes .@npcname$; mes "Hello "+strcharinfo(0)+",do"; mes "you want to get special"; mes "Buffs for 40.000 Zenny?"; next; switch(select("Yes,sure:No,bye:Cancel")) { case 1: mes .@npcname$; mes "Let me check everything."; if(Zeny < 40000) goto L_nozeny; set Zeny,Zeny - 40000; set BaseExp,+80000; set JobExp,+50000; sc_start SC_STRFood,180000,5; sc_start SC_AGIFood,180000,5; sc_start SC_VITFood,180000,5; sc_start SC_INTFood,180000,5; sc_start SC_DEXFood,180000,5; sc_start SC_LUKFood,180000,5; set donatedalready,gettimetick(2); next; mes .@npcname$; mes "Okay,thank you and have fun!"; close; } } if(BaseLevel >=81 && BaseLevel <=96) { mes .@npcname$; mes "Hello "+strcharinfo(0)+",do"; mes "you want to get special"; mes "Buffs for 80.000 Zenny?"; next; switch(select("Yes,sure:No,bye:Cancel")) { case 1: mes .@npcname$; mes "Let me check everything."; if(Zeny < 80000) goto L_nozeny; set Zeny,Zeny - 80000; set BaseExp,+200000; set JobExp,+60000; sc_start SC_STRFood,180000,6; sc_start SC_AGIFood,180000,6; sc_start SC_VITFood,180000,6; sc_start SC_INTFood,180000,6; sc_start SC_DEXFood,180000,6; sc_start SC_LUKFood,180000,6; set donatedalready,gettimetick(2); next; mes .@npcname$; mes "Okay,thank you and have fun!"; close; } } if(BaseLevel >=97 && BaseLevel <=99) { mes .@npcname$; mes "Hello "+strcharinfo(0)+",do"; mes "you want to get special"; mes "Buffs for 200.000 Zenny?"; next; switch(select("Yes,sure:No,bye:Cancel")) { case 1: mes .@npcname$; mes "Let me check everything."; if(Zeny < 200000) goto L_nozeny; set Zeny,Zeny - 200000; set BaseExp,+400000; set JobExp,+100000; sc_start SC_STRFood,180000,7; sc_start SC_AGIFood,180000,7; sc_start SC_VITFood,180000,7; sc_start SC_INTFood,180000,7; sc_start SC_DEXFood,180000,7; sc_start SC_LUKFood,180000,7; set donatedalready,gettimetick(2); next; mes .@npcname$; mes "Okay,thank you and have fun!"; close; } } mes .@npcname$; mes "Hello,you can use my Service,"; mes "when you're at least Baselevel 60"; close; L_nozeny: mes .@npcname$; mes "Sorry,but you need more Zeny!"; close; } // ==================================== End of the Scripts ======================================= // ============================= Have fun with the Scripts. Yours,Rikimaru ======================= // //=====// /==/ /==/ /==/ // // // /==/ /==/ /=/ /==/ // //=====// /==/ /=/ /==============/ /========/ /==//===/ /==/ /==/ // //=////// /==/ /==//=/ /==/ /==/==/==/==/==/ / / / /==/ /==/ /==/ // // == /==/ /==//=/ /==/ /==/ /==/ /==/ ======/ / /==/ /==/ /==/ // // == /==/ /==/ /=/ /==/ /==/ /==/ /==/ / /===/ / /==/ /==/ /==/ // // == /==/ /==/ /=/ /==/ /==/ /==/ /==/ / /===/ / /==/ /==/=====/==/ // // == /==/ /==/ /=/ /==/ /==/ /==/ /==/ /========/ /==/ /==///////==/ // ================ rAthena Script ================================================== // ============== Information ======================================================= // = iRO Daily Quest : No more Lonley Knights Delivery // = Made by : // = Rikimaru //===== Current Version: =============================================== //= 1.7 //===== Compatible With: =============================================== //= any rAthena SVN //===== Description: =================================================== //= The iRO Daily Quest : No more Lonley Knights Delivery //= Usefull for having fun in a Server with a Mini Quest //= Has a counter of 20 Hours until the Players can do the Quest agian. //===== Additional Comments: =========================================== //= 1.6 Finished Scripting all NPC's [Rikimaru] //= 1.7 Fixed a few mistakes in the Script [Rikimaru] //====================================================================== //============== DO NOT REMOVE MY CREDITS AND CLAIM MY WORK AS YOURS === alberta,122,55,5 script [Quest] Messenger Girl 862,{ set .@npcname$,"^0000FF[ [Quest] Messenger Girl ]^000000"; if(BaseLevel >= 81) { mes .@npcname$; mes "Hello "+strcharinfo(0)+",I"; mes "need your help."; next; mes .@npcname$; mes "Could you please send a "; mes "Message to Sir Grevious?"; mes "He's somewhere in"; mes "the Turtle Island"; next; switch(select("Yes:No:Cancel")) { case 1: mes .@npcname$; mes "Okay thank you!"; mes "go and find him."; set message5,1; close; case 2: mes .@npcname$; mes "Okay bye!"; close; case 3: close; } } if(BaseLevel <= 80 && BaseLevel >= 61) { mes .@npcname$; mes "Hello "+strcharinfo(0)+",I"; mes "need your help."; next; mes .@npcname$; mes "Could you please send a "; mes "Message to Sir Midetz?"; mes "He's somewhere in"; mes "Izlude."; next; switch(select("Yes:No:Cancel")) { case 1: mes .@npcname$; mes "Okay thank you!"; mes "go and find him."; set message4,1; close; case 2: mes .@npcname$; mes "Okay bye!"; close; case 3: close; } } if(BaseLevel <= 60 && BaseLevel >= 41) { mes .@npcname$; mes "Hello "+strcharinfo(0)+",I"; mes "need your help."; next; mes .@npcname$; mes "Could you please send a "; mes "Message to Sir Lion?"; mes "He's somewhere in"; mes "Prontera"; next; switch(select("Yes:No:Cancel")) { case 1: mes .@npcname$; mes "Okay thank you!"; mes "go and find him."; set message3,1; close; case 2: mes .@npcname$; mes "Okay bye!"; close; case 3: close; } } if(BaseLevel <= 40 && BaseLevel >= 21) { mes .@npcname$; mes "Hello "+strcharinfo(0)+",I"; mes "need your help."; next; mes .@npcname$; mes "Could you please send a "; mes "Message to Sir Richard?"; mes "He's somewhere in"; mes "the Treasure Land."; next; switch(select("Yes:No:Cancel")) { case 1: mes .@npcname$; mes "Okay thank you!"; mes "go and find him."; set message2,1; close; case 2: mes .@npcname$; mes "Okay bye!"; close; case 3: close; } } mes .@npcname$; mes "Hello "+strcharinfo(0)+",I"; mes "need your help."; next; mes .@npcname$; mes "Could you please send a "; mes "Message to Sir Donovan?"; mes "He's somewhere here"; mes "in Alberta."; next; switch(select("Yes:No:Cancel")) { case 1: mes .@npcname$; mes "Okay thank you!"; mes "go and find him."; set message1,1; close; case 2: mes .@npcname$; mes "Okay bye!"; close; case 3: close; } } // ======================== End of 1st NPC ============================================== // ==================== Other NPC's coming now ========================================== alberta,56,80,5 script Sir Donovan 65,{ set .@npcname$,"^0000FF[sir Donovan]^000000"; if(gettimetick(2) - sendm1 < (60 * 60 * 20)) { mes .@npcname$; mes "Sorry but you have to wait"; mes "Until 20 Hours are over!"; close; } if(message1==1) { mes .@npcname$; mes "You got a Message for me?"; mes "Thank you. Take the Exp!"; set BaseExp,+141; set JobExp,+100; set sendm1,gettimetick(2); close; } mes .@npcname$; mes "Hello..."; close; } // ================== End of the NPC ==================================================== alb2trea,62,69,5 script Sir Richard 65,{ set .@npcname$,"^0000FF[sir Richard]^000000"; if(gettimetick(2) - sendm2 < (60 * 60 * 20)) { mes .@npcname$; mes "Sorry but you have to wait"; mes "Until 20 Hours are over!"; close; } if(message2==1) { mes .@npcname$; mes "You got a Message for me?"; mes "Thank you. Take the Exp!"; set BaseExp,+1500; set JobExp,+1000; set sendm2,gettimetick(2); close; } mes .@npcname$; mes "Hello..."; close; } // ================== End of the NPC ==================================================== prontera,109,116,5 script Sir Lion 65,{ set .@npcname$,"^0000FF[sir Lion]^000000"; if(gettimetick(2) - sendm3 < (60 * 60 * 20)) { mes .@npcname$; mes "Sorry but you have to wait"; mes "Until 20 Hours are over!"; close; } if(message3==1) { mes .@npcname$; mes "You got a Message for me?"; mes "Thank you. Take the Exp!"; set BaseExp,+16509; set JobExp,+10000; set sendm3,gettimetick(2); close; } mes .@npcname$; mes "Hello..."; close; } // ================== End of the NPC ==================================================== izlude,123,173,5 script Sir Midetz 65,{ set .@npcname$,"^0000FF[sir Midetz]^000000"; if(gettimetick(2) - sendm4 < (60 * 60 * 20)) { mes .@npcname$; mes "Sorry but you have to wait"; mes "Until 20 Hours are over!"; close; } if(message4==1) { mes .@npcname$; mes "You got a Message for me?"; mes "Thank you. Take the Exp!"; set BaseExp,+160308; set JobExp,+100000; set sendm4,gettimetick(2); close; } mes .@npcname$; mes "Hello..."; close; } // ================== End of the NPC ==================================================== tur_dun01,188,118,5 script Sir Grevious 65,{ set .@npcname$,"^0000FF[sir Grevious]^000000"; if(gettimetick(2) - sendm5 < (60 * 60 * 20)) { mes .@npcname$; mes "Sorry but you have to wait"; mes "Until 20 Hours are over!"; close; } if(message5==1) { mes .@npcname$; mes "You got a Message for me?"; mes "Thank you. Take the Exp!"; set BaseExp,+500000; set JobExp,+150000; set sendm5,gettimetick(2); close; } mes .@npcname$; mes "Hello..."; close; } // ================== End of the NPC ==================================================== // =============== Have fun with this Script. Yours,Rikimaru ============================ // //=====// /==/ /==/ /==/ // // // /==/ /==/ /=/ /==/ // //=====// /==/ /=/ /==============/ /========/ /==//===/ /==/ /==/ // //=////// /==/ /==//=/ /==/ /==/==/==/==/==/ / / / /==/ /==/ /==/ // // == /==/ /==//=/ /==/ /==/ /==/ /==/ ======/ / /==/ /==/ /==/ // // == /==/ /==/ /=/ /==/ /==/ /==/ /==/ / /===/ / /==/ /==/ /==/ // // == /==/ /==/ /=/ /==/ /==/ /==/ /==/ / /===/ / /==/ /==/=====/==/ // // == /==/ /==/ /=/ /==/ /==/ /==/ /==/ /========/ /==/ /==///////==/ // ================ rAthena Script ================================================== // ============== Information ======================================================= // = iRO Daily Quest : Find my Lost Dogs // = Made by : // = Rikimaru //===== Current Version: =============================================== //= 1.4 //===== Compatible With: =============================================== //= any rAthena SVN //===== Description: =================================================== //= The iRO Daily Quest : Find my Lost Dogs //= Usefull for having fun in a Server with a Mini Quest //= Has a counter of 24 Hours until the Players can do the Quest agian. //===== Additional Comments: =========================================== //= 1.3 Finished Scripting all NPC's [Rikimaru] //= 1.4 Fixed a saved Variable Typo [Rikimaru] //====================================================================== //============== DO NOT REMOVE MY CREDITS AND CLAIM MY WORK AS YOURS === brasilis,298,307,3 script [Quest] Angelo 50,{ set .@npcname$,"^0000FF[ [Quest] Angelo ]^000000"; if(gettimetick(2) - puppyfound < (60 * 60 * 24)) { mes .@npcname$; mes "I'm sorry but you have to wait"; mes "24 Hours until you can do the Quest again!"; close; } if(Puppy1==1 && Puppy2==1 && Puppy3==1) { mes .@npcname$; mes "Awesome you found them!"; mes "Take some Exp as a reward."; set BaseExp,+50000; set JobExp,+50000; set puppyfound,gettimetick(2); set gofindpuppy,0; set Puppy1,0; set Puppy2,0; set Puppy3,0; next; mes .@npcname$; mes "Goodbye!"; close; } if(BaseLevel >= 70) { mes .@npcname$; mes "Oh God thank you!"; mes "Hello "+strcharinfo(0)+","; mes "I really need your help!"; next; mes .@npcname$; mes "My Puppies ran away."; mes "They're somewhere in"; mes "the field up here."; next; mes .@npcname$; mes "Could you please find"; mes "them for me?"; next; switch(select("Yes,sure:No,sorry:Cancel")) { case 1: mes .@npcname$; mes "Okay come back when you found them!"; set gofindpuppy,1; close; case 2: mes .@npcname$; mes "Okay bye!"; close; case 3: close; } } mes .@npcname$; mes "Get to Baselevel 70 to"; mes "Start my Quest!"; close; } // ====================== Now the Puppies are coming ================================== bra_fild01,110,135,5 script Puppy 1 81,{ set .@npcname$,"^0000FF[ Puppy 1 ]^000000"; if(gofindpuppy==1) { mes .@npcname$; mes "Woof... Woof..."; set Puppy1,1; mes "["+strcharinfo(0)+"]"; mes "Found one. Going back"; mes "to Angelo later "; next; mes "If you found the three"; mes "Puppies,then go"; mes "back to Angelo!"; close; } mes .@npcname$; mes "Woof...Woof..."; close; } bra_fild01,39,204,5 script Puppy 2 81,{ set .@npcname$,"^0000FF[ Puppy 2 ]^000000"; if(gofindpuppy==1) { mes .@npcname$; mes "Woof... Woof..."; set Puppy2,1; mes "["+strcharinfo(0)+"]"; mes "Found one. Going back"; mes "to Angelo later "; next; mes "If you found the three"; mes "Puppies,then go"; mes "back to Angelo!"; close; } mes .@npcname$; mes "Woof...Woof..."; close; } bra_fild01,307,147,3 script Puppy 3 81,{ set .@npcname$,"^0000FF[ Puppy 3 ]^000000"; if(gofindpuppy==1) { mes .@npcname$; mes "Woof... Woof..."; set Puppy3,1; mes "["+strcharinfo(0)+"]"; mes "Found one. Going back"; mes "to Angelo later "; next; mes "If you found the three"; mes "Puppies,then go"; mes "back to Angelo!"; close; } mes .@npcname$; mes "Woof...Woof..."; close; } // ========================== End of all the Scripts ========================================== // ===================== Have fun with the Scripts. Yours,Rikimaru ============================ // //=====// /==/ /==/ /==/ // // // /==/ /==/ /=/ /==/ // //=====// /==/ /=/ /==============/ /========/ /==//===/ /==/ /==/ // //=////// /==/ /==//=/ /==/ /==/==/==/==/==/ / / / /==/ /==/ /==/ // // == /==/ /==//=/ /==/ /==/ /==/ /==/ ======/ / /==/ /==/ /==/ // // == /==/ /==/ /=/ /==/ /==/ /==/ /==/ / /===/ / /==/ /==/ /==/ // // == /==/ /==/ /=/ /==/ /==/ /==/ /==/ / /===/ / /==/ /==/=====/==/ // // == /==/ /==/ /=/ /==/ /==/ /==/ /==/ /========/ /==/ /==///////==/ // ================ rAthena Script ================================================== // ============== Information ======================================================= // = iRO Daily Quest : Swab the Deck // = Made by : // = Rikimaru //===== Current Version: =============================================== //= 1.4 //===== Compatible With: =============================================== //= any rAthena SVN //===== Description: =================================================== //= The iRO Daily Quest : Swab the Deck //= Usefull for having fun in a Server with a Mini Quest //= Has a counter of 20 Hours until the Players can do the Quest agian. //===== Additional Comments: =========================================== //= 1.3 Finished Scripting all NPC's [Rikimaru] //= 1.4 Fixed a saved Variable Typo [Rikimaru] //====================================================================== //============== DO NOT REMOVE MY CREDITS AND CLAIM MY WORK AS YOURS === alberta,104,60,5 script [Quest] First Mate 748,{ //============================= Settings ========================== set .@npcname$,"[ [Quest] First Mate ]"; set .BeadID,6222; //======================= End ===================================== if(countitem(6221) > 0 && gettimetick(2) - exchangedalready > (60 * 60 * 20)) { mes .@npcname$; mes "Hey,how many Mystic Leaf Cat Balls"; mes "do you want to exchange to Shiny Beads?"; next; mes .@npcname$; mes "Input the Amount of the Mystic Leaf Cat Balls,which you want to exchange."; mes "If you input 0 , you're going to cancel the deal."; next; input @beadamount; if (@beadamount == 0) { close; } mes .@npcname$; mes "Do you really want to exchange"; mes ":"+ @beadamount +" Mystic Leaf Cat Balls"; mes "for "+ @beadamount +" Shiny Beads?"; next; switch(select("Yes!:No!")) { case 1: mes .@npcname$; mes "Okay converting... ... ..."; if(countitem(6221) < @beadamount) goto l_noitem; delitem 6221,@beadamount; getitem .BeadID,@beadamount; set BaseExp,+50000000;// CHANGE THE EXP AMOUNT!! set JobExp,+40000000;// CHANGE THE EXP AMOUNT!! set exchangedalready,gettimetick(2); next; mes .@npcname$; mes "Okay you can exchange the Shiny Beads at the Second Mate."; close; case 2: mes .@npcname$; mes "Okay goodbye!"; close; } l_noitem: mes .@npcname$; mes "I'm sorry,but you're missing some items!"; close; } mes .@npcname$; mes "Hey , do you want to do the Daily Quest?"; next; switch(select("Yes,sure!:No,bye!:Cancel")) { case 1: mes .@npcname$; mes "Okay you have to go to the alberta Ship"; mes "and enter one of the Portals and Catch A rat!"; next; mes .@npcname$; mes "If you catch it,you'll get a Mystic Cat Ball,"; mes "if you got it,come back to me,if you failed,"; mes "come back to me and get a new Cat Ball,to"; mes "catch the rats!"; next; mes .@npcname$; mes "So,here take this,"; mes "and come back when you finished."; getitem 12408,1; close; case 2: mes .@npcname$; mes "Okay,goodbye!"; close; case 3: close; } } // ============================ End of the First Mate Script =================================== alberta,107,59,5 script [Quest] Second Mate 100,{ set .@npcname$,"^0000FF[ [Quest] Second Mate ]^000000"; set .BeadID,6222; setarray @ItemID[0],5170,5773,5691,505,5578,5692; setarray @Cost[0],50,50,50,1,30,50; setarray @itemcount[0],1,1,1,2,1,1; mes .@npcname$; mes "Hello ["+strcharinfo(0)+"],do"; mes "you want to buy some items?"; mes "You'll have to give me Shiny"; mes "Beads for the Items!"; next; if (select("Yes,sure","No,nevermind!") == 2) close; next; mes .@npcname$; mes "Item = Cost"; for( set .@i, 0; .@i < getarraysize(@ItemID); set .@i, .@i + 1 ) { mes "^0000ff"+@itemcount[.@i]+"x "+getitemname(@ItemID[.@i])+"^000000 = ^00aa00"+@Cost[.@i]+"^000000"; if( .@i < 1 ) set .@menu$, getitemname(@ItemID[.@i]); else set .@menu$, .@menu$+":"+getitemname(@ItemID[.@i]); } next; select(.@menu$); set @choice, @menu - 1; mes @npcname$; if(countitem(.BeadID) <@Cost[@choice]) { mes "You need more Shiny Beads for "+@itemcount[@choice]+"x '"+getitemname(@ItemID[@choice])+"'"; close; } mes "Are u realy sure to trade "+@itemcount[@choice]+"x '^ff0000"+getitemname(@ItemID[@choice])+"^000000' for ^00aa00"+@Cost[@choice]+"^000000 Shiny Beads?"; if(select("No! Cancel!:Yes, Trade me!") == 1 ) { mes "Canceled the Trade"; close; } set .@new, .BeadID - @Cost[@choice]; if( .@new < 0 ) set .@new, 0; delitem .BeadID,@Cost[@choice]; getitem @ItemID[@choice], @itemcount[@choice]; mes "The Trade was succesfull. Have fun with the Item!"; close; } Download to all Quests : http://www.mediafire.com/?zwisgfnj0xx0yap I hope that a lot of people stop making topics now,where they request theese Quests. and remember to say thanks!1 point
-
View File HanzoBR Free Thor Skin Blue About this file - EN Made for a friend who ended up not using it, so I'm making it available to the community. This Skin has features of WoE Status (On/Off), Server Status (On/Off), Real + Fake Player Count. Please Selling this product is TOTALLY PROHIBITED! Contents Thor Patcher PSD Included - Modify as you wish. WebFiles View - Online Players, Server Status Map, WoE Status - HanzoBR WebFiles Configuration - Server Connection, Server Status and Online Players - Credit @Lawliet - Thanks for this Web Configuration In the Web/status/inc/config.php directory, configure: $Srv_Host = "127.0.0.1"; // Change to your database IP $Srv_Database = "ragnarok"; // Name of your database $Srv_Username = "ragnarok"; // Username $Srv_Password = "ragnarok"; // Password In the Web/status/playeronline.php directory you will find: $playerCount = PlayerCount(); $number = 0; // number of fake users - used only to configure space for the hundreds place in the view or not. // Add the $number to the result of the PlayerCount() function $result = $playerCount + $number; In $number = 0; you can change the value to 50 for example and the user will see $number + $playerCount Assuming you have 15 real players online, the $result will show 65 Players Online (50+15). I created this configuration to measure the space for the hundreds place in the view, so as not to cut the design, however use this function as you wish. In the Web/status/woestatus.php directory you will find: $now = new DateTime("now", new DateTimeZone("America/Sao_Paulo")); Set your Time Zone, find yours in Time Zone PHP, currently it is set to São Paulo-Brazil time Days configuration $allowedDays = [0, 2, 4]; // 0-Sunday, 2-Tuesday, 4-Thursday, In $allowedDays = [0, 2, 4]; - It means that WoE is enabled for 0 = Sunday, 2 = Tuesday, 4 = Thursday "0=Sunday, 1=Monday, 2=Tuesday, 3=Wednesday, 4=Thursday, 5=Friday, 6=Saturday" Hours configuration if (($day == 4 && $hour == 21 && $minute >= 0 && $minute < 60) || (in_array($day, [0, 2]) && $hour == 20 && $minute >= 0 && $minute < 60)) In (($day == 4 && $hour == 21 && $minute >= 0 && $minute < 60) - It means that on day 4 (Thursday) WoE will start at 9:00 pm and will last 60 minutes. And if you have WoE configured for different times, you can configure it without any problem; In (in_array($day, [0, 2]) && $hour == 20 && $minute >= 0 && $minute < 60) - It means that on days 0 (Sunday) and 2 (Tuesday) WoE will start at 8:00 pm and will last 60 minutes. Don't forget to if you liked this. ----------------------------------------------------------------------------------------------------------------------------- Sobre este arquivo PT-BR Feito para um amigo que acabou não utilizando, então estou disponibilizando para comunidade. Esta Skin tem recursos de Status WoE (On/Off), Status Server (On/Off), Contagem de Players reais + fake. Por Favor Venda deste produto está TOTALMENTE PROIBIDA! Conteúdo Thor Patcher PSD Incluso - Modifique como quiser. WebFiles Visualização - Players Online, Status Map Server, WoE Status - HanzoBR WebFiles Configuração - Conexão com servidor, Server Status e Players Online - Crédito @Lawliet - Obrigado pro isso Configuração Web No diretório Web/status/inc/config.php faça a configuração: $Srv_Host = "127.0.0.1"; // Alterar para IP do seu database $Srv_Database = "ragnarok"; // Nome da sua database $Srv_Username = "ragnarok"; // Usuário de acesso $Srv_Password = "ragnarok"; // Senha de acesso No diretório Web/status/playeronline.php você encontrará: $playerCount = PlayerCount(); $numero = 0; // número de usuários fake - utilizado apenas para configuração de espaço para casa de centena na visualização ou não. // Soma o $número ao resultado da função PlayerCount() $resultado = $playerCount + $numero; Em $numero = 0; você pode alterar o valor para 50 por exemplo e irá aparecer para o usuário o $numero + $playerCount Supondo que você tenha 15 players reais online o $resultado irá mostrar 65 Players Online (50+15), eu criei esta configuração para medir o espaço da casa de centena na visualização, para não cortar o design, no entanto use como quiser esta função. No diretório Web/status/woestatus.php você encontrará: $now = new DateTime("now", new DateTimeZone("America/Sao_Paulo")); Configure seu Time Zone, encontre o seu em Time Zone PHP, atualmente está configurado para horário de São Paulo-Brasil Configuração de dias $allowedDays = [0, 2, 4]; // 0-Domingo, 2-Terça-feira, 4-Quinta-feira, Em $allowedDays = [0, 2, 4]; - Significa que a WoE está habilitada para 0 = Domingo, 2 = Terça-Feira, 4 = Quinta-Feira "0=Domingo, 1=Segunda-Feira, 2=Terça-feira, 3=Quarta-Feira, 4=Quinta-feira, 5=Sexta-Feira, 6=Sábado" Configuração de horas if (($day == 4 && $hour == 21 && $minute >= 0 && $minute < 60) || (in_array($day, [0, 2]) && $hour == 20 && $minute >= 0 && $minute < 60)) Em (($day == 4 && $hour == 21 && $minute >= 0 && $minute < 60) - Significa que no dia 4 (Quinta-Feira) a WoE começará às 21:00hrs e terá duração de 60 minutos. E caso você tenha WoE configurada em horários diferentes, poderá configurar sem problema; Em (in_array($day, [0, 2]) && $hour == 20 && $minute >= 0 && $minute < 60) - Significa que nos dias 0 (Domingo) e 2 (Terça-Feira) a WoE comecará às 20:00hrs e terá duração de 60 minutos. Não se esqueça de se você gostou disso. Submitter hanzobr Submitted 03/05/25 Category Patchers Video Content Author HanzoBR1 point
-
Looking at your gravity-esc maps is always a pleasure. please continue to grow the world of RO for us with all those immersive maps. Can't wait to include them into my server!1 point
-

Version 1.0.0
242 downloads
Don't worry. Be Happy s2s2s2Free1 point -
Finally, I somehow find this root cause: You need to check your grf files (in order defined in DATA.INI), and usually, it will appears in below path: `data > luafiles514 > lua files > datainfo > titletable.lub` Bonus: CLS = Custom Lua Support
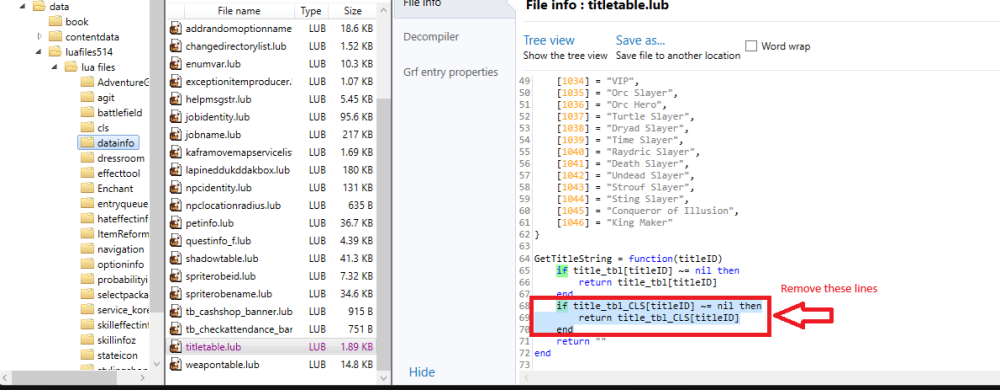 1 point
 -
It's been a while since my initial release of those descriptions, and a lot of things need to be changed. A few mistakes here and there, but also plenty of mechanics changed on rAthena whose descriptions need to match that. Yes, I'm looking at you, Enchant Deadly Poison. Let's not drag this too long, yeah? Here's some patch notes: Typos fixed on the following skills: Shield Chain, Cart Boost, Cart Termination, Watery Evasion/Suiton Updated Cart Boost to account for the new interaction between this skill and Please Don't Forget Me(it no longer cancels the effect) Weaponry Research: Includes information about the Hidden Bonus(battle.cpp, line 3269) Raid: The debuff only applies in Renewal Venom Splasher: The timer information was completely wrong. Corrected and now also includes cooldown, additional information added on comments Jupitel Thunder: Was missing any information regarding damage Explosion Spirits/Critical Explosion: Corrected information, the SP recovery is disabled, not halved Blitz Beat: Corrected damage on information, improved wording Head Crush: Corrected ambiguous information about bleeding Shield Boomerang: Information about damage calculation Shield Chain: Massively expanded on the information and comments, including comparisons between this skill and Shield Boomerang Dispel: Clarification on the fact that MDEF reducing the chance is a myth that never existed Land Mine: Damage information completely wrong, fixed now including Mercenary version Freezing Trap: Added information on damage and scaling Blast Mine: Damage informationm missing, durations wrong too, fixed now Claymore Trap: Damage information missing, fixed now Gravitation Field: Included information about the secret property of the skill, where damage ticks count as auto attacks Throw Zeny: Accurate information about reduction versus players and bosses Final Strike: Added a a note, pointing out that Hercules uses a stronger formula for the skill Grand Cross: Greatly improved description Throw Kunai: Changed to reflect changes on rAthena(no longer misses, pseudo elemental) Throw Shuriken: Same as above(even more nerfed than kunais, why did you guys ever do this?) Steal: Massively improved description with more information and insight on High DEX/Low DEX Envenom: Improved damage descriptions Left/Right Hand Mastery: Recent information about the skill's inner workings Enchant Deadly Poison: Updated to the latest details of the skill, post the recent rework Next update I'll include the monster skills that were requested. I'd also like to expand upon this by adding quick reference pages in-game, containing information such as Status Effects, monster skills, etc. I updated the first post to have the latest version, but I'll leave it here as well just in case. skilldescript.lub
 1 point
 -
Original idea - Alice Hello, community! I'm glad to show you one of the locations that I've been working on since the beginning of the year! The task was ambitious, 3D modeling was applied, a lot of time was spent on correcting the overall look but it totally worthed it. .•°'°•.•°'°•.•°'°•.•°'°•.•°'°•.•°'°•.•°'°•.•°'°•.•°'°•.•°'°•.•°'°•.•°'°•.•°'°•.•°'°•.•°'°•.•°'°•.•°'°•.•°'°•.•°'°•.•°'°•.•°'°•.•°'°•.•°'°•.•°'°•.•°'°•.•°'°•.•°'°•. crimea Please rate it if the map is good enough ~~ This map can be downloaded here https://rathena.org/board/files/file/4487-w0w_map_collection/
 1 point
 -
case MO_BODYRELOCATION: if(sc && (sc->getSCE(SC_SPIDERWEB) || sc->getSCE(SC_ANKLE))) break; if (unit_movepos(src, x, y, 2, 1)) { Hello. Solved it! Thanks @pajodex @Katakuri1 point
-
Just sharing my max guild capacity by 20 /src/common/mmo.h : From #define MAX_GUILD 16+10*6 to #define MAX_GUILD 10+10*1 // increased max guild members +6 per 1 extension levels [Lupus] and /src/char/int_guild.c : From g->max_member = 16 + guild_checkskill(g, GD_EXTENSION) * 6; to g->max_member = 10 + guild_checkskill(g, GD_EXTENSION) * 1;
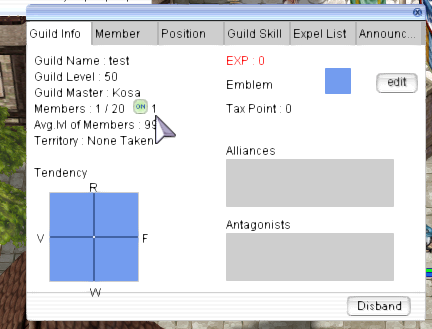 1 point
 -
Heya, The issue is from your char-server. "intif" is for "interserver" and "interface", intif_parse_StorageReceived (which is for all storages, including inventory, etc) is a packet the char-server sends to the map-server, type 3 is TABLE_STORAGE. Long story short, it means it failed to load the storage data for your character. The char-server logs should give you more information about the issue, though. The... fact that you aren't seeing more information is strange. It's not an invalid storage index as you'd get an error such as "Invalid storage with id #". So this only leaves an invalid SQL query. Your storage table doesn't seem to match what the char-server is expecting. Make sure your storage table matches with what rAthena is using. You should have received an SQL error, though.1 point
-

Version 1.0.1
209 downloads
// ========================================================= // World Boss System, scripted by Akkarin // ========================================================= // In this script's original state, a "World Boss" will // spawn in a random location after 10,000 monster kills // every 4 minutes past the hour. // // This script imitates the old World Boss mechanic from an // MMO called TERA. // // The location and MVP are selected at random from arrays. // =========================================================2.00 USD1 point -
You know, I just could not take and not make the full version of the map ja_yavin01 released earlier. So look and be surprised .•°'°•.•°'°•.•°'°•.•°'°•.•°'°•.•°'°•.•°'°•.•°'°•.•°'°•.•°'°•.•°'°•.•°'°•.•°'°•.•°'°•.•°'°•.•°'°•.•°'°•.•°'°•.•°'°•.•°'°•.•°'°•.•°'°•.•°'°•.•°'°•.•°'°•.•°'°•.•°'°•. yavin1b Please rate it if the map is good enough ~~ This map can be downloaded here https://rathena.org/board/files/file/4487-w0w_map_collection/1 point
-
the ROLSG is a simple tool yet effective when you don't have an internet connection. Probably when you're editing on offline or no connection. So +1 to this.1 point