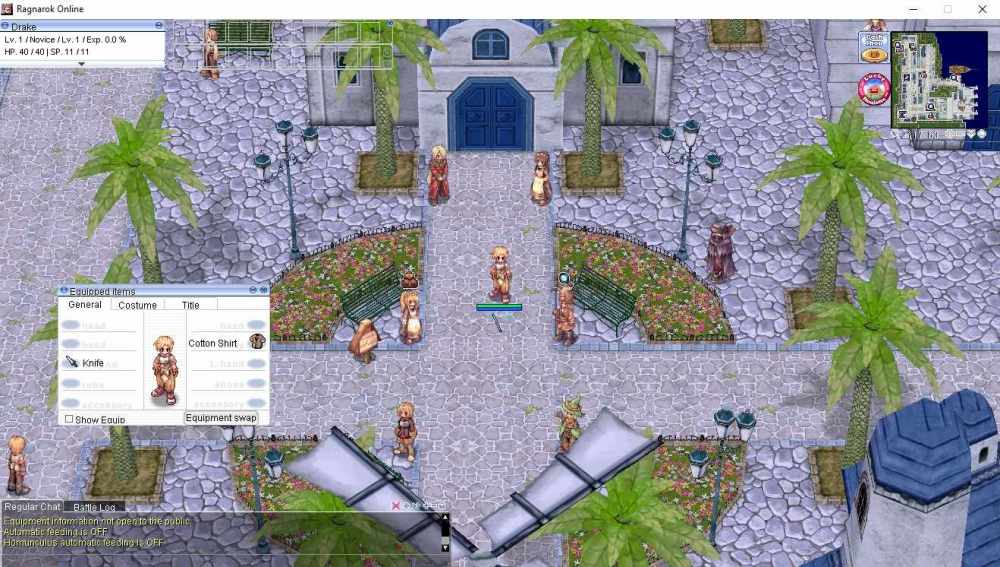
Leaderboard


Popular Content
Showing content with the highest reputation on 06/21/20 in all areas
-
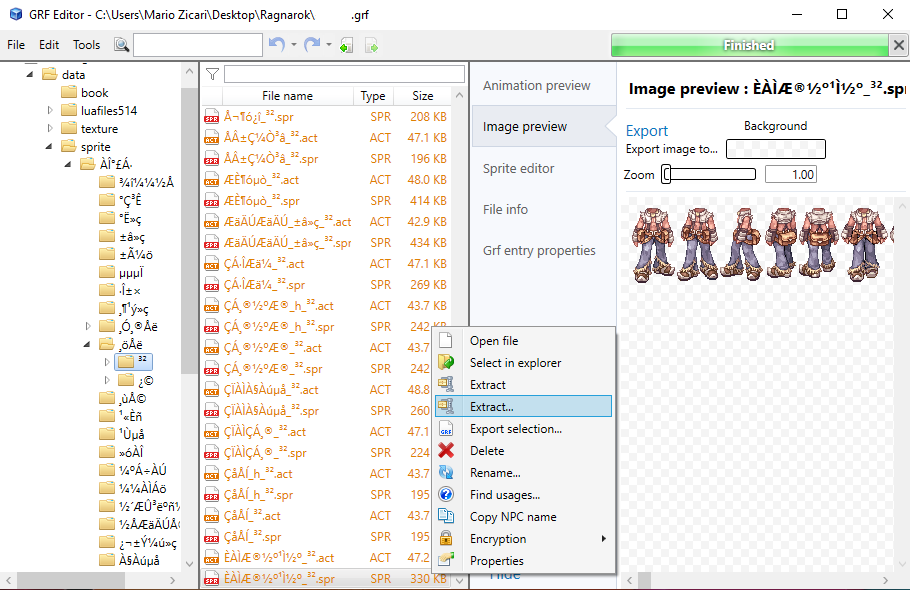
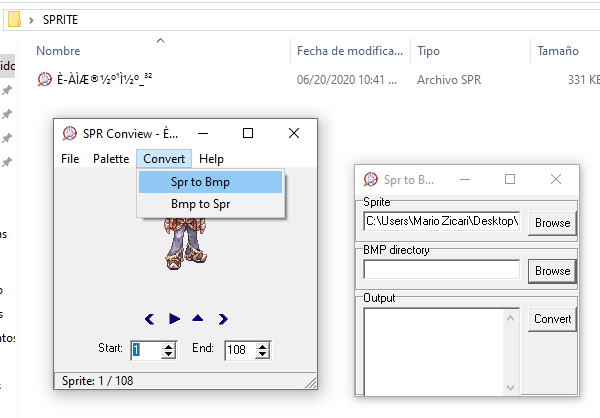
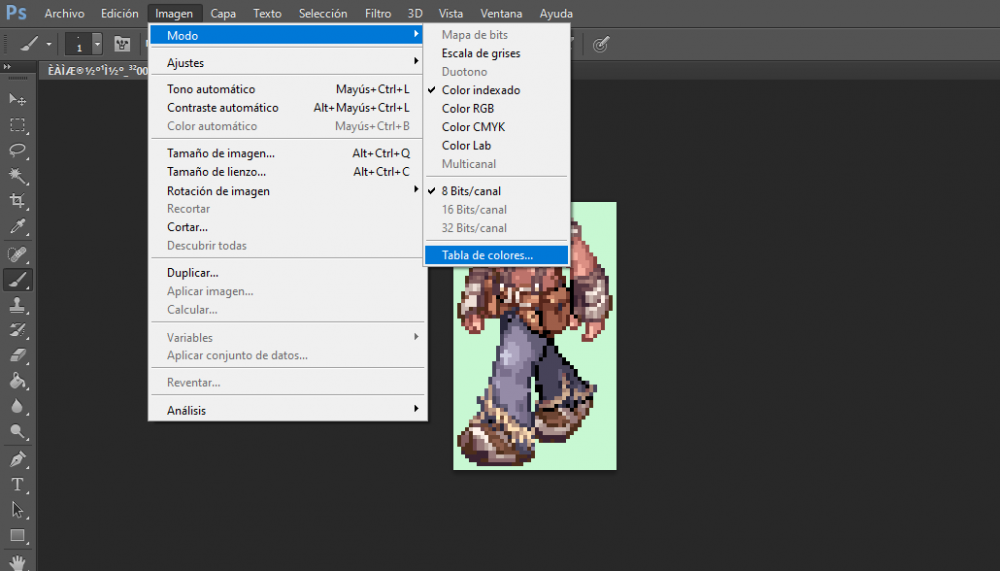
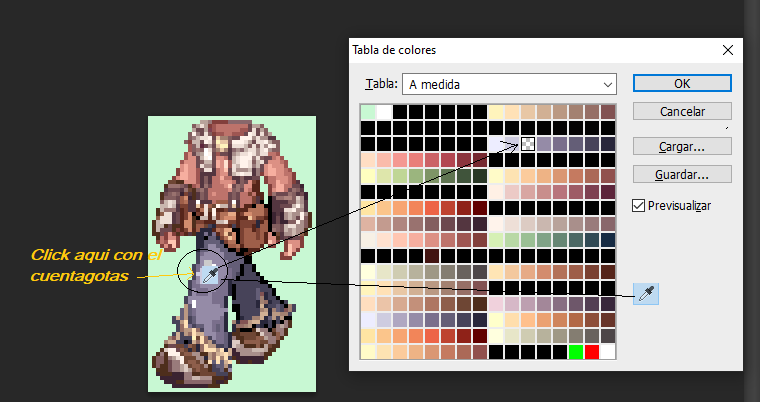
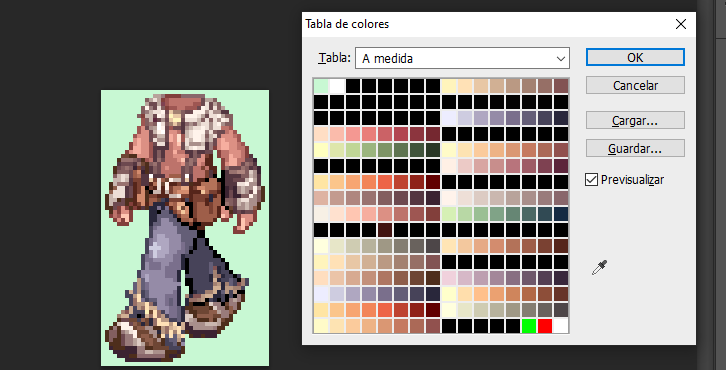
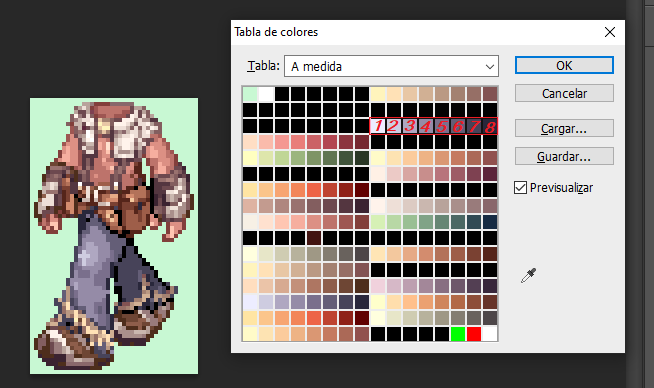
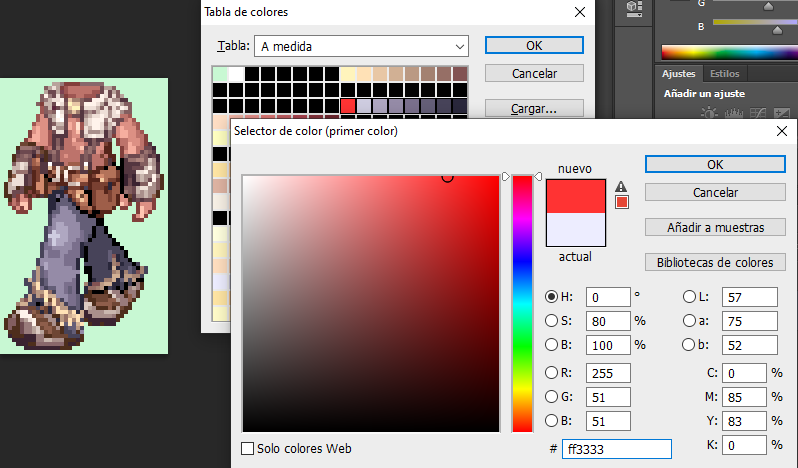
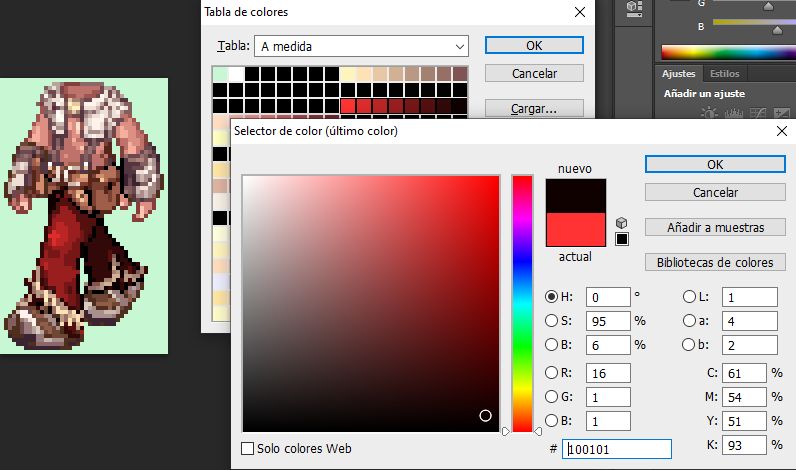
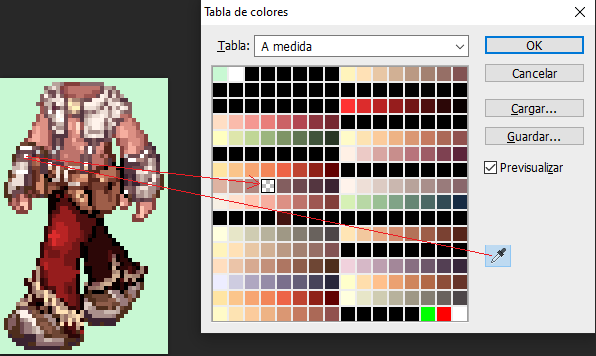
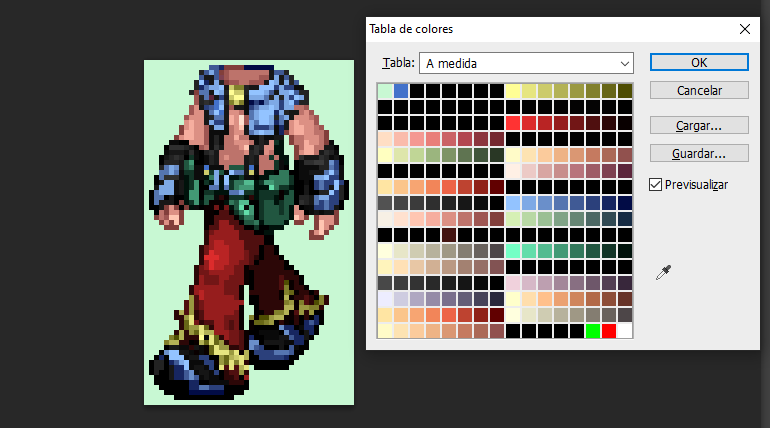
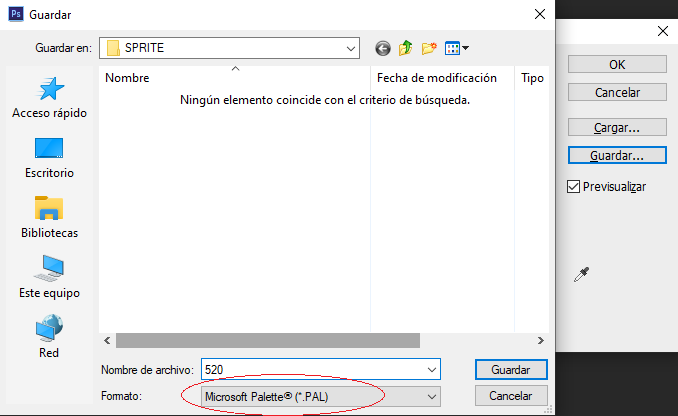
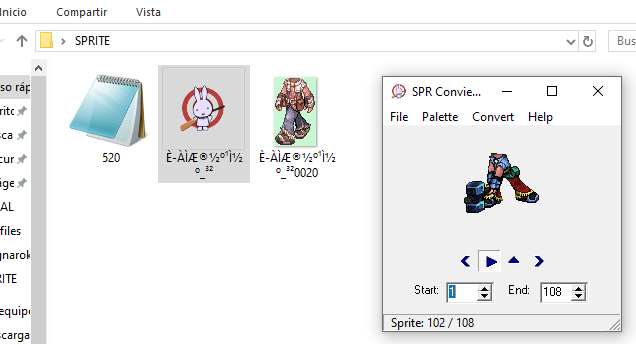
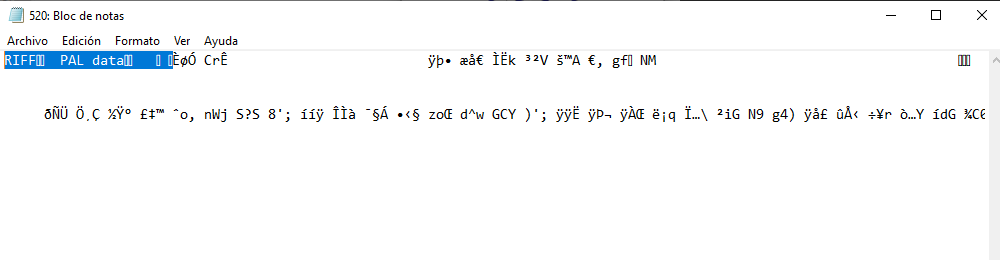
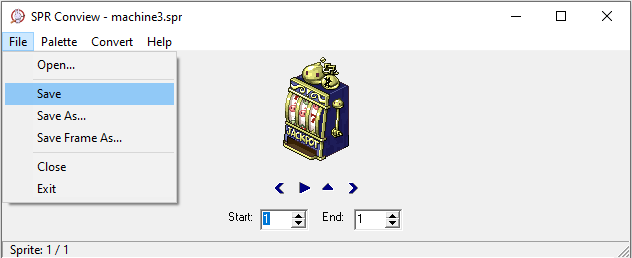
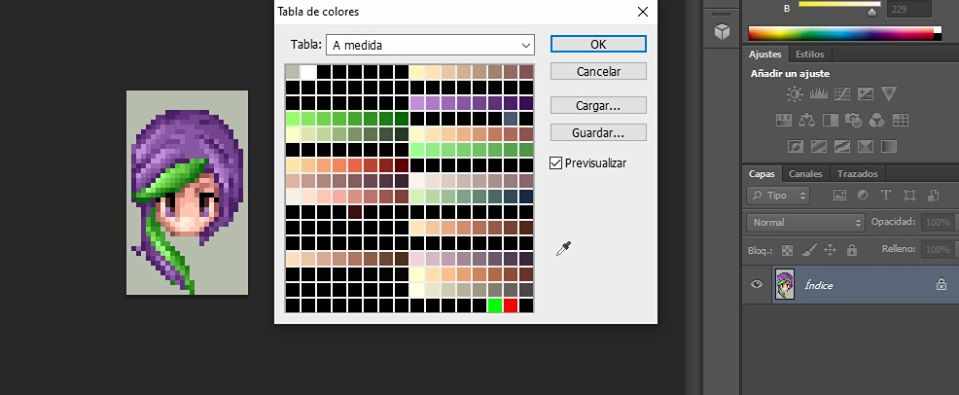
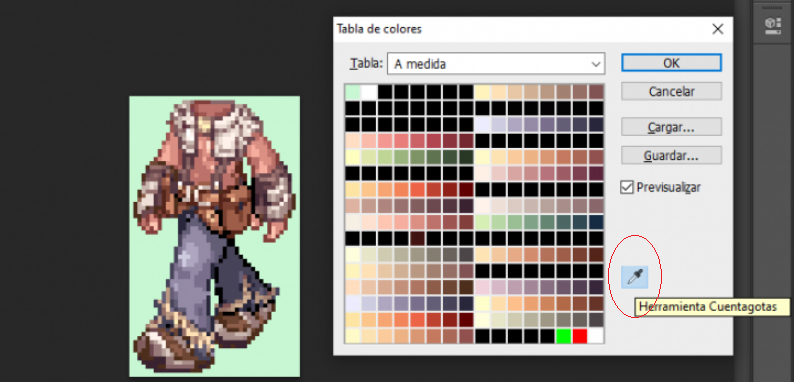
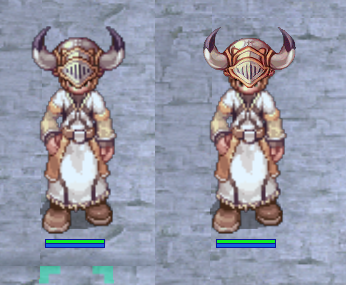
- Necesitaremos el GRF EDITOR para extraer del GRF el sprite que queramos modificar - Extraemos unicamente el SPR del objeto a editar, Aislaremos nuestro SPRITE en una carpeta, lo rompemos (extraemos todos los bitmaps) con el programa SPRCONVIEW, para hacer esto tenemos que darle a la opción convert Spr to Bmp. En el primer boton Browse que muestra la imagen, eliges el sprite que descargaste y le das a convert. las imagenes que se van a extraer de este sprite van a ir a parar en la misma carpeta donde esta ubicado el sprite, por lo que no elegimos BMP directory. Se recomienda tener el sprite aislado en una carpeta nueva.... no queras llenar tu escritorio con mas de 100 iconos de bitmaps ? Elegimos nuestra imagen Modelo, Preferiblemente una donde se vean todas las cualidades del objeto que vamos a RECOLOREAR, ELIMINAMOS EL RESTO El BITMAP elegido lo debemos abrir con el programa ADOBE CS6, Yo uso el portable Una vez abierto el Adobe CS6. Nos vamos a la parte que dice Archivo, y le damos a Abrir, ahí elegimos el bitmap que habíamos seleccionado, y una vez abierto nos vamos a la barra superior y elegimos imagen, Luego Modo, y por ultimo TABLA DE COLORES Cuando se Abre la Tabla de Colores Elegimos la Cuenta Gotas, le Damos un solo Click Buscamos la Porción de color que querramos editar! Y le damos SOLAMETE UN CLICK con el cuentagotas, Esto nos indicara de que cuadrante de la paleta procede el color que elegimos. YO CLICKIE EL PANTALON DEL WHITESMITH PARA SABER DONDE ESTABAN ESOS COLORES MUY IMPORTANTE A LA HORA DE EDITAR PALETAS, Es que no podemos editar lo que nos de la gana, NO PODEMOS ELEGIR UN SOLO CUADRITO! Tienes que elegir los 8 Cuadros de la regla donde se descubrió el color que acabas de clickear con el cuentagotas, PARA SELECCIAR LOS COLORES DEBES VOLVER A CLICKEAR EN EL CUENTAGOTAS PARA DESACTIVAR LA HERRAMIENTA. SI TE FIJAS EN LA IMAGEN AL VOLVER A CLICKEAR EL CUENTAGOTAS YA NO ESTARA EN HILIGHT! y ya con esto puedes seleccionar la rama de colores que descubriste Seleccionamos la regla de colores que habíamos descubierto, SIEMPRE TIENES QUE ELEGIRLA desde el Extremo Izquierdo hasta el Derecho, MANTENIENDO PRESIONADO EL CLICK Y ARRASTRANDO EL CURSOR A LO LARGO DE ESOS 8 BITS.. ASEGURARTE DE SELECCIONAR UNICAMENTE ESOS 8 DONDE DESCUBRISTE EL COLOR CON EL CUENTAGOTAS, No puedes pasarte porque editarias otra porcion del dibujo que no quisieras. CUANDO LO TIENES SELECCIONADO SUELTA EL CLICK DEL MOUSE Y SALDRA LA PANTALLA DE EDICIÓN DE COLORES ELIGES EL PRIMER COLOR Y LE DAS OK CUANTO ELIGES EL PRIMER COLOR, SE ABRIRÁ EL SELECTOR DEL ULTIMO COLOR, Cuando vas seleccionando el ultimo color vas a ir viendo como va cambiando el color de regla que elegiste... Lo que conseguimos con haber seleccionado los 8bits de la regla del color es un efecto mate que se ira aplicando en el color que descubrimos con el cuentagotas. La clave de un buen paletaje es Elegir Un primer color claro, y un ultimo color oscuro. Pero tu podrás hacerlo como mas te guste. Volvemos a utilizar nuestro cuentagotas para ver que mas podemos encontrar, esta vez seleccione los guantes del Whitesmith y descubri la regla de colores del Guante Repetiré el paso anterior, Desmarcare el gotero, Luego elegiré los 8 bits de la regla de colores donde encontré el color del guante! Usare un gris claro como primer color y un negro oscuro como ultimo color, para ver que me resulta. Descubrí que esta regla no solo abarca los guantes, si no que también comparte el color de los sujetadores de la camisa de nuestro Withesmith, y aquí es donde hago valido lo que dije anteriormente, QUE NO PODEMOS EDITAR LO QUE NOS DE LA GANA A VOLUNTAD. Solo podemos cambiar el matiz de la regla de colores. Tras experimentar mas con el gotero, encontramos varias reglas de colores que pudimos editar en nuestro whitesmith y este es el resultado final, Felicidades pues poseemos un color que ni el mismo Kamishi y su popular pack de paletas ha hecho. Le damos a guardar, y lo guardamos como MICROSOFT PAL Ya tenemos nuestro Archivo PAL, Para visualizarlo deberemos abrir el SPRITE! ojo el spr no el bitmap. Y en la pestaña Palette ponemos OPEN PALETE y seleccionamos la que recien guardamos. Podras ver el objeto en accion con la nueva gama de colores que le aplicaste Ese archivo pal puedes enviarlo al grf donde tenga las palettes siempre y cuando utilizes el nombre correspondiente de job, y el numero de paleta en la cual quieres que se muestre ese color. Debo aclarar que para que esas paletas se muestren correctamente en el cliente deberás abrir el archivo y remover la firma, ESTO APLICA UNICAMENTE PARA PALETAS DE COLOR DE PELO Y COLOR DE ROPA DE JOBS. La firma que debes borrar es la que muestro seleccionada aqui en la imagen. ----------------------------------------------------------------------------------------------------------------------------- SI EN LUGAR DE UN JOB, EDITASTE UN ITEM, UN MONSTRUO O UN NPC, ARMA ETC, SIMPLEMENTE ABRE EL SPRITE, CARGA LA PALETA Y DALE SAVE, aqui no hace falta remover firmas. Con el tiempo y dedicación seras un experto, podrás crear armas nuevas a bases de recolor, Podrás generar nuevos colores de cabello Podrás reparar las caras de algunos sprites donde los tintes o paletas manchan la cara Podrás crear tus propios escudos y armas, insertando y modificando imágenes y armando los sprites a partir de bitmaps. s

 2 points
 -
View File GRF Editor Hello everyone, GRF Editor is an open-source tool for editing GRF files (https://github.com/Tokeiburu/GRFEditor). It offers a wide variety of features and customizations. The software is very stable and responsive, it can handle large operations without lagging your computer. How to install Download the zip archive provided from the download link at the bottom of this description or directly from there: http://www.mediafire.com/?aflylbhblrzpz0h Install the application with GRF Editor Installer.exe; if you are missing a .NET Framework you will be prompted to download it. Once you are done, you can start the program from the link on your desktop. Key features Overall speed is faster (or at least equal) than any GRF tool. Common operations: add, delete, merge, extract, preview, save. Undo and redo for any operation. It can open any GRF file format. Clean and very interactive interface. Saving formats supported : 0x300, 0x200, 0x103 and 0x102 (through the Settings page) and conversion to the Thor format. Instant filter and search options (example : "map .gat"). File association and context menus integration for .grf, .gpf, .rgz and .thor (through the Settings page). Can rebuild separated images into one file easily. Drag and drop (with the ALT key, can be modified in the Settings page). This is a big part of the software; most of the items can be moved around within the application itself or from/to Windows Explorer. If drag and drop does not work, it is most likely because you've started the program using administrator privileges. GRF Editor does not requires administrator privileges to run. Tools Grf validation: allows you to validate a GRF with multiple settings. It can detect corrupted GRF entries, invalid sprites, empty files, non-GRF files, duplicate files and a lot more. Flat maps maker: generates flat maps from .gat and .rsw files. Useful to generate WoE maps or to fasten up the loading time. Patch maker: generates a GRF patch based on two different GRFs. Hash viewer: shows the hash code (both CRC32 and MD5) for files. Image converter: converts an image to any format requested (BMP, PNG, JPG, TGA). GrfCL: used to create batch files (.bat) which can automate tasks on GRF files. See the content in GrfCL.rar in the download for more information. This tool can be customized from the sources as well. Grf encryption The encryption feature has been enabled again. It's similar to what it used to be and it has been tested on client versions ranging from 2012-08-01 to 2024-01-01. Some error messages will be displayed if necessary. If you have an issue, copy the error message (with the code, if there's one) and send me the client executable with the cps.dll file generated by GRF Editor. There shouldn't be compatibility issues anymore though! Thor files Thor files are patches used by Thor Patcher ( https://github.com/rathena/rathena/wiki/Thor-Patcher ). Because of their similarity with the GRF file structure, they have been integrated within GRF Editor. The primary utility of this feature is that it allows you to add encrypted files to a Thor patch. All the other options can be achieved by using Thor Maker. You'll find the necessary steps below, but test your patches before sending them off to players (I've done a lot of testing on my end, but better be safe). If you're using SecureGRF, then make a new GRF, add the files and encrypt it. In GRF Editor, open the encrypted GRF you just made, use "Save as" and name the new file with a .thor extension. That's it, if you want to change the output directory, click on Edit > Edit Grf/Thor settings. You can select the output mode and the GRF to merge the patch with. Simply save again if you change these properties. If you're using GRF Editor's encryption, then make a new Thor file (File > New > New Thor) and add the files you want to patch it with. Right-click on the files you want to encrypt and use Encryption > Encrypt. Technical stuff Requires .Net Framework 4.0 to run (4.0 or more will work as well). Automatically converts file name encoding to the currently selected encoding (you can change the encoding in the Settings page). Data virtualization is used as much as possible to preview files, meaning the files aren't completely loaded. Right-clicking an item will bring up the available options with that file. Preview file formats: txt, log, xml, lua, lub, bmp, png, tga, jpp, db, ebm, pal, gnd, rsw, gat, rsm, str, spr, act, imf, fna, bson, csv, ezv and wav. Services are "crash ready", meaning that you will be warned about a failed operation and no work will be lost (the application won't close and crash). It tries to continue operating even if it meets unsual conditions. Operations can be cancelled by clicking on the button near the progress bar. The warning level can be changed to avoid messages like "Please select a folder first." When prompted with an error, use Ctrl-C to copy the current dialog's content. Some screenshots! 1) Previewing an act file, while showing the search feature 2) Preview of a model file (rsm or rsm2) 3) Preview of GrfCL 4) Preview of maps 5) Preview of Grf validation 6) Search feature (press Ctrl-F or Ctrl-H to bring up within a text editor) Got a feedback? I'd gladly hear you out and fix issues you have with the program. Submitter Tokei Submitted 01/11/13 Category GRF Files Video Content Author Tokeiburu1 point
-

Version 1.8.9.7
57264 downloads
Hello everyone, GRF Editor is an open-source tool for editing GRF files (https://github.com/Tokeiburu/GRFEditor). It offers a wide variety of features and customizations. The software is very stable and responsive, it can handle large operations without lagging your computer. How to install Download the zip archive provided from the download link at the bottom of this description or directly from there: http://www.mediafire.com/?aflylbhblrzpz0h Install the application with GRF Editor Installer.exe; if you are missing a .NET Framework you will be prompted to download it. Once you are done, you can start the program from the link on your desktop. Key features Overall speed is faster (or at least equal) than any GRF tool. Common operations: add, delete, merge, extract, preview, save. Undo and redo for any operation. It can open any GRF file format. Clean and very interactive interface. Saving formats supported : 0x300, 0x200, 0x103 and 0x102 (through the Settings page) and conversion to the Thor format. Instant filter and search options (example : "map .gat"). File association and context menus integration for .grf, .gpf, .rgz and .thor (through the Settings page). Can rebuild separated images into one file easily. Drag and drop (with the ALT key, can be modified in the Settings page). This is a big part of the software; most of the items can be moved around within the application itself or from/to Windows Explorer. If drag and drop does not work, it is most likely because you've started the program using administrator privileges. GRF Editor does not requires administrator privileges to run. Tools Grf validation: allows you to validate a GRF with multiple settings. It can detect corrupted GRF entries, invalid sprites, empty files, non-GRF files, duplicate files and a lot more. Flat maps maker: generates flat maps from .gat and .rsw files. Useful to generate WoE maps or to fasten up the loading time. Patch maker: generates a GRF patch based on two different GRFs. Hash viewer: shows the hash code (both CRC32 and MD5) for files. Image converter: converts an image to any format requested (BMP, PNG, JPG, TGA). GrfCL: used to create batch files (.bat) which can automate tasks on GRF files. See the content in GrfCL.rar in the download for more information. This tool can be customized from the sources as well. Grf encryption The encryption feature has been enabled again. It's similar to what it used to be and it has been tested on client versions ranging from 2012-08-01 to 2024-01-01. Some error messages will be displayed if necessary. If you have an issue, copy the error message (with the code, if there's one) and send me the client executable with the cps.dll file generated by GRF Editor. There shouldn't be compatibility issues anymore though! Thor files Thor files are patches used by Thor Patcher ( https://github.com/rathena/rathena/wiki/Thor-Patcher ). Because of their similarity with the GRF file structure, they have been integrated within GRF Editor. The primary utility of this feature is that it allows you to add encrypted files to a Thor patch. All the other options can be achieved by using Thor Maker. You'll find the necessary steps below, but test your patches before sending them off to players (I've done a lot of testing on my end, but better be safe). If you're using SecureGRF, then make a new GRF, add the files and encrypt it. In GRF Editor, open the encrypted GRF you just made, use "Save as" and name the new file with a .thor extension. That's it, if you want to change the output directory, click on Edit > Edit Grf/Thor settings. You can select the output mode and the GRF to merge the patch with. Simply save again if you change these properties. If you're using GRF Editor's encryption, then make a new Thor file (File > New > New Thor) and add the files you want to patch it with. Right-click on the files you want to encrypt and use Encryption > Encrypt. Technical stuff Requires .Net Framework 4.0 to run (4.0 or more will work as well). Automatically converts file name encoding to the currently selected encoding (you can change the encoding in the Settings page). Data virtualization is used as much as possible to preview files, meaning the files aren't completely loaded. Right-clicking an item will bring up the available options with that file. Preview file formats: txt, log, xml, lua, lub, bmp, png, tga, jpp, db, ebm, pal, gnd, rsw, gat, rsm, str, spr, act, imf, fna, bson, csv, ezv and wav. Services are "crash ready", meaning that you will be warned about a failed operation and no work will be lost (the application won't close and crash). It tries to continue operating even if it meets unsual conditions. Operations can be cancelled by clicking on the button near the progress bar. The warning level can be changed to avoid messages like "Please select a folder first." When prompted with an error, use Ctrl-C to copy the current dialog's content. Some screenshots! 1) Previewing an act file, while showing the search feature 2) Preview of a model file (rsm or rsm2) 3) Preview of GrfCL 4) Preview of maps 5) Preview of Grf validation 6) Search feature (press Ctrl-F or Ctrl-H to bring up within a text editor) Got a feedback? I'd gladly hear you out and fix issues you have with the program.Free1 point -
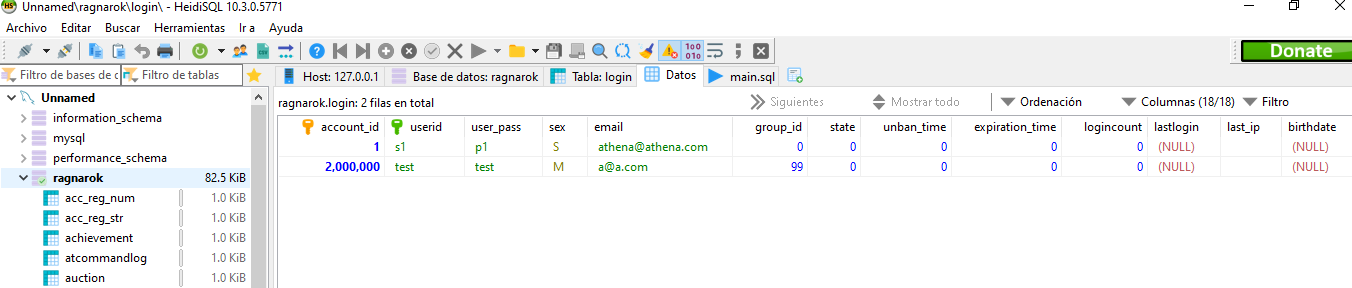
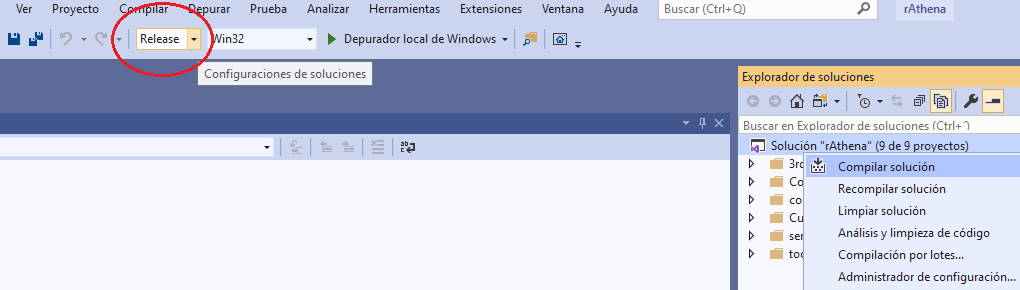
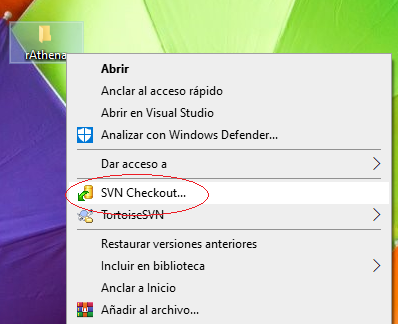
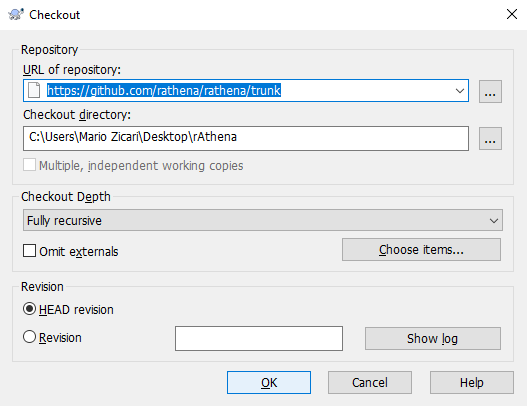
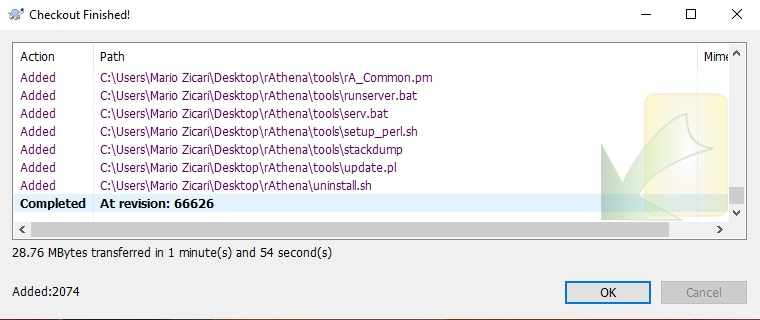
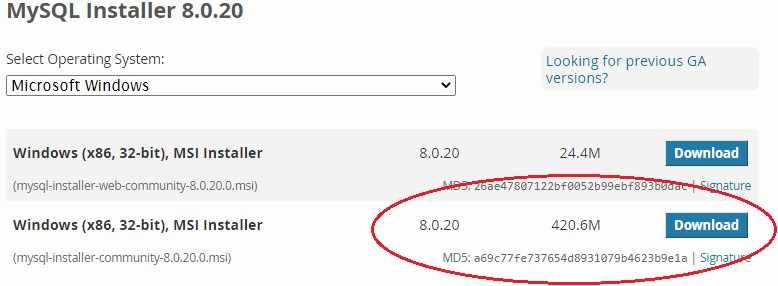
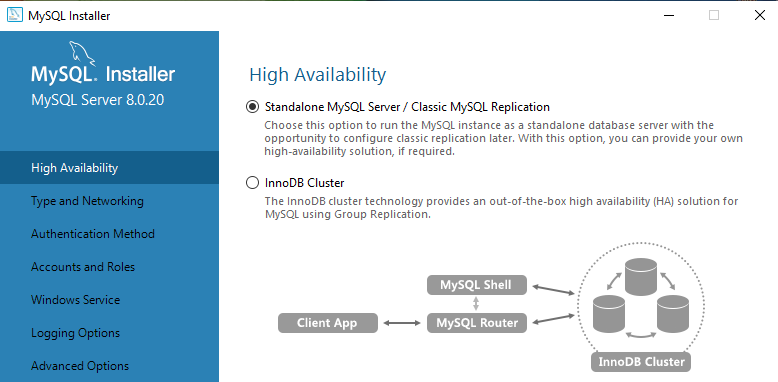
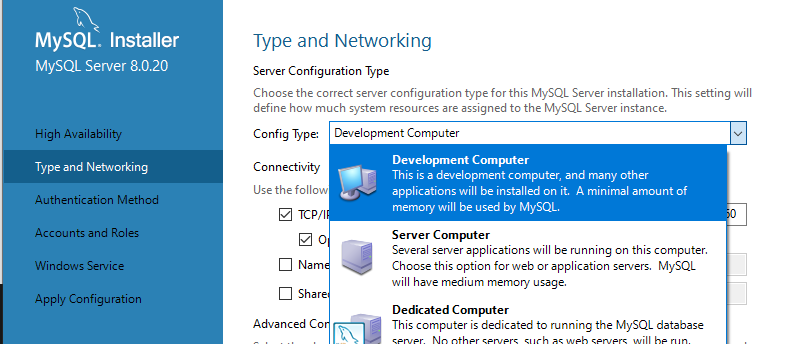
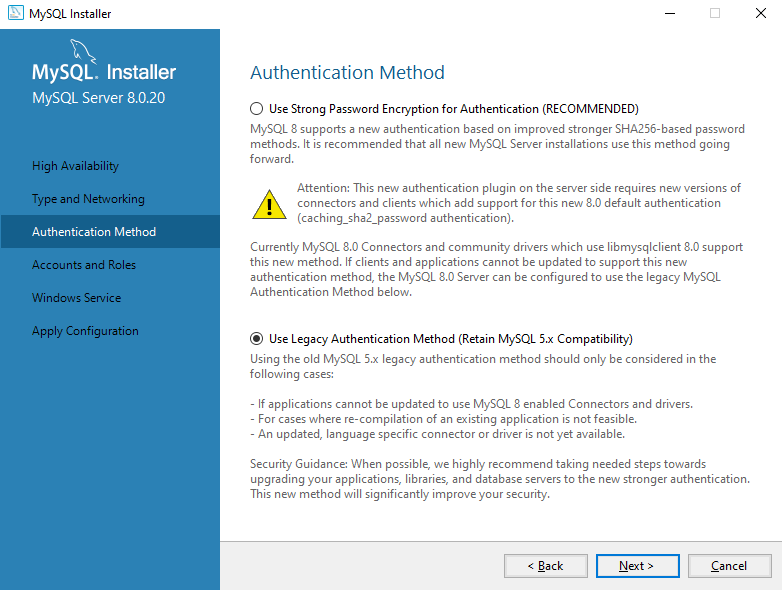
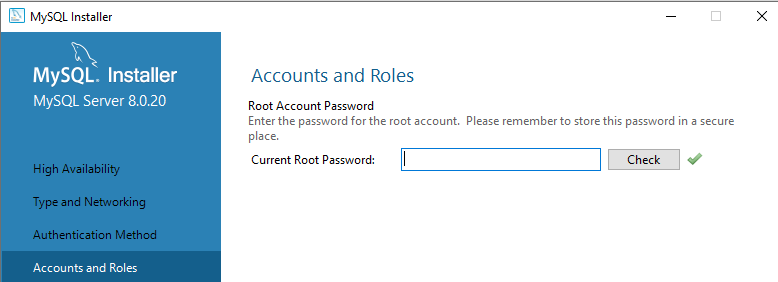
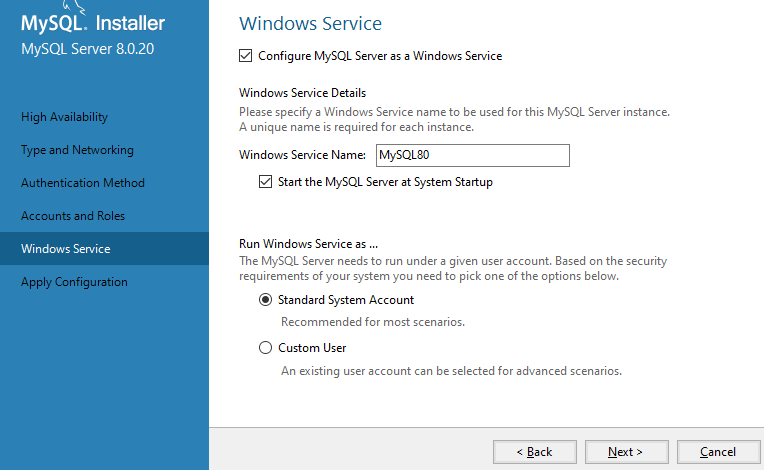
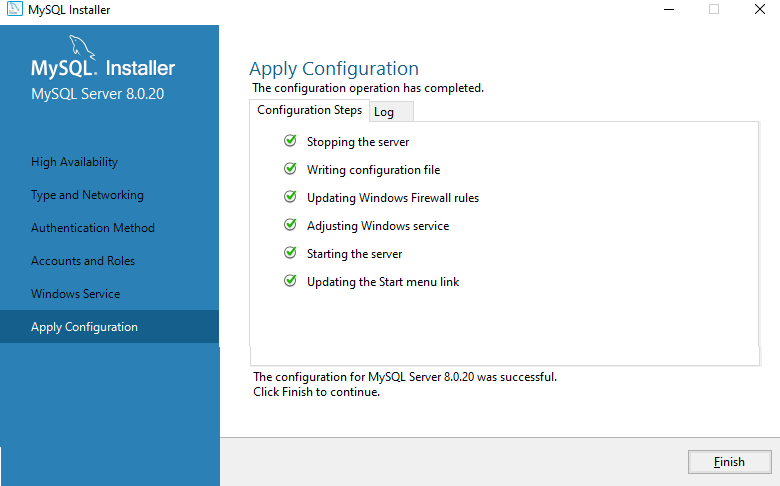
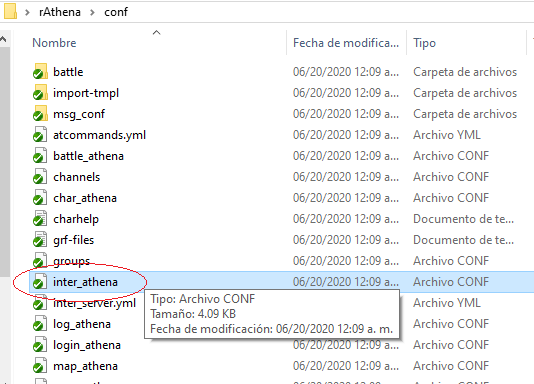
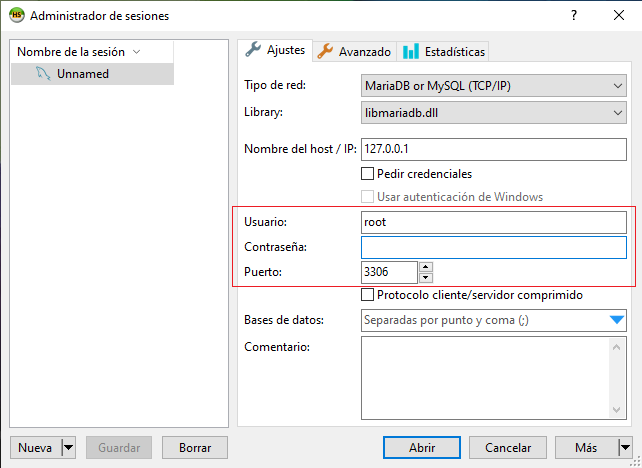
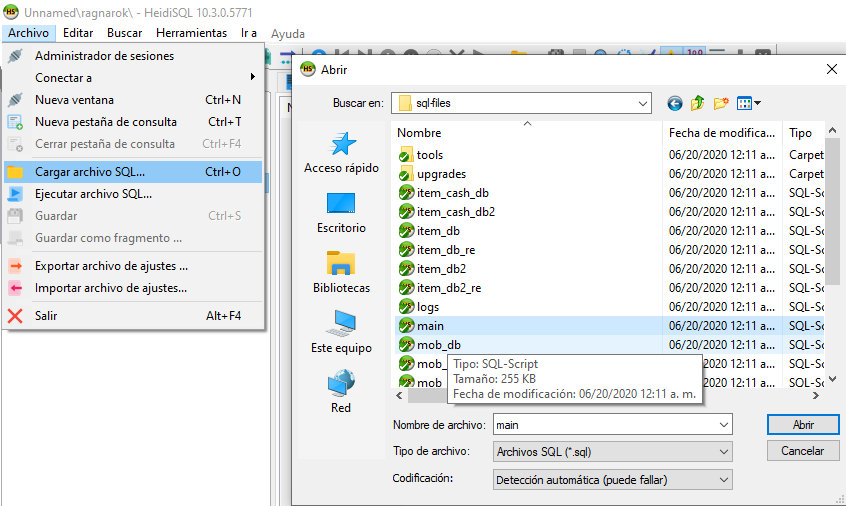
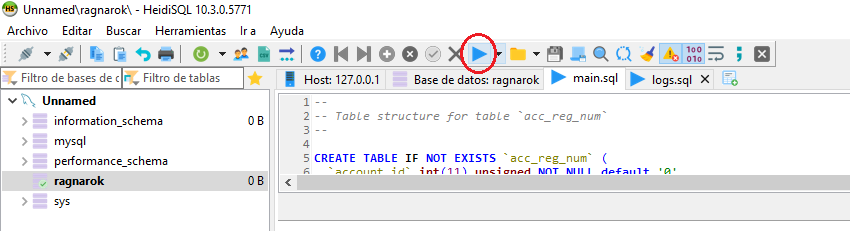
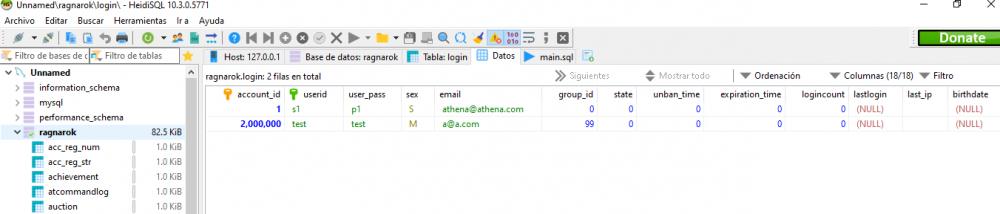
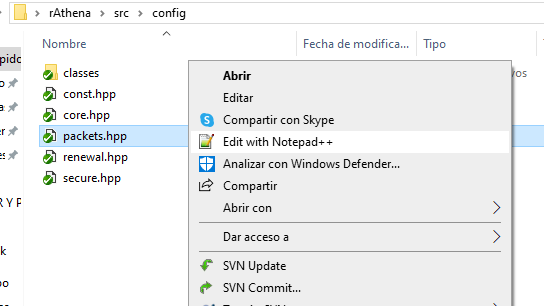
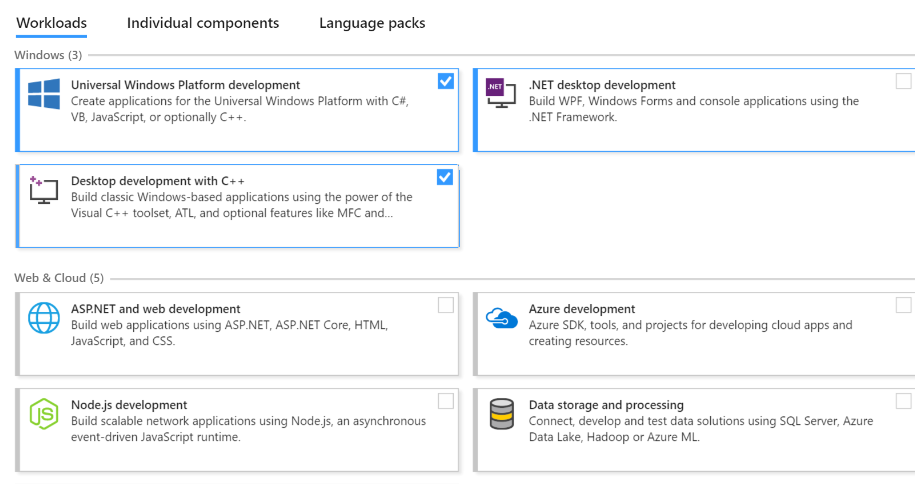
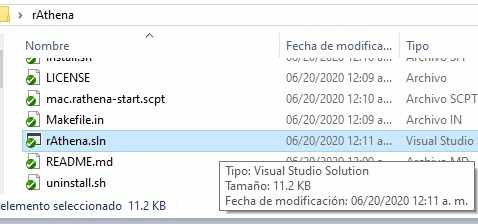
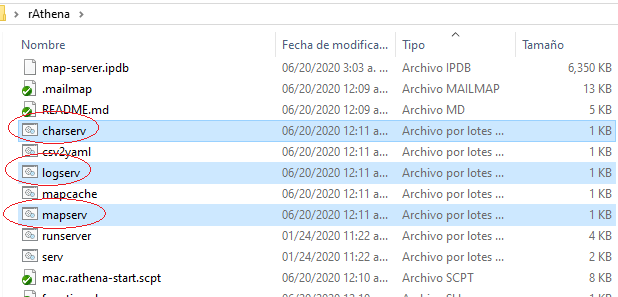
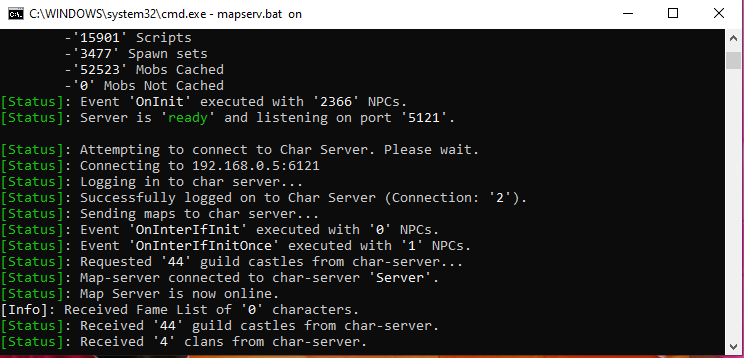
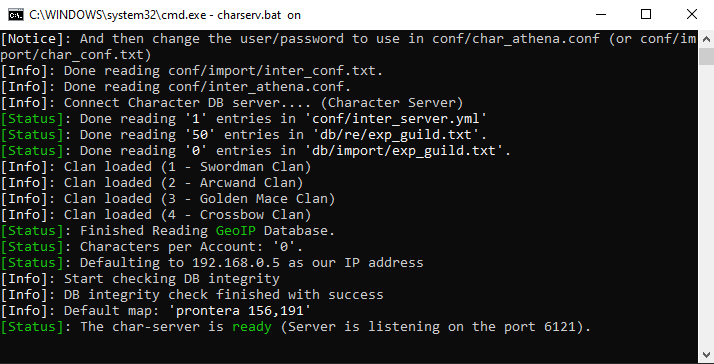
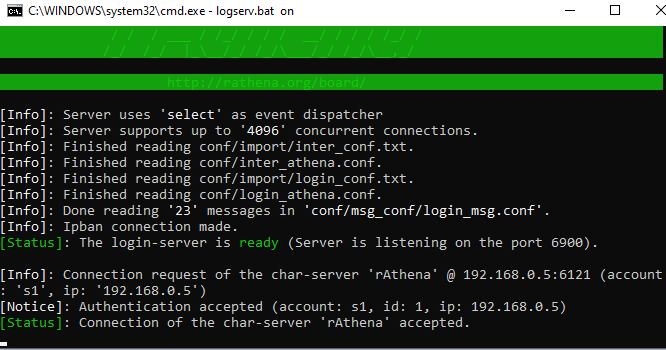
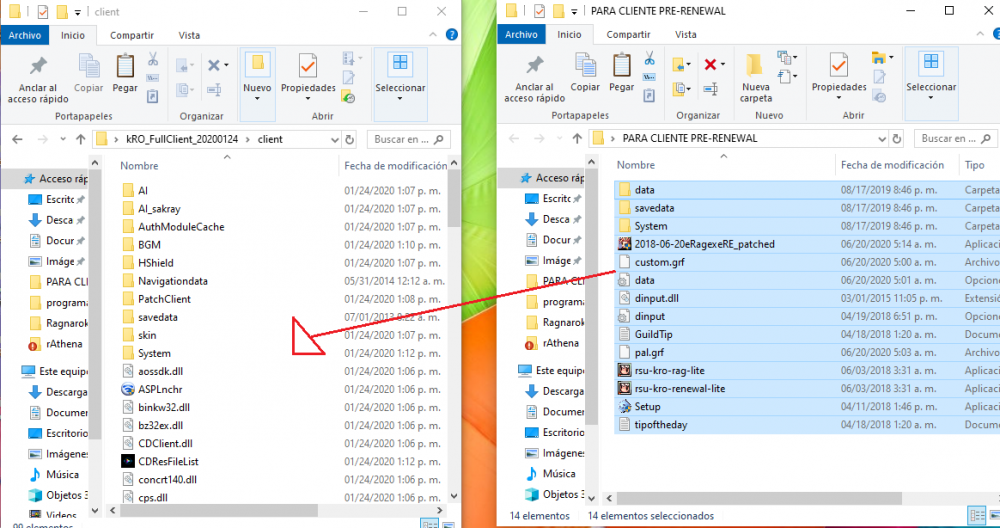
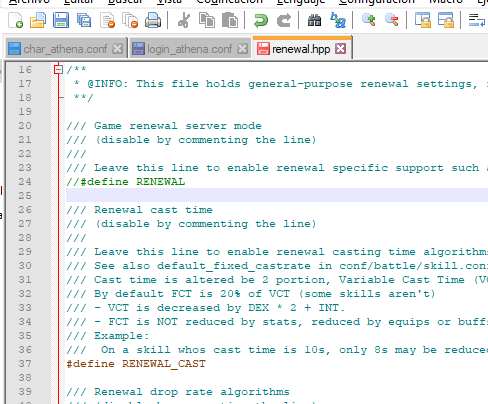
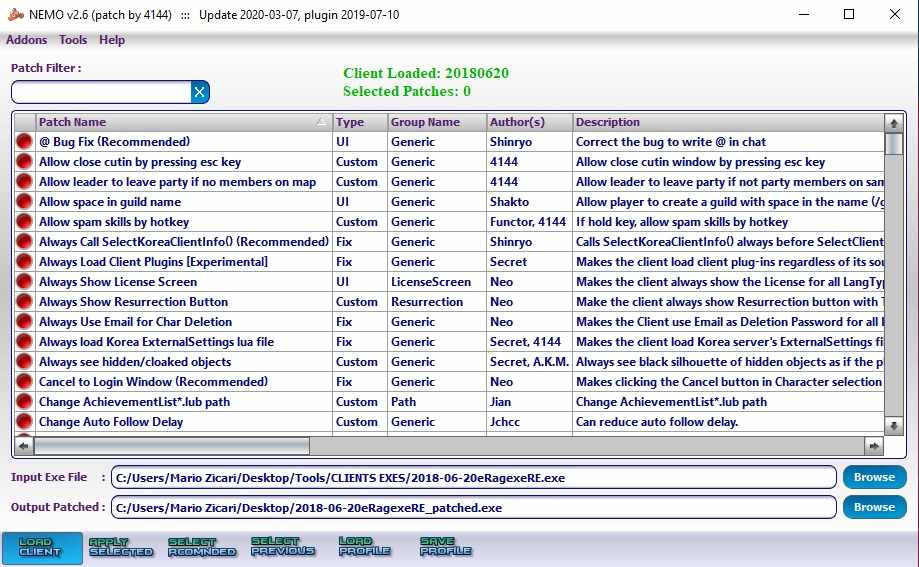
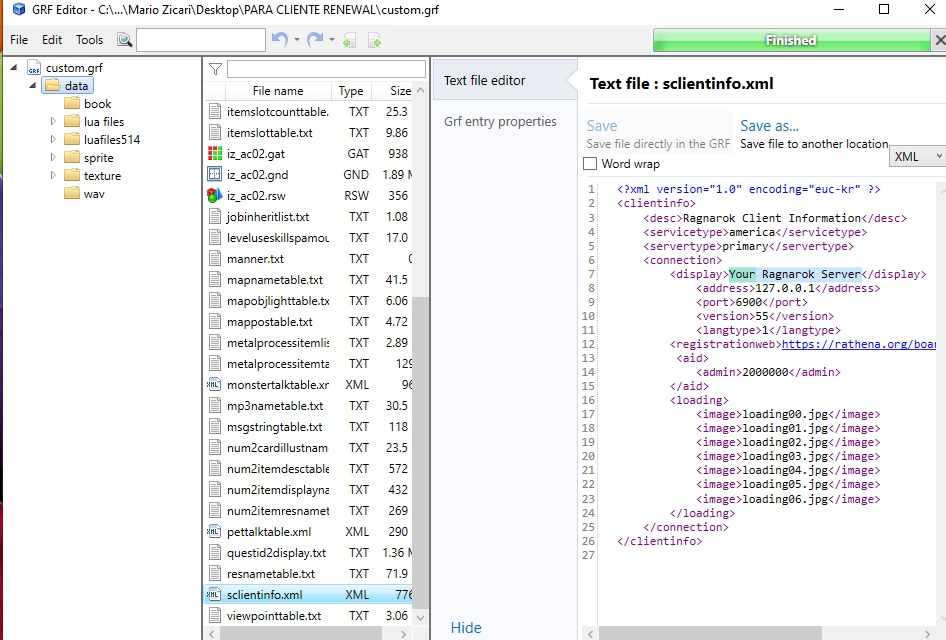
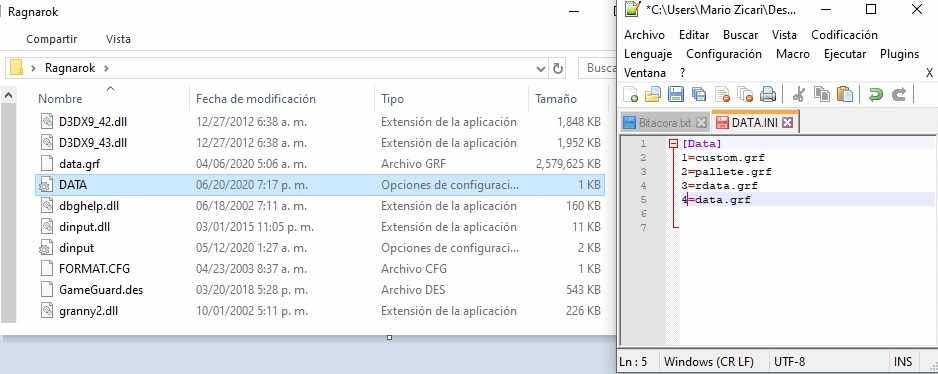
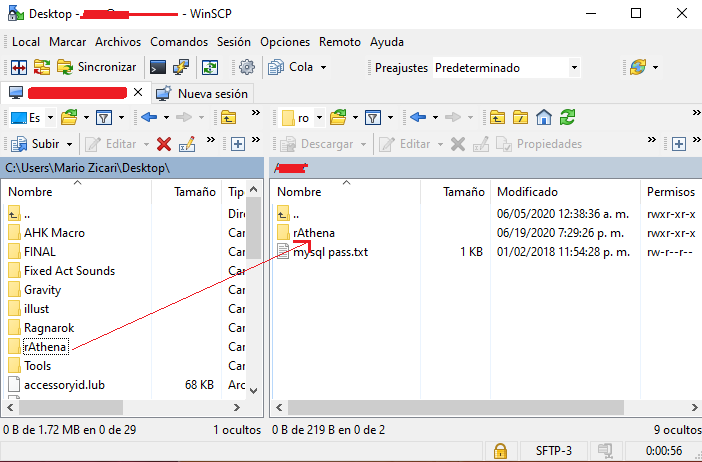
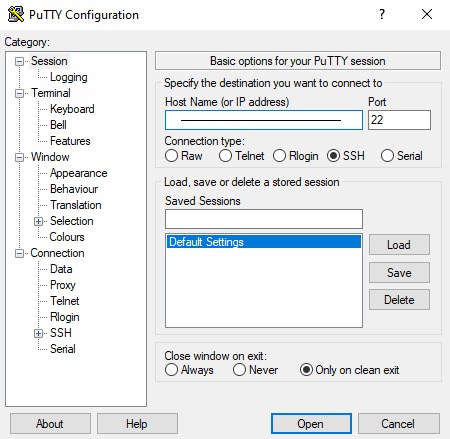
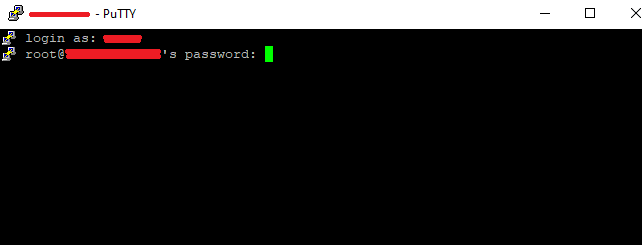
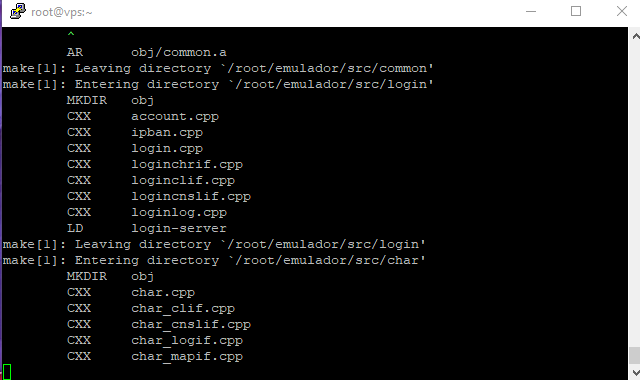
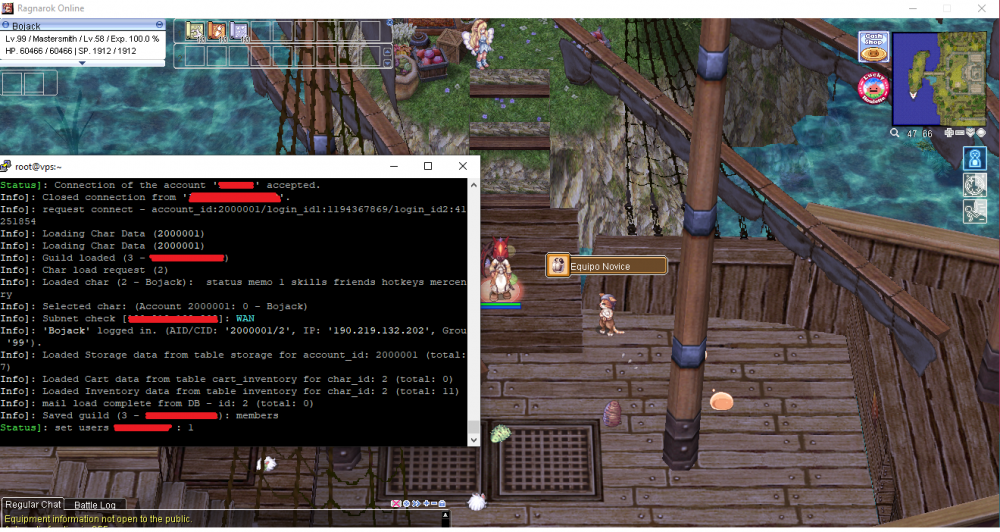
1- DESCARGAR NUESTRO EMULADOR Lo primero que necesitaremos es nuestro emulador rAthena ultima revisión y para ello debemos descargar Tortoise SvN aqui: https://tortoisesvn.net/downloads.html Una vez descargamos el Tortoise Svn nos vamos al escritorio y creamos una carpeta con nombre rAthena, a dicha carpeta le damos click derecho y elegimos la opcion SVN Checkout... Se abrirá la ventana de CheckOut y en el URL of repository colocamos https://github.com/rathena/rathena/trunk y en Revision ponemos HEAD Al darle Ok, el programa empezara a descargar el emulador a la carpeta rAthena, si todo salio bien habrás descargado con éxito tu emulador con la ultima revisión del repositorio. 2- CREAR NUESTRO SERVIDOR Una vez descargado el emulador, necesitaremos crear nuestra base de datos SQL en nuestro ordenador, con las credenciales del servidor, para ello vamos a necesitar el programa MySql Nos dirigimos a este link https://dev.mysql.com/downloads/installer/ y elegimos la opción mas pesada de 420 MB. Al momento de instalarlo nos irán saliendo las opciones de configuración, en la de High Availability marcamos la primera opción, Standalone MySQL Server y le damos next En la Opcion Type and Networkimg elegimos Development Computer y NO TOCAMOS ABSOLUTAMENTE MAS NADA DENTRO DE ESTA CONFIGURACION! le damos Next y entraremos en el Methodo de Autenticacion, aqui solamente marcamos Use Legacy y le damos al Next En Account & Roles, para el password de Root pondremos como pasword ragnarok en minúsculas, ragnarok es la que contraseña que viene por defecto en el inter athena conf del emulador. En Windows Service dejamos todo como esta y le damos next En la siguiente ventana, le damos a EXECUTE para que se empiezen a aplicar todas las configuraciones, Cuando todos los ganchos están en verde indica que se instalo bien tu servidor, En este punto, tienes instalado tu servidor local en tu computadora y esta corriendo. 3- DESIGNAR EL NOMBRE CORRECTO DE NUESTRO SERVIDOR ROOT EN LOS COMPONENTES DEL SERVIDOR Ya que tenemos nuestro servidor Root en la computadora, nos vamos a nuestro folder de emulador rAthena, buscamos la carpeta conf, y dentro encontraremos el archivo inter_athena, como este es un archivo de texto le damos a editar, y nos vamos a la parte de Global SQL Settings En la linea 31, en login_server_id reemplazamos ragnarok por root, pues root es el servidor SQL que instalamos en nuestro ordenador, y deberá quedar así: // MySQL Login server login_server_ip: 127.0.0.1 login_server_port: 3306 login_server_id: root login_server_pw: ragnarok login_server_db: ragnarok login_codepage: login_case_sensitive: no En la parte de ipban_db_id también cambiamos el ragnarok y ponemos root, debera quedar asi: ipban_db_ip: 127.0.0.1 ipban_db_port: 3306 ipban_db_id: root ipban_db_pw: ragnarok ipban_db_db: ragnarok ipban_codepage: En el char_server_id reemplazamos ragnarok y ponemos root, debera quedar asi: // MySQL Character server char_server_ip: 127.0.0.1 char_server_port: 3306 char_server_id: root char_server_pw: ragnarok char_server_db: ragnarok El map_server_id también le reeplazamos el ragnarok y le ponemos el nombre root ya que este es el nombre dado por nuestro servidor sql, deberá quedar asi: // MySQL Map Server map_server_ip: 127.0.0.1 map_server_port: 3306 map_server_id: root map_server_pw: ragnarok map_server_db: ragnarok Por ultimo pero no menos importantes los logs, en log_db_id reemplazamos ragnarok por root, debiendo quedar así: // MySQL Log Database log_db_ip: 127.0.0.1 log_db_port: 3306 log_db_id: root log_db_pw: ragnarok log_db_db: ragnarok log_codepage: log_login_db: loginlog CHAR_ATHENA Ya que terminamos de ajustar el inther athena conf, nos vamos al char_athena conf, esta parte es importante porque aquí seteamos el mapa de inicio de nuestros personajes creados. Eliges el mapa de inicio de tus novice para renewal o pre renewal.. Te recomiendo usar una data renewal si vas a usar un punto de partida renewal, NO PUEDES ser renewal sin data renewal pues se te pondra la pantalla negra cuando logees tu char... mas adelante te enseñare como configurar tu emulador para renewal o pre-renewal Dentro de char_athena también desactivamos algo bastante molesto llamado pincode, solo basta encontrar la linea que dice pincode_enabled y ponemos no, deberá quedar así: //=================================== // Pincode system //=================================== // NOTE: Requires client 2011-03-09aragexeRE or newer. // A window is opened before you can select your character and you will have to enter a pincode by using only your mouse. // Default: yes pincode_enabled: no LOGIN_ATHENA Aquí solo necesitamos ajustar una sola cosa! y es el poder Habilitar la creación de nuestro personaje con _M o _F En la linea 54 de este file ponemos yes en la opcion "//Can you use _M/_F to make new accounts o the server? Debera quedar así: // Can you use _M/_F to make new accounts on the server? // Note: This only works if client side password encryption is not enabled. new_account: yes terminamos las configuraciones del emulador por ahora. 4- GESTIONAR NUESTRA BASE DE DATOS Una vez configurado el inter_athena.conf char_athena.conf y login_athena.conf necesitaremos un programa para crear nuestra BASE DE DATOS, yo recomiendo altamente el programa HeidiSQL por su facilidad de uso, este es el primero que use cuando empece a crear servers, y nunca me ha fallado. Link de descarga aqui: https://www.heidisql.com/download.php Una vez tenemos Instalado Heidi!, procedemos a crear la base de datos de nuestro servidor, elegimos Nueva, Aquí Lo importante es mantener el usuario root ya que ese es el nombre de nuestro servidor de datos sql, en contraseña debemos poner ragnarok en minuscula, pues es la clave que elegimos al instalar mysql y son las claves de los componentes que vienen por defecto en el inter_atena.conf. Al nombre de la sesión le puedes poner el que mas te guste, yo lo dejare en unnamed para guiarlos mejor. Cuando la tenemos creada le damos a abrir, hacemos click derecho sobre Unnamed o el nombre de sesion que le hayas dado, eliges crear nuevo, y le das click a base de datos. Es MUY MUY IMPORTANTE que el nombre de la base de datos sea ragnarok pues es el mismo nombre que tienen los componentes del server en el inter_atena.conf que previamente configuramos ok? Una vez creada la base de datos ragnarok la seleccionamos y nos vamos a la pestaña archivo Al abrir la pestaña archivo seleccionamos cargar archivo SQL, y se nos abrirá la ventana de exploración, en la cual elegimos rAthena, luego sql-files y elegimos main y logs con control, una vez seleccionados main y logs le damos a abrir. Una vez abiertas dirígete a la pestaña main, y ejecutala dandole click al triangulo azul, veras como se van cargando las tablas en la base de datos ragnarok Una vez terminada de cargar las main, selecciona la de logs y procede con lo mismo, click al triangulo para ejecutar, la tabla logs es importante ya que esta registra los movimientos de items, objetos comandos, en fin es como una bitacora que ni so se carga el emulador se la pasara enviando warnings. Otros sql-files que podrias cargar dentro de la db ragnarok serian el roulette_default_data por si quieres implementar la ruleta en tu servidor, pero los premios y requisitos de la ruleta se configuran en esa misma tabla y no en scripts. Cuando se ha cargado todo, presiona f5, esto recargara las tablas, en pocas palabras actualizara o refrescara heidi y MAGIA puedes ir a la tabla login, y luego a la pestaña datos, la account_id 1 es del sistema y esa no la puedes ocupar para tu char, alli van a parar los chars que creas en tu server, para ser ADMIN con todos los comandos debes ponerte 99 el el group id. Ya tenemos servidor, y base de datos. 5- COMPATIBILIZAR EL EJECUTABLE Y COMPILAR NUESTRO EMULADOR Antes de Encender nuestro emulador debemos configurarlo y luego compilarlo. El cliente o ejecutable que recomiendo es 2018-06-20eRagexeRE.exe pues es el que considero mas estable, este ejecutable lo puedes descargar en el post de MathReaper Para compatibilizar el exe con el emulador debes ir a tu carpeta rAthena y elegir la carpeta SCR, (ya estamos en territorios de alto riesgo), dentro de la carpeta scr nos vamos a la carpeta config y abrimos packets.hpp Para tener una mejor experiencia editando estos archivos, recomiendo el programa notepad++ lo puedes descargar aqui: https://notepad-plus-plus.org/downloads/ al abrir packets.hpp encontraremos la linea que tiene asignada la versión del exe #ifndef PACKETVER /// Do NOT edit this line! To set your client version, please do this instead: /// In Windows: Add this line in your src\custom\defines_pre.hpp file: #define PACKETVER YYYYMMDD /// In Linux: The same as above or run the following command: ./configure --enable-packetver=YYYYMMDD #define PACKETVER 20200401 #endif en el #define PACKETVER 20200401 debemos cambiar y asignar el exe que les recomendé en este caso el 20180620 el texto deberá quedar así #ifndef PACKETVER /// Do NOT edit this line! To set your client version, please do this instead: /// In Windows: Add this line in your src\custom\defines_pre.hpp file: #define PACKETVER YYYYMMDD /// In Linux: The same as above or run the following command: ./configure --enable-packetver=YYYYMMDD #define PACKETVER 20180620 #endif Para Evitar la Black Screen del Exe al seleccionar tu personaje deberás editar y agregar tu packet version en el siguiente archivo: SCR/CUSTOM/ defines_post.hpp defines_pre.hpp si lo vas a hacer pre renwal editas el defines_pre.hpp si lo vas a hacer renewal entonces edintas el defines_post.hpp // Copyright (c) rAthena Dev Teams - Licensed under GNU GPL // For more information, see LICENCE in the main folder #ifndef CONFIG_CUSTOM_DEFINES_PRE_HPP #define CONFIG_CUSTOM_DEFINES_PRE_HPP /** * rAthena configuration file (http://rathena.org) * For detailed guidance on these check http://rathena.org/wiki/SRC/config/ **/ #define PACKETVER 20180620 #endif /* CONFIG_CUSTOM_DEFINES_PRE_HPP */ RENEWAL O PRE? El emulador viene RENEWAL por defecto, si queremos ser pre renewal tenemos que ir a la carpeta SCR de nuestro rAthena, luego a la carpeta config y abrimos renewal.hpp Una vez abierto lo único que debemos hacer es comentar la parte que dice #define Renewal, comentar no es mas que colocar dos slashes // al inicio del define de renewal! como muestra la imagen para deshabilitar todas las características de renewal solo basta con dejar el texto asi: //#define Renewal COMPILACION Una vez hecho todos estos cambio debemos compilar nuestro emulador! Para compilar el emulador necesitas tener instalado el Visual Studio Community, lo podrás conseguir en este link: https://visualstudio.microsoft.com/es/downloads/ Al momento de instalarlo deberás elegir las herramientas C+ yo recomiendo la universal windows platform development y desktop developtment with C++. el resto nisiquiera la vamos a mirar. Una vez tenemos el Visual Instalado nos vamos a la carpeta de nuestro emulador y abrimos la solución, de nombre rAthena.sln Una vez Abierta la solución!, ASEGURATE DE ELEGIR RELEASE como lo muestro en la IMAGEN y no Debug, luego click derecho en Solución rAthena y click a Compilar Solución, ahora deberás esperar que se compilen todos los proyectos Si tu compilación fue exitosa tendrás correctos todos los resultados Ya puedes abrir tu emulador, para ello ve a la carpeta rAthena y abre individualmente los proyectos loginserv charserv y mapserv Si quieres ahorrarte el trabajo de abrir siempre los 3 componentes del server cada vez que inicies tu emulador, abre solamente runserver, lamentablemente esto viene bugeado, y no se ha corregido, por lo cual tuve que editarlo para que funcionara, si lo quieres, PUEDES DESCARGAR ESTOS CON TODA CONFIANZA Y METERLOS EN TU CARPETA RATHENA, Reemplazando los que vienen por defecto, con esto podras abrir el emulador usando solo runserver. pero necesitaras estos 2 archivos que voy a poner aqui abajo: runserver.bat y serv.bat Si seguiste bien todas las indicaciones, tendrás abierto un emulador optimo y sin ningún error!. 6- CREAR NUESTRO CLIENTE Y DIFFEAR NUESTRO EXE PARA EMPEZAR A JUGAR NUESTRO EMULADOR Antes que nada necesitas el KRO COMPLETO, EL JUEGO RAGNAROK , Lo puedes descargar aquí mismo, Nuestro administrador Akkarin nos compartió el ultimo cliente en este topic: Una ves terminado de descargar y extraer el KRO Limpio, necesitaras crear los archivos de tu propio cliente, Estos archivos del cliente son los GRF y la Data Traducida que tiene Archivos Luas, Descripcion de Objetos, Quests, Entre Otros, y son los que deberás exportar a tu Ragnarok Limpio. Tengo a Disposición un RAR Limpio, con los archivos necesarios y básicos para un cliente, consta de 2 GRF's uno llamado Custom y Otro llamado Pal, tambien tiene un exe pre difeado que puedes usar para ir testeando tu servidor. Si tu servidor va a ser Pre Renewal, con los items, mapas, y descripciones de pre renewal deberas bajar este rar de mi unidad Drive: - https://drive.google.com/file/d/1M8gvEWnumjPwNwzXLrACBYYAqE3ptoRp/view?usp=sharing Si tu servidor va a ser RENEWAL con la descripcion de items, y mapas renewal deberas bajar este rar de mi unidad Drive: https://drive.google.com/file/d/18Pn4Zw0q_-yBTkE9n30JN8hGLGmL6iyo/view?usp=sharing Al descargar y extraerse, lo único que deberás hacer copiarlo todo y pegarlo a la carpeta del ro limpio. TODO LO QUE TE PIDA REEMPLAZAR LO REEMPLAZAS! estos archivos podrás editarlos o preservarlos por si quieres crear un instalador para tu usuarios. Si tienes el emulador encendido, puedes intentar entrar a tu servidor ejecutando el exe pre diffeado que acabas de pegar en tu ragnarok limpio, el de nombre 2018-06-20eRagexeRE_patched que te incluí en el RAR, Si te sale THE EXE HAS CHANGED al principio, cierra y vuelve a abrir, esto pasa una sola vez y te indica que el ejecutable que se usa es el de tu servidor y no el de Kro, Cuando abras podrás crear tu personaje, lo que indica que estas en el servicio correcto. Si quieres diffear tu propio ejecutable deberás descargar nemo Patcher en este Link: https://gitlab.com/4144/Nemo/ En imput exe file subes el ejecutable que hayas descargado, recuerda que debe ser la misma versión que definiste en tu emulador, en output es donde se va a generar el ejecutable diffeado, pones Load Client y se cargaran todos los parches posibles para el exe. Algunos diff Recomendados y Otros necesarios para que el cliente arranque sin problemas son: @ Bug Fix (Recommended) Allow close cutin by pressing esc key Allow space in guild name Always Load Client Plugins [Experimental] Always Show Resurrection Button Always Use Email for Char Deletion Always load Korea ExternalSettings lua file Cancel to Login Window (Recommended) Change RecommendedQuestInfoList*.lub path aqui escribes system\OngoingQuestInfoList Change character display deletion time from actual date to relative date Change minimal screen resolution limit Change new char name field height AQUI PONES 17 esto muestra el nombre correctamente al momento de crear tu personaje Chat Flood Remove Limit Custom Window Title aqio pones el nombre que le quieres dar a tu ventana de ragnarok Disable 1rag1 type parameters (Recommended) Disable Help Message on Login (Recommended) Disable Swear Filter Disconnect to Login Window Enable /who command (Recommended) Enable DNS Support (Recommended) Enable Effect for all Maps [Experimental] Enable Emblem hover for BG Enable Monster Tables Enable Multiple GRFs (Recommended) solo el recommended Enable Shortcut All Item Enable Title Bar Menu botones en tu ventana de ragnarok Enable guild while in clan si quieres guild mientras estas en clan, deberas modificar el script de clans en rathena para pasar este filtro Enforce Official Login Background Extend Chat Box Extend Chat Room Box Extend Npc Dialog Box Extend PM Box Fix Camera Angles (Recommended) Fix Homunculus attack AI Fix achievement counters for each type of achievement Por si habilitaras achievements Fix act delay for act files with many frames Fix item description bug Hide build info in client (Recommended) Hide packets from peek (Recommended) Hide zero date (1969-01-01) in guild members window Ignore /account: command line argument Ignore Lua Errors --- esto lo puedes desactivar cuando tengas tu cliente terminado Ignore Missing Palette Error --- esto lo puedes desactivar cuando tengas tu cliente terminado Ignore Resource Errors --- esto lo puedes desactivar cuando tengas tu cliente terminado Increase Headgear ViewID Ponle 4000, asumiento que meteras hat custom, ragnarok ya supero las 2000 IDS Increase Zoom Out 75% o max como quieras Increase hair style limit for human only in game (old) Load Custom lua file instead of iteminfo*.lub (Recommended) aqui debes poner System/iteminfo.lua Only First Login Background Read msgstringtable.txt (Recommended) Remove Gravity Ads (Recommended) Remove Gravity Logo (Recommended) Remove Hourly Announce (Recommended) Remove Serial Display (Recommended) Remove wrong chars from cash shop Restore Cash Shop Icon Restore Login Window (Recommended) Show Register Button boton de redireccion al enlace de registro de chars que hayas puesto en tu sclientinfo Show Replay Button aqui se reproduciran las partidas que grabes en tu ragnarok Skip License Screen Skip some hidden menu icon buttons si desactivaste botones este parche hara que se acomoden los espacios vacios entre botones ocultos Translate Client (Recommended) Use Ascii on All LangTypes (Recommended) Use Default Web Browser In Cashshop Use Default Web Browser for URL Use Normal Guild Brackets (Recommended) Use Official Cloth Palettes Necesario para que se muestren las paletas de colores Use Plain Text Descriptions (Recommended) Use Ragnarok Icon Use Tilde for Matk Los Diff que de ningún modo debes activar: Always Call SelectKoreaClientInfo() (Recommended) Aunque Diga recomended NO LO HABILITES Change Walk To Delay Incomodo, acelera la resuesta de clicks hara que camines hacia un npc aun despues de abrir su dialogo HKLM To HKCU NO LO HABILITES Skip Service Selection Screen NO LO HABILITES si rompes el protocolo de seleccion de servicio no podras abrir el select char window EDICIÓN DE GRF Y SCLIENTINFO El programa para editar tu grf sera GRF EDITOR de Tokei, este programa es el equivalente a un arma forjada por el mismo Hefesto, así recuerda darle un upvote si llegas a descargarlo Con este programa abres tu Custom.grf y podrás visualizar los archivos del GRF de tu servidor, recuerda que siempre que vayas a aplicar un cambio, deberás tener el exe del ragnarok cerrado. En la carpeta data de tu Custom.grf se encuentra el sclientinfo.xml, en el campo Display editas El nombre del servidor que se mostrara cuando abras tu ejecutable, podrás asignar o remover las ropas de game master, tambien podrás cambiar el link del web de registro al que te dirige el boton register. Si vas a subir tu emulador a un host deberas editar el sclientinfo y poner la ip en donde esta montado tu servidor. El orden de lectura de los GRF se asigna en un archivo llamado Data.ini y el orden debera ir asi: [Data] 1=custom.grf 2=palette.grf 3=rdata.grf 4=data.grf Como ha notado, el grf de palettes está aislado, si bien no es muy pesado, esta lleno de miles de archivos pals, si llegaras a descargar las paletas de kamishi te recomiendo usar un grf exclusivo de paletas y no mezclarlo con tu custom pues estanos hablado de mas de 40mil archivos que tomaran bastante tiempo en empaquetarse. ---------------------------------------------------------------------------------------------------------------------------------------------------------------------- Montar el Servidor a un Host Hasta Este Punto de la guía! ya tienes tu Servidor Local, Tu Emulador Funcional sin errores, Tu cliente con Exe y GRF custom. Para Montar tu emulador a un host recomiendo el programa WinSCP https://winscp.net/eng/download.php Abres Winscp y colocas las credenciales que te entrego tu proveedor de servicios Host Pasas el Emulador a la carpeta raiz de tu host Cambias los datos de tu char_athena.conf en este file editas el // Login Server IP y el // Character Server IP pones la ip del host. Edita tambien el // Server Communication username and password. Porque el default S1 Y P1 todos lo conocen, este debe coinicidir con la de tu main sql. En login_athena.conf no se editan ips. pero puedes volver a habilitar o deshabilitar la creacion de chars usando _M o _F, esto por si quieres que los registros sean únicamente por Control Panel // Can you use _M/_F to make new accounts on the server? // Note: This only works if client side password encryption is not enabled. new_account: no En map_athena.conf Colocas el mismo server comunication username y password que tienes en tu sql y en tu char_athena.conf, el default es S1 y P1 pero tu elige uno que nadie conozca. // Interserver communication passwords, set in account.txt (or equiv.) userid: passwd: En inter_athena.conf Aqui no se editan ips ni puertos, aquí solamente se se colocan las credenciales de las _db: y _pw: correspondientes a las que tienes creadas en la base de datos de tu proveedor de servicios. // MySQL Login server login_server_ip: 127.0.0.1 login_server_port: 3306 login_server_id: root login_server_pw: login_server_db: login_codepage: login_case_sensitive: no ipban_db_ip: 127.0.0.1 ipban_db_port: 3306 ipban_db_id: root ipban_db_pw: ipban_db_db: ipban_codepage: // MySQL Character server char_server_ip: 127.0.0.1 char_server_port: 3306 char_server_id: root char_server_pw: char_server_db: // MySQL Map Server map_server_ip: 127.0.0.1 map_server_port: 3306 map_server_id: root map_server_pw: map_server_db: // MySQL Log Database log_db_ip: 127.0.0.1 log_db_port: 3306 log_db_id: root log_db_pw: log_db_db: log_codepage: log_login_db: loginlog Abrir y Compilar tu emulador remotamente Para abrir tu emulador cargado al host, necesitaras un programa llamado Putty que puedes descargar aqui https://www.putty.org/ Al abrirlo en el campo Host Name or IP adress colocas la Ip de tu host y le das OPEN Ya estas dentro de tu vps, y el te va a solicitar el user y el password que te proporciono el Host, debes tener cuidado al colocar el password porque no se van a mostrar los typing en la consola. Al entrar exitosamente tendras un display de los comandos preparados por su proveedor, generalmente son ON, OFF, PREPARAR, COMPILAR etc. Con los que puedes arrancar, detener, reiniciar o compilar el emulador que tienes cargado en el host. Deberas compilar y iniciar el emulador después de haber editado los confs con los datos del host. Aqui vemos el trabajo de compilación mediante vps Aqui vemos como ha iniciado el servidor, debe estar lleno de status y no errores Aqui un logeo exitoso Recuerda editar tu sclientinfo y ponerle la ip de tu provedor de host.


 1 point
 -
RO Patcher Lite About Replacement for Gravity's RO patcher. Works faster and doesn't consume your entire memory for just seeing it crashing, aside from this, it works almost exactly as the official patcher does, so that it shouldn't break, unless Gravity changes something vital to their patcher. It works on every 32-bit and 64-bit Microsoft* Windows* platform and is free of any cost. Known Issues None. Download & Website http://ai4rei.net/p/rsu (discord available for real-time support) License This work is licensed under a Creative Commons Attribution-Noncommercial-No Derivative Works 4.0 International License.1 point
-
Need the latest kRO Install folder for your private server? Look no further! ----> Download <---- Latest: 2023-04-04 Installation: Official kRO Updated: 04/04/2023 Download Link: https://mega.nz/folder/jUsDgRxQ#ttLmLjPY9p9cfU5_ShWVCw Package contains RSU RO Patcher Lite for kRO and kRO RE by [Ai4rei] This package is maintained by [Akkarin] Note: Due to continued abuse of my webservers, the files have been moved to MEGA. You can download an extractable .zip of an installed kRO directory, or you can download the official installer from kRO's website. Note: If you require older maps that are compatible with 2021 and older clients, download the 2021 .zip. A fan of this topic? Hit the rep button1 point
-
RO Open Setup About Clone of the default game setup application, shipped with every RagnarokOnline installation. It works on every 32-bit Microsoft* Windows* platform. Source is available for customizations. Known Issues None. Translations English - 100% (primary) French - 100% (Valioukha) German - 100% (Xalion) Brazilian Portuguese - 100% (EvilPuncker) Czech - 100% Japanese - 100% (Mintmoon) Russian - 100% (Jarek) Simplified Chinese - 100% (tinpont) Spanish - 100% (jaBote) Thai - 100% (iSuzutsuki) Traditional Chinese - 100% (Angelmelody) translate OpenSetup into your language Q & A Why does the client not use the Lua settings? Use latest OpenSetup version. If that's already the case, use newer client. Why does OpenSetup not let me to save without Administrator? A few settings are still written to a location in the registry, that needs Administrator rights. I have have issues with OpenSetup, is there something I should add to my report? When you experience the issue, press Shift+Esc inside the OpenSetup window until it closes and provide the generated log file (exename.log) along with your report. Download & Website http://ai4rei.net/p/opensetup (discord available for real-time support) License This work is licensed under a Creative Commons Attribution-Noncommercial 3.0 Unported License.1 point
-
View File Euphy's Quest Shop with Success Rates In response to this post : I just added success rate function. Enjoy! Original Script is by Euphy and I just added some functions to this. PS : if there are any broken event scripts ( due to old versions ), just DM me the link and I might be interested in updating it. PPS: I will only FIX it and not modify it at all. ? Submitter Mabuhay Submitted 11/10/2019 Category Games, Events, Quests Video Content Author Euphy, Mabuhay1 point
-
set .@left, 50 - $giveaway; mes .@left + " Items left."; change to mes "Give Away: "+ $giveaway;1 point
-
if (wd.miscflag) replace it with if (wd->miscflag)1 point
-
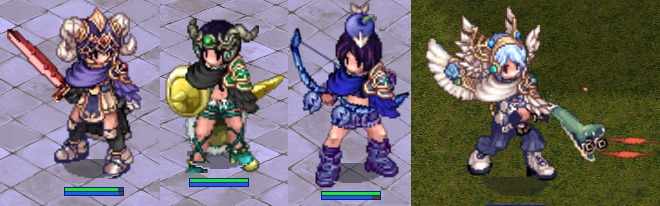
@Alberan Wow, thanks that you say about ESRGAN! I work with some npc sprites and it`s really looking good in game~ New part of sprites:


 1 point
 -
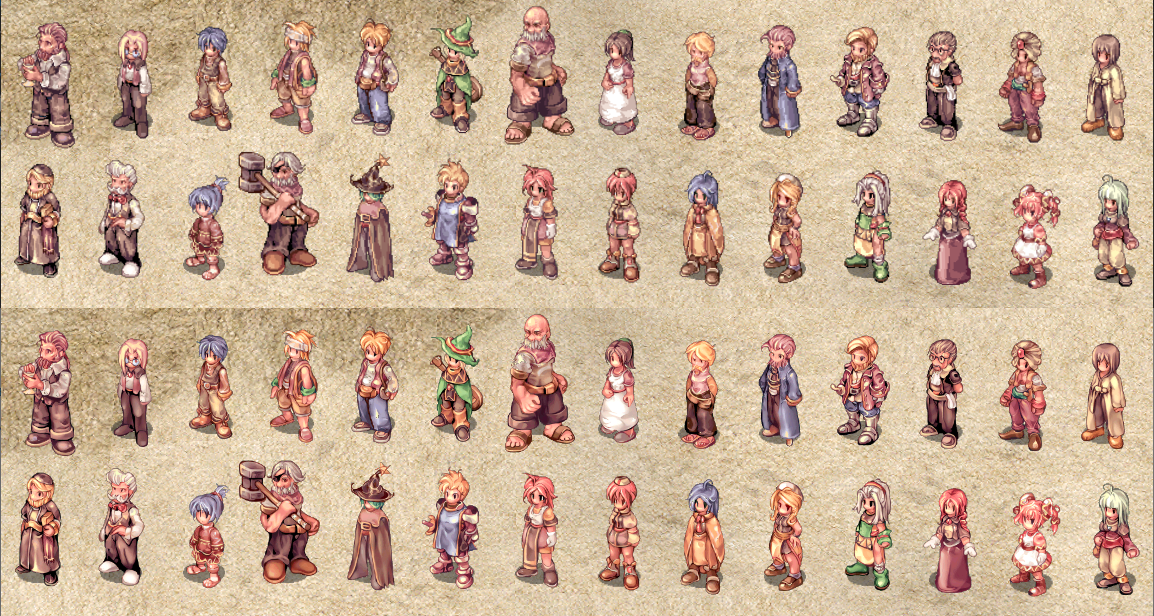
Version 1.0.0
3304 downloads
Introduction: This package are currently contains around 90~100 hairstyles for both male/female character. I obtained these from various sources like old eAthena, rAthena, Hercules, TheSpriteRepository and other member who shared these sprites with me etc. I don't remember who exactly made each of the sprites, or who even shared these... tell me if you know who are them. If any of these hairstyles are custom work that are meant for private use, kindly contact me, so that I could remove it from the listing. I do have more than this amount, but since my current test client (2018-06-20) can only support up to 100 sprites, so I randomly picked 100 and only upload it here. It included the default 31 hairstyle from kRO, but I think I replaced the 1~20+ hairstyles from JRO which dyed the hair in dark color, the rest are custom hair styles. How to use: You can either merge the provided GRF into your own GRF Load it as another individual GRF using the DATA.ini file Extract it and put it in your Data folder * Depend on your client hexed with whatever settings. Search forum for all these guides. Disclaimer: You're free to share with everyone but do not monetize the contents in any way! These materials are meant for study or research purpose. Use these at your own risk, and always give credit to original author. If there exists issue with sprite file, for example: sprite misalignment, error, etc, kindly ask help from any member who have knowledge with sprite edit. If there exists issue with palette color file, for example: messed up color, error, etc, kindly ask help from any member who have knowledge with palette color edit. Fun Fact: Do you know you can actually combine all male and female hairstyle (including doram) to create a list of universal hairstyles that could be used by any gender of player and doram?Free1 point -
![More information about "[FREE] Event Manager"](https://rathena.org/board/screenshots/monthly_2019_11/logo_new_standalone.thumb.png.797ed20519c1f6b7c5035d191b660e77.png)
Version 1.1.1
1093 downloads
Ehh since my event scripts are piling up, I decided to make an Event Manager // Basic Event Manager // By Mabuhay /*-=-=-=-=-=-=-=-=-=-=-=-=-=- Currently added are the ff : {#} NAME - "NPC_NAME" [1] Bombring - "Event_Bombring" [2] Dice - "Event_Dice" [3] Last Man Standing - "Event_LMS" [4] Novice V Zombie - "Event_NvZ" [5] Poring Catcher - "Poring_Catcher" [6] Poring Hunter - "Poring_Hunter" (Added 12-15-2019) -=-=-=-=-=-=-=-=-=-=-=-=-=-=-*/ // For easier management of Event NPCs ///////////////////////////////////// // NOTE: // ///////////////////////////////////// // I don't support any modifications unless I want to. // But if you want to change things especially the rewards, // Please refer to my F_Reward Functions // https://rathena.org/board/files/file/4068-itemvariablepoints-reward-function-for-beginners-or-lazy/ // You should be able to easily change the rewards // If you have basic scripting knowledge Header Settings: OnInit: // 1 = item reward // 2 = variable/cashpoints reward // If you want to set item and variable/cashpoints rewards, do 1|2. // If you only want 1, just choose between 1 or 2 $event_options = 1|2; // If item reward enabled // What items will be rewarded setarray $event_item_reward, 501, 10, 502, 5; // If variable reward.. set to your variable. // If cashpoints.. set to #CASHPOINTS / #KAFRAPOINTS (Free Cash Points) $event_var$ = "#EVENTVARIABLE"; // Variable name? // If cash points, set to Cash Points // If your custom var, set to the name of that thing. $event_var_name$ = "Custom Points"; // How much points gain if #VAR / #CASHPOINTS / #KAFRAPOINTS? $event_var_gain = 1; $event_item_arr = getarraysize($event_item_reward); // @eventstart for GM bindatcmd "eventstart", strnpcinfo(0)+"::OnStart",60,60; // @eventjoin bindatcmd "eventjoin", strnpcinfo(0)+"::OnJoinEvent"; end; You may now use @eventstart for GMs to select which ones to start. @eventjoin for players to enter and see which event is currently active Event timers / Clock are to be set here : // OnClock<hour><minute>: donpcevent "<npc_name>::OnStart"; OnClock0000: donpcevent "Event_Bombring::OnStart"; end; //----- 12 mn OnClock0100: donpcevent "Event_Dice::OnStart"; end; OnClock0200: donpcevent "Event_LMS::OnStart"; end; OnClock0300: donpcevent "Poring_Catcher::OnStart"; end; OnClock0400: donpcevent "Event_NvZ::OnStart"; end; OnClock0500: donpcevent "Poring_Hunter::OnStart"; end; OnClock0600: donpcevent "Event_Bombring::OnStart"; end; //----- 6 am OnClock0700: donpcevent "Event_Dice::OnStart"; end; OnClock0800: donpcevent "Event_LMS::OnStart"; end; OnClock0900: donpcevent "Poring_Catcher::OnStart"; end; OnClock1000: donpcevent "Event_NvZ::OnStart"; end; OnClock1100: donpcevent "Poring_Hunter::OnStart"; end; OnClock1200: donpcevent "Event_Bombring::OnStart"; end; //----- 12 nn OnClock1300: donpcevent "Event_Dice::OnStart"; end; OnClock1400: donpcevent "Event_LMS::OnStart"; end; OnClock1500: donpcevent "Poring_Catcher::OnStart"; end; OnClock1600: donpcevent "Event_NvZ::OnStart"; end; OnClock1700: donpcevent "::OnStart"; end; OnClock1800: donpcevent "Event_Bombring::OnStart"; end; //----- 6 pm OnClock1900: donpcevent "Event_Dice::OnStart"; end; OnClock2000: donpcevent "Event_LMS::OnStart"; end; OnClock2100: donpcevent "Poring_Catcher::OnStart"; end; OnClock2200: donpcevent "Event_NvZ::OnStart"; end; OnClock2300: donpcevent "Poring_Hunter::OnStart"; end; //----- 11 pm Currently I just alternately activate events per hour. You can change the event time as you wish. You may choose any of the ff: OnClock<hour><minute>: OnMinute<minute>: OnHour<hour>: On<weekday><hour><minute>: OnDay<month><day>: I hope this helps. If you want me to add more, just PM me on an event script that needs to be updated. Thank you. ? Compatibility is your responsibility. No backward Compatibility Support. Enjoy! NOTE : If you find this useful, please click the Upvote button to motivate me to do stuffs like this ? And you are welcome!Free1 point -

Version 1.0.0
619 downloads
In response to this post : I just added success rate function. Enjoy! Original Script is by Euphy and I just added some functions to this. PS : if there are any broken event scripts ( due to old versions ), just DM me the link and I might be interested in updating it. PPS: I will only FIX it and not modify it at all. ?Free1 point -
Version 1.0.0
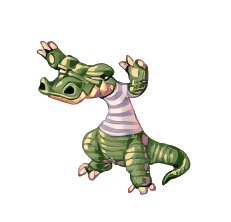
886 downloads
Hello everyone! I'm maken06. This is my second monster, enjoy it ? Don't steal credits, give credits to me, that I cost my effort to do them. Do Not edit my work without my permission, It includes recolors. pd: Do not forget to give me a reputation or reactionFree1 point -
Version 2.2.0
41117 downloads
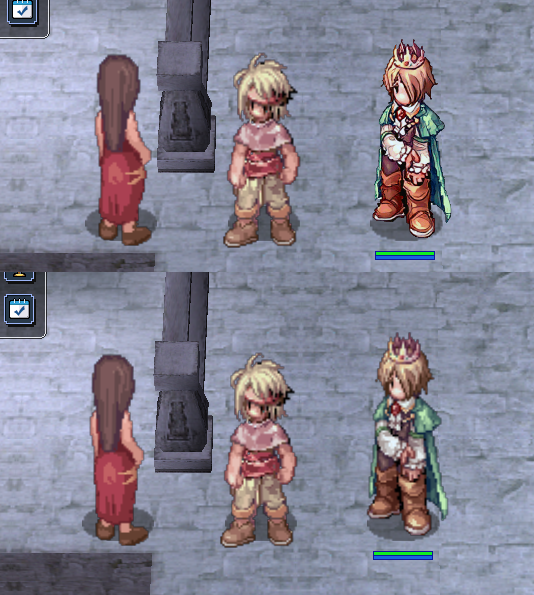
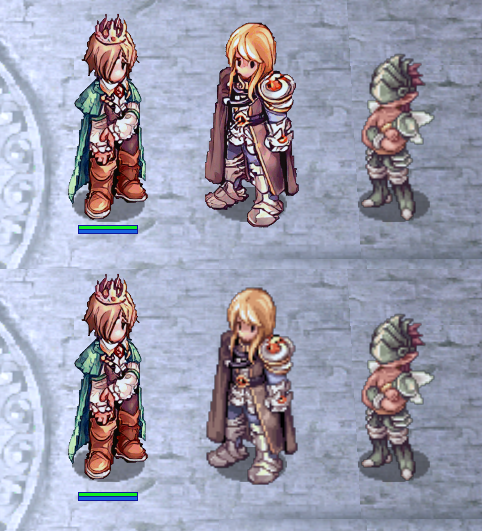
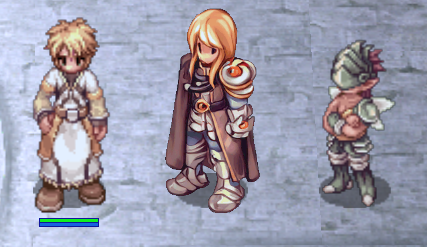
Third Job Costumes + New Classes The Correction With the advent of jRO releasing new Job Costumes, and also, the new classes from the Taekwon branch, many of server owners want to replace the vanilla sprites or even, implement the bodystyle system. But, there's a catch! Originally jRO, and now, even kRO spriters, have made it completely off of the default pattern of palette. In a classic example, you can notice the pattern of the RO palettes. What matters is the position of the colours, as an example, for all jobs, the white-ish tones will be always on the same row, so we can use it to create custom palettes. See how it works: But jRO didn't follow the classic pattern, making it incompatible with custom palettes (@Kamishi ones included). So, I edited frame by frame of each job sprite, of each gender, mounted or not, correcting them, converting them in a way so many of the previously created palettes will work. This package includes: Alternate Outfits: Alternate Royal Guard M/F + Gryffon Battlemount + Lion Mount Alternate Ranger M/F + Warg Battlemount + Ostrich Mount Alternate Minstrel/Wanderer + Ostrich Mount Alternate ArchBishop M/F + Alpaca Mount Alternate Warlock M/F + Fox Mount Alternate Mechanic M/F + Savage Mount Alternate Genetic M/F + Savage Mount Alternate Guillotine Cross M/F + Hyena Mount Alternate Shadow Chaser M/F + Hyena Mount Alternate Sorcerer M/F + Fox Mount Alternate Sura M/F + Alpaca Mount Alternate Rune Knight M/F + Dragon Battlemount + Lion Mount New Classes Star Emperor M/F + Wolf Mount Soul Reaper M/F + Wolf Mount As requested by @Emistry, I also added an extra, making it more compatible to default palettes: Kagerou/Oboro + Frog Mount Following the another @Emistry's request, all files are now already on GRFs. The previous version had no Cashmount palette included, this one fixes the issue. Only the already released costumes are supported at this moment. The Rune Knight seems to be the last of them, it's over a year from the first release! As a final part of the package, I'm including Classic Palettes for all Alternate Costumes. Enjoy the final product!Free1 point