Leaderboard


Popular Content
Showing content with the highest reputation on 07/09/18 in all areas
-
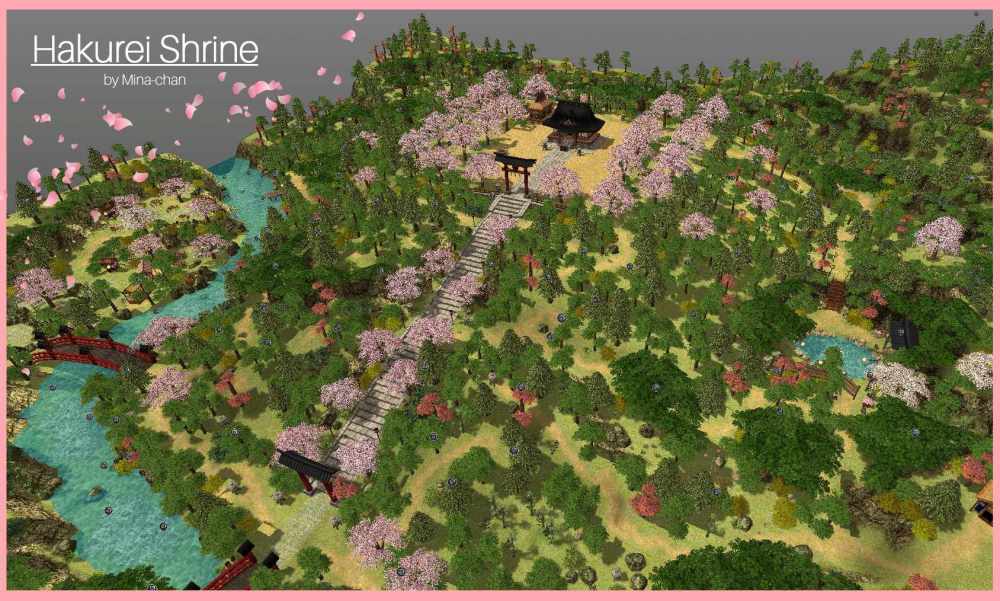
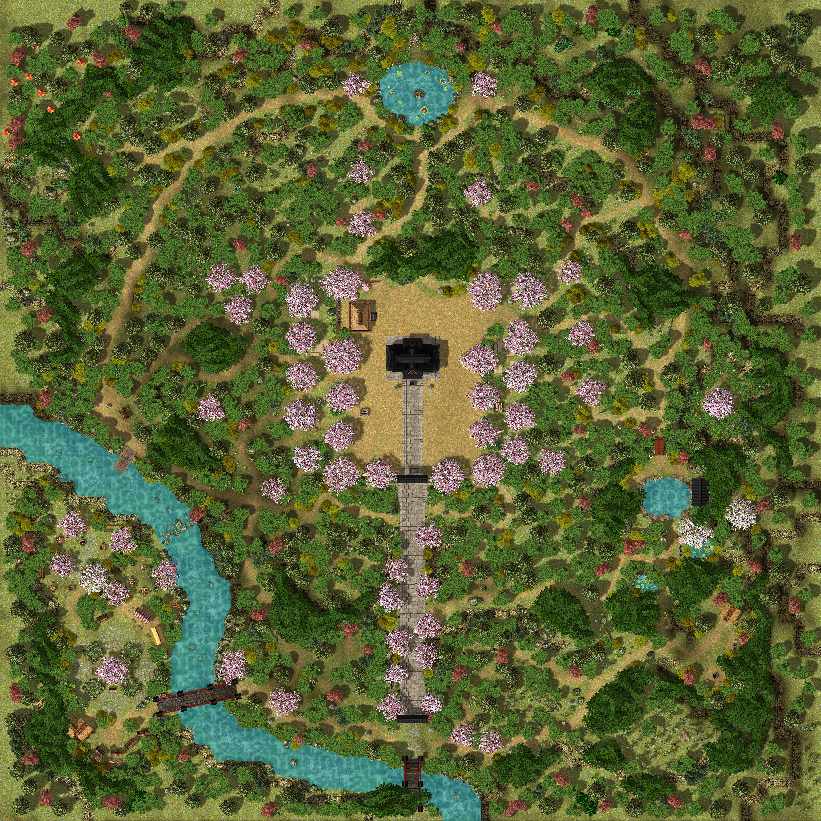
Hii! This is a map I finally finished recently, after months of working on it. It's also the very first map that I've made. As the title says, it's based on the Hakurei Shrine from Touhou! Although with some variations to make it even more explorable! It has several custom retextured objects, as well as many places to explore! Specially thought for romantic or relaxing purposes ^^ It has a touristic area, an Onsen or Thermal Open Bath, and much more! (As you can see in the previews. Video Showcase Image Previews ☆○o 。NEW 。o○☆ A revisited version was made and by April 23rd of 2019, the changes are: Even more ground color was added and fixed, and a new version of the map was made, with fallen petals around the sakura trees. Any comment is appreciated, thank you! x3
 3 points
 -

Version 1.0.2
5491 downloads
Heya, This is a tool to edit mapcache files for rAthena (db/(pre-)re/map_cache.dat). It is already part of Server Database Editor as a sub tool, but I've made it a tool on its own instead. It was made to fix the issue with WeeMapCache not assigning the water tiles properly. Otherwise, it's pretty much the same interface, but easier to use. The most recent version will always be found from the mediafire link below: http://www.mediafire.com/file/tjlnooebx6am673 Source files: https://github.com/Tokeiburu/Mapcache-EditorFree3 points -
*getobjects(<type>,<data>{,"<map name>"{,<x1>,<y1>,<x2>,<y2>}}) Get object GIDs on specified location based on specified 'type'. The returned value is number of all objects found. The GIDs is stored in temporary NPC variables. <type> can be combined value as bitwise of BL_PC - Character object BL_MOB - Monster object BL_PET - Pet object BL_HOM - Homunculus object BL_NPC - NPC object BL_MER - Mercenary object BL_ELEM - Elemental object 'data' values are bitmask of 0x1 - GID (default) 0x2 - Name 0x4 - Char ID (only for BL_PC) 0x8 - Class (Job ID for BL_PC, Sprite ID for BL_NPC, and Class for other types) Default 'map name' for look up is invoker location or NPC if no invoker found. Object GID found will be saved in these arrays, while 'type' is value of UNITTYPE_*. Use getd for good practice. .@obj_type_id[] .@obj_type_name$[] .@obj_type_cid[] .@obj_type_class[] Example 1: getobjects(BL_PC,0x1); .@n = getarraysize(getd(".@obj_"+BL_PC+"_id")); for (.@i = 0; .@i < .@n; .@i++) { getitem 607,1,getd(".@obj_"+BL_PC+"_id["+.@i+"]"); } Example 2: getobjects(BL_PC|BL_NPC,0x1|0x2); // For players .@pc = getarraysize(getd(".@obj_"+BL_PC+"_id")); for (.@i = 0; .@i < .@pc; .@i++) { getitem 501,1,getd(".@obj_"+BL_PC+"_id["+.@i+"]"); } // For NPCs .@npc = getarraysize(getd(".@obj_"+BL_NPC+"_id")); for (.@i = 0; .@i < .@npc; .@i++) { npctalk "My number is "+(.@i+1)+"",getd(".@obj_"+BL_NPC+"_name$["+.@i+"]"); } Keywords how to get players (account id) on a map, how to get player/char name on a map, how to get char id on a map, how to get char's job on a map, how to get npc id on a map, how to get npc name on a map (exname with hidden part), how to get monster gid on a map, how to get monster name on a map, how to get monster id (class) on a map, .... so does with homunculus, elementals, pets, mercenaries Downloads Latest: getobjects-rA-20180806-65df844d.diff getobjects-rA-20180708-b2c026d4.diff testgetobjects.txt2 points
-
Aerie's Guide for BrowEdit HTML version The aim of this guide is to help BrowEdit users, and novices, to realize a good map. There are already a number of guides on mapping for Ragnarok, especially for BrowEdit, I don't wish here to make here a simple overview of the steps, but add a real value. I will present, but briefly, the major steps for creating a map. I will focus in each part on advices, tips and possible difficulties. Many links, programs, methods, images are also available for you to build up tools for a good mastery of BrowEdit. I will also detail the addition of textures, models, water and effects. I recommand you the YukiTsuki guide for know how use BrowEdit : http://browedit.excalibur-nw.com/?a=viewtopic&id=533 And another, really important for get all keys with a nice interface, made by Steph81 : http://mappingro.prauds.fr/ (Click on BrowEdit, I'll refer to other sections too) If you want to know all possibilities (with keys) of each section. I wanna render thanks to Borf and his team for have create this program. (I'm still talking about BrowEdit ;D) Let me know if you want me to develop another part in this guide or to discuss another concept. (If a moderator thinks, it's not in the right section, please move it in the proper one. I've choose to put this guide here because it's for mappers or interested people, I hope they won't miss it ;D). Table of Contents : Configuration of BrowEdit I - Create a map and Apply textures. II - Relief III - Models IV - Gat V - Walls VI - Editing Water VII - Lightmaps VIII - Effects IX - Finishes X - Add Custom Textures XI - Add Custom Models XII - Tips Configuration of BrowEdit. Open data/configs/rocheaptop.xml per default in some versions or look for your configuration file, you must open and follow the link given in config.txt in the BrowEdit folder. Let's see what we can see in : <config> <ro directory="c:\program files\gravity\ro\"> <grf>c:\program files\gravity\ro\sdata.grf</grf>[color="#FF0000"] //You must configure it for link your grf, the program'll only read ressources linked[/color] <grf>c:\program files\gravity\ro\data.grf</grf> </ro> <files> <models> [color="#FF0000"] //Change it, if you want use alternate list of items, check [url="http://mappingro.prauds.fr/"]http://mappingro.prauds.fr/[/url] , you can get alternate list, classed by theme[/color] <model>data/romodels.txt</model> <model>data/alphamodels.txt</model> <model>data/randommodels.txt</model> </models> <textures> <texture>data/rotextures.txt</texture> <texture>data/texturescustom.txt</texture> </textures> <sounds> <sound>data/rosounds.txt</sound> </sounds> </files> <graphics>[color="#FF0000"] //You can choose the resolution of BrowEdit to fit it to size of your screen[/color] <resx>1024</resx> <resy>768</resy> <fullscreen>false</fullscreen> [color="#FF0000"] //write true for fullscreen mod[/color] <bpp>32</bpp> <font>tahoma</font> [color="#FF0000"] //check other font in data/fonts[/color] <skin>data/skins/hamvista.xml</skin> [color="#FF0000"] //Checl skins in data/skins[/color] <notilecolor>FFFF80</notilecolor> <bgcolor>8000FF</bgcolor> </graphics> <undo size="50" /> <language>english</language> <firstmap>prontera</firstmap> <splash>data/hamtaro.tga</splash> <water> [color="#FF0000"] //Check water section of the guide[/color] <directory>data\texture\¿öÅÍ\</directory> <extension>.jpg</extension> <count>8</count> </water> <gattiles> <tile>0</tile> <tile>1</tile> <tile>2</tile> <tile>3</tile> <tile>4</tile> <tile>5</tile> <tile>6</tile> </gattiles> <wm> [color="#FF0000"] //Here for a modification of some windows, don't need to be detailled[/color] <minimap> <x>598<> <y>70</y> </minimap> <hotbar> <x>744<> <y>0</y> </hotbar> <sprite> <x>237<> <y>184</y> </sprite> <textures> <x>25<> <y>25</y> <w>974</w> <h>718</h> </textures> <modelswindow> <x>25<> <y>25</y> <w>974</w> <h>718</h> </modelswindow> <texturetools> <x>0<> <y>586</y> <w>56</w> <h>124</h> </texturetools> <texturebrush> <x>56<> <y>53</y> <w>905</w> <h>665</h> </texturebrush> </wm> </config> ________________________________________________________ I - Create a map and Apply textures. - Under the version 600, create a map by File/New/ occure some problems. You can use File/Open From Grf/ save the map and with Tools/Clear Map, clear it. - An important things too, is the border of the map. If you don't let 2 tiles, you'll have dirty borders after when you'll add lightmaps. So, I always using a black border like that : It'll really usefull for make clean borders. Players won't see under the map when they approching sides : I don't have many things to say about this part, for know keys and opportunities, please refer to Steph81's work : http://mappingro.prauds.fr/ ________________________________________________________ II - Relief : Some Maps are particularly flat monotone, you must use the terrain, here in two parts, I'll show you how to make a single mountain, and then show you how to use the inclined surfaces and walls while using the copy / paste in BrowEdit. 1) Make Mountains : Place textures : With F2 mod chosse the height of the upper part : F3 mod and F key for link texture, soft it with S key after. 2) Tilt & Walls : This is an important part, you can make many things with it and it'll done a complexe relief to your map. How tilt textures : Then like the previous step for keys : The aim is to alternate tilts, flat textures and walls, for doing something like that : You must use copy/past system who is really usefull for make. With F2 mod select a part of your map or a tile and past where you want. It breaks the monotony of flat maps with a few simple walls. With some try you should obtain more complexe forms, like that : ________________________________________________________ III - Models : 1) Choose the right size : Always check the size of your models, you don't need to wait for a test IG, you can use Edit Mode/ Sprite Edit. Once selected make ctrl + Left Click : A Random character'll appears, and'll serve of scale. Another advice is the utilisation of different Scales, turn them, also use different rotations. It'll adding a new kind of variety in your models : Only one model used. 2) Using Object Group Edit: This is an important part to know for be faster. (F11 mod) Use different models and size like that : Select them and press D (for Duplicate), you can rotate them too. It's the better way for make maps with different models, a huge vegetation and a variety of situations. ________________________________________________________ IV - Gats : It's an easy part, you'll not have difficulties. But some notes : If you can't move in your map IG, it can be due to the creation of map in BE versions under 600, who don't support New Maps option. If you modify an original map, becareful with the priority read of gat files by the emulator (if use grf enable) and to rebuilt your mapcache if you're using it. In the gat mod, you can use the key I in the tile choosen for get exacts coordinates. (Usefull for place NPC on not walkable tiles) 1) Different type of Gat : Let's see what we get in src/map/map.c : inline static struct mapcell map_gat2cell(int gat) { struct mapcell cell = {0}; switch( gat ) { case 0: cell.walkable = 1; cell.shootable = 1; cell.water = 0; break; // walkable ground case 1: cell.walkable = 0; cell.shootable = 0; cell.water = 0; break; // non-walkable ground case 2: cell.walkable = 1; cell.shootable = 1; cell.water = 0; break; // ??? case 3: cell.walkable = 1; cell.shootable = 1; cell.water = 1; break; // walkable water case 4: cell.walkable = 1; cell.shootable = 1; cell.water = 0; break; // ??? case 5: cell.walkable = 0; cell.shootable = 1; cell.water = 0; break; // gap (snipable) case 6: cell.walkable = 1; cell.shootable = 1; cell.water = 0; break; // ??? default: ShowWarning("map_gat2cell: unrecognized gat type '%d'\n", gat); break; } Walkable : Where players and monsters can walk Not Walkable : Unvaible part of the map (but you can place npcs) Not Walkable (no snipe) : You can't walk and can't snipe too Not Walkable (snipable) : You can't walk but you can snipe. The Yellow wakable seems be used for skills who requieres water. (Holy Water) Use them in PvP / GvG maps or for your scenari. Here an, attack of a lime : 2) Tilt Gats : When you have finished your map relief, you can started the gat editing. First you are gats aren't at the good level if you have using F3 mod and a big pencil. You have different tools proposed for automatic gat editing : - Edit / Set Gat Height : You must use it each time you arrive at this step. All tiles will become similar in level and angle to the ground under them. - Edit / Set Gat Collision : Make walkable all flat ground and non-walkable all section inclined. (like mountains). - Edit / Set Gat Collision 2 : This option will calculate all models and make non-walkables tiles under them. But It's not perfect and you must verifiy everywhere. So I recommand you to use Gat Height, then increaze the size of the pencil and make all your map non-walkable, then only use walkable option. It'll be faster. Becareful for suspended tiles, when done don't use Set Gat Height option or you'll be ready to restart all again ;D You can make tilt gat, copy and past them, ... refet to the Relief section for get some keys. 3) Using Scripting for more type of gat : As we have see, we're limited in the choice of gat. Only use detailled one. Now, I'll present you some new cell type and a basic script for using them : - script Chat-Vending Zone -1,{ OnInit: setcell "prontera",0,0,360,360,cell_novending,1; setcell "prontera",137,268,147,235,cell_novending,0; setcell "prontera",163,267,172,235,cell_novending,0; setcell "prontera",0,0,360,360,cell_nochat,1; setcell "prontera",139,173,147,153,cell_nochat,0; setcell "prontera",163,267,172,235,cell_nochat,0; } (Here the 1 = means activate) Here, I'm forbidden the using of vending and chat in the City of Prontera, but i'm giving some exceptions on specific zones. Can be use in temporary scripts, for non-walkable per example. List of avaible cell : (db/const.txt) cell_walkable cell_shootable cell_water cell_npc cell_basilica cell_landprotector cell_novending cell_nochat ________________________________________________________ V - Adding Walls : Here, we'll see how set a wall. Really interesting to put some walls, you'll get less limitations, it's open you new possibilities of complexe maps. First, you must select a texture, you're permitted to use a part of the texture. You got upper and lower part of the wall, apply textures depending of your orientation in the map. 1) Automatic mod : Press : or ; touch for set walls, one click and it'll be one part who'll be set : Let this touch press then you'll get the texture fit along the entire wall. (Sometimes, this function doesn't work, depending of version of program and the loading of the program ... try to relaunch it, 3-4 times) Now, you can apply a texture well sized. Press Z touch (or Z and sweep along the purple wall indication OR alt + Z). Depending of position of the wall. You can also set a part of a texture and fit it automatically to the wall : (Same keys) 2) Manual mod : With F4 mod you can open the WallTexture window. You can flip to horizontal or vertical. And also selecting with a square the part of the texture, you can move each sommet for get original part of the selected texture. ________________________________________________________ VI - Editing Water : 1) Configure water in my map : This part is kinda easy to understood : Windows/Water You got 6 options, I'm gonna present them : - Amplitude : (0 = none) means the movement of the water, for a rough sea or a calm one. - Height : (0 = default height of map) positive figures = the water goes deeper under default height / negative figures = the water goes upper the default height. - Phase : the speed of the amplitude resolution. - SurfaceCycle : The speed of the texture moving (a water type is composed of 32 frames) - Type : Change the texture of Water - Speed : ... 2) Create new water type : A water is composed by 32 frames in *.jpg format. They are read continuously for make an animation. An automatic transparency effet happens too. Create a folder data/texture/¿öÅÍ/ It'll be in this folder that you'll put all your water files. All files must be in this format : So you have to make 32 textures for an entire water cycle. XX means the number type of your water (Check step 1 / Type option). I've created 8 new waters type, you can get them here : http://www.eathena.ws/board/index.php?showtopic=253679 3) Adding new water type : Make a grf in 0x200 format with your data. You must configure BrowEdit so the program can read the addition : Go to BrowEdit folder : data/configs/rocheaptop.xml (Don't forgot to link the grf, open data/configs/rocheaptop.xml per default in some versions or for nom your configuration file, you must open and follow the link given in config.txt in the BrowEdit folder.) Now take your configuration file : And modify your water count. Water count must be equal to latest XX + 1 (previous step). ________________________________________________________ VII - Lightmaps : Generally, it's the most dfficult part to configure, many mappers asking for it in support section. You have two parts to configure a global one who gives the ambiance of your map, and lightmaps for make some touches of colored lights in parts of your map. I'll also present you how make shadows and some tools. Don't forgot, lightmaps looks generally pretty with Browdit but IG you'll have some dirty apply, if it's your first time, take time for check them before know exactly what you're doing. 1) Global Lighting : Windows/ Global Lighting : Diffuse Light gives you the light of shadows cast by the position of the sun. (In models and in textures). You can choose with the longitude and latitude angle for the basic sun. Colors should never be upper 1, it's in RGB colors (check tools in the last part). Ambient Light, it's a kind of filter on your textures and models. It's in RGB system too. Intensity'll be another way of configure darkness / brightness. 2) Lightmaps Configuration : Light windows : Color stil works in RGB system. Intensity : Generally I'm using 127, upper it's really to pronounce (depends of your idea) Max Light Increment : It's for make priority between different lightmaps. (Just becareful for the shadow light, 4) section). Casts Shadows : recommand you to desactivate it, except for the one who'll serve for make global shadows. 3) Favorite Lights : It's very helpful, for be faster, you won't configure each time a light with same properties. Configurable in Windows/ Favorite lights. Here, I'll share my lightmaps, you'll have some colors and well configured. In your BrowEdit folder : data/lights.txt (replace lines) <?xml version="1.0" encoding="UTF-8" ?> <lights> <light> <name>default</name> <color r="0" g="0" b="0" /> <range>200</range> <brightness>127</brightness> <maxlight>256</maxlight> <givesshadow>0</givesshadow> <lightfalloff>1</lightfalloff> <height>10</height> </light> <light> <name>ambient light</name> <color r="0" g="0" b="0" /> <range>200000</range> <brightness>127</brightness> <maxlight>127</maxlight> <givesshadow>1</givesshadow> <lightfalloff>0.00001</lightfalloff> <height>50</height> </light> <colors> <light> <name>red</name> <color r="0.5" g="0" b="0" /> <range>200</range> <brightness>127</brightness> <maxlight>256</maxlight> <givesshadow>1</givesshadow> <lightfalloff>1</lightfalloff> <height>10</height> </light> <light> <name>green</name> <color r="0" g="0.5" b="0" /> <range>200</range> <brightness>127</brightness> <maxlight>256</maxlight> <givesshadow>1</givesshadow> <lightfalloff>1</lightfalloff> <height>10</height> </light> <light> <name>blue</name> <color r="0" g="0" b="0.5" /> <range>200</range> <brightness>127</brightness> <maxlight>256</maxlight> <givesshadow>1</givesshadow> <lightfalloff>1</lightfalloff> <height>10</height> </light> <light> <color r="0.5" g="0" b="0.5" /> <name>purple</name> <range>100</range> <brightness>127</brightness> <maxlight>256</maxlight> <givesshadow>1</givesshadow> <lightfalloff>1</lightfalloff> <height>10</height> </light> <light> <color r="0.5" g="0.2" b="0.2" /> <name>Torche</name> <range>100</range> <brightness>127</brightness> <maxlight>256</maxlight> <givesshadow>1</givesshadow> <lightfalloff>1</lightfalloff> <height>10</height> </light> </colors> <MyLight> <light> <color r="0.6" g="0.4" b="0.2" /> <name>Jaune Sombre</name> <range>30</range> <brightness>300</brightness> <maxlight>200</maxlight> <givesshadow>0</givesshadow> <lightfalloff>1</lightfalloff> <height>10</height> </light> <light> <color r="1" g="1" b="0" /> <name>Jaune</name> <range>100</range> <brightness>70</brightness> <maxlight>256</maxlight> <givesshadow>0</givesshadow> <lightfalloff>1</lightfalloff> <height>10</height> </light> <light> <color r="1" g="0" b="0" /> <name>Rouge</name> <range>100</range> <brightness>100</brightness> <maxlight>256</maxlight> <givesshadow>0</givesshadow> <lightfalloff>1</lightfalloff> <height>10</height> </light> <light> <color r="0" g="0" b="0" /> <name>Lumiere</name> <range>70</range> <brightness>500</brightness> <maxlight>256</maxlight> <givesshadow>1</givesshadow> <lightfalloff>1</lightfalloff> <height>10</height> </light> <light> <color r="0" g="0" b="1" /> <name>Bleu</name> <range>100</range> <brightness>100</brightness> <maxlight>256</maxlight> <givesshadow>1</givesshadow> <lightfalloff>1</lightfalloff> <height>10</height> </light> <light> <color r="0" g="1" b="1" /> <name>Cyan</name> <range>50</range> <brightness>127</brightness> <maxlight>256</maxlight> <givesshadow>0</givesshadow> <lightfalloff>1</lightfalloff> <height>10</height> </light> <light> <color r="1" g="0.9" b="0.9" /> <name>Blanche</name> <range>50</range> <brightness>100</brightness> <maxlight>256</maxlight> <givesshadow>0</givesshadow> <lightfalloff>1</lightfalloff> <height>10</height> </light> <light> <color r="0.5" g="1" b="0.5" /> <name>Verte</name> <range>60</range> <brightness>120</brightness> <maxlight>256</maxlight> <givesshadow>0</givesshadow> <lightfalloff>1</lightfalloff> <height>10</height> </light> <light> <color r="0.5" g="0" b="0.5" /> <name>Violet</name> <range>50</range> <brightness>127</brightness> <maxlight>256</maxlight> <givesshadow>0</givesshadow> <lightfalloff>1</lightfalloff> <height>10</height> </light> <light> <color r="0.6" g="0.4" b="0.2" /> <name>Orange (mine)</name> <range>50</range> <brightness>500</brightness> <maxlight>256</maxlight> <givesshadow>0</givesshadow> <lightfalloff>1</lightfalloff> <height>10</height> </light> <light> <color r="0" g="0" b="0" /> <name>Orange leg</name> <range>100</range> <brightness>127</brightness> <maxlight>256</maxlight> <givesshadow>1</givesshadow> <lightfalloff>1</lightfalloff> <height>10</height> </light> <light> <color r="1" g="0" b="1" /> <name>Rose</name> <range>40</range> <brightness>127</brightness> <maxlight>256</maxlight> <givesshadow>0</givesshadow> <lightfalloff>1</lightfalloff> <height>10</height> </light> <light> <color r="0" g="0" b="0" /> <name>Rose</name> <range>100</range> <brightness>127</brightness> <maxlight>256</maxlight> <givesshadow>1</givesshadow> <lightfalloff>1</lightfalloff> <height>10</height> </light> <light> <color r="0" g="0.3" b="0.3" /> <name>cyan dark</name> <range>30</range> <brightness>127</brightness> <maxlight>256</maxlight> <givesshadow>1</givesshadow> <lightfalloff>1</lightfalloff> <height>10</height> </light> <light> <color r="0.3" g="0" b="0.3" /> <name>rose dark</name> <range>40</range> <brightness>127</brightness> <maxlight>256</maxlight> <givesshadow>1</givesshadow> <lightfalloff>1</lightfalloff> <height>10</height> </light> <light> <color r="0" g="0" b="0" /> <name>rose dark</name> <range>100</range> <brightness>127</brightness> <maxlight>256</maxlight> <givesshadow>1</givesshadow> <lightfalloff>1</lightfalloff> <height>10</height> </light> </MyLight> </lights> 4) How make Shadows ? It's really simple, when you put all your lightmaps for color, you'll adding the two last one for create shadows. It should seems like that : First Light : Second Light : The first'll cast shadows and the second one mitigate the previous one. (Without it's really too dark, but if you prefer don't put the second one). Color 0,0,0 is the perfect light (you can of course modificate it for get another color but Global Lighting is generally enough). The Second light must be always inferior to the first or you'll not have shadows. Once calculate, use Generate/Smooth lightmaps. (2-3 times is enough) 5) Tools : For RGB colors : http://www.drpeterjones.com/colorcalc/ ________________________________________________________ VIII - Effects : 1) How Using an Effects ? Easy to use, but difficult to make them useful, why ? Because the loop time still don't work under BrowEdit, so with many effects (more than 4 seconds of duration)'ll be flooded IG and your game'll become really slow (or Freeze). Thats why, I'm using some of them directly by Script : - script EP7_lightanim -1,{ OnLight: donpcevent "#ep7effectAby1::OnAction"; sleep2 1000; donpcevent "EP7_lightanim::OnLight"; end; } //=============== ars_fild58,95,103,0 script #ep7effectAby1 139,{ OnAction:specialeffect 14;end; } Place the npc on the coordinates you wish and choose the loop with the sleep2. Here for the list of effects and images : http://mappingro.prauds.fr/ 2) Testing Effects : For make an effect avaible, you need to have ressources in your client and also them hexed in your launcher. BrowEdit list effects can be updated in data/effects.txt, just add in this format some lines : Tested them until you get a Gravity Error ;D 3) Tips for set the Loop Time : This method have been report by Akira-Toriyama : http://board.frathena.net/index.php?showtopic=1453&hl= Put your effect, then open the window Effect. For each change in each case you must press Enter touch before click on ok button. Re-open the window and your Loop Time have been changed ;D ________________________________________________________ IX - Finishes of a Map : This is an important part of this guide, you should apply this method for each maps, don't do it will occure problems, like black textures (cliping effect) and missing models. I recommand you to work on the version 586 of BrowEdit, available here : http://browedit.excalibur-nw.com/release/ (Use svn tool) for his stability and his saves function. 1) What is a Quadtree ? Quadtrees are a division of the map in small square for make a faster loading of the map. The map'll be loading gradually when the player walk onto, but the problem is the reading speed of the client, it never goes enough fast so many black textures (cliping)'ll appears. 2) Why I've got missing models when I'm IG? This happens when you use the quick save. The quick save don't calculate each models per quadtree but make a whole one, fatest yes, but occure some random vanish models. You should always use the classical Save, by the way take of your BrowEdit version, some of them only does quick save (like version 620). For be sure about your version, check your console during the save : If you got this, change your BE version : 3) How fix the Cliping Effect ? Operation to make each time you modify your maps when done. You'll need a hexadecimal editor for realize this. Example : http://www.pspad.com/en/ (freeware) Select your *.rsw files and open it with your hexadecimal editor : Look to 3rd column, first line. Here 0201, modify to 0109 and save ! Don't forget : BrowEdit always saves your map in 0x201 version. Each time you'll save your map, you must restart this manipulation. 4) How fix vanish models ? Tips from Angst. The first way can works but you will sometimes get some vanish models (with 0x201 version). The 201 version seems to don't accept objects to high. Please follow the process if you get vanish models : 5) Make a Minimap : It's really simple, when your map is done, just click on View/Top Camera. Then press Alt + Print Screen, and paste it on Paint (or another program, if you have). Save in *.bmp format / 256 colours. Name your file with the same name as your map, and put it in : Should look like that : You can resize it for save some Ko. (I'm using 400*400 generally) ________________________________________________________ X - Adding new textures : Note before, you must respect the original format : *.bmp / 256*256 / 24 bits / 71 ppp, or it won't be read by the program. 1) Where put them in the client side ? Make a folder "data", open it, inside create a one "texture" called, open it, then another called "event" (for example, if you decide to use another one, you must change the adresse in the step 2) and put all your custom textures in. (TEXTURENAME.bmp) 2) How adding them to BrowEdit ? In your BrowEdit folder : data/texturescustom.txt Open it and write with this format for each textures added : 3) Link textures to BrowEdit You must repack your data folder in 0x200 grf format for be read by BrowEdit. (Don't forgot to link the grf, open data/configs/rocheaptop.xml per default in some versions or for nom your configuration file, you must open and follow the link given in config.txt in the BrowEdit folder.) 4) Add transparency effect to a model or texture : You can apply some transparency effect on your models / textures. You must have a program using layers like photoshop : (explanations from Angst) TGA format(Photoshop): File>Save: (In the save dialogue make sure "Alpha Channels" is Checked. A popup will ask : Also on the Alpha 1 channel I find the client can't read anything below 15-25% transparency. (Black/white value) IG it shows up as fully invisible if the transparency is set below the values stated above.. Also I've found you can use larger textures for better resolution IG (Less pixelation) Common size: 256x256 Higher res: 512x512 Even Higher res: 1024x1024 Note: these sizes are for custom models using textures you create, not ones used with the RSM Editor. Wall images can be any size, though I generally do not go less than 256 wide. Please follow instructions in Adding texture part for adding it to your browedit / client. Here some examples of works on : http://www.eathena.ws/board/index.php?showtopic=269326 / http://www.eathena.ws/board/index.php?showtopic=272164 You can also get examples of TGA files in those map packs. 5) Add new water type : You can get here my new water pack : http://www.eathena.ws/board/index.php?showtopic=253679 How install them ? - Go to BrowEdit folder : data/configs/rocheaptop.xml - You must link the grf first (water.grf) in <grf></grf> - Change the count of water type like this (depending of the total of water type : officials + customs) : For make a new one, look to texture/¿öÅÍ/ . There is 32 images in jpg format per water type. So texture/¿öÅÍ/water800.jpg means 8th type frame 00 (00 to 31). You can go upper like 15th type frame : it will looks like texture/¿öÅÍ/water1502.jpg ________________________________________________________ XI- Adding new models : I recommand you first to create a database of models (and also textures who are very usefull for editing them or get the good format of models's textures). You should decompress all your grf and keep only "model" & "texture" folders (make this operation for all your grf with this kind of stuff). Then apply Unbollox to get the right names, like those one uses in BrowEdit. I'll not speak about 3ds models here, just show how add a new model and retexturing it. (For a custom one, it's the same schema). I'll also show you how use Arcturus models separately. 1) How find a model and isolate it ? Choose a model : It's this link in my database : Make a folder "data", open it, then a folder called "model", open it, then another called "event" (for example, if you decide to use another one, you must change the adresse in the step 3) and put all your custom models in. (MODELNAME.rsm) Copy and paste in : 2) Editing your model : Select Windows/RSM Editor, and select your custom model (or the copy in your data/model/event/) As you can see, you can modify the used texture (here only one), just double click in the mini-texture and a new windows'll open then choose a new texture. (For adding a custom texture check the previous chapter.) Save it. (Sometimes the mini-texture don't change until a save or reboot program). *You must replace and repack the grf used by this model each time you editing it.* 3) How adding your model in BrowEdit ? In your BrowEdit folder : data/romodels.txt Open it and write with this format for each models added : 4) Link models to BrowEdit : You must repack your data folder in 0x200 grf format for be read by BrowEdit. (Don't forgot to link the grf, open data/configs/rocheaptop.xml per default in some versions or look for your configuration file, you must open and follow the link given in config.txt in the BrowEdit folder.) 5) Using Arcturus Models : Here a special note for Arcturus model a previous game of Gravity using the same client mechanisms and formats. Link to the pack : http://www.eathena.ws/board/index.php?show...amp;hl=arcturus [by Akayoo] Check his indications for know how adding this pack, all have been already preparate in BrowEdit for those models. It can provide an interesting quantity of models and textures really useful for made original maps. But be careful you must relink all models and textures by adding them separetly. So use the Adding textures / Adding custom sections. Please don't use the whole pack for your map, it'll be really useless, nobody wants a maps with a grf of 200 Mo ;D ________________________________________________________ XII- Tips : I'll put here some tips for BrowEdit, you can of course prupose yours. 1) Two Maps in one window Launch your program, then open a map, then another one. Now you can press the tabulation touch and switch from a map to another. You can pick an object and put it in the other map. You can also copy/paste entire parts of the map. If you copy a part of a map on another becareful of Global Lighting they must be the same. When you paste, save, you'll get a Sanitary Lightmap : Boundary Light map. After saved, just relaunch the programm and it'll be done ;D 2) Added Blue Sky This question frenquently remains. It's possible to make it but you're really limited. So, I'll explain you 3 differents method for make this effect. First method : Replace an existing map with this effect. I list here all maps : Second method : Use a Hexadecimal editor, open your executable with it then search for a map with sky effect. Replace the name found by the name of your map : Third method, use a blue texture around your map and use mapflag clouds / clouds2. (Check Arcturus grf for get some sky textures.) When you're creating your map, you must put per default yellow texture and let it empty. I'll do some tests for get other effects maps like bilfrost or thanatos one. ________________________________________________________1 point
-
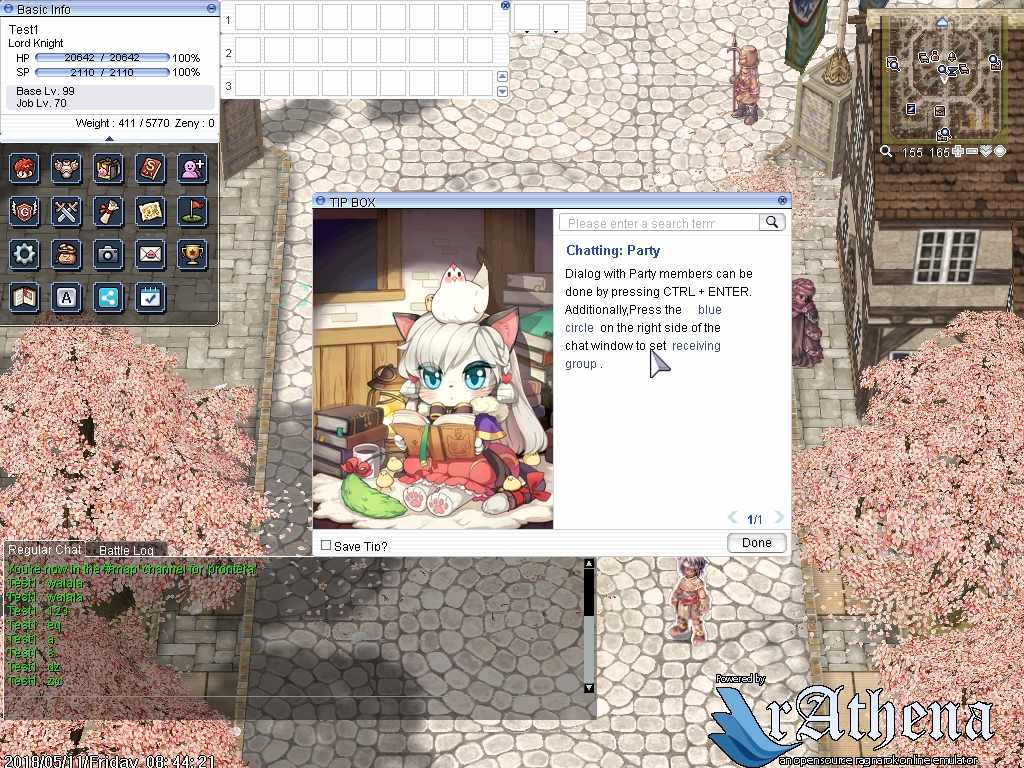
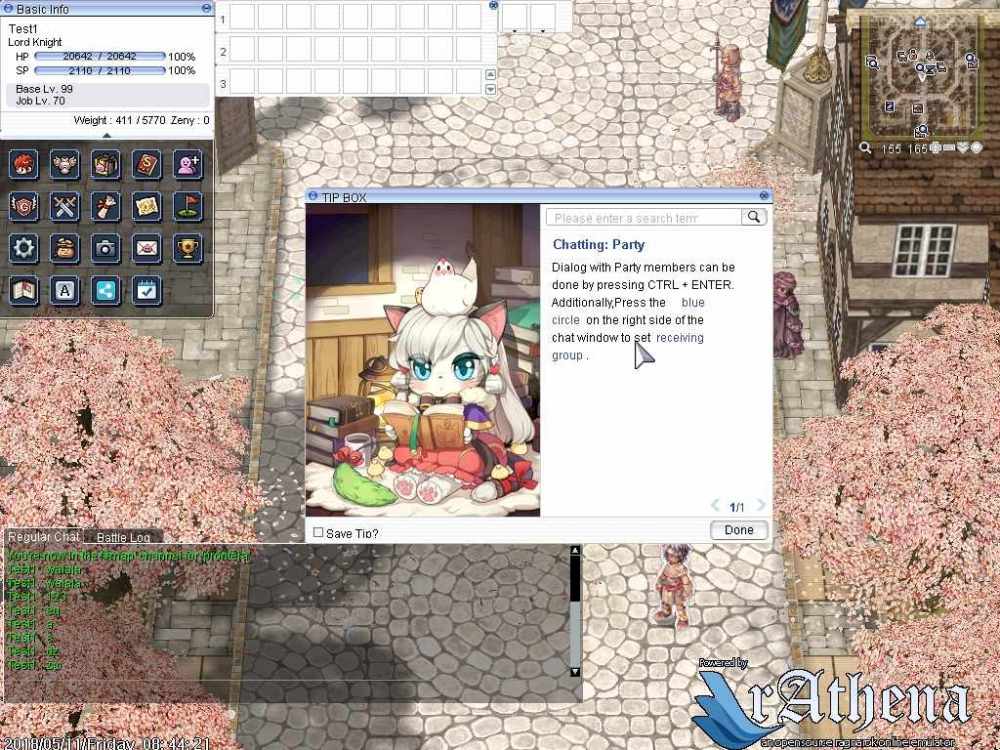
Hello everyone, I present to you a modified tip box which has been completely translated to English. Tested on: 2018-04-04c RagexeRE and worked like a charm. In your System folder in Client side, replace your tipbox.lub with my translated tipbox i have attached below: tipbox.lub Then, Patch your client with whatever settings you want and then open the patched client in hexeditor ( I used XV132 for this) IMPORTANT NOTE : Make sure you hex a "patched" client. DO NOT do it on an unpatched client or else NEMO will show errors for random "recommended patches" that you select while patching it. Find the following and replace with hex for english translation : for checkbox: BD C3 C0 DB C7 D2 20 B6 A7 20 BF AD B1 E2 English translation: 53 61 76 65 20 54 69 70 3F 20 20 20 20 20 for close button : B4 DD B1 E2 English translation : 44 6F 6E 65 (korean translation of close has only 4 strings so I had to replace it with "Done" to match the string size -_-) OR go to your NEMO folder/patches/TranslateClient.txt and add this at the end of it then patch your clients: (Thanks to @Asheraf for telling me about this xD) M: Translate Tip box ------------------------------ F: BD C3 C0 DB C7 D2 20 B6 A7 20 BF AD B1 E2 R: 'Save Tip?' F: B4 DD B1 E2 R: 'Done' Old tip box: New translated tipbox: -- On a funny Note, I had no clue what the korean translation for the Check box was LOL so I just randomly translated it to "Save tip?" instead cuz it was a logical solution LMAO
 1 point
 -
Just a ladder to nowhere... or is it somewhere? The original idea is taken from the mini-game SPC-087. You can watch the gameplay of this game on YouTube, I do not know which blogger you are more interested in, so here's the link to the teaser: Click here to go .•°'°•.•°'°•.•°'°•.•°'°•.•°'°•.•°'°•.•°'°•.•°'°•.•°'°•.•°'°•.•°'°•.•°'°•.•°'°•.•°'°•.•°'°•.•°'°•.•°'°•.•°'°•.•°'°•.•°'°•.•°'°•.•°'°•.•°'°•.•°'°•.•°'°•.•°'°•.•°'°•. 1@scp087 Please rate it if the map is good enough ~~ This map can be downloaded here https://rathena.org/board/files/file/4487-w0w_map_collection/1 point
-
We continue to experiment! This is my first attempt to send my imagination into space. Not open, but still distant and mysterious. .•°'°•.•°'°•.•°'°•.•°'°•.•°'°•.•°'°•.•°'°•.•°'°•.•°'°•.•°'°•.•°'°•.•°'°•.•°'°•.•°'°•.•°'°•.•°'°•.•°'°•.•°'°•.•°'°•.•°'°•.•°'°•.•°'°•.•°'°•.•°'°•.•°'°•.•°'°•.•°'°•. ttmoon Please rate it if the map is good enough This map can be downloaded here https://rathena.org/board/files/file/4487-w0w_map_collection/1 point
-
Version 1.0.1
3408 downloads
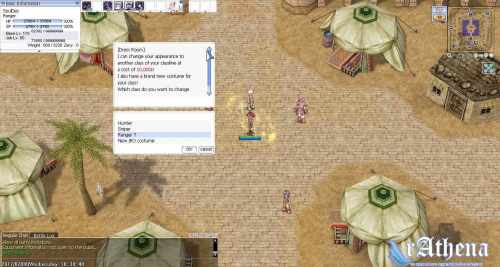
This NPC let your players change their appearance to other classes in their class line plus their jRO costume at a price. For example, a sniper can change his/her appearance to hunter and ranger (plus jRO ranger costume).Free1 point -
Just copy the item_db of the shadow equips on your pre-re folder1 point
-
Source? just copy them in your import/item_db.txt, the location of those items is re/item_db.txt1 point
-
Great work~ Did you make some custom model?1 point
-
Version 1.0.0
1851 downloads
Hey there everyone, long time no see! So it's been a very long time since I have been on these boards and I do miss it all. Feeling a little nostalgia looking through these all, I decided to release them all to the public, completely free. Going in no particular order after the first few, they are just my favorites. I hope you guys love them as I have. Sanctum Main town oriented map. My absolute favorite and latest work (When I was mapping). The idea I had for this was a chuck of a mountain broke off and landed here, subsequently creating a waterfall from atop and surrounding the town. Giving it protection and a perfect center for life. I never got around to finishing the outside of the map, I don't even know what I thought for the surroundings, perhaps just trees. Sanctum In And here is the inside map for Sanctum. The first picture is the general area where various NPC's can be placed. The second picture is where I planned to use an script to automatically place anyone who wished to vend in the one walkable/edited Gat. It would cycle through and remove those vending for a prolonged period of time and also anyone not vending at all. Guild Base This map was designed for the top guilds or just those who hold castles to have a domain of their own. The first picture is just a hangout spot for anyone in the guild. The second picture is for any combat/training/monster summoning to be done. The third picture is for the guild master where special NPC's can be placed as the server owners desire. Novice Starter Grounds PvP Valkyrie A little small for a PvP map but I enjoyed making it and like how it turned out. Trinity The first main town I made some time back around 2010. Don't judge me on some of the rookie mistakes I made with lighting and such haha. The following Trinity ___ maps are connected via a warp on the edges of the map. Trinity In Trinity Courtyard Before the Sanctum maps, this was my favorite creation. I just liked the feel of this one. Trinity Vending Similar to the Sanctum In vending idea, I wanted to limit vending to only those tiles with the colored objects on it. Trinity Port Anexus A simple instance based map with a boss at the end. Another one of my earlier works. Works The beginnings of my templates map. I would urge any current mapper to use this technique to create unique model compilations and copy it over to the map in progress. I have used this to create a forest that looks completely customized in a matter of minutes. Well there they are, open to any and all. I hope to hear your feedback on these! Thanks, Truly ~Free1 point -
June Digest 2018 The following digest covers the month of June 2018. Staff Changes: @sader1992 is now a Content Moderator. Development Highlights: CORE: Added new jRO hat effects (b2594f48) Corrected Tarot Card dispelling Clan buffs (f4e8dee5) Removed an extra semicolon typo (3a918fa4) Initial support for Star Emperor and Soul Reaper (fc951469) Moved common, config and mapcache to C++ (801d3ed9) Updated Mado Gear effects (dc413a3c) Resolved some compile issues (1ce3792a) Fixed over refine bonus (105cc3ab) Updated Freezing effects (5e9a23de) Corrected Cloud Kill behavior (f3eab9dd) Corrected Crystallized state effect (375f0ae4, 8e9f7a59) Fixed MariaDB compilation problems (21cb1a22) Synchronized source file headers (11b42569) Fixed CMake on Windows (4633ab5c) Fixed a map-server crash from getitem3 (23f7b945) Added item random options into picklog (d5a815a6) Cleaned up some hardcoded variables (880e227e) Added clan name display (9a7e27b6) Removed useless debug variables for an old issue (55f1b01b) Fixed Silvervine Root Twist animation for players (796a67be) Fixed compiler warnings in malloc.cpp on x86 (a4336fd8a) Enable autobonus to be reactivated (e7fd6aa5) DATABASE: Added lhz_d_n2 and other missing maps, plus its mapflags (f025be5f, 87db2326) Updated Achievement database (ef046159) Fixed Goldsmith Dagger class equip requirement (879ef2af) Fixed Chewy Ricecake and Oriental Pastry bonuses (f6758959) Corrected Variable Cast Rate for Geffen Magic Robe in Renewal (00e518b2) Fixed many items at Pre-RE and RE database (f7c62d28) Added missing maps to map_cache (acebcd38) Fixed Bloody_Roar and Bloody_Roar_C item scripts (e4a80565) Corrected Devil Whisper Costume drops (a215ed97) Corrected End Sektura bonus (4a64eb49) Corrected Sightless Mind range (aef23561) Fixed some accessory being refineable (380dde04, 9c50cd76) Additionally removed refineable value from Dungeon_Ticket (18873555) Fixed Drooping Pope and Imperial Spear item script (1c950627) Fixed Bunker Shield item script (8c4be8db) SCRIPT: Initial release of Morse Cave instance (d388a712) Added Old Glastheim Buffs (7c4d7692) Added Hero Ring exchanger and Enchant NPCs (6c0da909, 967f28ed) Updated custom mushroom script (006efe11) Corrected spelling issues in Dewata Quests (f67b353a) Corrected spelling and made name change in Rune Knight Job Change Quest (87913bcd) Fixed a typo in guildcastles.txt (915c1562) OTHERS: Added Inkfish to mailmap (98e2cfd2) Added Valaris to mailmap (85413183) Added jTynne to mailmap (37330448) Added a build test for GCC-8 (4044966e) Statistics: Excluding merges, 10 authors have pushed 72 commits to master and 131 commits to all branches. On master, 336 files have changed and there have been 5,878 additions and 10,015 deletions. 55 Active Pull Requests 60 Active Issues 40 Merged Pull Requests 15 Proposed Pull Requests 48 Closed Issues 12 New Issues List of Contributors: @aleos89, @Atemo, @Balferian, @bentheexo, @BrOgBr, @cahya1992, @crazystorm2017, @cydh, @danielbernard, @ecdarreola, @Everade, @exneval @Felleonel, @flamefury, @Haikenz, @laziem, @Lemongrass3110, @mazvi, @mrjnumber1, @Questune09, @Raf4h, @redlightliu, @Rytech2, @secretdataz, @teededung, @zackdreaver Show your support to rAthena by submitting your Issue or Pull Requests! By providing enough useful info (Git Hash, Client Date, RE/Pre-RE, crashdump, how to reproduce, etc) you will help us to solve the issues faster1 point