Leaderboard

Popular Content
Showing content with the highest reputation on 02/19/13 in all areas
-
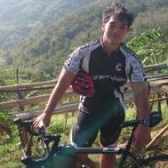
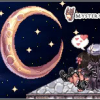
Briefing & Concept Hello everyone! You read it well, a free release continue reading! Since some time ago, I have been working with @Syouji with different kind of maps to offer as releases to the community. This is one of them (of a lot to come, in case of course you like our work ) This is a release by Syouji and Me. Yes, teaming up in mapping is something possible (we have our own method which it works efficiently). Anyone here is welcome to join as long as he has the experience and the intention to do a release to the community interests. I think, that if you have watched enough Dragon Ball Z you will recognize this screen from the anime right away. Yes, the cell arena from the cell series in Dragon Ball Z. This screen was almost all we had to make this place look really similar to it. I don't have more words to say about this awesome place I'm almost sure almost everyone knows allready what place is. About this map So, what do we have new on this map? This map since it is about a pvp arena, we tried to make it clean on the center. However, enhancements and details on the enviroment were added, to match the dragon ball style. This map was possible by ripping 3D resources from Dragon Ball Z Budokai 2, a PS2 Game. I have to say, that those pillars were modeled/texturized from scratch. And although they look really similar of the image I added before, they are more based of the Dragon Ball Z Kai, link of this image of reference is here ---> https://dl.dropbox.com/u/52175822/HD_Images/dbz_arena/1000px-Juegos_de_Cell.jpg One of the most hard parts of the map was, to match the greenish style of the anime, into a working map. It is not that easy to make something looks good with those kind of color tones. I hope you will like the result Syouji vs Olrox ... the final battle now in 1080p! Video is awesome. It is very fun, and I suggest you to look at it. HD Screenshots Screens are in Full HD resolution. You can allways hit the image thumbnaill to check the images on full size, and check some details that can only be appreciated in HD resolution. Comparative Screen This panoramic screen is from browedit, and it is supposed to be a comparisson of the original dragon ball cell game arena art. it is not too hard to see the similarity Overview 1 Topview 2 Flatview 3 Detailed view 4 With no more words to say: Download Link We will appreciate every feedback you can tell of our work. That will keep us motivated to do this kind of cooperative releases in the future. Thank you everyone, and, have fun!4 points
-
File Name: @autopots File Submitter: goddameit File Submitted: 18 Feb 2013 File Category: Source Modifications Content Author: Goddameit Preview : http://bit.ly/XzIQJj When HP/SP lower than you set, it will auto use that item. Command : PS : Test and create on rA 17132 Click here to download this file3 points
-
Hi every rathena dev, Just want to ask you to put Judas and me on credit when you use our work. http://trac.rathena.org/changeset/17133/rathena and I know there is other one can't remember which rev. This come from the valhalla leak. Why I know this? Cause it's exactly the same update as valhalla. It's the same translation/item correction/ect... But you miss some src modification to make the statpoint.txt works fine. I don't care that you use our works but please put give us credit. I never remove any credit on the valhalla svn so please do the same for us.3 points
-
The following is a guide that my friend, Vi, created mainly for the players of my old server during her early days of spriting. She is no longer active in the RO scene and my old server is no longer active so I just thought it would be a big waste to not share this with the community. By passing on this knowledge to those who are interested in learning the basics of spriting, I hope that more talented artists will arise in this community and more professional work can be seen. Please refrain from ripping images off of this guide and do give Vi full credits if you decide to repost this elsewhere. p.s. I am only sharing this information, therefore no support can be given from me over this guide so please don't ask me any questions. ^^ -------------------------------------------- hello! In this guide, I will cover the point after which you have completed your frames and you want to transition your .bmp frames into files workable for Ragnarok Online. This is perhaps the most grueling part of creating custom work for RO. I am in no way an expert (I am simply a novice, still always learning) and simply writing this to aid anyone who wishes to sprite. This is dedicated smexy Lexy. Before starting, you will need these programs: Any image editing software, I personally use Photoshop to do the artwork. actOR to edit your .act files. SPRconview to convert your .bmp files to .spr files and vice versa. You can obtain actOR and SPRConview from ratemyserver's RO tools page here. things to know At this point, you should have the artwork for your headgear done. This is what I'll be using as an example for this guide, Lady's Sailor Hat: Depending on your hat, you can have one to fifteen frames (if this isn't an animated headgear). Generally, things such as "GF Wanted," "Notice Board," etc. hats have one frame. Hats generally have five+ frames. Hats with five frames generally only have art work done for the first five angles of the hat, while the ones with fifteen frames have artwork done for all poses/angles. The Lady's Sailor Hat has fifteen frames. What determines how many frames you have is the .act you choose to work off of for your headgear. I don't know how to create an .act from scratch, I typically pick a headgear closest/most similar to the hat I have done. The .act file holds the positioning information for your headgear, it references the .spr file for the images. What does the .spr file do? The .spr file holds all the visual information for your headgear. The .act and .spr files work hand in hand. Let's get started. creating your .spr file. Time to slice your original artwork into its individual frames. Make sure all of the frames of your headgear are the correct size. If the size you choose is too large, you will encounter problems when you create your .spr file. It will do things such as distort or repeat itself in the frame. So slice up your artwork. I've picked the size 31 x 31 for the Lady's Sailor Hat. You have to save each of your frame files as an indexed .bmp. In Photoshop, you must go to Image > Mode > Indexed Color... It will ask you to Flatten Layers, click OK. This window will pop up: Now you want to go to the drop down menu where it says "Exact" and select Custom. (Make sure that before you select Custom, the drop down menu is already set to Exact. If not, select Exact and then go to Custom.) A second window will pop-up and you will see all of the colors used in your headgear. This step is critical, or else your headgear will show up with crazy colors when you convert it in SPRConview. Now, you have to denote what color is going to be transparent. In this second window, which is called the Color Table, the first box is the color which tells the .spr file what to make transparent. I've chosen this mint green color. So click the first box and the color picker will pop up. Simply click your background color. Now you want to save out your Color Table. Click save on the right hand of the color table. This is also indeed an .act file, but don't be confused! This is different from your file to be used with RO. I've saved my palette file out as "palette_ladyssailorhat.act." Now that you have all of the color information done, save your file. Save it as an 8-bit .bmp file. naming convention in ragnarok online, each gender has their own set of spr/act files. If you dig through the sprite files in your data folder, you'll notice ¿© and ³² as a suffix for your file names. ¿© denotes female, while ³² denotes male. Generally, I save my files as suffix_headgearname00xx.bmp. So continuing saving your frames out. Remember to check if your headgear's color palette is loaded into each frame. You can load your color palette by going to the "Custom" drop down menu and clicking "Load..." on the right hand side to select your palette file. After you finish, your folder should look something like this: Now go into your sprite data folder and pick a headgear that you feel is closest to the headgear you're working on. For the Lady's Sailor Hat, I've chosen Pirate's Pride. So copy and paste the .act/.spr files of the headgear into the folder of the headgear you are working on. Now open up SPRconview. Now go to Convert > Bmp to Spr. You will get another pop up window. Add all of the frames of your headgear and make sure that they're in numerical order. Under where it says Sprite, hit Browse and browse to where you saved the .spr file of the headgear you chose. Remember, I chose the Pirate's Pride. After you've done that, click Convert. Done with your .spr file! When you do this, SPRconview will replace the images of the original headgear with the ones you have made. Open up the .spr file and check to make sure everything is a-okay. Scroll through it and make sure the colors aren't all off either, as well as the transparency. That's it for your .spr file. time to edit your .act file Now go back to your folder and open up the .act file that you had copy and pasted for your headgear with actOR. Most of the time, when you open up your .act for the first time, you may get a message saying that the width and height is not correct. Simply click Yes and carry on. Now you should see this: Now look to the right. Under reference, check the box next to "head." You'll see that the head shows up, but the hat is behind the head! So look to the left where it says "Change priority ref. spr..." A window pops up. Underneath "head" hit the bubble for back. The hat is now in front of the head. Look: You can change the reference head anytime you want by replacing the ref_head act/spr files in the location where you installed actOR. Simply replace those files. Now, we have to edit the .act file. But first, here is a quick diagram explaining the basics of actOR. 01 action This refers to each of the acts that correspond with an action in Ragnarok. In the drop down menu, there are 13 acts, going from 0-12. Act 00 is the act for standing, act 01 is for walking, act 02 is for sitting, etc. You have to check every single act and every single direction to make sure that the hat sits on the head properly. This is where most of the labor comes from. 02 direction clicking through this scrolls through all of the angles of the head and hat. 03 scroll bar for each pose/angle, there are several frames. this scroll bar scrolls through all of them. You must check through all of these to make sure that the hat sits on the head properly. 04 reference this is simply where you turn the reference head and body on and off via the boxes, x is on and a blank box is off. 05 x offs this is the x-coordinate of the headgear. You can edit this value by clicking and dragging the headgear by hand, or tap-tap double clicking the value under Xoffs with a certain timing to change it numerically. 06 y offs this is they-coordinate of the headgear. You can edit this value by clicking and dragging the headgear by hand, or tap-tap double clicking the value under Yoffs with a certain timing to change it numerically. 07 EXT this simply refers to the reference head sprite/hairstyle. 08 x offs this is the x-coordinate of the head. You can edit this value by clicking and dragging the headgear by hand, or tap-tap double clicking the value under Xoffs with a certain timing to change it numerically. 09 y offs this is the y-coordinate of the head. You can edit this value by clicking and dragging the headgear by hand, or tap-tap double clicking the value under Xoffs with a certain timing to change it numerically. That is basically all you need to know of actOR to get the job done. Personally, I don't know what everything else does! Now you must go through all the .act's angles and frames to make sure the hat sits correctly on the character's head. Once you are done, simply save your file. And you're done! You now have the .act and .spr file of your headgear. the data folder 1 sprite this main folder is where your sprites reside. under this folder is two other folders. a. ¾ÆÀÌÅÛ holds the .spr/.act of the thumbnail of your headgear. b. ¾Ç¼¼»Ç¸® where your headgears reside. Underneath this folder are two other folders. c. ¿© the female folder d. ³² the male folder 2 texture this main folder is where your .bmp images for your items reside. under this folder is two other folders. a. À¯ÀúÀÎÅÍÆäÀ̽º this folder holds two other folders under it. b. collection this is where the artwork for your headgear resides as a 75 x 100 bitmap image. c. item this is where the .bmp thumbnail of your image resides; the image is the same as the .spr thumbnail of your headgear and is 24 x 24 in size. notes I generally work with the female .act/.spr files first. Afterwards, I simply copy and paste those files over to the male folder and paste, afterwards, I rename them. A lot of the time, the female .act will not suffice for the male .act since the male hairstyles tend to be smaller than the females. You will have to go back and edit the male .act file after copying and pasting. The way you position your headgear might not work across all hairstyles as well. You want to choose a position that can be workable across most hairstyles.1 point
-
The very first map I made and first released a couple of years ago I just recently made some changes. This is my Hyrule Town v2.0 based on The Legend of Zelda: Minish Cap game. Overview Center (Lower, Mid, Upper) The Dragon Dojo Church Place Legendary Mana Tree The Statue Tropical Palace The Legendary Four Sword Airship Picori Mushroom Floating Island Water Mill Changelog: v1.0 - 1st release (April 17, 2011) v1.3 - Added some visual effects, fixed few gat tiles, modified the lightmap (April 22, 2011) v2.0 - added more and replaced some objects, added a visual effect (January 5, 2013) Thanks and credits: Nintendo & Capcom for the original concept of the map. Kenedos for inspiring me to try RO mapping You may redistribute but you may NOT alter this file, and please don't forget to give me credits if you want to share this to other sites. Also hit if you downloaded this map. Thanks This work is licensed under a Creative Commons Attribution-NonCommercial-NoDerivs 3.0 Unported License. Hyrule.rar1 point
-
Hi everyone, About 30 minutes from now (12:00 am EST), the forums will be down for maintenance. The forums will be offline for 30 - 40 minutes. Forum maintenance is complete.1 point
-
Hey, guys! I am back for awhile! I had been wanting to contribute at least some of my works to RO community, but couldn't get much time to work on it so i came up with flux integrated themes from my past webs design idea as i know there aren't much free flux template released yet. This is my first time experimenting flux themes and is also my first integration. I am hoping that everyone will like it. My second release (Flux Themes). Sneak Peek: Edit: Simplicity v2.1 released! Click this link for more information -> http://elven.netne.net/blog/?p=3441 point
-
Working fine! This maps its so beautiful. Thanks for share.1 point
-
Hair comes from here: http://spriterepository.com/files/file/2533-costume-saiyan/ Thanks for the feedback guys =)1 point
-
for( .@i = 2000000; .@i < 3000000; .@i++) { if( !isloggedin(.@i) ) end; attachrid(.@i); getitem .@give_this_id, .@at_this_quantity; detachrid; } Make a loop of 1 million is a very bad solution on my computer a loop of 50 000 take 1 min and the increase isn't linear Moreover mapserv will stop the loop if it seems infinite also if( !isloggedin(.@i) ) end; == if not online, the loop end : all online player wouldn't have the reward1 point
-
DAMN! I watched the whole movie! Awesome! O_O I never knew you two were Borflings!1 point
-
First! Awesome release!1 point
-
First, search for the original text strings on your 'msgstringtable.txt' file in your client data folder, then edit them to shorten the tabs1 point
-
I hope this'll decrease Royal Guards strength and improve other classes such as Minstrel & Wanderer. Looks like hitting 193 aspd won't be much of an issue anymore, kind of sad.1 point
-
try this prontera,155,171,5 script Sample 757,{ if( getpetinfo(2) == "null" ){ npctalk "You didnt have any pet."; }else if( getpetinfo(3) >= 1000 ){ npctalk "Your pet are already in Loyal state."; }else{ atcommand "@petfriendly 1000"; } end; }1 point
-
Does Harmony add a `last_mac` column to the `login` SQL table? (Assuming it does), adjust the script like this: http://kpaste.net/0bbff5?raw1 point
-
Pelo o que lembro, o rA ainda não tem elas estáveis, dizem que o brAthena tem. ( digo dizem porque eu li, mas nunca testei)1 point
-
I like it o_O. I like how it's simple, colour friendly, and your depictions are nice. The navigation seems reasonable, though, I can't understand it so I can't really tell The only thing is the black box. I think you should make it fade a little bit so that people's eyes don't look straight to it. You'll find that since your background and images are colourful and "lively" and you toss in a bold dark colour, such as black, in the mix, people's eyes will tend to focus on the darker area.1 point