Leaderboard


Popular Content
Showing content with the highest reputation on 01/06/21 in all areas
-
Welcome rAthena Community! Hello everyone Ren here, so it has come to my attention through the discord channel alot of you are having issues setting up your new clients and are having issues or your new and want to jump right into the server construction but cant figure out how to properly set up a new 2020 client without errors or issues. I am here to finally remedy that! The guides on the documentation are here and there and newcomers can't figure out why they are having errors and tend to skip things here and there. Below I will fully explain from start to finish how to set up a Ragnarok 2020 Client for Renewal and Pre Renewal use! Lets Begin! Okay so below I've decided to skip text and shoot for a video tutorial this will eliminate more errors and create a better reference! Please do exactly as I do to eliminate error this includes making new folders to make a tidy work space! (Note for video I will not be redownloading files as I do not like clutter. I will also be using a text editor to type.) Guide Links KRO - Full Client For Ragnarok Game Files (Akkarins File) NEMO - Client exe Patcher for your server (Most Updated) NEMO RagClient - The latest supported client for 2020! ROTranslation - Chris's Full RO Translation (Most Updated) GRF Editor - GRF tool to open grfs and create them (Requires rAthena Account) MISINFORMATION ON VIDEO REGARDING ITEMINFO_V5.LUA I WANTED TO POINT OUT CORRECT INFORMATION REGARDING ITEMINFO_V5 LUA THAT I REALIZED I MISINFORMED IN THE VIDEO WHEN EVER UPDATING RSU IT WILL OVERWRITE ORIGINAL ITEMINFOS V5 FOR ALL 2020 CLIENTS. IN PATCH ON NEMO PLEASE MAKE YOUR OWN /ITEMINFOSERVER.LUA SO KRO DOESNT OVERWRITE! JUST COPY THE INFORMATION FROM ORIGINAL V5 AND MAKE IT YOUR OWN! Information Regarding Language Types Other Then English Okay so I wanted to give a few details on regarding languages other then english that are not covered within the video. If your looking to change the language to russian for example please make sure you have this patch below enabled while patching! - Always load korean external settings file! Then you can select other language type numbers 0-17 etc. Here is also my text document with the steps! // Welcome to the 2020 client set up guide // Alot of you have been having issues with setting up the new client if you follow this video from start to finish you will be able to 1. Have a properly running server client side 2. Learn to be more organized 3. Add custom items // Lets start step 1. Make a new folder on your desktop for your server client files and tools. A clean enviroment will help with less errors! This means installing a fresh copy of the full kRO game. Also follow my organization of where i place all my tools and files. step 2. Download all the required files to have a full client side, all of these files can be found on my guide post and save them to the tools folder. step 3. Extract the full kRO to your game files folder within your server folder & update using the 2 RSU patchers. step 4. Install GRF Editor onto your windows system , this has its own folder within program files. step 5. Extract the rest of the tools one by one into your tools folder. step 6. Go back to your game files folder and make sure that kRO is fully updated by running the two patchers 1 by 1. After downloading all the neccessary tools and extracting the game files and updating we may now continue on to building a fresh GRF for your servers use! This is better then using old grfs that have to much stuff that will conflict with the new client files. This client also uses new resource files and new system folder files which will be covered. okay lets begin. step 1. open grf editor step 2. navigate to your rotranslation folder step 3. copy or drag both basic texture sub folders into data folder on grf editor step 4. if your planning on running a pre renewal drag the renewal data over first but if your planning on running renewal like i am drag the pre over first then the renewal step 5. now we completed building our basic server grf we will now edit our connection file called clientinfo.xml you can delete the sclientinfo as it is not needed with the new client now we can save the grf to our game files folder where everything is for the game! Keep grf editor open for adding custom items later on. now we can move on to creating the client to use for the server! step 1. navigate to the nemo folder inside our tools folder! step 2. browse for your ragexe that you downloaded. I'm using 20200401 which is most current and pre set in on the server side step 3. load the client step 4. load the ro translation profile for 2020 this is all pre defined for the client so we can skip through step 5. this is the name of our config file to point the client to the grf we can change it to our own custom name used step 6. this is important so if your running an earlier client you might use the original iteminfo.lua this is the new item info which doesnt get overwritten by kro in updates this is where some of our information will go for the custom items. step 7. now we can load the recommended patches step 8. dont worry about the errors as they are just telling you those patches are not for the latest client it still selects the recommended ones we need! step 9. selecting our own patches. You can pick through which ones you want but if your not advanced just follow me this is for increasing your custom item view range it is recommended you choose between 5000-8000 as customs view start at 3000 this might change later on if kro decides to release more. we will go with 5000 because i dont see us adding anymore then 200 custom items. step 10. lets recheck to make sure we got everything beautiful now we can apply the patches and move our client to our game files folder with our grf! you can rename your client to what ever you want! now that we created our grf and made our client we can go back to the ro translation folder step 11. navigate to the pre renewal or renewal folder if your making a pre renewal server add the renewal system folder to your game files folder and overwrite first then add the pre renewal systems folder on top of that just like we did with the grf in my case i am making a renewal so ill do opposite now the next folder once weve done that we can test the client if you get some weird text you have to edit your data.ini and rename it to yourserver.ini like we did for the patch now we can move on to adding the custom items!!! step 1 . re open grf editor in this case ill use my grf step 2. navigate to your tools folder and to the folder that holds your custom items step 3. follow me step 4. now we can edit the two files needed to correctly link the client with the server side. navigate to the data/luafiles514/lua step 5. extract both files that i do and they will end up in your game directory under the folder data we can go ahead and open the accessory id! okay this is important!!! just copy like i did above and edit the names make sure its 100% matching save the file and we can open the next file which is accessory id mistake i made is that we were in the accname so we just swap around :P same thing goes on here we just copy the above line and edit out. now the 3000 is our view id not the item id which @item calls for this will be the view display of our custom which is why we set the patch for 5000 so we will start at 3000 gives original items a bit of room now we can save! step 6. drag the two files back into the grf and save now were completely done with the grf! now we can move back to our game files folder for the last task! move to the system folder to iteminfo_v5.lub/lua heres where we add the actual item db number in this case i used 30000 just copy what i did and youll be fine you just have to make sure when you add the item into the item db whether it be sql/yml that you set the right item id and view id also the AEGIS name will be _Equilibrium_Wings here on the item info you can see there is none it links to a different part of the grf but deff make sure to add the _ under the aegis name! All done that wasnt so hard! -Renzadic!1 point
-
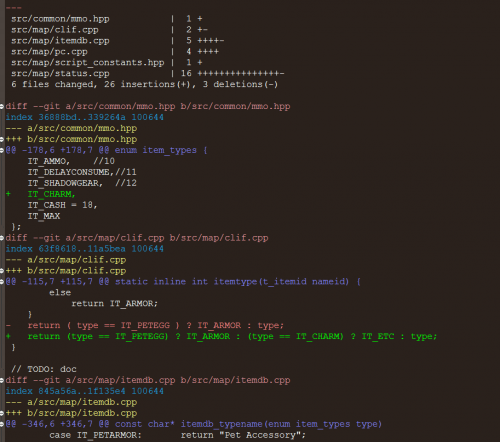
View File Charm item (New Code Source) I took a modified version of the original and fixed it for the current version of rathena 2020+, I saw that there were a lot of people asking for it, so I decided to post my diff, the project is not mine nor the code, I just fixed it for the new emulator. Submitter Froost Submitted 01/06/2021 Category Source Modifications Video Content Author hamsterdigital1 point
-
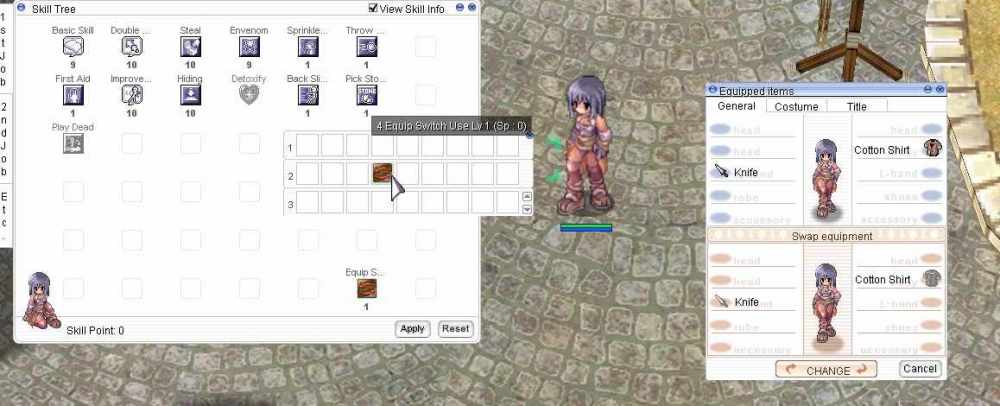
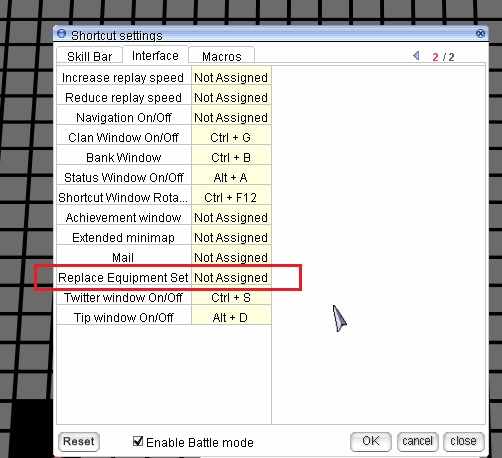
Hello dear members, it has been a long time since my last login here, and I came back with my recent customization, it's damm good, that once finished in my test server confirmed that was 100% functional, with and with no issues , I decided to share.... This Skill provides the same function than the equipment swap tab, but instead of opening the inventory and aim with the cursor to the "change" button!, you can do the same even faster, with a custom skill icon and just one tip of your finger. ***------- Trunk Side -------*** 1- Go to your skill_db.txt and make sure to find the skill #5067. If you are using pre-renewal config, you may export the bellow skill line to the pre-re/skill_db.txt file instead. 5067,0,6,4,0,0x1,0,1,1,no,0,0x1,0,none,0,0x0, ALL_EQSWITCH,Equip Switch 2- Now that the skill is implemented, you need to add the timers in the db file skill_cast_db.txt, this can´t be ignored, you may add the skill line. I gave the skill 10 seconds cooldown, but you can do it at your like. //-- ALL_EQSWITCH 5067,0,0,0,0,0,10000 3- Most important part, can´t be ignored, add the skill line for every job in the skill_tree.txt file. just like this: //Novice 0,5067,1,0,0,0,0,0,0,0,0,0,0 //-- ALL_EQSWITCH#Equip Switch# //Swordman 1,5067,1,0,0,0,0,0,0,0,0,0,0 //-- ALL_EQSWITCH#Equip Switch# //Magician 2,5067,1,0,0,0,0,0,0,0,0,0,0 //-- ALL_EQSWITCH#Equip Switch# //Archer 3,5067,1,0,0,0,0,0,0,0,0,0,0 //-- ALL_EQSWITCH#Equip Switch# And keep going until you add the skill to every job available in your server. (watch out the job# id, for the copy paste, don´t forget to add the correct number). ***------- Client Side --------*** - You need the icon sprites for the skill and the item bmp, you can make a prettier one, in my case I recycled Taekwon skill icon Counter Kick Stance and recolored. You will find it attached, well, This .spr and .act files must be added inside the drop sprite folder the route is: data/sprite/¾ÆÀÌÅÛ ALL_EQSWITCH.act ALL_EQSWITCH.spr - Now for dragging the skill icon from the skill tab, you need the item bmp, also attached, and It has to be added inside the item folder. The route is: \data\texture\À¯ÀúÀÎÅÍÆäÀ̽º\item ALL_EQSWITCH.bmp ---EDITING THE LUAS--- - The very first thing we are going to edit is the skilltreeview.lub this file is found inside the skillinfoz folder at this route: \data\luafiles514\lua files\skilltreeview.lub Please only add the skill for the novice tree, watch out the key and please note that there is not comma at the last line added skill, if you wonder about the #41 is the bottom right corner penultimate slot in the alt+s skill tab. SKILL_TREEVIEW_FOR_JOB = { [JOBID.JT_NOVICE] = { [0] = SKID.NV_BASIC, [7] = SKID.NV_FIRSTAID, [14] = SKID.NV_TRICKDEAD, [41] = SKID.ALL_EQSWITCH }, - Second Step editing the luas belongs to the file skillid.lub this file is found inside the skillinfoz folder at this route: \data\luafiles514\lua files\skillinfoz And you have to add the skill ALL_EQSWITCH = 5067 Example: WE_CALLALLFAMILY = 5063, WE_ONEFOREVER = 5064, WE_CHEERUP = 5065, ALL_EQSWITCH = 5067, - Third step for the luas, the skilldescript.lub This file is located in \data\luafiles514\lua files\skilldescript.lub In this file you have to create a description for the new skill implemented in this case the ALL_EQSWITCH This is an example of mine, watch out the keys and the commas, you can make a good description with your own taste.: [SKID.ALL_PRONTERA_RECALL] = { "Return to Prontera", "Max Level: 2", "Skill Form: ^339900Supportive^000000", "Description: ^777777Teleport to Prontera, 15 minutes after use delay.^000000" }, [SKID.ALL_EQSWITCH] = { "Switch Equipment", "Max Level: 1", "^CC3399Requirement: Finish Quest^000000", "Skill Form: ^339900Active^000000", "Target: ^777777Self^000000", "Description: ^777777Swap you actual equipment with the one placed in the alternative equip tab.^000000" }, [SKID.ALL_THANATOS_RECALL] = { "Return to Thanatos", "Max Level: 1", "Skill Form: ^339900Supportive^000000", "Description : ^777777Teleport to Thanatos, 5 minutes after use delay.^000000" }, - Finally the Last Step and most most most important, the skillinfolist.lub This file is located in \data\luafiles514\lua files\skillinfolist.lub We have to add the new skill to this file, EXAMPLE: [SKID.ALL_GLASTHEIM_RECALL] = { "ALL_GLASTHEIM_RECALL", SkillName = "Return to Glastheim", MaxLv = 1, SpAmount = { 0 }, bSeperateLv = false, AttackRange = { 1 } }, [SKID.ALL_EQSWITCH] = { "ALL_EQSWITCH", SkillName = "Equip Switch", MaxLv = 1, Type = "Quest", SpAmount = { 0 }, bSeperateLv = false, AttackRange = { 1 } } } - In this case I added the skill at the last in the bottom, so you watch out the keys and the commas placed properly to avoid client side error, VERY VERY VERY IMPORTANT, you see the Type = "Quest" bold in green? Please, do not ignore that line, ... That line is very very important, and the client use that line, to avoid investing job skill points in that quest skill. Now, for getting the skill active, you can edit the npc global funcion and add it to the platinium skills: in your trunk/npc/other/Global_Functions.txt Example: ////////////////////////////////////////////////////////////////////////////////// // Gives attached player their Platinum Skill based on their class. ////////////////////////////////////////////////////////////////////////////////// function script F_GetPlatinumSkills { skill "NV_FIRSTAID",1,SKILL_PERM; skill "ALL_EQSWITCH",1,SKILL_PERM; or make your own script to get the skill permantent. Now The Testing In Game: Party Ragnarok 2020-03-14 19-25-47.mp4 OPTION 2: For Experienced Users, if you want to save hours on this.... just go to the shortcut settings and add a shortcut to replace equip.
 1 point
 -
Version 2.0
1031 downloads
You know when you login to your server that you work on, or even play on, and you always end up typing the same commands each time before you even say hello to anyone? @autoloot, then @uptime to see when the last reboot was, @rates if you've got fluctuating exp/drop rates, etc etc. @showexp cos you want to know what's going on, blah blah blah. With this Settings NPC, a player can set those commands to automatically execute when they login. These are account based, but could easily be modified to char based. Following the general format of the script, it should be easy to add/remove commands from those available to the player. @main is listed at the bottom of the script, so if you don't use it you may as-well remove that line. This script is years old, revamped to make it work with recent revisions - I've tested it on both our live server, and my dev server and seems to work.. but if you find any bugs or glitches, or something that could be optimised a bit more, please let me know ?Free1 point -
if( getrefine()>=8 ){ bonus2 bAddRace,RC_Player,8; bonus2 bAddRace,RC_DemiHuman,8; }1 point
-
Version 1.0.0
1025 downloads
I took a modified version of the original and fixed it for the current version of rathena 2020+, I saw that there were a lot of people asking for it, so I decided to post my diff, the project is not mine nor the code, I just fixed it for the new emulator.Free1 point -
up para dito nice1 point
-
thanks Renzadic, Follow your answer I already fix the issue 1. but for the mouse move.. you don't mind send me the link and tell me where to download the setting.exe? (seems like there are so many download packages there ?)1 point
-
You can disable the pincode system in your server conf/char_server.conf As for the mouse you can download open settings from the downloads section which replaces the old ragnarok settings.exe the option for mouse is located within that exe. Hope this helps, Renzadic~1 point
-
Version 1.0.0
537 downloads
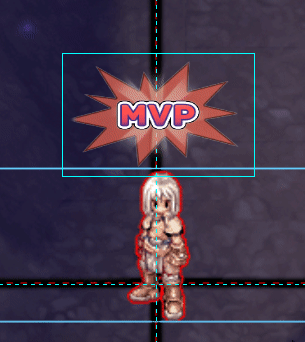
an alternative effect for MVP.strFree1 point -

Version 1.2.5
13646 downloads
Heya, This tool is an action file editor, it edits Act and Spr files. You will find similarities with ActOR in its design, but it should be much more enjoyable to edit animations ;]. Special thanks to Nebraskka for testing this software in its early days. All the suggestions and feedbacks made this software much better. How to install Download the zip archive provided from the download link at the bottom of this description or directly from there : http://www.mediafire.com/file/uoymx2vni249mlu Install the application with Act Editor Installer.exe; if you are missing a .NET Framework you will be prompted to download it. Once you are done, you can start the program from the link on your desktop. Key features The software has many, many features available. It would take too long to describe each one of them, so I've only focussed on the more impotant ones. You can undo and redo everything, scripts included. You can edit and add sounds easily. Powerful and easy to use palette editor. Sprite types have been abstracted - you don't have to worry or care about that. Animation speed can be changed easily. Most components have a drag and drop feature. Advanced scripting engine (C# language). The scripts can also be used to customize the software menus. Error checking when saving the act/spr to avoid invalid files. The sprite version will be automatically downgraded if RLE compression is not available. Frame interpolation (inbetweening/tweening) is possible via the Animation menu. Prompts you with an image converter dialog if the added image is invalid. Allows advanced edition for actions and frames via their respective menus. You can load files from GRFs directly (and save in the GRFs directly as well). Technical stuff Requires .Net Framework 3.5 (SP1) Client Profile to run (3.5 or more will work as well). When prompted with an error, use the "Copy exception" button to copy the debugging info. I will need this to fix the issue you're encountering. The editor's primary window The interface is really straightforward and similar to ActOR. I'll only focus on new elements! Rendering mode : This option changes the behavior of how layers are rendered. If you use 'Editor', you'll clearly see all the pixels when zooming in. If you use 'Ingame', it will use a linear scaling instead, which is closer to what the client does. References : These allow you to know where your item will be positionned (the yellow marker is the anchor, see below). Color mask : To edit the color of a layer, simply click on the color rectangle. You can also drag and drop the colors between different layers to quickly modify many of them. Common shortcuts : You can manipulate layers by using common shortcuts. More can be found from the Edit menu. These below are only the primary ones. Ctrl-A : Select all layers. Ctrl-C : Copy the selected layers. Ctrl-V : Paste the copied layers. Ctrl-X : Cut the selected layers. Alt-C : Copy current action. Alt-V : Paste current action. Advanced action and frame editions These expose all the available methods of the editor. You can remove a range of frames or copy a frame 10 times very quickly and easily. This dialog is found in Action/Frame > Advanced edit... Anchors You can edit anchors from the editor directly. Anchors are points that connect frames together, from different act files. Here's an example without and with anchors : This is mostly useful when you're using reference sprites (on the right panel). Clicking on the anchor button will let you choose where to attach the sprite (this is set semi-automatically for you though). You can edit those from the Anchors menu, but it is recommended to start from a pre-existing act to avoid doing this tedious process. Palette editor The palette editor allows you to quickly recolor sprites with an intuitive interface. Only indexed images can be edited (it's a palette editor after all) and three modes are available. The gradient mode changes an existing gradient to another color while keeping the original saturation and brightness of the colors - this makes the gradients blend in better. If there are no gradient (usually because it's a custom sprite), there's always the Adjust color mode. This one changes all color from a specified range to another one (Photoshop has a similar feature, which does work better). You can click on the image (on the left) to automatically select the palette indexes. These will be highlighted for a few seconds to show you what you're about to edit. Interpolation (tweening) This script can be accessed via Animation > Interpolate frames. This process fills the images between two frames by detecting the changes applied to the layers. Here's a simple example of how it can be used : Script engine The script engine can be accessed via Scripts > Script Runner. This is a big feature of Act Editor, it allows you to automate all your work with the act and much more. Click on the Help button for guides and available methods (don't hesitate to try out a script; if an error occurs the act will be reversed to its previous state). The documentation doesn't cover all of the available options and methods for obvious reasons (the .net framework is huge). Doc example : The language used by the script engine is C#. If you're not familiar with it, simply check out the script samples (Scripts > Open scripts folder)! I won't go into details here, questions can be asked in the support thread regarding addiotional features and methods. If you believe your script should be added in the program, send it to me and I'll probably add it. Customizable The settings dialog allows you to modify all colors in the editor easily. You'll also find the sound resources (GRFs and folders) that can be set up in the Sound tab. The Shell integration tab can associate the .act files with the software to edit them more easily. Don't hesitate to give me a feedbacks or suggestions!Free1 point