Leaderboard
Popular Content
Showing content with the highest reputation on 10/07/23 in all areas
-
Hi, Your current script don't support 0% fail chance. Find rand(100) and change to rand(1,100)1 point
-
Version 1.0.0
209 downloads
About This File Check the video showcase of this map below Check the video above and Subscribe to keep me motivated doing more and more free maps like this!Free1 point -
you didnt specify which part for the refine. Example : if (getequiprefinerycnt(EQI_HAND_R) >= 7) { autobonus "{ bonus bIgnoreDefClass,Class_Normal; }",1000,3000,BF_SHORT|BF_NORMAL; }1 point
-
refine.patch1 point
-
Hi everyone, I just found a very good solution to monitor and organize your palettes for each jobs. I cant help but to share this way of renaming palettes to every single jobs/ costumes / etc Some of you might know this way already, but just sharing because all other posts have been helping me out. For example Assassin Cross Palettes 건너_숍_남_1.pal Renaming into 건너_숍_남_1_1.pal 건너_숍_남_1_2.pal 건너_숍_남_1_3.pal and Renaming into other Jobs Costume like Arc Bishop 아크비숍_남_1.pal 아크비숍_남_1_1.pal 아크비숍_남_1_2.pal Or If you have All of the jobs and not gonna sort it out, just change 아크비숍_남_1.pal 건너_숍_남_1_1.pal 그리폰로얄_남_5_1.pal to 아크비숍_남_2.pal 건너_숍_남_1_2.pal 그리폰로얄_남_5_2.pal This way you can monitor what jobs or which costume is missing and can copy paste, rename it in and instance.1 point
-
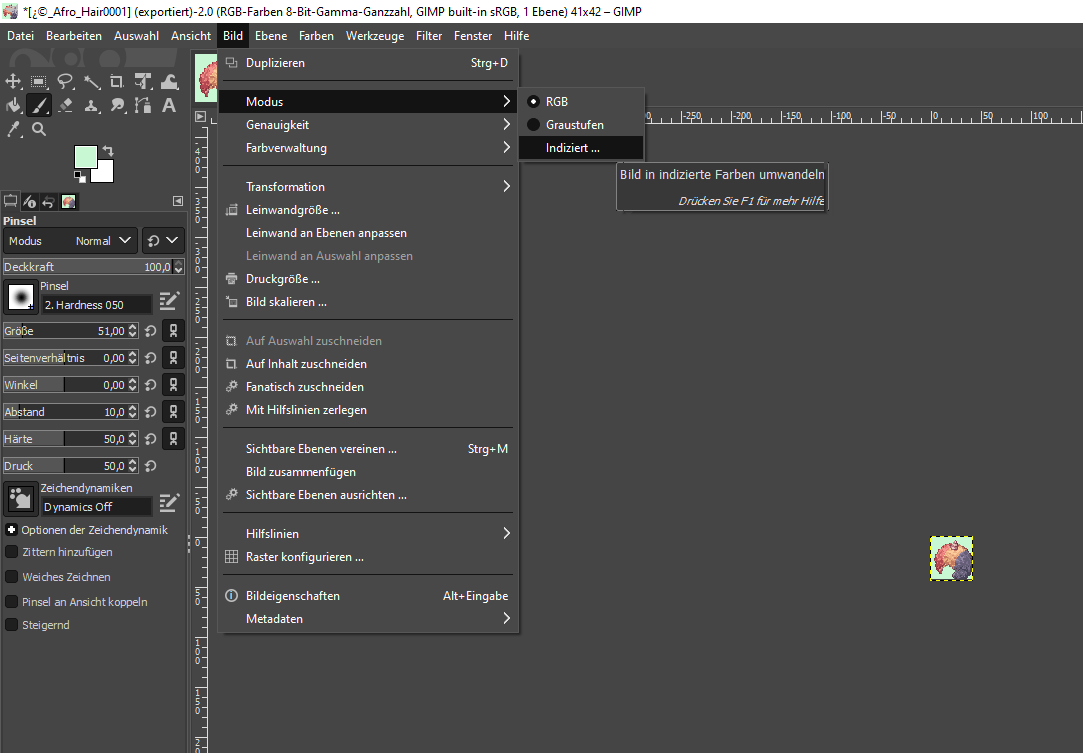
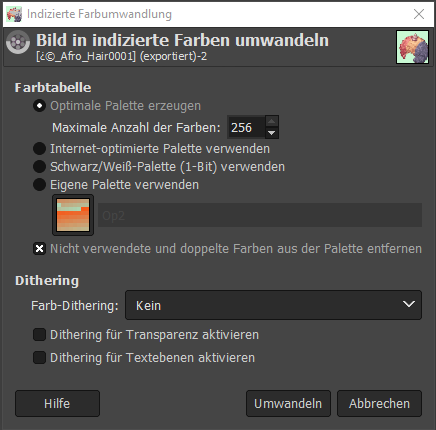
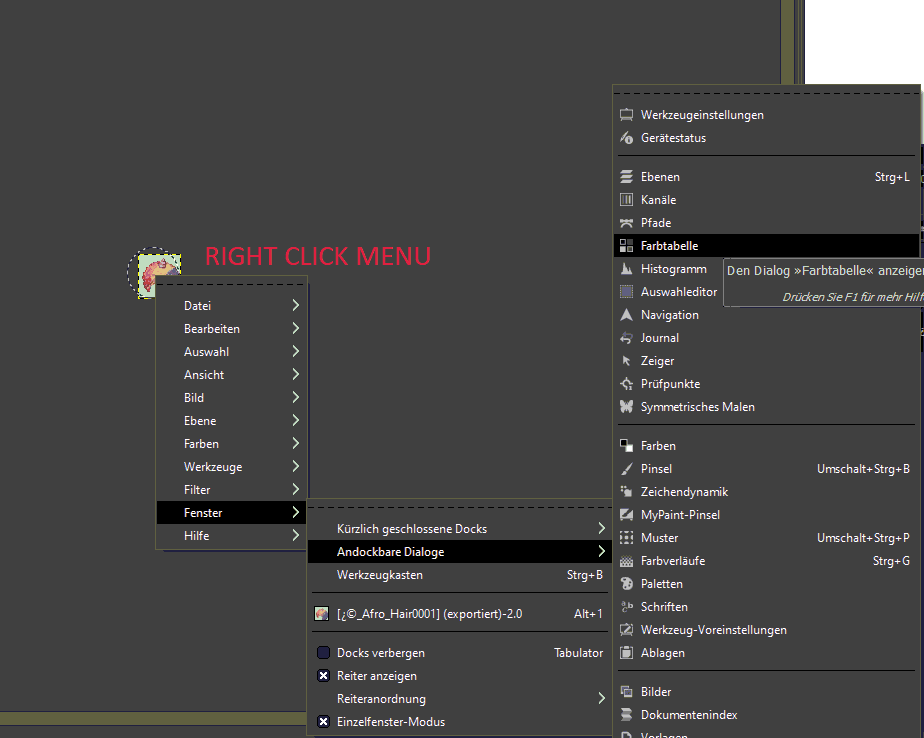
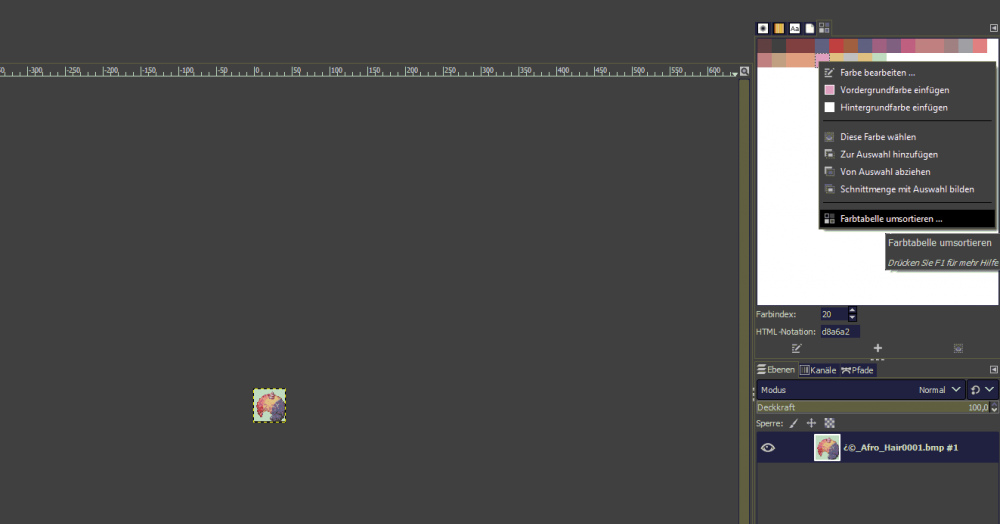
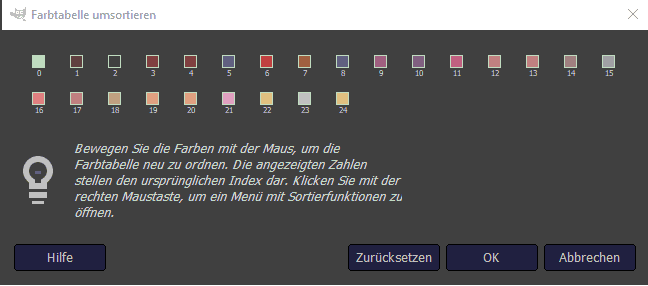
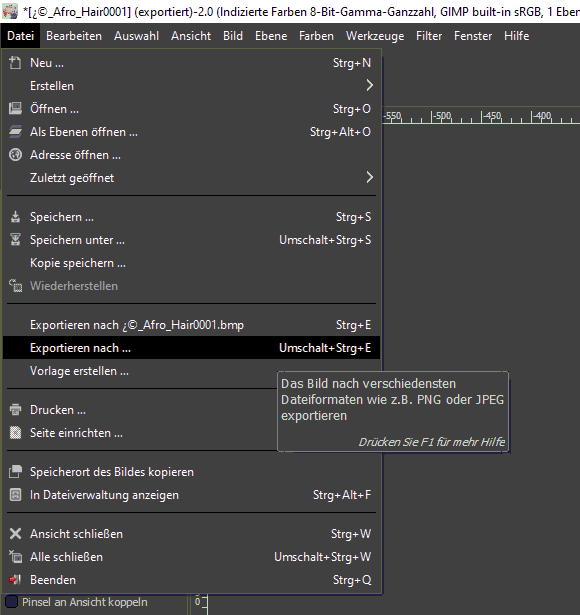
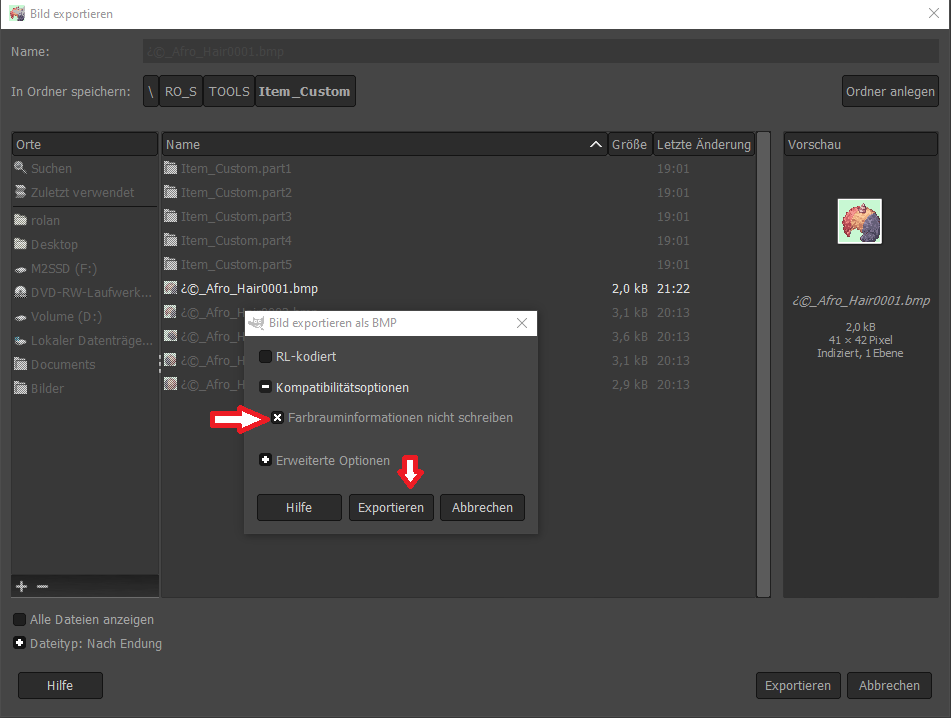
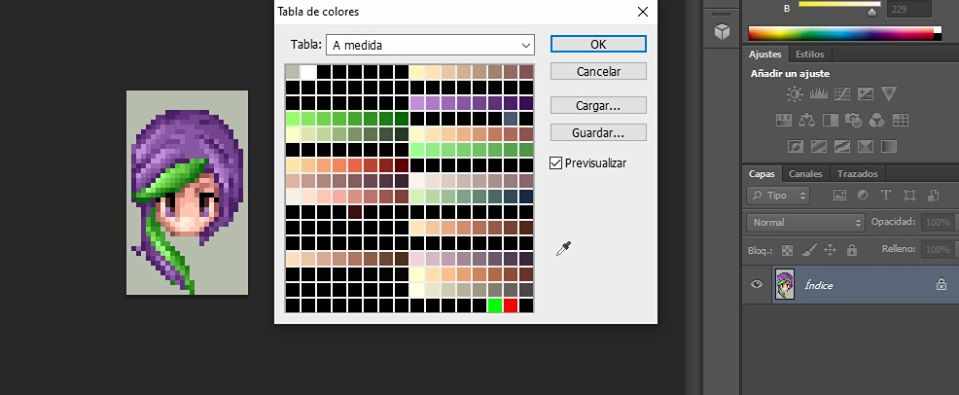
I had the same issues with photoshop aswell. With gimp I was able to make it work: Since there was no answer to this question I post this here... maybe someone else will find that usefull. The Images are in german.. I try my best to translate the buttons. 1. First load your image into gimp. 2. Change your image into Indexed mode. In the top menu: Image>Mode>Indexed 3. In the "index" menu make sure to check the first option "optimal palette" and underneth that "maximum colors 256" (Not more!) 4. Now your image is indexed. Now click rightclick on the image in gimp. In the right-click-menu: windows->dockable dialogues->colortable 5. now on the top right the color table should show up. First click it with one leftclick. Then do a right-click and select the option on the bottom. Should be something like "resort colortable". 6. In the next window make sure that your background color is the first one. find it and drag and drop it into the first position and hit "OK". Your background color which will be transparent in Ragnarok Online should be the first color. (For my image it was the green color) 7. Now click "file" in the top menu and then "export to" (or maybe export as...) 8. the export will notify you that the alpha channel will be lost. thats okay... In the export menu make sure to check "kompability mode" and beneth that "dont wirte color space information" -- don't know if this translation is correct... At last hit "export". You have to do this to all images like that.. or else the colors will be rendered wrong... Hope that helps someone : )

 1 point
 -
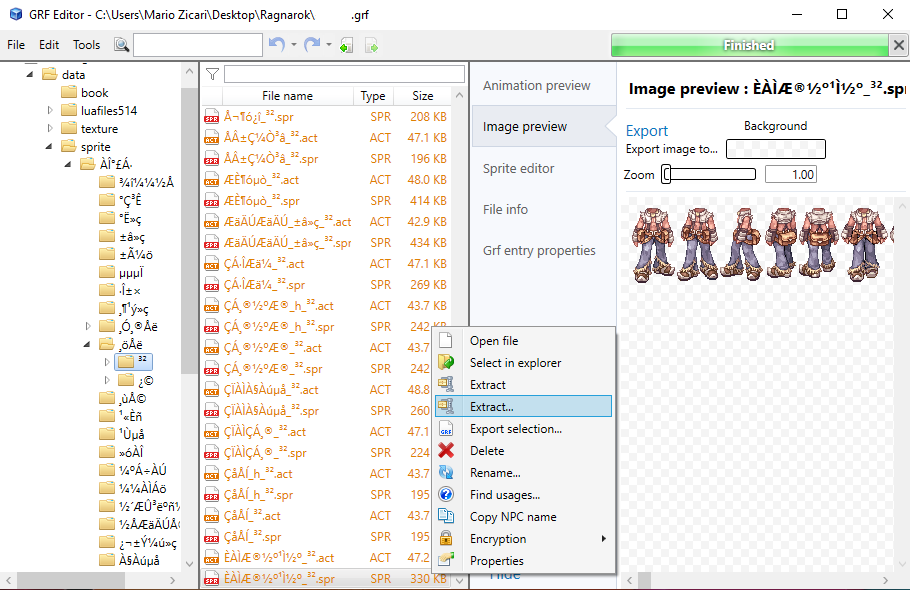
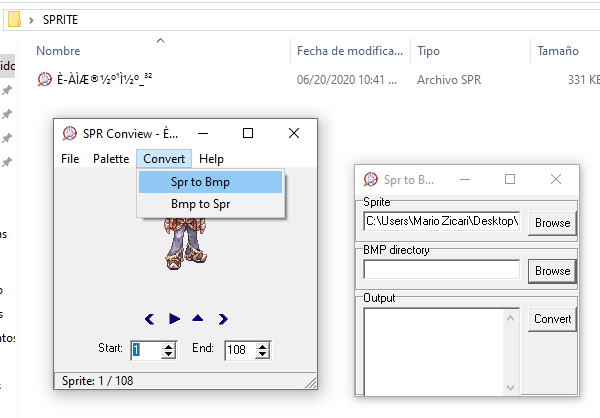
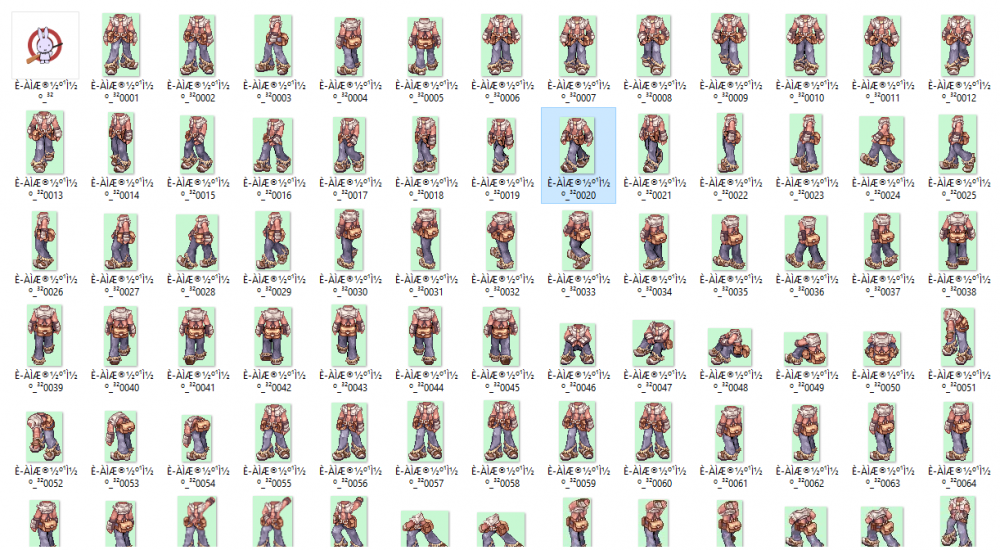
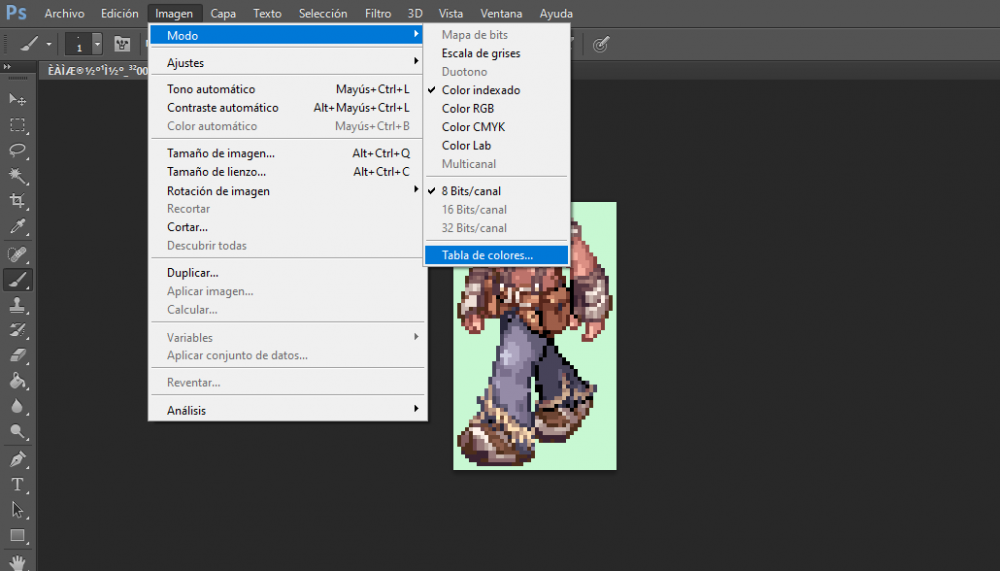
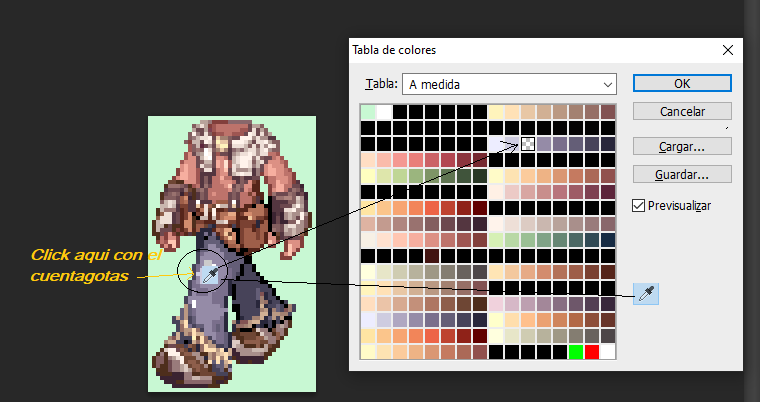
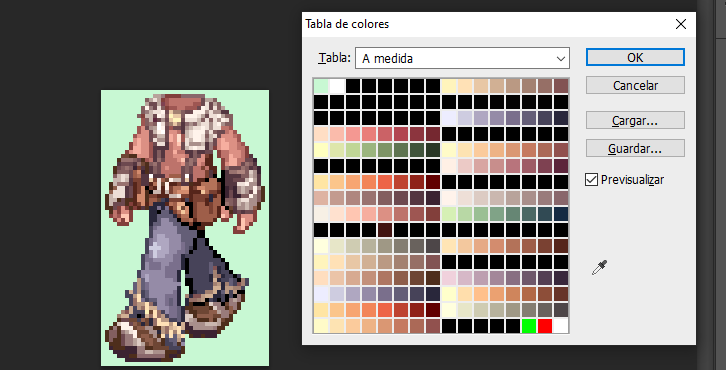
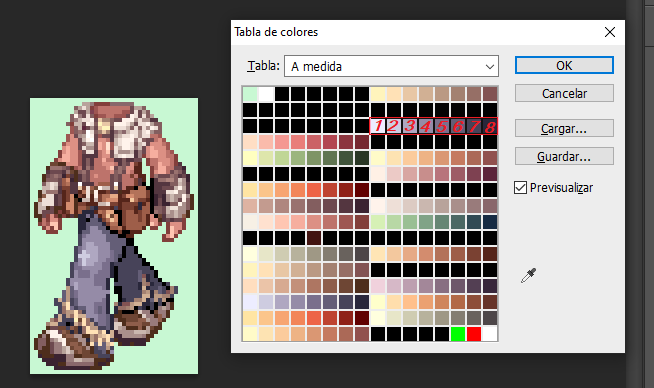
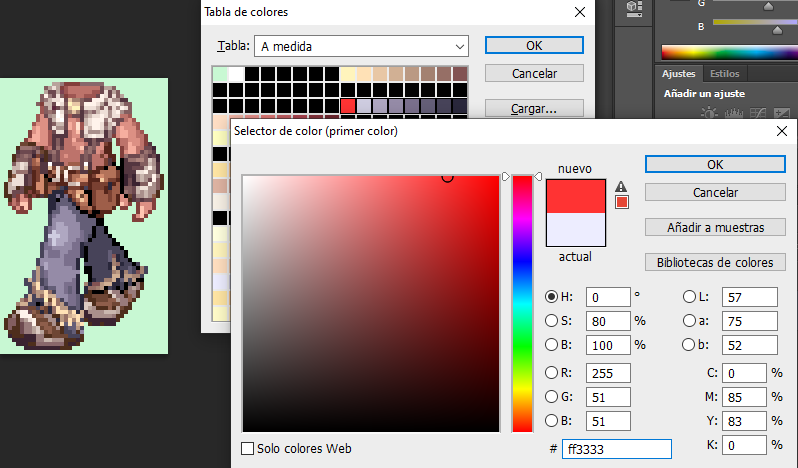
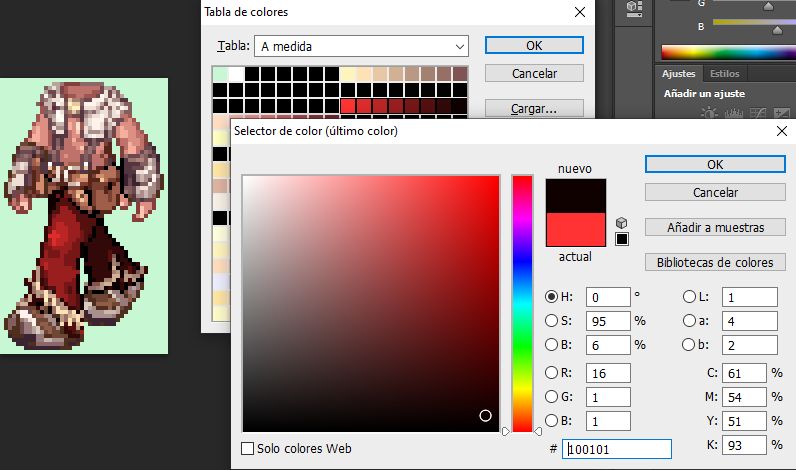
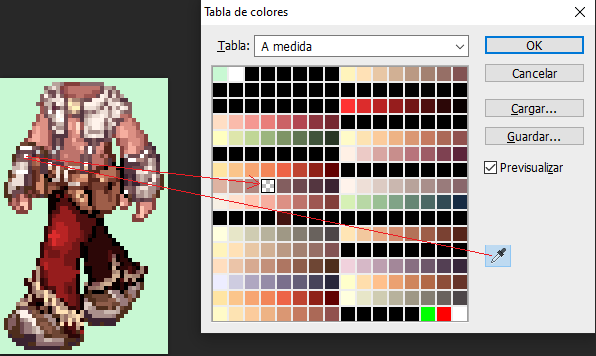
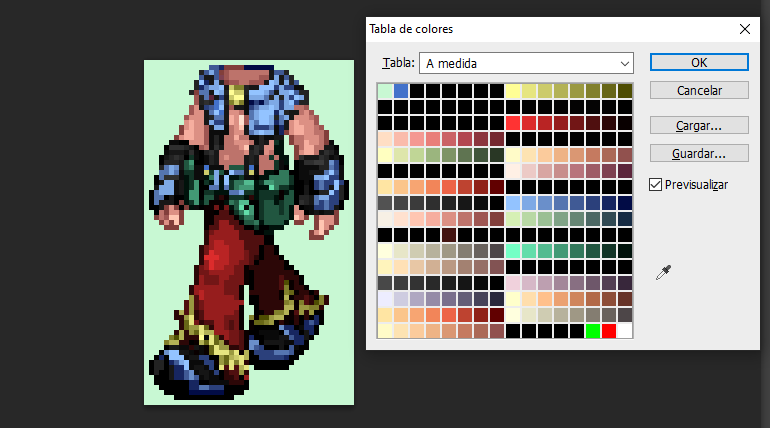
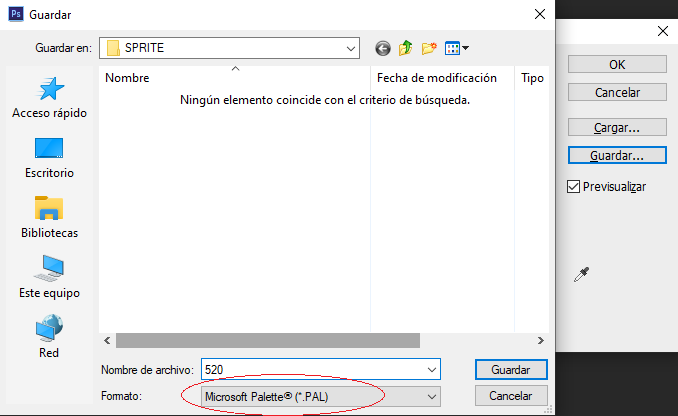
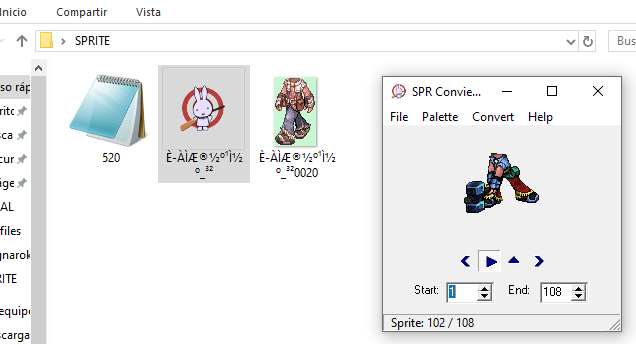
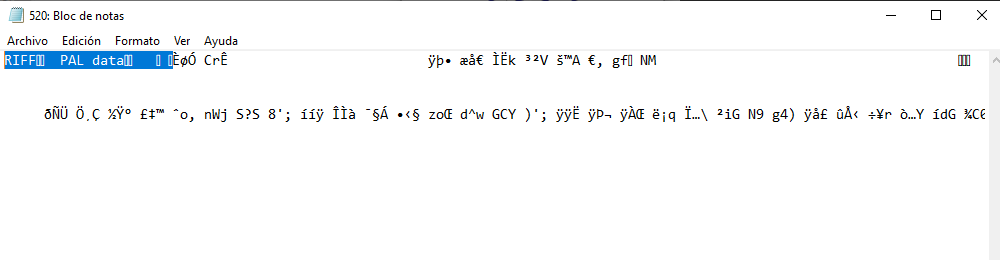
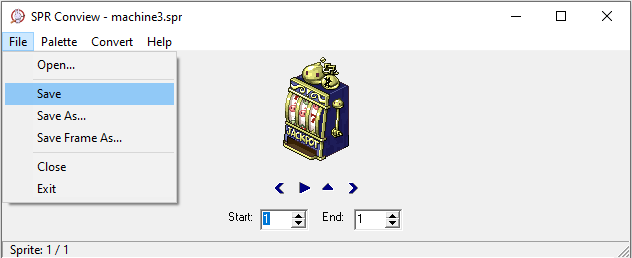
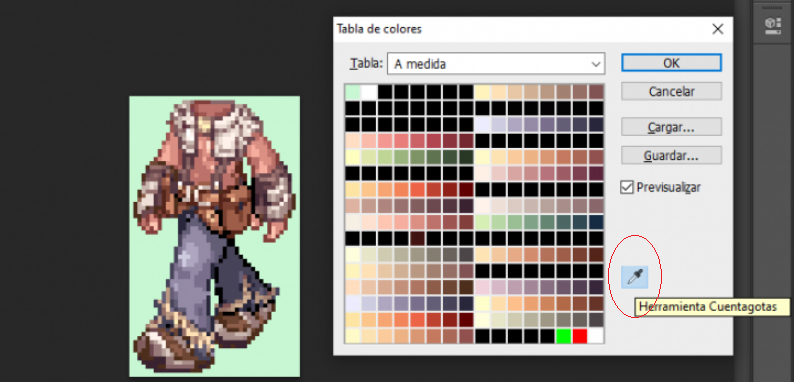
- Necesitaremos el GRF EDITOR para extraer del GRF el sprite que queramos modificar - Extraemos unicamente el SPR del objeto a editar, Aislaremos nuestro SPRITE en una carpeta, lo rompemos (extraemos todos los bitmaps) con el programa SPRCONVIEW, para hacer esto tenemos que darle a la opción convert Spr to Bmp. En el primer boton Browse que muestra la imagen, eliges el sprite que descargaste y le das a convert. las imagenes que se van a extraer de este sprite van a ir a parar en la misma carpeta donde esta ubicado el sprite, por lo que no elegimos BMP directory. Se recomienda tener el sprite aislado en una carpeta nueva.... no queras llenar tu escritorio con mas de 100 iconos de bitmaps ? Elegimos nuestra imagen Modelo, Preferiblemente una donde se vean todas las cualidades del objeto que vamos a RECOLOREAR, ELIMINAMOS EL RESTO El BITMAP elegido lo debemos abrir con el programa ADOBE CS6, Yo uso el portable Una vez abierto el Adobe CS6. Nos vamos a la parte que dice Archivo, y le damos a Abrir, ahí elegimos el bitmap que habíamos seleccionado, y una vez abierto nos vamos a la barra superior y elegimos imagen, Luego Modo, y por ultimo TABLA DE COLORES Cuando se Abre la Tabla de Colores Elegimos la Cuenta Gotas, le Damos un solo Click Buscamos la Porción de color que querramos editar! Y le damos SOLAMETE UN CLICK con el cuentagotas, Esto nos indicara de que cuadrante de la paleta procede el color que elegimos. YO CLICKIE EL PANTALON DEL WHITESMITH PARA SABER DONDE ESTABAN ESOS COLORES MUY IMPORTANTE A LA HORA DE EDITAR PALETAS, Es que no podemos editar lo que nos de la gana, NO PODEMOS ELEGIR UN SOLO CUADRITO! Tienes que elegir los 8 Cuadros de la regla donde se descubrió el color que acabas de clickear con el cuentagotas, PARA SELECCIAR LOS COLORES DEBES VOLVER A CLICKEAR EN EL CUENTAGOTAS PARA DESACTIVAR LA HERRAMIENTA. SI TE FIJAS EN LA IMAGEN AL VOLVER A CLICKEAR EL CUENTAGOTAS YA NO ESTARA EN HILIGHT! y ya con esto puedes seleccionar la rama de colores que descubriste Seleccionamos la regla de colores que habíamos descubierto, SIEMPRE TIENES QUE ELEGIRLA desde el Extremo Izquierdo hasta el Derecho, MANTENIENDO PRESIONADO EL CLICK Y ARRASTRANDO EL CURSOR A LO LARGO DE ESOS 8 BITS.. ASEGURARTE DE SELECCIONAR UNICAMENTE ESOS 8 DONDE DESCUBRISTE EL COLOR CON EL CUENTAGOTAS, No puedes pasarte porque editarias otra porcion del dibujo que no quisieras. CUANDO LO TIENES SELECCIONADO SUELTA EL CLICK DEL MOUSE Y SALDRA LA PANTALLA DE EDICIÓN DE COLORES ELIGES EL PRIMER COLOR Y LE DAS OK CUANTO ELIGES EL PRIMER COLOR, SE ABRIRÁ EL SELECTOR DEL ULTIMO COLOR, Cuando vas seleccionando el ultimo color vas a ir viendo como va cambiando el color de regla que elegiste... Lo que conseguimos con haber seleccionado los 8bits de la regla del color es un efecto mate que se ira aplicando en el color que descubrimos con el cuentagotas. La clave de un buen paletaje es Elegir Un primer color claro, y un ultimo color oscuro. Pero tu podrás hacerlo como mas te guste. Volvemos a utilizar nuestro cuentagotas para ver que mas podemos encontrar, esta vez seleccione los guantes del Whitesmith y descubri la regla de colores del Guante Repetiré el paso anterior, Desmarcare el gotero, Luego elegiré los 8 bits de la regla de colores donde encontré el color del guante! Usare un gris claro como primer color y un negro oscuro como ultimo color, para ver que me resulta. Descubrí que esta regla no solo abarca los guantes, si no que también comparte el color de los sujetadores de la camisa de nuestro Withesmith, y aquí es donde hago valido lo que dije anteriormente, QUE NO PODEMOS EDITAR LO QUE NOS DE LA GANA A VOLUNTAD. Solo podemos cambiar el matiz de la regla de colores. Tras experimentar mas con el gotero, encontramos varias reglas de colores que pudimos editar en nuestro whitesmith y este es el resultado final, Felicidades pues poseemos un color que ni el mismo Kamishi y su popular pack de paletas ha hecho. Le damos a guardar, y lo guardamos como MICROSOFT PAL Ya tenemos nuestro Archivo PAL, Para visualizarlo deberemos abrir el SPRITE! ojo el spr no el bitmap. Y en la pestaña Palette ponemos OPEN PALETE y seleccionamos la que recien guardamos. Podras ver el objeto en accion con la nueva gama de colores que le aplicaste Ese archivo pal puedes enviarlo al grf donde tenga las palettes siempre y cuando utilizes el nombre correspondiente de job, y el numero de paleta en la cual quieres que se muestre ese color. Debo aclarar que para que esas paletas se muestren correctamente en el cliente deberás abrir el archivo y remover la firma, ESTO APLICA UNICAMENTE PARA PALETAS DE COLOR DE PELO Y COLOR DE ROPA DE JOBS. La firma que debes borrar es la que muestro seleccionada aqui en la imagen. ----------------------------------------------------------------------------------------------------------------------------- SI EN LUGAR DE UN JOB, EDITASTE UN ITEM, UN MONSTRUO O UN NPC, ARMA ETC, SIMPLEMENTE ABRE EL SPRITE, CARGA LA PALETA Y DALE SAVE, aqui no hace falta remover firmas. Con el tiempo y dedicación seras un experto, podrás crear armas nuevas a bases de recolor, Podrás generar nuevos colores de cabello Podrás reparar las caras de algunos sprites donde los tintes o paletas manchan la cara Podrás crear tus propios escudos y armas, insertando y modificando imágenes y armando los sprites a partir de bitmaps. s

 1 point
 -
Version 1.0.0
655 downloads
this patch make the player must have a variable true to claim his attendance reward the variable is #Attendance_YYYYMMDD ofc the variable change each day this will allow you to create a script to make for example a quest that the player must do every day to claim the attendance like for example the player must kill 500 monster before he can claim his attendance or must gather items or must be x level or must player x amount of time in the day so he can claim the reward of all the above the file include an information script file that have 2 function , one to set the variable and one to get the variable value (if you want to use them , just add them to your rathena/npc/other/Global_Functions.txt) it also include 2 example quests for you to get some inspiration to create your own script TODO: create function for gepardFree1 point -
Version 1.0.1
1558 downloads
//===== rAthena Script ======================================= //= saders Mini Endless Tower 25 level //===== By: ================================================== //= Sader1992 //https://rathena.org/board/profile/30766-sader1992/ //===== Current Version: ===================================== //= 1.0 //===== Compatible With: ===================================== //= rAthena Project //https://github.com/sader1992/sader_scripts //===== Description: ========================================= //==== cooldown is 1day can be changed via rathena/db/import/quest_db.txt (86400 == 1 day) //==== you can add rewards in the start of the script function named 'F_Mini_Endless_Tower_Rewards' //==== Support Gepard! (see line 185) or search for ( .gepard = false; ) set it to true to use it //============================================================ //==== please send me a message if you find error //============================================================ //============================================================ License : by downloading this file you are agree on the following: i will report any bugs or errors to sader1992 . i will not sell/exchange this file in anyway . i will never claim sader1992's work as mine . i will not remove the lines that say 'by sader1992' all the rights retain to sader1992 . Terms above may be changed or adjusted without prior notification .Free1 point -
Hi. I noticed that, Archer, Spear and Sword Mercenary uses 3 different body sprites, and the Head and Hat are different defined. My question is, how to edit the Head and Hat for those mercenaries?1 point
-
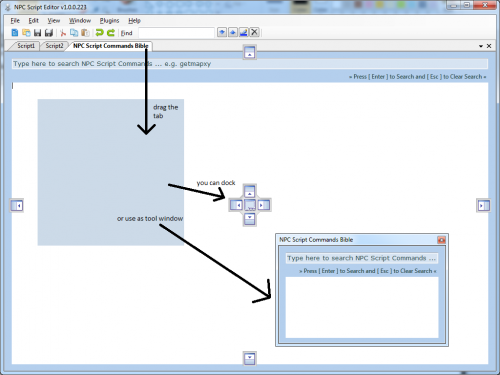
Version v1.0.0.600
8459 downloads
Easy to use & feature packed NPC Script Editor for RO emulator(s). Has a built in plug-in system, so anyone can write their own plugin to extend this editor's feature. Now optimized for performance and support NPC Script Parsing / Syntax / Error checking (F6) right in the editor to speed up your coding.Free1 point