

Leaderboard


Popular Content
Showing content with the highest reputation on 01/18/18 in all areas
-
File Name: [email protected] File Submitter: keitenai File Submitted: 1 Dec 2017 File Category: Src Modification Content Author: keitenai Updated: 31 July 2022 Information: @ resist will check the current values of resistance from each Element / Race / Size / Class. Thanks to @Santafe for the idea of this command. 1. Download the Diff file. 2. Patch the diff to your rAthena 3. Recompile your server. 4. RUN THE SERVER! Compatible with: rAthena 97b5f3b ( as of July 31, 2022 ) Download : keitenai_@resist_command_V2.diff

 1 point
 -
AndRO is a self-written RO client for Android that is compatible with rAthena, eAthena, and Hercules. To run it, you need a working game client on your device and a running server. App will use GRF list from DATA.INI and server list from clientinfo.xml. Default packet version is 20171227. You can change it by specifying <version>YYYYMMDD</version> tag in your client's data/clientinfo.xml For obvious reasons it doesn't support gepard and stuff. Just plain ro protocol. Download link: http://roworkshop.com/andro You may also want to customize your client's data/clientinfo.xml for AndRO by adding some of the additional options that AndRO supports: http://roworkshop.com/andro/main/clientinfo.html1 point
-

Version 1.2.0.0
8470 downloads
Heya! This is a new project I've made aiming to manage the various databases as easily as possible. This tool was initially developped using Client database editor's engine, a tool from GRF Editor. It has been adapted to support more database formats and many of the features have been improved. How to install Download the zip archive provided from the download link at the top right corner of this description or directly from there : http://www.mediafire.com/download/p0zhcc8ipa6cjt3 . Install the application with SDE Installer.exe; if you are missing a .NET Framework you will be prompted to download it. Once you are done, you can start the program from the link on your desktop. Features Both rAthena and Hercules' formats are supported by the application. Many conversions between rAthena and Hercules are possible. Converting items can be done simply by right-clicking on the elements and selecting "Copy entries to clipboard (ServerType)". Undo and redo commands are available, as well as navigation commands (quite useful when switching tabs a lot). There are many shortcuts within the application, all of which are shown when right-clicking items or going through the menus. I do plan on adding more as well. The databases are 'merged' between each other to offer an easier view. This is true mostly for the item and mob databases. Flag fields can be entered with either an hexadecimal value or an integer value. You will have to add "0x" if you want to enter an hexadecimal number though. For Windows XP users, the program's layout may change a bit. The Aero theme is applied to make sure the application looks like it should. Getting started Create a new project from File > New project. Go in the settings tab and set the path of your database. If you're using pre-renewal, then drop the pre-re folder in the "Server DB path" box (drop the re folder otherwise). Don't drop your "db" folder, it simply won't work! Save your project file to avoid redoing this step everytime you reload the application by going in File > Save project info. The project info file is automatically saved, so you don't need to save it everytime you do a modification in the settings. If you associate .sde files with this tool, you will be able to start up your project from the project file directly (which is more convenient). The last setting is the resource files and it is optional. Simply drag and drop a GRF in the paths list. This will add icons in the items list view (it will also make the application slower when scrolling for that list). Easy input fields All the fields are easy to set and most of them have tooltips. For example, to edit the drops of a mob, simply right-click on the items and change the drop value (both float and integer values are accepted in the field : typing 5.20 is the same as typing 520). How to save the database There are multiple ways to save the database : quick save, full save and export. Quick save keeps the commands you've applied on the database (Ctrl-S), this is the saving option you should be using. Full save (Ctrl-Shift-S) does not keep the commands and you will not be able to undo any operations afterwards. Export (File > Export to db/SQL) exports the database to another folder and this is normally used to convert databases. When saving, the comments are preserved as much as possible, but this is not always possible. For example, the items table from Hercules is always rewritten, so the comments will be lost in this file. Unmodified tables will not be saved. Disabling a tab will also prevent the associated table from being rewritten/saved. This can be achieved by right-clicking on a tab and selecting "Disable 'table name'". SQL support You can export your current database to SQL from File > Export to SQL > ... The first option in the list is the current database format. The other options are used for conversions between rAthena and Hercules. Backups system The application automatically creates backups everytime you save the database (can be disabled in Settings > Enable backups manager). You can revert to a previous date by going in Tools > Backups manager. This tool's purpose is to make sure you never lose any important data (as well as preventing data corruption). Merging or adding lines from another database It is possible to merge databases by going in Edit > Add item from raw db line. Simply copy and paste the lines from the database you want to add. You must select the corresponding table before doing so, of course. (Known bug : adding lines with invalid parameters will put the database in an invalid state). Synchronize with client database files If "Synchronize with client database files" is checked in the Settings tab, you'll be able to turn on all the following features. Bind item tabs together (suggested by UltraCat) This feature enables you to quickly alternate between the Item and Client Items tabs. Whenever you switch table, it will autoselect the item previously selected. The text search filter will also be applied to all three tables (Item/Item2/Client Items). Subfilters (such as item description, script, etc) will be ignored if the item isn't included in the search result. Manage view IDs automatically (suggested by UltraCat) This feature allows you to completely ignore the view IDs for headgears and costumes. Only the identified resource's field is taken into account when synchronizing with the client databases, so make sure you set at least this field! You must also set up the lua paths; go in any item table and click on the wheel next to the "View ID" field. This will bring up a dialog to setup the paths (preferably, the files should be located in your data folder to avoid saving the GRF all the time). They will be automatically decompiled if necessary. If everything has been properly set, the View ID field for the headgears and costumes will be grayed out. When saving, you'll notice some view IDs will be switched around, but SDE will try to keep your original IDs as much as possible. The view names will be changed to the item's Aegis Name (has no effect ingame). Mob sprites edition In the mob tables, you will find a wheel button, similar to the view IDs. Setting up the paths will allow you to see the mob sprites as they will appear ingame (except for granny models, like emperium for instance). The "..." button can let you select the sprites from the mob folder in the GRFs (or data folder). Preview images With the client tables synchronization, the preview image for items in the list view will be properly displayed. This is handy for custom items. Notepad++ support There is support for Notepad++ to easily find items in a text (or conf) database. Right-click an item and use "Select in Notepad++". Search feature The search engine is the same used as CDE, so it should make it easy to find an item. There is also a hidden search option : if you type "[number_of_slots] 4" it will give all the items with 4 slots or "[refineable] true" will give you all refineable items. This can be applied to any attribute in the table which are not shown in the search panel. Todo list Import from SQL (is that even necessary?). Automatically create a table from a file. Batch files / command line methods (would be similar to GrfCL). Known bug : exporting mob_skill_db from Hercules to SqlRenewalHercules doesn't seem to be parsing properly (for this file only). Type safety (check for invalid inputs, use the same SQL rules when loading the databases). Hope you enjoy this tool! The sources will be available on githut for the next release. If you have a feedback or suggestions, let me know and I'll probably add them to the software. Sources https://github.com/Tokeiburu/RagnarokSDEFree1 point -
Hi again, i bring this tool to my fellow mappers out there!. Browedit Manager [v0151] ~Download~ (Mediafire) ~Download~ (Dropbox) ~Download~ (Mega) Usage: Just uncompress to any folder and read the following manual: Changes on 0.151: - Added save last settings used function for "Add Custom Texture" and "Add Custom Model". - Implemented "View Files" buttons for fast access to custom files. - Implemented "Add Custom Model". - Fixed a couple of minor bugs, added workfiles to avoid the basic missing textures/models messages, running through settings again will fix this!. Changes on 0.141: - Fixed a couple of bugs with add custom texture functions. Changes on 0.14: I changed a couple of icons of the editor: Lightning Sounds Effects - Added Some new colors to Background/No Tile selection!. - Implemented Categories/Subcategories in Add Custom Texture!. Main Menu Build Version: Select the Version of Browedit to Launch.(I only bundled the 2 versions i use, 586 and 620, i don't think you'll need anything else.) Start Browedit: Launch the selected Version of Browedit!.(Requires to run through settings first!) Open (RO Directory): Open the RO Directory that was setup on the Settings window!.(Requires to run trough settings first!) Settings: Sends you to Settings Window!.(Required to run this program!) Add Custom Texture: Sends you to Add Custom Texture Window!.(Requires to run through settings first!) Exit Manager: Closes Program!.(Doesn't close Browedit Windows!) Settings RO Directory: Setup your RO Directory!.(Directory where you have your data.grf and/or rdata.grf as well as choosing the files to be used. ) Background Color: Select the color you want to use as a background inside Browedit!.(Purple (Default)!) Empty Tile Color: Select the color you want to use for the tiles that have no texture yet inside Browedit!.(Purple (Default)!, Originally was a bright yellow, i recommend to change the default!) Resolution: Select Browedit's Resolution!.(800x600 (Default)!, I only included resolutions of Power by 2 that i've tested, widescreen resolutions tend to glitch!) Camera Smoothing: Select Browedit's Camera Smoothing value!.(0.6 (Default)!, I tried a lot of variants but i cannot tell much difference about this, i recommend to leave at default.!) Save Files And Return: Saves the changes you made to Settings and returns to Main Menu window!.(After this, buttons on the Main Menu will be available!.) Add Custom Texture RO Directory: Shows you the current RO directory in use by browedit!. Texture Sub-Folder: Type the sub-folder you want to use in the RO directory (if you select Copy to Texture to RO Folder the sub-folder will be created if it doesn't exist!) Copy Texture to RO Folder: Copies your new texture file to your RO Directory!.(By default it's unchecked assuming your new texture is already on data\texture\!) Texture Directory: Browse for your new texture!.(By default it'll show you your RO directory, if you have your new texture somewhere else, be sure to check Copy Texture to RO Folder!) Texture ID Name: Specify an ID Name for your new texture!.(By default it copies your filename, Uncheck Same Name if you want to change the ID Name!) Category Name: Specify a Main Category inside browedit's texture browser! (Case Sensitive!!, custom by default). Sub-Category Name: Specify a Sub-Category for your Main Category inside browedit's texture browser! (Case Sensitive!!) Engage!: Processes your new texture!.(Adds it to Browedit and copies to RO Directory if choosen!) Return to Main Menu!: Returns you to Main Menu!. Add New Map RO Directory: Shows you the current RO directory in use by browedit!. Map Dimensions: Select the dimensions of your new map! (the map aspect is shown in the image above!). Map Name: Type your new map name! (There are server-side/client limitations!). Engage!: Processes your new map!. Return to Main Menu!: Returns you to Main Menu!. Add Custom Model RO Directory: Shows you the current RO directory in use by browedit!. Model Sub-Folder: Type the sub-folder you want to use in the RO directory (if you select Copy Model to RO Folder the sub-folder will be created if it doesn't exist!) Model Directory: Browse for your new model!.(By default it'll show you your RO directory, if you have your new model somewhere else, be sure to check Copy Model to RO Folder!) Category Name: Specify a Main Category inside browedit's model browser! (Case Sensitive!!, custom by default). Sub-Category Name: Specify a Sub-Category for your Main Category inside browedit's model browser! (Case Sensitive!!) Engage!: Processes your new custom model!. Return to Main Menu!: Returns you to Main Menu!. Notes: - Removed the ugly Hamtaro almost from everywhere! and replaced it with a cutter Poring chewing a pencil! - Contains 2 working revisions of Browedit (And plugins) within the package, 586 (which i personally use to Map) and 620 (which i only use to automatic gat calculation). - It's probable i'll post Video tutorials on how to use these 2 revisions in order to achieve similar Gravity's quality maps sometime in the future!. - As you well know, you cannot create new maps from scratch from Browedit, it's neccesary to look for an already existing map with the desired dimensions, clean it and then start mapping, the function Add New Map saves you that trouble as i added a pack of several different clean maps from where to pick from!. Copyright Notes: This tool only helps mappers to manage their Borf's Browedit settings, i'm in NO way claiming intellectual or physical or whatever crap over this program!!, for all intends and purposes this program is just an Add On to Browedit!. As always, Leave your suggestions and opinions!. Enjoy~! ~Nuckelavee1 point
-
ive been reading your replies to your support questions recently , you cant run a server without having minimum knowledge , i know that you are new with and stuff ( which you mentioned multiple times ) , you better read wiki/ docs folder so you can at least understand the answers you getting for you questions, most of the questions you are asking are already answered multiple time in rathena , you just need read and understand, stop expecting SPOON FEED1 point
-
you can check logs in your fluxcp ( logging using admin account) / check pick log table in your mysql db1 point
-
You can change it by using any HEX editor. // 2015-11-04aRagexe 4B51CE change 6A FF 6A 00 50 8D 4D D8 E8 85 B8 B7 FF to 90 90 90 90 90 90 90 90 90 90 90 90 90 4B5291 change 6A FF 6A 00 50 8D 4D D8 E8 C2 B7 B7 FF to 90 90 90 90 90 90 90 90 90 90 90 90 90 6FAFB0 change 20 28 00 00 5B 20 54 6F 20 00 00 00 29 20 5D 20 3A 20 to 20 00 00 00 5B 20 54 6F 20 00 00 00 5D 20 3A 20 00 00 // 2016-02-03aRagexeRE 4D209E change 6A FF 6A 00 50 8D 4D D8 E8 95 08 B6 FF to 90 90 90 90 90 90 90 90 90 90 90 90 90 4D2161 change 6A FF 6A 00 50 8D 4D D8 E8 D2 07 B6 FF to 90 90 90 90 90 90 90 90 90 90 90 90 90 71D994 change 20 28 00 00 5B 20 54 6F 20 00 00 00 29 20 5D 20 3A 20 to 20 00 00 00 5B 20 54 6F 20 00 00 00 5D 20 3A 20 00 001 point
-
Login in fluxcp using admin account> go to players account details> click on modify account, add credits>click save1 point
-
{ bonus bAspdRate,BaseLevel/10; bonus bMaxHP,(-40*(BaseLevel/10));},{},{}1 point
-
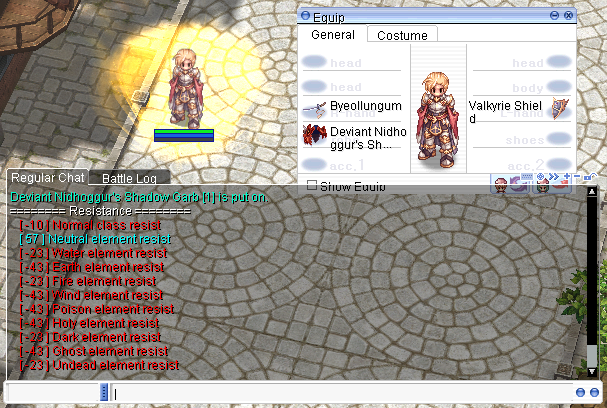
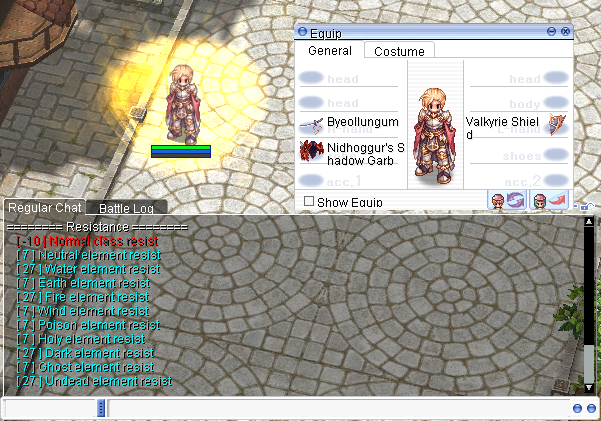
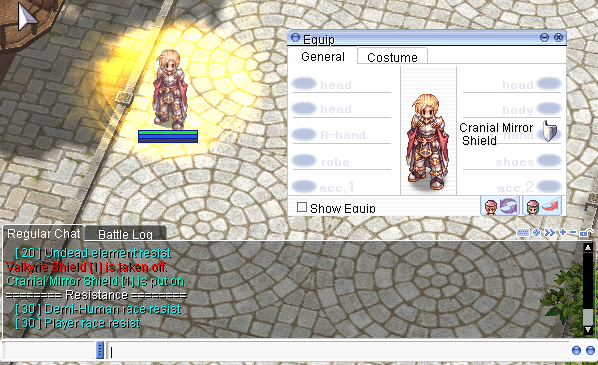
Made it work for my 2013 client, heres the src edit i did to ur src diff : /*========================================= * Check values of resistance to elements * [ Keitenai ] *-----------------------------------------*/ ACMD_FUNC(resist) { char output[CHAT_SIZE_MAX]; int i; struct { const char* format; int value; } output_table[] = { { " [ %d ] Neutral resist", 0 }, { " [ %d ] Water resist", 0 }, { " [ %d ] Earth resist", 0 }, { " [ %d ] Fire resist", 0 }, { " [ %d ] Wind resist", 0 }, { " [ %d ] Poison resist", 0 }, { " [ %d ] Holy resist", 0 }, { " [ %d ] Dark resist", 0 }, { " [ %d ] Ghost resist", 0 }, { " [ %d ] Undead resist", 0 }, { NULL, 0 } }; memset(output, '\0', sizeof(output)); clif_displaymessage(sd->fd, "========= Resistance Values ========="); output_table[0].value = sd->subele[ELE_NEUTRAL]; output_table[1].value = sd->subele[ELE_WATER]; output_table[2].value = sd->subele[ELE_EARTH]; output_table[3].value = sd->subele[ELE_FIRE]; output_table[4].value = sd->subele[ELE_WIND]; output_table[5].value = sd->subele[ELE_POISON]; output_table[6].value = sd->subele[ELE_HOLY]; output_table[7].value = sd->subele[ELE_DARK]; output_table[8].value = sd->subele[ELE_GHOST]; output_table[9].value = sd->subele[ELE_UNDEAD]; for (i = 0; output_table[i].format != NULL; i++) { sprintf(output, output_table[i].format, output_table[i].value); clif_displaymessage(fd, output); } return 0; } Note: ELE_ALL isnt required, tested on :Nydhrogg's garb; it auto assigns +7 to all the eles besides that, subele(ELE_ALL) isnt present in the 2013 version1 point
-
Okay so i fixed my own problem.. @mhielo12 also maybe yours. the problem on the diff is on the Vending.c the thing about it says we don't have enough items because its looking on our cart.. not on our inventory.. =) replace all the cart.u.items_inventory -> inventory.u.items_inventory there are 4 cart.u.items_inventory on the diff. so you will see them easily.1 point
-
Hi ! Yes, but currently writing plugin system is not on priority list because the client needs basic functionality There'll be one later1 point
-
2706 downloads
Well, here you got some Updated Palettes, what is inside? I have onlye add: - Kagerou and Oboro - Summoner I have no add the Costume 3rd Job of Jro because dont look well in some jobs, the paletts dont match with the sprites and is a mess of black pixels for everywhere. Waiting you found it usefull for your server. Enjoy.Free1 point


.thumb.png.d3186060278217cbced56ca1b64fcfb5.png)