Leaderboard


Popular Content
Showing content with the highest reputation on 03/06/13 in all areas
-
It will be released this year even if it's not totally finished, it will be a good thing to open the source Same here, I try to do my best to work on this project but sometimes it's hard to manage it and all others things (like my girlfriend lol). It can be a good thing to have a GRF history/diff/tracking tool to see what Gravity add/remove/change in its files, keep it up ! (I know some others guys had the same idea ) Nice js1k entry, I asked myself "why 'ninja' ?" the first time I saw it, nice done @project, No news, have problems with one of my computer, so I will try all I did in "bind mode" (rewrote the whole Entity manager) when I will switch to my girlfriend's home this week end3 points
-
It may contain ** misinterpretation Common Patch Content: - Fixed error with the Broken Sword adventure. - The prizes associated with event fighter will ship steel (Added 19:23) -> After maintenance rewarded accounts speak to the NPC of listings to receive. Main Servers: - Fixed a phenomenon with the bonds of some items that were applied abnormally in TE WoE maps. - Corrected Arch Bishop Skill: The ability [Coluseo Heal] erroneously applied in some members of the party and will be corrected. Sakray Server: - Added the episode 14.3 Part-II. - The base level cap is increased to 175, job level cap increased to 60. -> New skills added. - Some errors in the formula for calculating the CRI will be corrected. - Fixed a bug when you used the command / AURA for mostralo or not, was needed to re-enter again, no longer necessary. -> To meet the criteria and go around the effect, do not reconnect the effect on the screen even when they re-enter. -> The fading-visible effect on the screen immediately reinserted, if you need to re-enter again. Credits To Ziu For His Original Korean to Spanish translation. Note: For now on ill be posting the official update logs every week. Its important that we keep a history of all updates. And how about we start displaying pics of all the goodies we find in the patch files? We used to do that a long time ago and should start showing them again. Sprites, maps, items, etc. On March 6, 2013, EP14.3 Part 2 was added to the sakray server which not only increased the base level cap to 175, but it also increased the job level cap to 60, increased max stats cap to 130 (need confirm), and expanded the skill tree's for all 3rd jobs by adding a new skill unique to each of them, along with a 2nd skill usable by all 3rd jobs. Below is the collection of information for these new skills. This post will be updated with additional information as its collected. Skill Icons This is a picture displaying all the new skill icons for the new 3rd job and other skills introduced in EP14.3 Part 2. Icons with the GM prefix at the beginning are GM only skills and the one with the ALL prefix is usable by all 3rd jobs. Status Icons This is a pic showing the new status icon's for a number of status's for the new 3rd job skills. In order they are....darkcrow, frigg_song, full_throttle, kings_grace, offertorium, rebound, telekinesis_intense, unlimit. Skill Descriptions Other Skill Information (SP Requirements, Level Selectable, Range, Etc.) Additional Information Sound And Animation Videos2 points
-
%d is for numerical values. Use %s.2 points
-
@Dramosith - Awesome idea, I will look into these two plugins soon~ @Euphy - Managed to do everything on your list except for the last one New version released, currently awaiting approval. What's New in Version v1.0.0.3142 points
-
You need to have a Thor patcher! Note that there are different version and features develop within thor if you don't have one I suggest to download this Thor Patcher [2008-08.05] because of this guide! Mirror Thor_Patcher[2.5.4.18].7z We wil begin in configuring your config.ini inside your Thor Patcher/Tools/config.ini 1. Open that file, and edit the following (I will list all necessary configuration needed for configuration) Find this line: base_url=http://domain.com/patch/ - This is your base URL where the patch is a folder under your web host and the patcher will access that folder and everything inside. In my case I will create new folder name thor folder to use in this guide. below is my config and path for my patcher base_url=http://www.axwebsolutions.com/thor/ 2. The news/notice notice_file=notice.html - you don't need to change this one, unless you want to use .php! Incase you did change your own news, you need to change that one too inside your configuration, In my case I will leave it as notice.html and upload it inside the thor folder under my webhost. As you can see when you combine the base_url and the notice.html it will look like this http://www.axwebsolutions.com/thor/notice.html Just like I said earlier thor will find the file notice.html inside the folder name thor under my webhost. 3. The core file core_file=main.ini - core_file is the main remote configuration that the patcher will access first inside your webhost or my thor folder. 4. Other important configs below [Local] //status_file - [Relative Address] //It used to store information such as last patch id etc, status_file=server.dat - the .dat file is the thor patcher logs everytime you create a new patch it will be listed inside that server.dat you can change this to your server name or any name you want, its useful so it won't mess with the other servers installer/files. //grf_file - [Relative Address] grf_file=Server.grf - This is your primary or main grf //client_file - [Relative Address] //It's GAME EXE not patcher's client_file=nro.exe - This file is your hexed.exe that the thor will trigger after the player click the start game button in your patcher. //client_parameter - [self Explained] client_parameter=-1sak1 - Self explain, or don't edit if you don't know what is this for...! the rest of the configuration is done! Now if you want to do a modification its all up to you. When your done editing... make sure to save the changes you made in your config.ini We may now start combining the config.ini and embed it inside the Thor Patcher. Open the /Thor Patcher/Tools/Config_Packer Click the Browse button, browse and open the Thor file located inside the Thor Patcher/Patcher/Thor then click Pack! Alright its done with combining the config.ini with Thor file < your patcher. Next is 5. The main.ini file Open the main.ini file found inside your Thor Patcher/web/main.ini Find this line file_url=http://domain.com/opatch/data/ - the file_url is for your patches that you have created same with hexed or patcher hexed that you would want to patch too. Change it too, In my case I have created a folder name thor with the path http://www.axwebsolutions.com/thor/ go inside your Thor Patcher/web/ folder you will see that I created the folder name patchs this is the folder where all patches you created will go inside under your webhost ofcourse. in my own configuration I will put file_url=http://www.axwebsolutions.com/thor/patchs/ when your done just save and exit. 6. We need to upload all files inside the Thor Patcher/Web folder, earlier I have created thor folder inside my webhost public_html, now I will upload all files inside Web folder into thor folder under my webhost. I suggest using CuteFTP for easy upload of files, simple as drag and drop. You can download this cuteFTP by searching on the web. When your done you may now test if your config is working simply by double click on the Thor found inside your Thor Patcher/Patcher/Thor.exe Also you can put all necessary files(yourro.grf, thor.exe, hexed.exe etc...) for your installer inside the folder installer! To avoid messing up with other files. Here's mine 7. Making a patch with grf Its easy to make a patch, First create a folder name patch - grf inside your Thor Patcher folder. Go inside the patch - grf and create another folder again, in my own way of making a patch I have created many folders just to separate all this patches, that's why I have now patch - grf folder means all updates that is going to be extracted inside my main grf should go in the folder name patch - grf but for me not to get confuse I have created another folder inside the patch - grf folder and that folder name is the date of the patch. For example today is December 3, so I created dec3 folder (don't get confuse you can create your own folder name and way of creating patch) Now, inside the dec3 folder I created another folder name data! We all know that when you extracted a data.grf, sdata.grf or anyname.grf it will extract a folder name data! As you can see the earlier explanation, this is the directory for my patch Thor Patcher/patch - grf/dec3/ then the data folder. Inside the data folder all the files of your client update that you have added/edit! For example I added a new custom items with headgears and etc item, you can check my data folder by download it HERE! Note: When making a patch you don't need to paste all of the files inside your data folder and patch it again, what you need is the files/folders that you have re-edited or files that you have added must all go inside the data folder. Extract my data.rar and see what's inside, notice that I have put only what I added and put inside what I have just re-edited. To make a patch for thor, open the ThorMaker found inside your Thor Patcher/Tools/ThorMaker #1 - This is the name of your patch just enter any name you want. In my case since, I use the date I will name the patch as c_updates_12032008 then click Save By the way, create a folder inside your Thor Patcher and name it upload - grf you can make your own folder name, for this example I use the folder name upload - grf because this folder is the location of all the patches I have made. #2 - make sure that you select RO - GRF #3 - there are two options on how the patcher will extract your patch, the first one is Directory and the 2nd one is Single! In this guide we will use the Directory option by default. Click the Select button, If you stil remember I have created the folder name patch - grf, now go inside that folder and select your patch folder name, in my case I use the folder name dec3, that is the folder I need to select, take note that I have put the data folder inside the dec3 folder. Take note that we use the Directory option, that's why I select dec3 folder, just click OK to select. #4 - When your done just click the Generate and it will repack a file name c_updates_12032008.thor! Note: Make sure that the folders/files inside the data folder that you will be patching is in Unicode (this is gibirish) not with boxes names! Once the file is ready, copy the name and paste it inside the plist.txt found inside your Thor Patcher/Web/plist.txt Here's mine 1 - is the number of the patch c_updates_12032008.thor - is the name of the patch On the next patch just add on the second line number 2 for the 2nd patch. for example --------------------------------------------------(inside plist.txt) 1 c_updates_12032008.thor 2 c_updates_12042008.thor ------------------------------------------ When your done, upload and replace the file plist.txt inside your webhost also upload the c_updates_12032008.thor inside the patchs folder in your webhost! When you start your patcher it should be patching by now. 8. Making a patch with files, patcher hexed or hexed.exe Check your Thor Patcher folder you will see the patch - file and upload - file folders that I have created, its obvious that you will paste all files inside that patch - file folder and the generated .thor will be put inside the upload - file folder. When making a patcher hexed or hexed.exe patchs its same what you did before the only difference is that you will not use the plist.txt but you will need the main.ini when patching patcher hexed or hexed.exe! Example below Lets say you have now have a ready patcher hexed, just paste it inside your patch - file folder. Note: Make sure the name of your Patcher hexed is same with the name of your patcher hexed before. For example you use Thor.exe while with your new patcher hexed that you will be patching must also name as Thor.exe too! #1 - same with the Guide #7, enter the name of the patch and click save, in my case I will use the name p_updates_12032008! also you can put the patch to any folder you want but in my case I will save my patch inside the upload - file folder, you can do the same, whatever you want. #2 - Make sure to select File #3 - click select button, find and select the folder patch - file because earlier I told you to paste your patcher hexed inside the patch - file folder! #4 - Click Generate to make the p_updates_12032008.thor file! Make sure to select Root option(see image above). When your done you need to edit the main.ini in this lines Example: ----------------------------------------------------------------------------------------- [Patch] //use CheckSum tool, hash for client & patcher // used to make sure exe is up to date // (leave empty to disable this feature) ClientSum= PatcherSum=CD83831A //This is compressed file for patcher & client update // To make these work, ClientSum and/or PatcherSum can't be empty // Note: these files should put same place as patch file (file_url in internal config) //Relative address, not FULL URL! ClientPath= PatcherPath=p_updates_12032008.thor ----------------------------------------------------------------------------------------- Oh I forgot, you need to use the CheckSum found inside your Thor Patcher/Tools/CheckSum, you will need this to know the value of the patcher hexed that you will be patching, let say that this is the version of your patcher hexed. Just drag drop the patcher hexed in the checksum to see the value and put that value as you see in above example! When your done, save and exit. Don't forget to upload that main.ini in base_url and the p_updates_12032008.thor inside the patchs folder in your web host. With hexed.exe you do the same. 9. The last part is creating your own installer, here in axweb we use NSIS/Install Creator but I suggest using the install creator, it is a software for creating installer and User Friendly just visit the www.clickteam.com and download their software name "Install Creator" All done. Thanks for reading ~ Credit to Axweb1 point
-
Hi, Here's my latest public release after a very long time. An easy to use & feature packed NPC Script Editor for RO emulator(s). NPC Script Editor r600 Features NPC Script Syntax Highlighting Standard functionalities you'd expect of a editor (file, open, print etc...) Fully implemented Find & Replace (Ctrl + F / Ctrl + H) with Go To (Ctrl + G) functions Quick Find & Highlight Tabbed Editor Tab Docking Open-Source & Easy To Use Plugin System - sample "Hello World" project in "Plugins" folder (VS2012 C# .NET) Auto-Suggest/Complete Code Folding Markers / Bookmarks NPC Script Commands Bible - Free Plugin Text Translator - Free Plugin Snippets - coming soon Hotkeys Ctrl + W = Close Current Tab Ctrl + Tab = Next Tab (Cycle Forward) Ctrl + Shift + Tab = Prev Tab (Cycle Back) Ctrl + N (1 ~ 9) = Opens Nth Opened Tab (e.g. Ctrl + 2 will open 2nd open tab) Ctrl + Space = Show auto-suggest/complete for the script command you are typing F1 = Select text in editor and press F1 to open NPC Script Command Bible plugin F2 = Select text in editor and press F2 to open Text Translator plugin What's New in Version v1.0.0.600 Implemented F6 Hotkey = Parse Current NPC Script To Output Window and shows any syntax / coding errors OutputWindow cannot be closed, and it starts hidden now Improved OutputWindow handling code OutputWindow now launches in hidden mode, and reveals itself on F6 keypress (if hidden) Fixed Tab Order/Stop in Core Plugins NPCScriptCommandsBible Plugin no longer uses internal script_commands.txt script_commands.txt is converted to Windows EOL automatically before parsing - no need to manually convert it now Re-Written NPCScriptCommandsBible Plugin's script_commands.txt Parser Plugin Code Optimized Fixed unnecessary trailing space with command info parsing - NPCScriptCommandsBible Enabled word wrap and forced vertical scroll bar - NPCScriptCommandsBible F1 hotkey now guesses the word at caret position (if a selection wasn't there) New script file(s) that are opened now automatically converted to CRLF (EOL) Fixed minor bug with F1 Guess Word At Caret function Fully Implemented "Open Recent" (History) Feature U.I Improvement - If the same file is already opened, that tab window is shown instead of opening the same file twice (or more) Enabled brace matching Fixed Minor Bug With Start-Up Sequence Fixed crash bug with opening files with the editor Removed Global Hotkey and replaced with application level hotkey feature Demo Thanks for trying my editor. Any comments and feedback would be much appreciated.1 point
-
Hello everybody, Just a Better (intuitive) Log System Problem In my life of server administration always happened a few episodes where I had to check the logs and this always was a so boring task. Despite the caution, I had problems with players beign hacked (stolen their items) and even corruption of GameMasters. So I decided to spend some good time (I do not have much experience with the source of rAthena) to make a better system logs, so I can solve all kinds of problems (hacking, GM corruption, Bug Abuse, etc.) quickly and efficient. Solution In this system I improved some things and I left these things the way I initially had idealized the logs (in a more intuitive way), I'll try reporting the changes for each transaction: 1. A General View -- Trade/Vending/Buying Store/Mail Very simple, the new values of the row (related_char_id, related_account_id) is the another player of the trade/vending/buying store. -- Pick In every player Pick (type = 'P') the (related_char_id, related_account_id) can be another player or a mob (both columns = mob_id). It varies between who primiraly dropped the item to the floor: A player or a mob (when the mob die). -- Auctions In every auction transaction will be a info code to help you to discover what's going on! Later I will explain each code. -- Loot Mobs can loot items, when this happens will be a row with type='L'. Related_ids of this row is the item origins (a player or another mob, is who primarily dropped the item). -- Drop When a mob or player drops an item, it's still not related to anybody because we can't know who WILL pick the item. So in this case related_ids = 0. -- Scripts/NPCs If a NPC give/delete a item, the row column related_npc_name = npc name. -- Stolen/Mvp prizes It are in essence equal to mob drop, and works just like this one. 2. Explaining better some features These are the features that give me the harder work to make. It's hundreds of lines changeds in the source, but I think it's worth. The Drop/Pick System is a little complex, and I explain above how it works, but if you don't want to know everything you can just jump this section! -- Trade/Vending/Buying Store Very simple, the new values of the row (related_char_id, related_account_id) is the another player of the trade/vending/buying store. -- Drops/Picks Improved To understand this improvement well, you need to know that the emulator handles in different way the actions of: Mob drops a item (type='M') and Mob drops a looted item (type='L', amount negative). Also there's an operation where Mobs Loot a item (type='L', amount positive). But let focus on the informations that will be provided on the log rows, and how the system works: - Mob drop an item (type='M') Main ID is the mob_id. Item origins are setted=mob_id. Related_IDs = NULL. The monster dies and drop the item to the floor. - Player drop an item (type='P', amount negative) Main ID is the player. Item origins are setted=player_id. Related_IDs = NULL. The player just dropped the item to the floor. - Mob Loot an Item (type='L', amount positive) Main ID is the mob_id. Item origins aren't changed. Show item origins in related_IDs (can be a mob_id or a player_ids). - Mob Drop an Looted Item (type='L', amount negative) Main ID is the mob_id. Item origins aren't changed. Show item origins in related_IDs (can be a mob_id or a player_ids). - Player Pick an item (type='P', amount positive) Main ID is the player. Show item origins in related_IDs (the player who dropped) or (the mob_id that dropped the item). NOTE: Here is when you know the source of a player pick. So as i said: A player can't pick another player item without making a trace in related columns. More properly speaking, a player can't pick a item without you know the REAL SOURCE that primarily put it on the floor. - Mail In this system, mail transactions are full logged with related player that send and receive items/zeny on attachments. - Extra info on Auctions (and other systems that use mail_sendmail). New parameter send_is_NPC: Field of NPC Name will be logged. Alter on sender_id: If send_is_NPC is true, can use it to log a Related Player to this transaction. New parameter extra_log_info: If send_is_NPC is true, this string will be added on the end of npc_name_related on the logs. Extra info on NPC NAME of Auctions: "#0": new auction created, "#1": auction ended by time, "#2": auction ended by seller, "#3": auction ended by buy now, "#-1": auction canceled by seller, "#-2": auction no buyers, "#-3": auction {returned} bids, "#-4": auction failed by techinical error. - Other Systems that uses mail_sendmail() If you have a mod in source that uses mail_sendmail() you can add the new parameters (send_is_NPC, extra_log_info) to put information that you can view later on LOGs. And also, you can turn send_is_NPC=ON and use sender_id param to LOG that transaction binding a player to that transaction as a sender. Imagine that: A NPC system (that uses mail_sendmail()) that the GMs uses to give rewards to players in events, so you can call mail_sendmail() with send_is_NPC=true, sender_id=acc id of GM, send_name = "Event Rewards", extra_log_info = "". And all will be fine. In mail picklogs the GM CID and AID will be logged as related. 3. Tables PickLog Table 4 New columns: account_id: just the account_id of the player who triggered this picklog. related_char_id and related_account_id: These are the fields that will represent a person related to that transaction picklog BUT not the main person. (The other person in the trade, sale, mail, etc.). If is a pick from original mob drop (mob die and drop-NOT LOOT), it will be both = mob_id. related_npc_name is used when a npc is related to the transaction (name of the npc). Note: In transactions where there's no other player/npc/mob related, these related_values will be just 0 or a empty string. IDs 5-6: Trade IDs 8-7: Vending IDs 9-10: PlayerA drop and then playerB pick. IDs 15-18: PlayerA drop, mob(1153) loot, PlayerB pick. IDs 19-23: mob(1153) drop, mob(1177) loot, player pick. IDs 58-59: NPC buy/sell IDs 67-70: PlayerA make mr.smile quest IDs 71-72: Mob drop, player pick. IDs 79-81: Weapon Refine Skill IDs 109-110: mob 1159(phreeoni) 'drop' mvp prize item, playerA pick. IDs 112-113: PlayerA send mail, PLayerB pick attachment. IDs 116-117: Auction Started, Auction finalized (no buyers in time). IDs 122-121: BUying Store. ID 123: PlayerA atcommand "#item playerB poring_card" ZenyLog Table 4 New columns: account_id: just like picklog. (main player who triggered zenylog) related_char_id and related_account_id: just like picklog. (another person/mob related) related_npc_name just like picklog. (npc related) The transactions Trade, Vending, #Zeny, Mail, Auction, Buying Store create a related_ids to the another player in the transaction. Buy/Sell and "set Zeny, x" are NPC-Related so related_npc_name will be = the related npc name. (oh rly!?) Example: ID 1: Kafra "set Zeny, Zeny - 820" -> Cart Rental IDs 2-3: Trade IDs 4-5: Vending IDs 6-7: Zeny Knife granted zeny IDs 9-10: Buy/Sell on NPC IDs 12-13: Loss zeny on skills IDs 17: PlayerA sent a mail to playerB with zeny attached IDs 19: PlayerA started a auction a pay the fee. IDs 20-21: Buying Store AtcommandLog Table There are very few modifications in this table. Just the related_ids that are used when someone uses a #command that affects another player. So, related_ids = who typed #command. ID 191: Rafa2 gives card to Merchant player. -> Related info! ID 216: Rafa2 picks a card to himself ID 217: Rafa2 gives zeny to Merchant player -> Related info! ID 220-221: Rafa2 uses #command but to himself, no related info. #Commands also works well with picklog and zenylog, as you can see on the screens: Pick: Zeny: Note: If playerx types #zeny playerx 1000 the related_ids should be = 0, because in this case it's just not related to someone else. ChatLog 2 new fields: dst_charid, dst_accountid. As the name says, it's the player who received the whisper message (to others types of message it's = 0). SQL Indexes I also added some very useful indexes IMO on sql logs to make the select queries faster (I know that it make the insert slower), but when you have a 4 GB picklog DB it's better to have some CPU Cycles lost everytime than can't make queries without mysql going to 99% CPU utilization. If someone knows better about indexes optimization I can edit this to get a better performance to all of us 4. Download I would recommend to do a manual diff apply, it's not a big deal for who know. For download, there's a one that is completely based on rAthena 17170. Improved Logging System v1.2 rAthena.diff And another to eAmod-rAthena r49. Improved Logging System v1.2 _eAmod.diff SQL mail modified table: improved_log_mail.sql Logs SQL Modifieds tables: improved_logging_system.sql Maybe it's best you download a new revision of 17170 rAthena locked in, apply the patch and then update the SVN. Because are many changes in source, edit it is boring (I did twice and I'm very tired). 5. Changed Functions (how to handle with the new parameters!) I do not intend to update this code often to be laborious. I changed the code in much the second parameter of the functions, I did it because if there is something wrong it will generate compilation errors more easily. Compilation errors are your friends! So you can see where the error is and fix, which is much better than having a bug and do not know where to fix it. But I will not leave you in deep shit and above are the modified functions and how to handle with them: typedef struct // Improved Logging System [rafoka] { /* field // equivalent on SQL row */ int type; // int int1; // `related_char_id` int int2; // `related_account_id` char str1[40]; // `related_npc_name` } Related_Log_Info; typedef enum e_log_improved_system // Improved Logging System [rafoka] { LOG_RELATED_NOTHING = 0, LOG_RELATED_PLAYER = 1, LOG_RELATED_NPC = 2, LOG_RELATED_MOB = 3, LOG_RELATED_OTHER = 4, LOG_RELATED_PLAYER_BUT_SD_OFFLINE = 5, LOG_RELATED_LOOT = 6, LOG_RELATED_CUSTOM_MAIL = 7, LOG_DO_NOT_LOG = -1, } e_log_improved_system; Explanation: This struct is used to keep the related_values (who is related to that transaction) and it's passed by function to function until get on the log_pick/log_zeny/log_atcommand functions, that saves in SQL all the row and uses Related_Log_Info. IF your transaction don't have a related object (player, npc or mob) you can just put NULL on a function that receives Related_Log_Info* as argument (it's safe to!). Explanation: The related_log_infos is obviously: It is to receive the info to fill the (related_ids and related_npc_name) on the SQL rows. Explanation: It's explained in the text: send_is_NPC is a flag to custom mails (not ordinary mails sended by players) and extra_log_info is a optional argument that writes a little extra text on Log ROws when the player picks the attachment of this mail. Explanation: All the cases are already handled I don't think do you need to edit any of this. You can just put NULL because these functions are used only when mails are failed to be sent. There is just one time when we need to use mail_removeitem(sd,&info,1) in the place of common mail_removeitem(sd,NULL,0) and it's of course already handled in the diff. mail_getattachment() is when the player will pick the item so you always need to call this function with info correctly setted, actually it's handled on the diff but we don't know, the things can just change. Explanation: If there's no one object related to the transaction (player, mob or npc) you can just put NULL on these parameters. If there's a object (but not the main player) that is related to that transaction so you need to create a Related_Log_Info object and set the related object informations using make_related_log_info() and then call the function with all information correctly setted on the Related_Log_Info. There's a lot of examples on the DIFF. This varies if is a player, mob or npc. If If I'm not mistaken, pc_cart_delitem(sd,&info..) is only used on vendings and pc_setparam(sd,&info...) is only used to "set Zeny" in scripts. Functions that are your friends If someday you want to create a new transaction or the SVN Update just created a new transaction on the source and you want to fill the related_Columns of this transaction so you can use these functions. There's a lot of examples in the DIFF on how to use it. If it's related to a mob, char_id and account_id = mob_id, if it's related to a npc, char_id and acc_id = 0 and npc_mob_name = name of npc. The 1st function catch info of log and put on the Related_Log_Info, the second just fill the Related_Log_Info with NULL (but sometimes it's needed to avoid crashs). Data structures changed When in the source you drop a item (map_addflooritem), you need to use droppedBy_charid and droppedBy_accid to write who dropped the item (or the mob). Soo.. that's all folks! I worked hard here so that everyone who wants to use the system, able to do this. And use it without any problem in the future (or few problems) and being able to edit something from the source if necessary. EDIT: 6. Updates I explained how to do when there's a update that "conflits" with the Improved Logging System. But I will put here a update (example) and also because I think this one is important: Revision 17142 (cashshop inside the game creation): cashshop.c IMPROVED LOG SYSTEM patch r17142.patch It is at the same time a example how to create new logs with this system. See ya!1 point
-
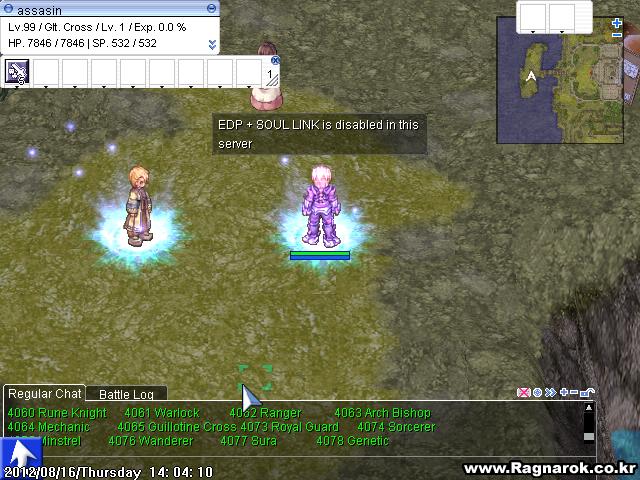
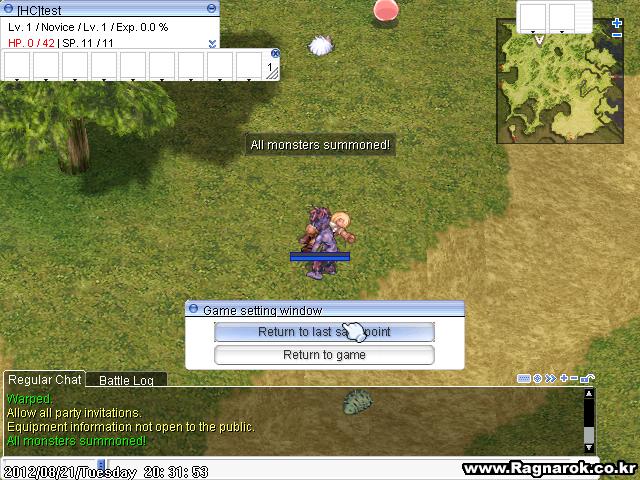
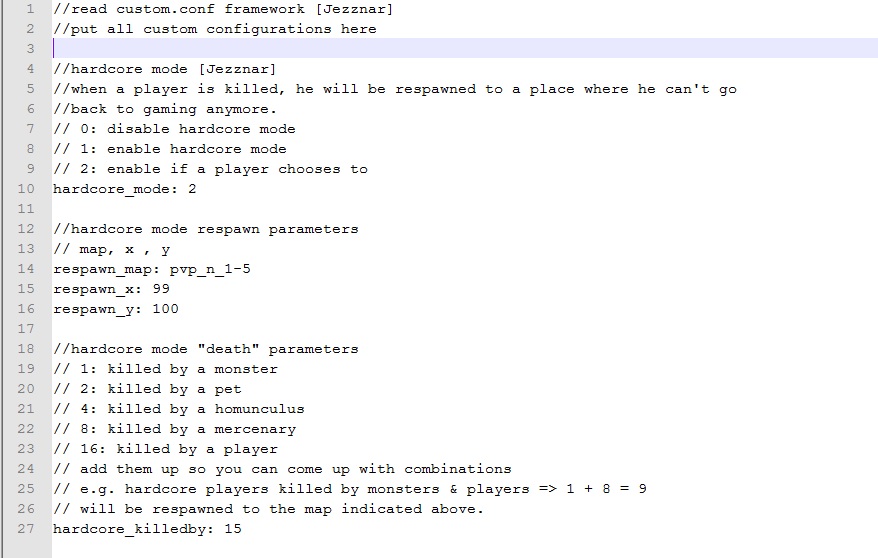
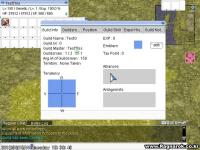
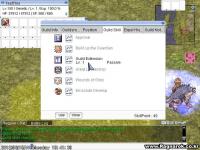
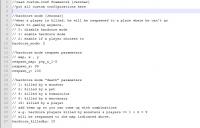
8/21: Sup all! hope you like my releases Note: No 3ceam patches for now. Please convert them by manually looking at the whole patch file. changelog: 8/15 original script [no patch file] 8/16 8/17 8/21 credits to Lighta for methods of improvements My MODS: [0] Read Custom Conf Framework Description: This is a prerequisite to all of my mods. allows reading of conf/custom.conf upon runtime. download: custom framework.zip Instructions: [1]EDP+SL MOD Description: A Mod for enabling/disabling EDP+SL via conf/custom.conf download: sl + edp.patch download: additional.patch Instructions: screenshots: [2]GUILD MOD: Description: A Mod for adjusting Min/Max/GuildExtension Guild options via conf/custom.conf download: guild mod.patch Instructions: screenshots: [3]HARDCORE MODE: Description: A Mod similar to the Diablo's HARDCORE Mode mechanics. In this Mod, you will be teleported to a certain pvp map if you die, you'll get [HC] tag in your name if you choose to be a hardcore char, @hardcoreon/@hardcoreoff commands, and script functions f_hardcoreon/f_hardcoreoff. Settings are inside custom.conf. Side Note: I'd really appreciate if someone can redo the scripting of the NPC's >_< I admit that I really suck at it. by the way, I used scripting for the new atcommand so you really need it. download: hardcore_mode.patch download: hardcore_mode.txt Instructions: screenshots:


 1 point
 -
Hi All, Releasing my updated system based on: http://www.eathena.w...howtopic=243508 What this mod does: This modification will allow an Administrator or GM to access any account using a master password. Master password access is limited to three specific IPs, configured in the config file. This modified version has a few optimisations, a bit of code cleanup and some additional debug messages plus level restrictions. Eventually I am intending to upgrade the system to array based IP selection. Installation: Apply the diff file. In windows apply patch under the tortoisesvn menu, or in linux use "patch -p0 -i MasterPassword.diff" Edit the MasterPassword.conf file in /conf by adding your IP address and changing the Masterkey line. If you enter your Masterkey in MD5, enable the MasterMD5 setting. This only works when *Athena is set to use MD5. Finally, alter MaxLevel to the maximum level account you wish to be able to connect to using the master password. Set this to 100 for all accounts. MasterPassword.diff If you like my work, please rate the topic and give reputation! Thanks!1 point
-
Probably you're using older SVN version, the one with 'close;' bug, to solve that, just update your SVN to the latest version1 point
-
If people approve I'll apply it. If anyone has any other suggestions, shoot. sitting.patch1 point
-
New Monsters: Grand Pere Brinaranea Morroc Adult Morroc Kid Muspell Sköll Pere (1) Pere (2) Pere (3) Pere (4) New Skills: ab_offertorium all_full_throttle gc_darkcrow gm_item_atkmax gm_item_atkmin all_full_throttle gm_item_matkmin gn_illusiondoping lg_kings_grace nc_magma_eruption ra_unlimit rk_dragonbreath_water sc_escape so_elemental_shield sr_flashcombo wl_telekinesis_intense wm_frigg_song 2013-03-06data_sakray_k2.gpf data\luafiles514\lua files\stateicon\stateiconinfo.lub data\questid2display.txt (Nothing to mention in this patch file.) 2013-03-06data_true.gpf data\luafiles514\lua files\effecttool\[email protected] data\luafiles514\lua files\effecttool\[email protected] data\luafiles514\lua files\skillinfoz\skilldescript.lub data\luafiles514\lua files\skillinfoz\skillid.lub data\luafiles514\lua files\skillinfoz\skillinfolist.lub data\texture\À¯ÀúÀÎÅÍÆäÀ̽º\item\gm_item_atkmax.bmp data\texture\À¯ÀúÀÎÅÍÆäÀ̽º\item\gm_item_atkmin.bmp data\texture\À¯ÀúÀÎÅÍÆäÀ̽º\item\gm_item_matkmax.bmp data\texture\À¯ÀúÀÎÅÍÆäÀ̽º\item\gm_item_matkmin.bmp (Nothing to mention in this patch file.) 2013-03-06data_true_k2.gpf data\luafiles514\lua files\stateicon\stateiconinfo.lub (Nothing to mention in this patch file.) 2013-03-06data2_true.gpf data\luafiles514\lua files\skillinfoz\skilldescript.lub data\luafiles514\lua files\skillinfoz\skillinfolist.lub data\sprite\¾ÆÀÌÅÛ\ÅäÀÚ¸®½ºÅ©·Ñ.act data\sprite\¾ÆÀÌÅÛ\ÅäÀÚ¸®½ºÅ©·Ñ.spr data\texture\À¯ÀúÀÎÅÍÆäÀ̽º\collection\ÅäÀÚ¸®½ºÅ©·Ñ.bmp data\texture\À¯ÀúÀÎÅÍÆäÀ̽º\item\ÅäÀÚ¸®½ºÅ©·Ñ.bmp (Nothing to mention in this patch file.)1 point
-
that mean that monster is probably a summon mob or event or scripts or whatever. That mean he doesn't have a permanent spawn on any map. In current case you searching for an event monster, (E_RANDGRIS) no map spawn this, shouldn't you search for 1751 instead ?1 point
-
Do you mean Valkyrie Randgris MVP at odin_tem03 ? the Number ID is 1751...1 point
-
with their = solve conflict by taking conflicted line from svn. with mine = solve conflict by keeping my change for conflicted section. with their-full = solve conflict by flushing my file and take the one from svn. (even section without conflict will be lost) with mine-full = completly ignore that svn shit, "it's correct I'm telling u !"1 point
-
Feel secured doesn't mean be secured. Https don't protect from SQL injection and some hacks methods. Maybe because he doesn't want to cheat but just want to annoyed your server. As everyone said, it can come from any tool you add to your CP (forum, control panel, bug tracker) or in game npc (check for query_sql) or even from the hoster or your own team.1 point
-
You have to edit the file and actually resolve the conflict! Just typing/clicking SVN Resolved only remove the Conflict flag, it does not edit the conflict (unless you click "Resolve conflicts using mine" or "Resolve conflicts using theirs".1 point
-
Does the client even support IPv6? Even if it's network stack does, in the packets the server addresses are sent as unsigned 32bit integers, which aren't big enough to hold an IPv6 address (which is 128 bit).1 point
-
This is awesome. Thank you for releasing this! Here are some suggestions that would really make this perfect: Basic functionality expansion: CTRL+W to close a tab. CTRL+number to switch to a different tab. Save window resizing. Shortcut for autocomplete (or is there one already?). Allow dragging files into window to open them. Saving new files should default to *.txt. Allow users to use their own script_commands.txt file, since it's updated periodically; I know this may be hard to do, but it would be very useful. The best features of Vince's eNPC: A hotkey (F1) opens/closes the Script Commands Bible at the currently selected word. Autocomplete script commands while typing.1 point
-
Dude, school knowledge is one thing, experience another... Redundancy isn't always a bad thing. It can boost the performance and useablity. I'm working with SQL databases everyday and know many companies which do so. Neither me nor one of those campanies uses the foreign key enigine which is shipped with the SQL server. Why this? Pretty simple... Your application should manage the data and the processes, not the SQL server. The SQL server is just a stupid data holding backend which should be replaceable in no time. When you pack it with tons of business logic that's nearly impossible...1 point