Leaderboard


Popular Content
Showing content with the highest reputation on 12/26/11 in all areas
-
Greetings people I'm glad, we are here eventually.2 points
-
Well..actually there is some minor mistake on item given there... Both High Priest / High Wizard Card Option giving the same things.. Anyway, just some advise ~ You can reduce those script length...make it compact.... there is alot lines are repeated......and hence make the script look's very long.... you can make use of array to enhance your scripts.... it is just a simple script work like this provide X give Y For Example : prontera,164,175,4 script Biolab Card Trader 1637,{ set .ItemID,7179; setarray .CardList[0],4357,4359,4361,4363,4365,4367; setarray .Credits[0],100,200,300,400,500,600; mes "[Ms.Biolab]"; mes "im Here To transmute the Card in BioLab Monster"; mes "I Can Give you What you want in BioLab Monster with low prize"; for( set .@i,0; .@i < getarraysize( .CardList ); set .@i,.@i + 1 ){ set .@Menu$,.@Menu$ + "^0000FF"+getitemname( .CardList[.@i] )+" - ^FF0000"+.Credits[.@i]+" "+getitemname( .ItemID )+"^000000:"; } next; set .@i,select( .@Menu$ ) - 1; mes "You selected ^0000FF"+getitemname( .CardList[.@i] )+"^000000."; mes "Cost - ^FF0000"+.Credits[.@i]+" "+getitemname( .ItemID )+"^000000"; next; if( select("Exchange:Cancel") == 1 ){ if( countitem( .ItemID ) < .Credits[.@i] ){ mes "You didnt Have Enough "+getitemname( .ItemID ); }else{ delitem .ItemID,.Credits[.@i]; getitem .CardList[.@i],1; mes "Gained 1 "+getitemname( .CardList[.@i] ); } } close; }2 points
-
The title of the topic.. I think it is not a question anymore2 points
-
try this prontera,155,181,5 script Sample 718,{ // 1 Poring Coin = How Many Zeny ? set .Rates,100000; while( 1 ){ switch( select("Poring Coin to Zeny:Zeny to Poring Coin") ){ Case 1: if( !countitem(7539) ){ mes "You didnt have enough Poring Coin."; }else{ mes "You have "+countitem(7539)+" Poring Coin."; mes "How many Poring Coin will be convert to zeny ?"; input @Amount,0,countitem(7539); if( !@Amount || (( .Rates * @Amount ) + Zeny ) > 1000000000 ){ mes "Deal Cancelled."; }else{ delitem 7539,@Amount; mes "Converted "+@Amount+" of Poring Coin into Zeny."; mes "Gained Total of "+( .Rates * @Amount )+" of Zeny."; set Zeny,Zeny + ( .Rates * @Amount ); } } next; break; Case 2: if( Zeny < .Rates ){ mes "You didnt have enough Zeny."; }else{ mes "You have "+Zeny+" Zeny."; mes "How many Poring Coin you want ?"; mes "You can get maximum of "+( Zeny / .Rates )+" Poring Coin."; input @Amount,0,( Zeny / .Rates ); if( !@Amount ){ mes "Deal Cancelled."; }else{ set Zeny,Zeny - ( @Amount * .Rates ); mes "Converted "+( @Amount * .Rates )+" Zeny into "+@Amount+" Poring Coin."; getitem 7539,@Amount; } } next; break; } } close; }2 points
-
Download these files first: MySQL Gui Tools MySQL Essentials Download Compiled SVN here(I suggest to use trunk) or use TorquiseSVN to download rAthena SVN in its Repository and use Visual Studio for recompiling. When you're done downloading those files, follow these steps: ==========// SVN Files Setup //========== 1) Goto your downloaded svn and extract it. 2) Goto conf folder and look for char_athena.txt, inter_athena.txt, map_athena.txt and subnet_athena.txt 3) Open char_athena.txt, and map_athena.txt and look for this: // Server Communication username and password. userid: s1 passwd: p1 and change that into // Server Communication username and password. userid: ragnarok passwd: ragnarok 2) Open your char_athena.txt again and look for this: // Login Server IP // The character server connects to the login server using this IP address. // NOTE: This is useful when you are running behind a firewall or are on // a machine with multiple interfaces. //login_ip: 127.0.0.1 // The character server listens on the interface with this IP address. // NOTE: This allows you to run multiple servers on multiple interfaces // while using the same ports for each server. //bind_ip: 127.0.0.1 // Login Server Port login_port: 6900 // Character Server IP // The IP address which clients will use to connect. // Set this to what your server's public IP address is. //char_ip: 127.0.0.1 remove the "//" in login_ip and char_ip. It will look like this: // Login Server IP // The character server connects to the login server using this IP address. // NOTE: This is useful when you are running behind a firewall or are on // a machine with multiple interfaces. login_ip: 127.0.0.1 // The character server listens on the interface with this IP address. // NOTE: This allows you to run multiple servers on multiple interfaces // while using the same ports for each server. //bind_ip: 127.0.0.1 // Login Server Port login_port: 6900 // Character Server IP // The IP address which clients will use to connect. // Set this to what your server's public IP address is. char_ip: 127.0.0.1 3) Open your inter_athena.txt and look for this: // Global SQL settings // overriden by local settings when the hostname is defined there // (currently only the login-server reads/obeys these settings) sql.db_hostname: 127.0.0.1 sql.db_port: 3306 sql.db_username: ragnarok sql.db_password: ragnarok sql.db_database: ragnarok sql.codepage: // MySQL Character SQL server char_server_ip: 127.0.0.1 char_server_port: 3306 char_server_id: ragnarok char_server_pw:ragnarok char_server_db: ragnarok // MySQL Map SQL Server map_server_ip: 127.0.0.1 map_server_port: 3306 map_server_id: ragnarok map_server_pw: ragnarok map_server_db: ragnarok // MySQL Log SQL Database log_db_ip: 127.0.0.1 log_db_port: 3306 log_db_id: ragnarok log_db_pw: ragnarok log_db_db: log log_codepage: if you're using my guide that is a given and you don't need to edit them. But if you're planning to change any of here like the user password or what, you need to change this too. 4) Open your map_athena.txt and look for this: // Character Server IP // The map server connects to the character server using this IP address. // NOTE: This is useful when you are running behind a firewall or are on // a machine with multiple interfaces. //char_ip: 127.0.0.1 // The map server listens on the interface with this IP address. // NOTE: This allows you to run multiple servers on multiple interfaces // while using the same ports for each server. //bind_ip: 127.0.0.1 // Character Server Port char_port: 6121 // Map Server IP // The IP address which clients will use to connect. // Set this to what your server's public IP address is. //map_ip: 127.0.0.1 // Map Server Port map_port: 5121 remove "//" in char_ip, and map_ip, it will look like this: // Character Server IP // The map server connects to the character server using this IP address. // NOTE: This is useful when you are running behind a firewall or are on // a machine with multiple interfaces. char_ip: 127.0.0.1 // The map server listens on the interface with this IP address. // NOTE: This allows you to run multiple servers on multiple interfaces // while using the same ports for each server. //bind_ip: 127.0.0.1 // Character Server Port char_port: 6121 // Map Server IP // The IP address which clients will use to connect. // Set this to what your server's public IP address is. map_ip: 127.0.0.1 // Map Server Port map_port: 5121 5) Open you subnet_athena.txt and you'll see this: subnet: 255.0.0.0:127.0.0.1:127.0.0.1 If you changed the ips in char_athena.txt, inter_athena.txt and map_athena.txt, you should consider to put them here too. for example, the ip is 125.60.252.169 subnet: 255.0.0.0:125.60.252.169:125.60.252.169 ==========// MySQL Setup //========== 1) Install MySQL Gui Tools 2) Install MySQL Essentials. Choose MySQL 501. Enter "ragnarok" for the password for "root"(remember you can change this later on, this is just a basic one). Just click the Execute and when done, just click Finish. Go to Task Manager and check if mysqld-nt.exe is running in processes although it's not necessary if no error occured during installation. 3) Start MySQL Query nd it will prompt up a window. Fill in Stored Connection: (leave it blank) Server Host: localhost Port: 3306 Username: root Password: (remember the password you made when you're installing MySQL Essentials?put it here) Default Schema: ragnarok(you can change this afterwards, this is just a basic name) and leave other field as it is but to make sure everything is correct. Then press enter. 4) *When you are in MySQL Query Browser, click once on ragnarok database that is below Schemata. *Go to menu, click File and choose Open Script... *We need to execute main.sql, mail.sql and log.sql (execute upgrade_svn* .sql files, too, if require) so, look for the main.sql, which should be in sql-files folder in eAthena Server and other .sql files. *Pick main.sql and click Open. *Click the Green Execute Icon to the upper right to execute. Do the same with mail.sql now and execute it. *When you are done, we need to create log database by right-click somewhere within the table where the databases are and choose Create New Schema and type in log and click OK. *Double-click on log database, go to menu, click File, choose Open Script..., open logs.sql and Execute. *Double click ragnarok database to expand to see all tables. *Look for login table and double click and double click again. *Click once on Edit so, we can edit the cells. This icon should be in bottom. *For userid: and user_pass:, type in the name that you used in char_athena.conf and map_athena.conf. *When you are done editing, just click the Apply Changes that is next to the Edit icon. 5) Goto MySQL Administrator. Login there. Stored Connection: (leave it blank) Server Host: localhost Port: 3306 Username: root Password: (remember the password you made when you're installing MySQL Essentials?put it here) Then Enter. 6) And you're inside the MySQL Administrator now. Go to User Administration and Click New User and enter this: MySQL User: ragnarok Password: ragnarok Confirm Password: ragnarok then click "Apply Changes". After that, Click the ragnarok user and goto schema priviledges(right-side of user information). Click ragnarok and log database and click "<<", then click "Apply Changes" And we're done1 point
-
E - Script Collection Last Update : September 10, 2013 Refine Function SQL Mission Board Monster Marching Vendor Control Advanced Stylist Coin Exchanger Doppelganger Race Of The Day Limited Items Multi Currency Shop Random News GM Online List Link Broken E-Inquiry DotA Runes Flower Counting Game Class Restriction Chain Quest Build Manager Misc Scripts : Freebies Script Card Trader Gold Room [ Pick Gold ] Gold Room [ Guild Tax ] Map Restriction [ GM Based ] Daily Reward Monthly Reward Monster Spawner Monster Summoner with Last Summoned Display Players Stats & Equipments 3rd Job Item Giver Exchanger [ Cashpoint to Coins ] Exchanger [ Poring Coin - Zeny ] Exchanger [ Points to Tickets ] Exchanger [ Item to Item ] Exchanger [ Item to Item ] Exchanger [ Multi Item to 1 Item ] Party Match Auto Ban Over Stats Users Soul Link Buff Kill Players gain Cash Points Party Members All Get Items [ Snippet ] Message Board Stalker Class Skill Reproduce NPC Multiple Selection Quest [ Template ] In-Game Item Rewarder In-Game Points Rewarder Invasion Event Custom Item Rate Status Point Seller [ Snippet ] Anti Bot Security Script Anti Bot Script [ Code / Question ] Item Combo Restriction [ LHZ Card ] Drop Item Upon Death PVP Switcher + Announcer [ Guild Master ] Rotating Waitingroom Messages +10 Refiner [ Specific Items ] Random Rate Item Exchanger MVP Invasion Premium Users [ Boost Rates ] Display Cutin Image upon Login Custom Randomed Box Items Kick GM during WOE Custom Crafting NPC Restrict Same IP [ Certain Map ] Coloured Items Exchanger Guild Master Changer Party Team PK Match Gambling Game IRC Channel Crafting NPC Guild Storage Restriction Stage Game [ Version 4 ] Monster Wiki Event [ Version 3 ] Special Thank you for my Tutor : Notes : I am a bit lazy to write all those Script Descriptions, i do believe that all of you able to get how this script works. Anyway, i will still doing my best to write the Updated Changelog or informations about the script as detail as possible. All the Scripts above are uploaded to Pastebin . Abide the Following Rule : Scripts Error / Not Working , you have to Explain it in Details. ( Add in Images / Modified Scripts ) Do not SPAM / BUMP in my Topic. Do not ask for Support stuffs for other Scripts in this Topic. Link Down , then drop [ @Emistry ] a message. I Reserved the Right for NOT Answering your Posts if you did not abide my Topic's Rules. Keep This In Your Mind : All the Scripts i distribute here are NOT FOR COMMERCIAL USES . DO NOT remove my Credits if you are using part of the scripts to modify your own. DO NOT re-release the scripts in any form / way. If you ♥ these Scripts , Click on to Vote this Topic up. Or you may also click on at above the Topic
 1 point
 -
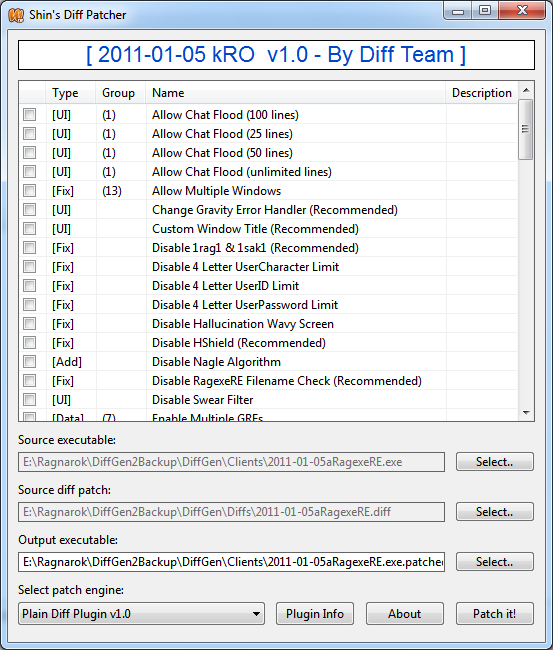
Shin's Diff Patcher Info: Supports all Windows 32 bit versions (Windows XP SP2 and higher) and probably all 64 bit versions. Features: Plug-in based Uses list view instead of two seperate list boxes for easier selection Shortcuts to simplify your work Resizable window Inline diff descriptions (as long as the plug-in supports it) Auto-save and load of diffs Includes PlainDiffPlugin which provides support for *.diff files Allows items to be sorted either by type, group or diff name Prevents diff collision when selecting diffs that reference the same group CRC file check Data missmatch check Downloads: ShinsDiffPatcher SVN (Version 1.1.3b; 198kb) WeeDiffPlain Plugin Src SVN (Version 1.0; 11kb) Quick Usage 1. Select patch engine. 2. Select client exe. 3. Select diff file (if plug-in needs it). 4. Select output exe. 5. Click on "Patch It!" 6. Done. All patches that you have selected are automatically saved and will be restored the next time you select a diff file. You can also use the following shortcuts: - Ctrl + A = Select all diffs (only one item from each group if any) - Ctrl + D = Deselect all selected diffs - Ctrl + C = Copy all selected diffs into Clipboard Notes: You may think "What? Another patcher? Man..". Yes, another one. I'm not quite satisfied with the currently available diff patchers because they either lack of features or just don't provide the freedom I would like to have. I think I have chosen this name for the patcher because it's kinda convention to use his own name in the title bar (even though the initial name is WeeDiffPatcher). This is just an alpha release since there are some optimizations I would like to complete before I release a final version. I've included the source code for the DiffPlainPlugin to show you how you can implement your own plug-ins in order to get them working with my patcher. I would still like someone else to implement a proper plain diff plug-in because I haven't focused to optimize it to it's best (even though I have removed all possible memory leaks) since I developed this patcher for another plug-in based solution. If you have any suggestions or features that your plug-in needs in the future, don't hesitate to ask.
 1 point
 -
Preamble I have written an achievement system I want to share with you. It is not the best way to solve achievement systems nor is it very efficient(though it might be more efficient than NPC scripting) and if you already have an achievement system(src or npc) and it's working for you, please don't change to mine. Mine is rather old(about half a year or more) and back then it was the first time I wrote something completly new for eAthena. What I did today was applying the system to rA and create a working diff. If you are willing to use this system then I beg you to report any bug found. Also, if there is enough demand, I might consider re-writing it from scratch, because I am overall unhappy with the system, but not really motivated to further work on it in greater detail. Also the code-style I used back then is totally going against the one I am using nowadays... Don't judge me! Functions There are pre-defined types of achievements in this system Monsterkill Achievements Itemfind Achievements (Only use this for Items NOT trade/drop/storage-able, or else it will result in abuse) Itemuse Achievements Explore Achievements Quest Achievements Special Achievements Let me explain them one after another: Monsterkill Achievements(0): Well, name says it mostly, but there is a bit more to it. You can define different types per achievement. The types are counting by ID(0), by size(1), by race(2), by element(3) or for all MvPs(4). And if player A has killed X monsters that meet the requirement, then he gets the achievement. Itemfind Achievements(1): Again, name says what it does. If you find certain items, you get the achievement. Make sure you only use it on non tradeable etc. items or it will be abused. It can also be filtered into types. They are the following: ID(0), Equip(1)[see item_db->equip), Type(2)[see item_db->type]. It will count if you drop it and pick it up again, so really, only use it on items not storageable, tradeable and dropable! Itemuse Achievements(2): Its porpuse is to count every item used. This achievement might be bugged, report anything you find fishy! It uses the same filtering as Itemfind, so please refer to that. Explore Achievements(3): When entering a map, the system checks whether the map is inside the database for explore achievements and if so, it sets the count. If the player visited all maps for one achievement, then he receives the achievement. Quest Achievements(4): When finishing certain quests, you are able to gain quest achievements. Simple as that! Special Achievements(5): This are achievements in the achievement database. But they are only applicable over @achieve from a GM or with the achieve script_command. This achievement has Event porpuses and is only added for a complete database for your website etc. Now comes the technical stuff... How to install the achievement system 1. Download the *.diff and the *.sql file(they are in the *.rar provided). 2. Import the *.sql into your rAthena database. 3. Apply the *.diff onto your rAthena server. 4. Check your ./conf/battle/exp.conf and ./conf/battle/misc.conf: Two new configs have been added: achievement_cutin_duration and achievement_exp_rate. Read the conf files for more information and change it to whatever you wish it to be. 5. Add the two new files ./src/map/achievement.c and ./src/map/achievement.h to your MAKEFILE or to your project solution and recompile! (^ Up to this point, I won't provide ANY support ^) How to add achievements Well, that is mainly why I would like to find another way of solving the achievement system. But currently it is like this: 1. Add your achievement to achievement_db. Here is a brief summary of the columns: If you chose 5 as type, you are nearly done, skip step 2. If you chose another type, please read on. 2. Go to the respective table of your chosen type: 0->mob_achievement 1->item_achievement 2->itemuse_achievement 3->explore_achievement 4->quest_achievement Now add an entry for your newly added achievement. The columns are rather similiar, but I'll explain in greater detail: mob_achievement: achievement_id: Set to ID assigned by achievement_db for your new achievement type: See description of Mobkill Achievements. There are numbers in brackets for each filtering type valueX: The value for what to filter. I.e. if you chose ID, then place an ID here. If you chose elements, place a number from the element enum here (see script_commands or src for reference) amountX: How many to kill itemfind_achievement: itemuse_achievement: achievement_id: Set to ID assigned by achievement_db for your new achievement type: See description of Itemfind Achievements. There are numbers in brackets for each filtering type valueX: The value for what to filter. I.e. if you chose ID, then place an ID here. amountX: How many to find/use explore_achievement: achievement_id: Set to ID assigned by achievement_db for your new achievement mapX: Name of the map. I.e. prontera quest_achievement: achievement_id: Set to ID assigned by achievement_db for your new achievement questX: ID of the quest 3. Last step is to reload the AchievementDB ingame via @reloadachievement or restart your server. Atcommands So, I added two atcommands working together with this System: @achieve <Achievement_ID> <Player_Name>. Give <Player_Name> Achievement with <Achievement_ID> as ID. IT DOES NOT CHECK WHETHER HE MEETS THE REQUIREMENTS! Built in for debugging and special achievements @reloadachievements. Reload the Achievement DBs. Helpfully if you added new achievements and don't want to restart the server. Scriptcommands *Achieve( <AchievementID>{, <Account_ID>}); Same as the Atcommand. If no account_id is given, use attached player. Does also not check if player meets requirements. Intended for special achievements *GetAchievementInfo(<AchievementID>, <flag>); Flag determines what to return: 0 = type, 1 = bexp, 2 = jexp, 3 = nameid, 4 = points, 5 = status 5 Only works with attached players and returns 1 if the player finished the achievement and 0 otherwise. *GetAchievementName(<AchievementID>); Returns the name of the achievement *GetAchievementCutin(<AchievementID>); Returns the name of the cutin of the achievement I think this is about all you need to know. Please report any bugs and post any suggestions. If you overwhelm me enough, I might rework it to be more user-friendly! Only post bugs and suggestions after you've read through the whole article. I will notive if you haven't. At last Download achievement.patch achievement.sql €dit: I really want to stress the following facts again: Read the whole article! Only use if you are unable to script/code a system that is suficient to suit your needs or this system matches your needs perfectly(well, w/e)! Report any found bug! €dit²: Forgot to mention. The last achievement is stored within the permanent playervariable "LastAchievement" and it stores the ID of the achievement. So you can check it via NPC script etc. Changelog: 1.0 FIrst version 1.1 Fixxed bug of not deleting the cutins properly [Thanks Dexter] 1.2 Fixxed cutin bug fully, fixxed typos in config1 point
-
-You do not know what an IP is -You do not know the difference between LAN and WAN -You do not know what Ports are in regard to 'IP' -You do not even know if you have a router, let alone know how to use it -You do not know how to use google or the search button -You know how to use 'google' or 'search' but REFUSE to use them -You are not willing to try things on your own to see if they work (read: go out on a limb) -You expect someone to 'teach you how to make a server' -You expect to charge players, or make a lot of money -You are lazy -You just "wan make cool server" -You just "wan be GM" -You plan to host and play from the same computer -You are not dedicated If any of these apply to you DO NOT even think about starting a server. If you still really have your heart set on it go LEARN. read, search, google, just don't expect or ask someone to teach it to you. А также, ЕСЛИ ВЫ НЕ МОЖЕТЕ ПРОЧЕСТЬ И ПОНЯТЬ ТЕКСТ, ЧТО НАПИСАН ВЫШЕ.1 point
-
WeeDiffGen <no image available> Info: Plug-in for my diff patcher that allows you to generate diffs on the fly without the need of a diff file. Clients 2010-08-17bRagexeRE 'till 2011-04-05aRagexeRE parsed successfully. Features: Allows input boxes Inline descriptions Has an easy to use interface to create further diffs Plug-in based (you can just delete diff plug-ins which you never use) Supports 35+ diffs so far Probably some others that I forgot for now Downloads: WeeDiffGen SVN WeeDiffGen Plugins SVN WeeDiffGen Interface SVN Quick Usage 1. Grab the Diff Patcher here: http://www.eathena.w...howtopic=268538 2. Download WeeDiffGen.dll from SVN and place it inside the plug-ins folder of the patcher. 3. Create a folder named "WeeDiffGen" inside the plug-ins folder and paste your desired plug-ins there. 4. Start the patcher and select WeeDiffGen as patch engine. 5. Select an executable. 6. Select your diffs. 7. Select output file. 8. Patch it. Alternatively: Download the whole repository from here: https://subversion.assembla.com/svn/weetool...insDiffPatcher/ Notes: This release is not the final one. It is meant for developers to test and implement new stuff without taking care of hexing newer clients. Also, it may still contain some bugs. I won't give any support on how to implement server side code to get your server working with those clients. However, the generator itself creates a log file in case a diff should break. Should a diff not been listed in the patcher, then it probably failed to parse and added an entry inside of the file "Patcher/plugins/WeeDiffGen/WeeDiffGen.log". If you never used a specific diff, then just don't place it inside the plug-ins folder of WeeDiffGen. This way you have the possibility of only using those diffs that you have always used. Don't forget that this plug-in only works with my Diff Patcher above or equal to version 1.1a. So if you still use the old version then go and update it. It will also work only on clients that were compiled with VC9. Also, you can request a diff that has been already marked as obsolete. As long as there is enough interest in a diff, I don't mind to fix/create it.1 point
-
Miruku is a full replacement for the RagRay project. It is a simple installer aimed to provide users with a one click experience to install kRO Ragnarok & kRO Renewal. Hit download to visit the website and access the project. This should remain server administrator's preferred method of allowing "Full Client" installation. Simply link players to the project's webpage and have them install Miruku. Then have them install your patcher to the same folder Miruku was installed. Job done. You have a client up to date from the 15th Dec, 2011. Enjoy. Download: http://miruku.rathena.org1 point
-
Queue System The code is commented all the way through to ease the reading and understanding of it. Updates 25/12: Redownload queue.txt, forgot silly quotation of a query at the bottom during testing. 25/12: Updated example at the bottom of the post to keep pulling if it gets an error. 27/12: Fixed a bug and optimized a variable, thanks KeyWorld. New version 1.01 14/06: Did some minor optimizations and commented better for linked lists. New version 1.02. I decided to stick with getgmlevel since it's a better way to sort influential people out then groupid. If your server do not have table creation permission, please execute the query on line 29 separately. Please do not use or redistribute this script without giving proper credits. Report all bugs you notice! Files queue.txt - Version 1.02 queue.txt - Version 1.01 queue.txt - Version 1.00 queuetest.txt - The script I used to bug test, good to check if unsure how to use the functions speedtest.txt - Please run this and reply with the values Prologue When you create a script involving more than one player at a time, you usually have to limit the script or access in an ugly kind of way, or build a kind of waiting hall where the players have to sit until it’s their turn. You never find the time to make a sleek waiting system for every script you make. You then remember playing another RPG where you could sign up, even sign up with friends, and you would be paired up with other people who signed up for the same event, battleground or PvP fight. Look no further; this Queue system is what you’re looking for! What is it? This is a system that you embed in to your own script. It’s simple in its function but also powerful to let you customize it exactly to match what you need for the moment. It lets you store players, parties or guilds in a queue. You can then retrieve them from that queue. Both actions have their own simple function call; “push” and “pull”. You only need the player attached when “pushing” them to the queue and you will receive a list of Account IDs when you “pull” players from the queue. Why would you, a mighty coder, use this system when you could just make it yourself? What makes it special enough to actually bother to include? This system lets you put players and parties in the same queue. You can then tell it to retrieve, say, 20 players for you. For the current event, you do not care if people join with friends or by themselves so it will put together 20 people within your customizations and makes sure to keep the parties unbroken. It will also make sure that the players, who have waited the most, get picked first. Features Are there any more awesome features? Yes! Full feature list: General: · Can support infinite amount of queues · The list uses MySQL so no queue is lost when restarting the server · Supports priority system (will be explained below) · Custom error codes so you will know exactly what went wrong · Supports linking events together (will be explained below) Push: · Supports single players, parties and guilds · Can set level required for the queue Pull: · Can return mixed players/parties · Can return only players · Can return parties only until X players are found · Can return a single party of a certain size · You can choose how many players to pull from the queue · If X players aren’t found, you can set it to return the IDs found or an error Priority system: If you want to make donators have a perk, if your event requires a champion to join fast or for any reasons don’t want players to wait, the priority system is something to use! If you set priority to a player, they will be put first in the queue, bypassing those who have been waiting. This can ONLY be used when pulling players or players and parties. You cannot give parties priority. Linked events: If you have some events that you want people to be able to queue for at the same time, linking events is for you! Say you have two events: Event 1 Event 2 You can put a link together in 2 possible ways. 1) $@queue3[0], 1, 2; This will get players from queue 1 and 2 when asking for event 3. 2) $@queue1[0], 3; $@queue2[0], 3; This will get players from queue 3 when asking for 1 or 2. What can I use it for? Say you are making any kind if event, battleground, PvP room or if you just like to put people in to a queue to then announce the time for them. All you have to worry about is (1) putting them in the queue and what should I do with the account IDs I’ve received when asking who was next in line. The rest just works. How can I use it? If you want a simple queue, you can just include the code and then copy/paste one of the examples below. If you want to make it fit perfectly in your script, then you should read up on the two functions described below. First of all, there’s a NPC at the top of the script file. If you want to link events (see information about linking above) then you should edit that NPC. The main two functions you will be interacting with are “push” and “pull”. The push function callfunc("push", arg(0), arg(1), arg(2), arg(3)); Type of input 0. Player 1. Party 2. Guild Event number; 0 means all events Level required for the event Should the member get priority? 0. No 1. If GM level is above 0 2. Yes Function return values: 0. Successful 1. No player attached 2. Base level too low 3. Player is missing a party 4. Party size is too small ( < 2 ) 5. A party member was offline 6. A party member was too low level 7. A player/guild was already in the queue 8. Player is missing a guild 9. Player is not guild leader The pull function This function sets two temporary, global variables. Make sure to copy them before the script gets another queue! $@queue[] – Contains all the IDs wanted $@queue_size – Contains the amount of IDs recieved callfunc("pull", arg(0), arg(1), arg(2), arg(3)); How you would like to search for players 0. Both players and parties 1. Only players 2. Only parties 3. Only guilds Event number; 0 means all events Amount of players wanted Required to fill the group 0. Returns the ones found, even if it couldn’t find the amount wanted 1. Returns an error if it couldn’t find the amount wanted (If you’re searching for parties only, this will search for a party at exactly the size specified) Function return values: 0. Successful 1. Size wanted was 0 2. Didn't get the required amount of players from the DB 3. Didn't get the required amount of players after filtering Example: // Put the player in to the queue for event 1, lvl 5 is required callfunc("push", 0, 1, 5, 0); ... ... ... // Now I want to get 5 players for my event 1, I want to make sure I get all 5 while(callfunc("pull", 0, 1, 5, 1)) sleep 100; // Keep pulling untill we don't have an error set .@queue_size, $@queue_size; copyarray .@queue[0], $@queue[0], .@queue_size; // Here I have all the account IDs in '.@queue' and I can use them as I want! I have included the NPC I used to bug test the script. It will show how you use the functions described above. It can also erase the content of the table and fill it with dummy data for testing.1 point
-
New paradise group quest is good (100-110 mains servers kRO).... shown mini-guide (sorry is in Spanish)....1 point
-
Welcome!1 point
-
welcome!1 point
-
Can you please spend just few minutes / even few seconds to write it abit more details ? Dang !! Explain !! Explain !! ~ . ~1 point
-
if you want like no bugs and stable , but older then what QQFool suggested is fine. But if you want new and also stable, but walk/delay problem then 2011-03-15 is fine. If you want latest up to date but slight bugs[no walk/act delay] then 2011-11-22 is fine as well1 point
-
effect_list.txt 375. Assumptio (Visual Effect) specialeffect2 375;1 point
-
thats why the topic says you need to have scripting knowledge to understand1 point
-
Нет, не обязательно. Клиент по сути может читать папку в 3-х кодировках (если не больше). У кого не отображается корейский тому, естественно, удобней будет работать с другими кодировками, как в твоём случае, ибо так ты хотя бы будешь узнавать папку по символам, а не по количеству "квадратиков"1 point
-
You need to set your client to Run as Administrator.1 point
-
Something a lil bit more elaborate skillpointremover.txt1 point
-
1 point
-
WOE Time ? just adjust it using your WOE Setter .....1 point
-
1 point