Leaderboard


Popular Content
Showing content with the highest reputation since 06/04/25 in Posts
-
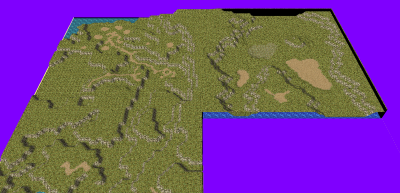
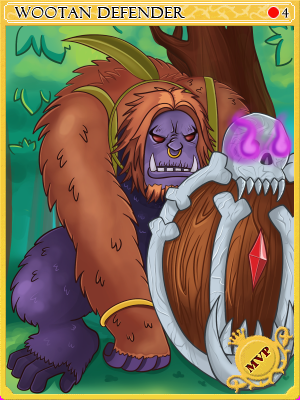
This map belongs to the game universe expansion series. Made with attention to detail and inspired by the original! .•°'°•.•°'°•.•°'°•.•°'°•.•°'°•.•°'°•.•°'°•.•°'°•.•°'°•.•°'°•.•°'°•.•°'°•.•°'°•.•°'°•.•°'°•.•°'°•.•°'°•.•°'°•.•°'°•.•°'°•.•°'°•.•°'°•.•°'°•.•°'°•.•°'°•.•°'°•.•°'°•. um_fild05 Now you can visit the new part of the Hoomga Jungle! The map is a continuation of the Umbala Field 04 location and repeats its main features. The landscape also follows the outlines of the original art design of the location on the world map. The map seamlessly connects with neighboring levels. This map is also supposed to be the home of the MVP Wootan Defender, who was never featured in the original game. However, an ancient version of this MVP was added as a boss in Illusion of Luanda, but for some reason lived in the Comodo North Cave mixed with other monsters and even with another MVP Ancient Tao Gunka instead of in the forest area. Now you can fight its regular version in its native jungle zone and get a unique custom item. I asked the artist to draw a card and a custom shield for this MVP. MVP Wootan Defender MVP Wootan Defender Card Special Loot Wootan's Token - ID 25633 Wootan Defender's Shield Piece - ID 25634 Wootan Defender's Shield [1] - Custom All images and sprites can be downloaded in this topic: https://rathena.org/board/files/file/3844-w0w_custom_collection/ or here: Wootan Defender Card+Shield.zip P.S. You may not have noticed in the video but all the gorillas are doubled in size. In their normal size they look very weak the same height as the player. But they have good pixel art that does not lose its beauty when enlarged. It also allows you to double their HP stats and experience to make their farming at least a little more interesting. P.S.S. Also fixed the neighboring location um_fild04: 1) Removed official inaccessible gat points 168,137 and 185,138 2) Added seamless passage to the new location um_fild05 Please rate it if the map is good enough ~~ This map can be downloaded here https://rathena.org/board/files/file/4487-w0w_map_collection/


 8 points
 -
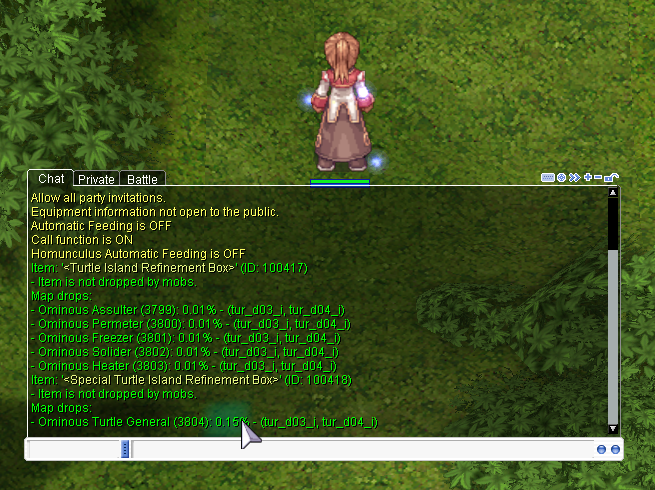
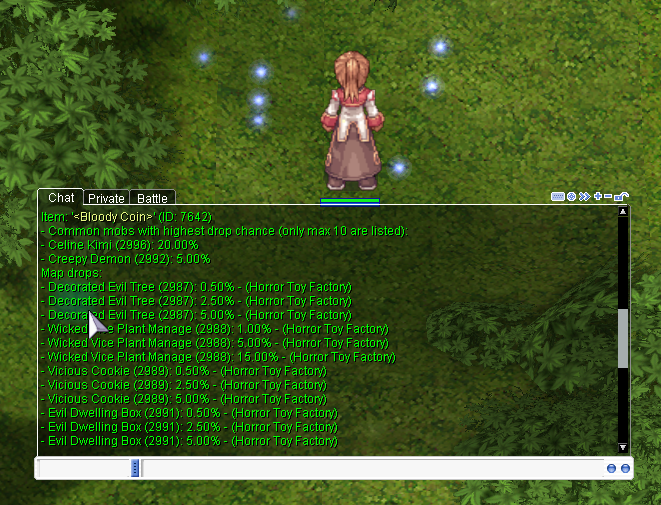
This is a request from Extend whodrops command to include map drops #8017 I'm only enhancing @whodrops command. I've included map_drops.yml in the command extern MapDropDatabase map_drop_db; extern InstanceDatabase instance_db; sprintf(atcmd_output, "Map drops:"); clif_displaymessage(fd, atcmd_output); std::map<std::pair<uint16, double>, std::vector<std::string>> map_drop_groups; bool found_map_drops = false; for (const auto& map_entry : map_drop_db) { std::shared_ptr<s_map_drops> mapdrops = map_entry.second; std::string map_name = map_mapid2mapname(map_entry.first); std::string display_name = map_name; if (map_name.find("@") != std::string::npos) { for (const auto& instance_entry : instance_db) { std::shared_ptr<s_instance_db> instance = instance_entry.second; if (strcmp(map_mapid2mapname(instance->enter.map), map_name.c_str()) == 0) { display_name = instance->name; break; } for (const auto& additional_map : instance->maplist) { if (strcmp(map_mapid2mapname(additional_map), map_name.c_str()) == 0) { display_name = instance->name; break; } } if (display_name != map_name) break; } } for (const auto& global_drop : mapdrops->globals) { if (global_drop.second->nameid == id->nameid) { double rate_percent = (global_drop.second->rate * 100.0) / 100000.0; std::pair<uint16, double> key = std::make_pair(0, rate_percent); map_drop_groups[key].push_back(display_name); found_map_drops = true; } } for (const auto& specific_entry : mapdrops->specific) { uint16 mob_id = specific_entry.first; for (const auto& drop : specific_entry.second) { if (drop.second->nameid == id->nameid) { double rate_percent = (drop.second->rate * 100.0) / 100000.0; std::pair<uint16, double> key = std::make_pair(mob_id, rate_percent); map_drop_groups[key].push_back(display_name); found_map_drops = true; } } } } if (!found_map_drops) { sprintf(atcmd_output, " - Item is not dropped by map-specific drops."); clif_displaymessage(fd, atcmd_output); } else { for (const auto& group : map_drop_groups) { uint16 mob_id = group.first.first; double rate = group.first.second; const std::vector<std::string>& maps = group.second; std::string map_list = ""; for (size_t i = 0; i < maps.size(); ++i) { if (i > 0) map_list += ", "; map_list += maps[i]; } if (mob_id == 0) { sprintf(atcmd_output, "- All monsters: %.2f%% - (%s)", rate, map_list.c_str()); } else { std::shared_ptr<s_mob_db> mob = mob_db.find(mob_id); if (mob) { sprintf(atcmd_output, "- %s (%d): %.2f%% - (%s)", mob->jname.c_str(), mob_id, rate, map_list.c_str()); } } clif_displaymessage(fd, atcmd_output); } } Screenshot: Extend whodrops command to include map drops (#8017).diff
 5 points
 -
As shown on the screen, the fix files are clean, unpacked client files. You can apply WARP patches using these files, but some patches may not be supported. In such cases, you must modify the client manually — please do not contact me for support regarding this. Commercial use is strictly prohibited. Example:As of the 2023-10-xx client, WARP can no longer patch the clientinfo.xml file. You will need to modify it manually. Also, CPS is not included in clients released after 2024-05-16. In addition: 2023-12-06_Ragexe_1701399778_patched.exe (Restore clientinfo.xml, externalsettings Korea patch) — This file includes additional patches that I applied manually. 2025-05-08_Ragexe.exe and 2025-06-04_Ragexe.exe — These files have also been modified with additional patches and are distributed in a compressed state. They cannot be edited further.
 4 points
 -
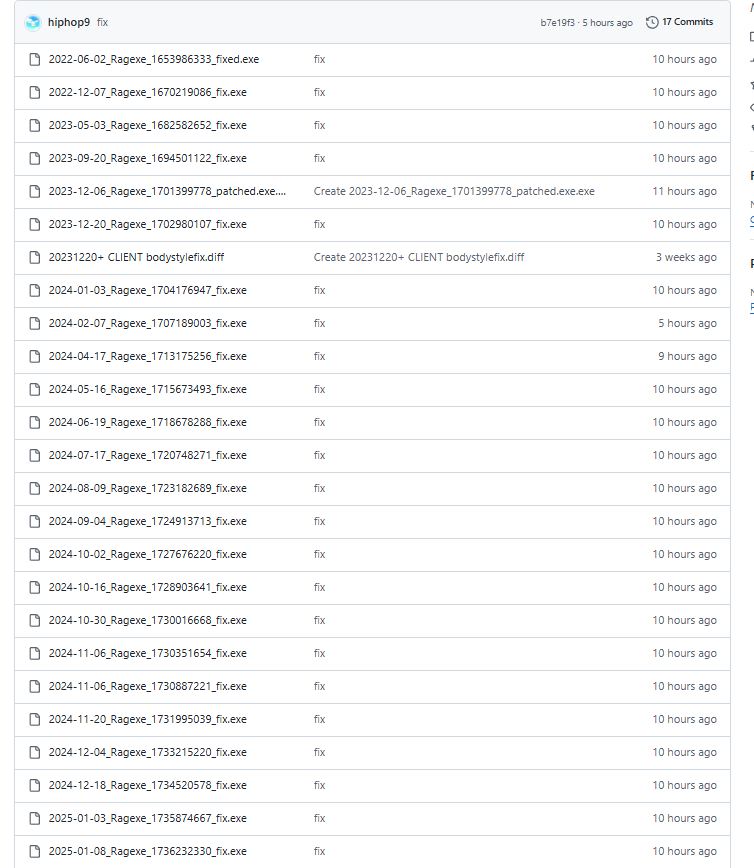
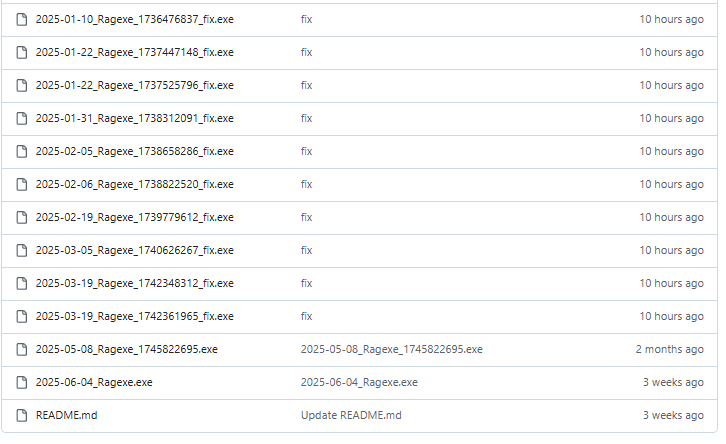
KRO : https://github.com/hiphop9/ROClient_en 2025-06-04_Ragexe.exe -PATH- @ Bug Fix(Recommended) Add Close Button Custom Window Title Disable 1rag1 Params(Recommended) Disalbe Filename Check(Recommended) Disable Help Message Enable DNS Suport Enable Multiple GRF(Recommended) Fix NPC Dialog Scroll Increase Zoom Out 75% Read Data Folder First(Recommended) Remove Hard Coded Address & Port(Recommended) Restore Clientinfo.xml(Recommended) Restore Old Login Packet(Recommended) externalsettings Korea patch Skip License Screen Translations client EnableWho EnableShowName AlwaysAscii CallKoreaClientInfo PlainTextDesc HideBuildInfo TranslateClient NoGGuard CustomItemInfoLub CustomAchieveLub CustomTownInfoLub CustomTipboxLub Customspopuplub CustomMapInfoLub CustomOngQuestInfoLub CustomRcmdQuestInfoLub Customachievementslub CustomQuestClassificationInfolub NoNagle OpenToServiceSelect GuildBrackets NoGravityAds NoGravityLogo FixLatestNCWin Restore model culling Headgears viewID 64000 ExtendCashShopPreview EnableProxySupport IncreaseMapQuality rAthena 2025-06-14 (66a4a2ab68ce85d781514c3c000433f981d6842f) https://github.com/hiphop9/rathena20250614 - emotion ui update for 20230925 clients - 20231220+ CLIENT bodystylefix - macro user report packet This is distributed for testing purposes only. Please do not request additional patches!! I am not a seller!! Therefore, if you plan to operate or commercialize a server, do not contact me!!
 3 points
 -
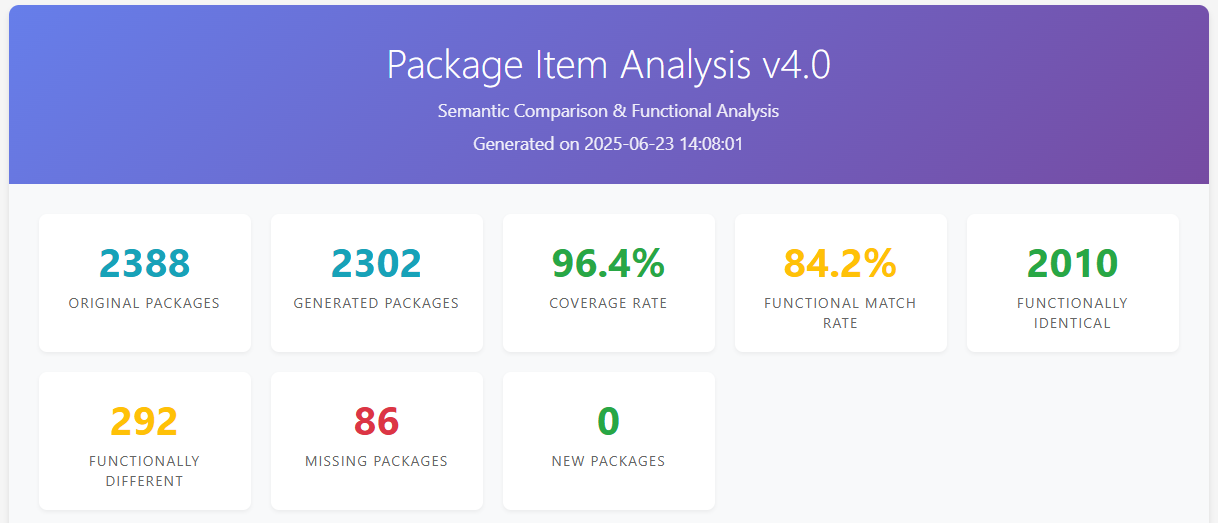
Within this few days I've tried to see how packageitem.lub structure and is it possible to create generator for that. Yes, possible but I wont share the generator here, because Ive tried for renewal it takes around 15 minutes or more because of too much of groups in item_group_db (2777 groups) and also a lot of items. Btw, I'm using latest rAthena and latest ROTP by Chris to date (24 June 2025), maybe ill update this post if needed but since its for Pre-RE, I don't think there will be much changes then. I've tried to use AI to analyze data generated from my generator with ROTP latest packageitem.lub and below is the result for Renewal data. As you can see, the generator covered 96.4% packages for Renewal compare to latest packageitem ROTP and 86 of missing packages is because of unknown itemID and non existing group. I need to filter some group in rAthena item_group_db.yml because of some groups thats are not even in official packageitem.lub, so thats why the new packages is 0. There are 292 functionally different because of different prob/rates and also the item data inside that specific group compare to official one. Below is latest packageitem.lub from ROTP as default which is Renewal. And below is the generated one for Pre-Renewal by using ROTP Pre-RE iteminfo.lua data Since there isn't any released as I'm aware of for Pre-Renewal packageitem.lub so I'll share it here and you could try it. The data is generated by using ROTP Pre-Renewal iteminfo.lua and rAthena Pre-Renewal files. If the probability info didn't shown, recheck packageitem.lub does it have that itemID existing, and if yes but still not showing, try to add the itemID in the list in simplecashshopscript.lub. If there is any inaccuracy compare to rAthena you can let me know and I'll try to update it ASAP. packageitem.lubsimplecashshopscript.lub
 3 points
 -
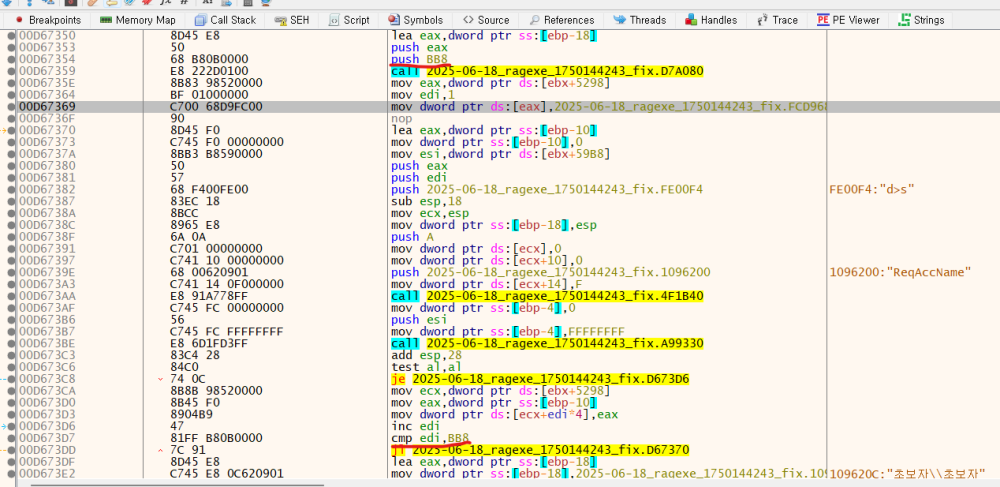
Hexadecimal = BB8 (Decimal = 3000) max 64000 = FA00
 3 points
 -
This feature enhances the standard MVP death mechanic by replacing the generic "Tomb" label with the **actual name of the MVP** that was defeated. When an MVP dies on the map, a tombstone NPC appears at the exact spot of death, and instead of showing a generic label, it dynamically displays the **name of the boss** (e.g., "Phreeoni", "Ifrit", "Baphomet"). **How it works for players:** - When an MVP is killed, a tombstone spawns on the map. - The tomb now shows the name of the MVP, not just “Tomb”. - This helps MVP hunters and players identify what boss was recently defeated, even if they arrived late. - It improves both visual clarity and overall immersion in the game. I created a demo video showcasing how this behaves in-game. **Note to fellow developers:** After completing this feature, I discovered that someone had already created a similar concept before me. However, I had no knowledge of that existing implementation during development and did not reference or use any of their code. This version was built independently from scratch based on how I personally wanted it to function. While the **concept is similar**, the **implementation and behavior may differ** between our versions. I still believe this showcases a useful quality-of-life addition for MVP-related mechanics, and I hope it can serve as inspiration or a base for others who wish to implement their own version. Feel free to check out the demo video and let me know your thoughts!3 points
-
i would like to share my winter snow EN skin winter snow EN.rar
 3 points
 -
Disable GM sprite - hex Search for: C4 04 84 C0 0F 84 C3 00 00 00 Two matches For both occurrences, replace with: C4 04 84 C0 90 E9 C3 00 00 00 Restore model culling hex Search for: 80 BE 54 01 00 00 01 You will find two matches. In both cases, look at the following bytes: 80 BE 54 01 00 00 01 75 1D 80 BE 54 01 00 00 01 75 45 Replace the 75 1D and 75 45 parts with 90 903 points
-
The 2023+ clients use new job IDs for the jRO costumes: JOB_RUNE_KNIGHT_2ND = 4332, JOB_MECHANIC_2ND = 4333, JOB_GUILLOTINE_CROSS_2ND = 4334, JOB_WARLOCK_2ND = 4335, JOB_ARCHBISHOP_2ND = 4336, JOB_RANGER_2ND = 4337, JOB_ROYAL_GUARD_2ND = 4338, JOB_GENETIC_2ND = 4339, JOB_SHADOW_CHASER_2ND = 4340, JOB_SORCERER_2ND = 4341, JOB_SURA_2ND = 4342, JOB_MINSTREL_2ND = 4343, JOB_WANDERER_2ND = 4344, You need to add them in the source. Open file \src\common\mmo.hpp. Find JOB_SKY_EMPEROR2 = 4316, then add the following code below it: JOB_RUNE_KNIGHT_2ND = 4332, JOB_MECHANIC_2ND, JOB_GUILLOTINE_CROSS_2ND, JOB_WARLOCK_2ND, JOB_ARCHBISHOP_2ND, JOB_RANGER_2ND, JOB_ROYAL_GUARD_2ND, JOB_GENETIC_2ND, JOB_SHADOW_CHASER_2ND, JOB_SORCERER_2ND, JOB_SURA_2ND, JOB_MINSTREL_2ND, JOB_WANDERER_2ND, Save the file then recompile the server. I've updated the example script for you: // callfunc "F_JobSuit",<Job ID>; //Change to specific sprite // callfunc "F_JobSuit",-1; //Change to 2nd job // callfunc "F_JobSuit",-2; //Change to transcendent 2nd job // callfunc "F_JobSuit",-3; //Change to 3rd job // callfunc "F_JobSuit",-4; //Change to 4th job // callfunc "F_JobSuit",-5; //Change to alternative third class costume // callfunc "F_JobSuit"; //Return to default sprite function script F_JobSuit { .@block_expanded_jobs = false; //Disable changing for expanded job player (true/false) if (getargcount() == 0) { if (PACKETVER >= 20231220) setlook LOOK_BODY2,Class; else if (JobSuit_id > 4331 && JobSuit_id < 4345) setlook LOOK_BODY2,0; else changebase Class; JobSuit_active = false; JobSuit_id = 0; end; } if (getarg(0) > -1) { if (jobname(getarg(0)) == "Unknown Job") { dispbottom "Unknown Job"; end; } callsub S_OK,getarg(0),1; } if (.@block_expanded_jobs && (BaseClass == Job_Novice || BaseClass == Job_Summoner || BaseClass == Job_Gunslinger || BaseClass == Job_Ninja || BaseClass == Job_Taekwon)) end; if (BaseClass == Job_Summoner) { if (Upper) callsub S_OK,Job_Summoner; else callsub S_OK,Job_Spirit_Handler; } else if (BaseClass == Job_Gunslinger) { switch(getarg(0)) { case -1: callsub S_OK,Job_Gunslinger; case -2: case -3: callsub S_OK,Job_Rebellion; case -4: case -5: default: callsub S_OK,Job_Night_Watch; } } else if (BaseClass == Job_Ninja) { switch(getarg(0)) { case -1: callsub S_OK,Job_Ninja; case -2: case -3: callsub S_OK,(Sex ? Job_Kagerou : Job_Oboro); case -4: case -5: default: callsub S_OK,(Sex ? Job_Shinkiro : Job_Shiranui); } } else if (BaseClass == Job_Novice) { switch(getarg(0)) { case -1: callsub S_OK,Job_Novice,1; case -2: case -3: callsub S_OK,Job_Super_Novice; case -4: case -5: default: callsub S_OK,Job_Hyper_Novice; } } else if (BaseJob == Job_Soul_Linker) { switch(getarg(0)) { case -1: case -2: callsub S_OK,Job_Soul_Linker; case -3: callsub S_OK,Job_Soul_Reaper; case -4: case -5: default: callsub S_OK,Job_Soul_Ascetic; } } else if (BaseJob == Job_Star_Gladiator) { switch(getarg(0)) { case -1: callsub S_OK,Job_Taekwon; case -2: callsub S_OK,Job_Star_Gladiator; case -3: callsub S_OK,Job_Star_Emperor; case -4: case -5: default: callsub S_OK,Job_Sky_Emperor; } } switch(getarg(0)) { case -1: callsub S_OK,roclass(eaclass()&EAJ_UPPERMASK); case -2: callsub S_OK,roclass(eaclass()&EAJ_UPPERMASK|EAJL_UPPER); case -3: callsub S_OK,roclass(eaclass()&EAJ_THIRDMASK|EAJL_THIRD); case -4: .@job = roclass(eaclass()&EAJ_THIRDMASK|EAJL_THIRD); callsub S_OK,roclass(eaclass(.@job)|EAJL_FOURTH|EAJL_UPPER); case -5: .@job = roclass(eaclass()&EAJ_THIRDMASK|EAJL_THIRD); if (.@job > 0) callsub S_OK,roclass(eaclass(.@job)|EAJL_FOURTH|EAJL_UPPER)+80; } S_OK: .@c = getarg(0); if (.@c < 1 && getarg(1,0) == 0) end; if (PACKETVER >= 20231220) setlook LOOK_BODY2,.@c; else if (.@c > 4331 && .@c < 4345) setlook LOOK_BODY2,1; else changebase .@c; JobSuit_active = true; JobSuit_id = .@c; end; } - script #JobSuitOnLogin -1,{ OnPCLoginEvent: if (JobSuit_active) F_JobSuit(JobSuit_id); end; }2 points
-
Hello, I don't see the variable being set in your item script. You can use OnPCLoginEvent on a NPC to reapply the appearance. Replace changebase with setlook LOOK_BODY2. Example using a function: Script: | callfunc "F_JobSuit"; UnEquipScript: | callfunc "F_JobSuit",-1; // callfunc "F_JobSuit"; //Change to evolution sprite // callfunc "F_JobSuit",<Job ID>; //Change to specific sprite // callfunc "F_JobSuit",-1; //Return to default sprite function script F_JobSuit { if (getarg(0,0) != -1) { if (jobname(getarg(0,-1)) != "Unknown Job") .@c = getarg(0); else if (BaseJob == Job_Priest) .@c = JOB_ARCH_BISHOP; else if (BaseJob == Job_Wizard) .@c = JOB_WARLOCK; else if (BaseJob == Job_Blacksmith) .@c = JOB_MECHANIC; else if (BaseJob == Job_Hunter) .@c = JOB_RANGER; else if (BaseJob == Job_Assassin) .@c = JOB_GUILLOTINE_CROSS; else if (BaseJob == Job_Crusader) .@c = JOB_ROYAL_GUARD; else if (BaseJob == Job_Monk) .@c = JOB_SURA; else if (BaseJob == Job_Sage) .@c = JOB_SORCERER; else if (BaseJob == Job_Rogue) .@c = JOB_SHADOW_CHASER; else if (BaseJob == Job_Alchemist) .@c = JOB_GENETIC; else if (BaseJob == Job_Bard) .@c = JOB_MINSTREL; else if (BaseJob == Job_Dancer) .@c = JOB_WANDERER; if (PACKETVER >= 20231220) setlook LOOK_BODY2,.@c; else changebase .@c; JobSuit_active = true; JobSuit_id = .@c; end; } if (PACKETVER >= 20231220) setlook LOOK_BODY2,Class; else changebase Class; JobSuit_active = false; JobSuit_id = 0; end; } - script #JobSuitOnLogin -1,{ OnPCLoginEvent: if (JobSuit_active) F_JobSuit(JobSuit_id); end; }2 points
-
Hey everyone, I wanted to showcase a custom MVP mechanic system I've been developing for Ragnarok Online using rAthena. The idea is to bring more dynamic, thematic, and visually appealing mechanics to MVP encounters — moving beyond the usual tank-and-spank format. DISCORD Takechiii#8303 DISCORD Takechiii#8303 🛠 What does this system do? Allows MVPs to execute custom attack patterns on specific map coordinates. Works on an 11x11 grid centered around the MVP (6x6 coordinate) to trigger precise damage zones. Each MVP’s behavior can be thematically tailored (e.g., feline patterns for Moonlight Flower, curses for Osiris, etc.). Easily reusable and expandable for other bosses or PvE events. This system is inspired by raid-style battles. It’s ideal for: Custom instances MVP events with multiple phases Progressive PvE challenges I’m still refining the system and adding new mechanics and visual effects. I’m open to feedback, suggestions, or even collaborations!
.gif.e7839edf2de6bc4096258197f4507b38.gif)
.gif.8116413800d3cae296a78fd1068d19c9.gif)
.gif.46462875b4da6c4a88731f9035c1007f.gif)
.gif.9bf900762d1b3ea51bb7933478481a46.gif)
.gif.cc8056b60036454c9e7bcc4a0f2a7cc9.gif)
.gif.6936da3e740a05d833f841152aeddb44.gif) 2 points
2 points -
Zuku, I'm not finding the files to download the custom sprites for the items of the MvP.. is there any link to them? Thanks in advance!1 point
-
Hi bro care to share1 point
-
Hi I'm new to this designing business. I plan to make custom made designs for Elurair Patcher in the future and it will be coded by my friend. These are banners I've previously made for private RO servers I've played. If you want to request for a design, you can hit me up in discord (@itzmejazzy_)


 1 point
 -
Hi, I'm working on a ranking system inspired by League of Legends, and I decided to create these files to apply it to the players I'm new to editing this kind of stuff. I wish a professional could review it and give it a proper cleanup, but anyway, it doesn't seem too bad for now. How do use it: 1) Download League of Legends Rank File. 2) Put into your GRF. 3) Go to your hateffectinfo.lub (data/luafiles514/hateeffectinfo) 4) Search or something Similar. HAT_EF_NightSkyOfRutie = 225, 5) Put this: -- Ranks Lol Tag by Scanty -- HAT_IRON_RANK = 231, HAT_BRONCE_RANK = 232, HAT_PLATA_RANK = 233, HAT_ORO_RANK = 234, HAT_PLATINO_RANK = 235, HAT_ESMERALDA_RANK = 236, HAT_DIAMANTE_RANK = 237, HAT_MAESTRO_RANK = 238, HAT_GM_RANK = 239, HAT_RETADOR_RANK = 240, 6) Now, Search for [HatEFID.HAT_EF_NightSkyOfRutie] = { resourceFileName = "efst_NightSkyOfRutie\\christmasx3.str", hatEffectPos = -11, hatEffectPosX = -0.3, isRenderBeforeCharacter = true, isAdjustPositionWhenShrinkState = true, isAdjustSizeWhenShrinkState = true }, 7) After that --- Inician Rangos de Lol - By Scanty --- [HatEFID.HAT_IRON_RANK] = { resourceFileName = "custom\\rangos_lol\\iron_RANK.str",hatEffectPos = 6, isIgnoreRiding = false, isRenderBeforeCharacter = false, isAttachedHead = true, isAdjustPositionWhenShrinkState = true, isAdjustSizeWhenShrinkState = true}, [HatEFID.HAT_BRONCE_RANK] = { resourceFileName = "custom\\rangos_lol\\bronce_RANK.str",hatEffectPos = 6, isIgnoreRiding = false, isRenderBeforeCharacter = false, isAttachedHead = true, isAdjustPositionWhenShrinkState = true, isAdjustSizeWhenShrinkState = true}, [HatEFID.HAT_PLATA_RANK] = { resourceFileName = "custom\\rangos_lol\\plata_RANK.str",hatEffectPos = 6, isIgnoreRiding = false, isRenderBeforeCharacter = false, isAttachedHead = true, isAdjustPositionWhenShrinkState = true, isAdjustSizeWhenShrinkState = true}, [HatEFID.HAT_ORO_RANK] = { resourceFileName = "custom\\rangos_lol\\oro_RANK.str",hatEffectPos = 6, isIgnoreRiding = false, isRenderBeforeCharacter = false, isAttachedHead = true, isAdjustPositionWhenShrinkState = true, isAdjustSizeWhenShrinkState = true}, [HatEFID.HAT_PLATINO_RANK] = { resourceFileName = "custom\\rangos_lol\\platino_RANK.str",hatEffectPos = 6, isIgnoreRiding = false, isRenderBeforeCharacter = false, isAttachedHead = true, isAdjustPositionWhenShrinkState = true, isAdjustSizeWhenShrinkState = true}, [HatEFID.HAT_ESMERALDA_RANK] = { resourceFileName = "custom\\rangos_lol\\esmeralda_RANK.str",hatEffectPos = 6, isIgnoreRiding = false, isRenderBeforeCharacter = false, isAttachedHead = true, isAdjustPositionWhenShrinkState = true, isAdjustSizeWhenShrinkState = true}, [HatEFID.HAT_DIAMANTE_RANK] = { resourceFileName = "custom\\rangos_lol\\diamante_RANK.str",hatEffectPos = 6, isIgnoreRiding = false, isRenderBeforeCharacter = false, isAttachedHead = true, isAdjustPositionWhenShrinkState = true, isAdjustSizeWhenShrinkState = true}, [HatEFID.HAT_MAESTRO_RANK] = { resourceFileName = "custom\\rangos_lol\\maestro_RANK.str",hatEffectPos = 6, isIgnoreRiding = false, isRenderBeforeCharacter = false, isAttachedHead = true, isAdjustPositionWhenShrinkState = true, isAdjustSizeWhenShrinkState = true}, [HatEFID.HAT_GM_RANK] = { resourceFileName = "custom\\rangos_lol\\GM_RANK.str",hatEffectPos = 6, isIgnoreRiding = false, isRenderBeforeCharacter = false, isAttachedHead = true, isAdjustPositionWhenShrinkState = true, isAdjustSizeWhenShrinkState = true}, [HatEFID.HAT_RETADOR_RANK] = { resourceFileName = "custom\\rangos_lol\\Retador_RANK.str",hatEffectPos = 6, isIgnoreRiding = false, isRenderBeforeCharacter = false, isAttachedHead = true, isAdjustPositionWhenShrinkState = true, isAdjustSizeWhenShrinkState = true} 8 ) Create a script to test. you need to use this: hateffect 240, true; *hateffect(<Hat Effect ID>,<State>); This will set a Hat Effect onto the player. The state field allows you to enable (true) or disable (false) the effect on the player. The Hat Effect constants can be found in 'src/map/script_constants.hpp' starting with HAT_EF_*. Requires client 2015-05-13aRagEXE or newer. League of Legends Rank.rar
 1 point
 -
Update: Working on the latest rathena version as of the date I'm typing this. // SERVER SIDE 1. Open src/map/status.cpp find and add after case SC_JEXPBOOST: case SC_EXPBOOST: case SC_JEXPBOOST: case SC_VIPSTATE: // VIP Status Icon case SC_PERIOD_RECEIVEITEM_2ND: case SC_PERIOD_PLUSEXP_2ND: 2. Open src/map/status.hpp find and add before SC_MAX, SC_OVERCOMING_CRISIS, SC_VIPSTATE = 2000, // VIP Status Icon SC_MAX, //Automatically updated max, used in for's to check we are within bounds. find and add before EFST_MAX, /// Do not modify code above this, since it will be automatically generated by the API again EFST_VIPSTATE = 2000, // VIP Status Icon EFST_MAX, 3. Open src/map/script_constants.hpp find and add after export_constant(SC_OVERCOMING_CRISIS); export_constant(SC_CONTENTS_20); export_constant(SC_OVERCOMING_CRISIS); export_constant(SC_VIPSTATE); // VIP Status Icon /// Do not modify code below this, until the end of the API hook, since it will be automatically generated again find and add after export_constant(EFST_C_BUFF_9); export_constant(EFST_C_BUFF_9); export_constant(EFST_VIPSTATE); // VIP Status Icon /// @APIHOOK_END 4. Open db/import/status.yml copy and paste (your status.yml should look like this if you haven't added any custom sc_status) Header: Type: STATUS_DB Version: 4 Body: - Status: Vipstate Icon: EFST_VIPSTATE Flags: NoRemoveOnDead: true NoDispell: true NoBanishingBuster: true NoClearance: true 5. Open db/import/item_db.yml or db/pre-re/item_db_usable.yml (up to you) - Id: 30000 AegisName: Vip_Card_3D Name: VIP Card 3D Type: Cash Buy: 20 Weight: 10 Trade: NoDrop: true NoSell: true NoGuildStorage: true NoMail: true NoAuction: true Script: | if (vip_status(VIP_STATUS_ACTIVE)) { dispbottom "You have extended your VIP duration."; } else { dispbottom "You have successfully become a VIP member."; sc_start SC_VIPSTATE,-1,1; } vip_time 4320; - Id: 30001 AegisName: Vip_Card_7D Name: VIP Card 7D Type: Cash Buy: 20 Weight: 10 Trade: NoDrop: true NoSell: true NoGuildStorage: true NoMail: true NoAuction: true Script: | if (vip_status(VIP_STATUS_ACTIVE)) { dispbottom "You have extended your VIP duration."; } else { dispbottom "You have successfully become a VIP member."; sc_start SC_VIPSTATE,-1,1; } vip_time 10080; - Id: 30002 AegisName: Vip_Card_30D Name: VIP Card 30D Type: Cash Buy: 20 Weight: 10 Trade: NoDrop: true NoSell: true NoGuildStorage: true NoMail: true NoAuction: true Script: | if (vip_status(VIP_STATUS_ACTIVE)) { dispbottom "You have extended your VIP duration."; } else { dispbottom "You have successfully become a VIP member."; sc_start SC_VIPSTATE,-1,1; } vip_time 43200; 6. Open npc/custom and add a text file named vip_system.txt copy and paste - script VIP_TIME -1,{ OnPCLoginEvent: if (vip_status(1)) { .@remain = vip_status(VIP_STATUS_REMAINING); // seconds dispbottom "Remaining VIP duration: " + Time2Str(vip_status(VIP_STATUS_REMAINING) + gettimetick(2)); sc_start SC_VIPSTATE, .@remain * 1000, 1; end; } OnPCLogoutEvent: if (vip_status(1)) { sc_end SC_VIPSTATE; // remove the buff to update the timer on login } end; } 7. Open npc/scripts_custom.conf add to the last line npc: npc/custom/vip_system.txt 8. Recompile your server // CLIENT SIDE 1. You need four files from your RO GRF. Locate and extract them first from luafiles514/lua files/stateicon/ efstids.lub stateiconimginfo.lub stateiconinfo.lub stateiconinfo_f.lub // I'm not sure if this one is necessary but I decided to include it anyway xD 2. Edit efstids.lub Scroll down last line and add. EFST_VIPSTATE = 2000, 3. Edit stateiconimginfo.lub Scroll down last line and add. Edit to your liking. StateIconList[EFST_IDs.EFST_VIPSTATE] = { haveTimeLimit = 1, posTimeLimitStr = 2, descript = { { "VIP", COLOR_TITLE_BUFF }, { "%s", COLOR_TIME }, { "Base EXP Rate +50%" }, { "Job EXP Rate +50%" }, { "Drop Rate +50%" }, { "Additional 300 Storage Slot" }, { "Ignore gemstone requirement for skills" }, { "Max character limit increase" }, { "Auto Attack Feature" }, } } 4. Edit stateiconinfo.lub Scroll down last line and add. [EFST_IDs.EFST_VIPSTATE] = "vipicon.tga", 5. Edit stateiconinfo_f.lub Scroll down last line and add. EFST_IDs.EFST_VIPSTATE, Done! Congratulations! Free VIP Icon from here. Put it inside your grf - data\texture\effect Note: The timer on the VIP status icon will not be displayed if the duration exceeds 24 days and 19 hours. Unfortunately, I don't know how to make this possible either.1 point
-
I think it should be working, as usual dont try it at town since maybe some dev might try at prontera/town with @pvp or something. U can try with the 4 example given (if im not mistaken) and see the damage. Try at any field/dungeon.1 point
-
I just tried it and it's working fine for me. Please share what you put in the file and how you tested it.1 point
-
Put in import folder1 point
-
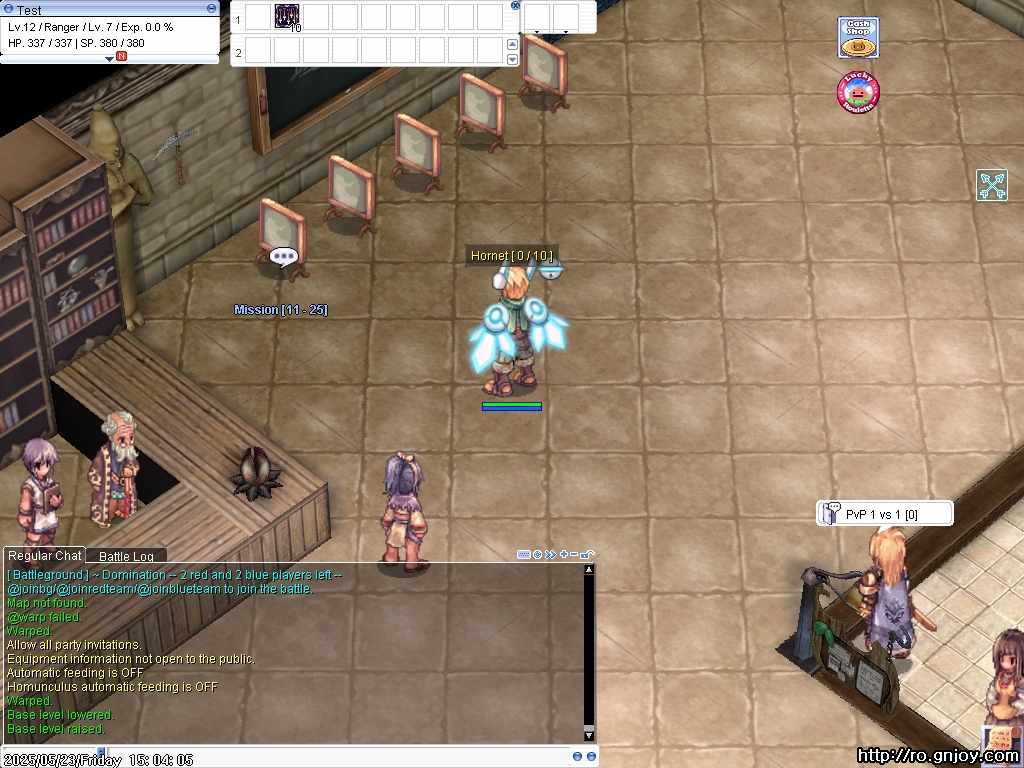
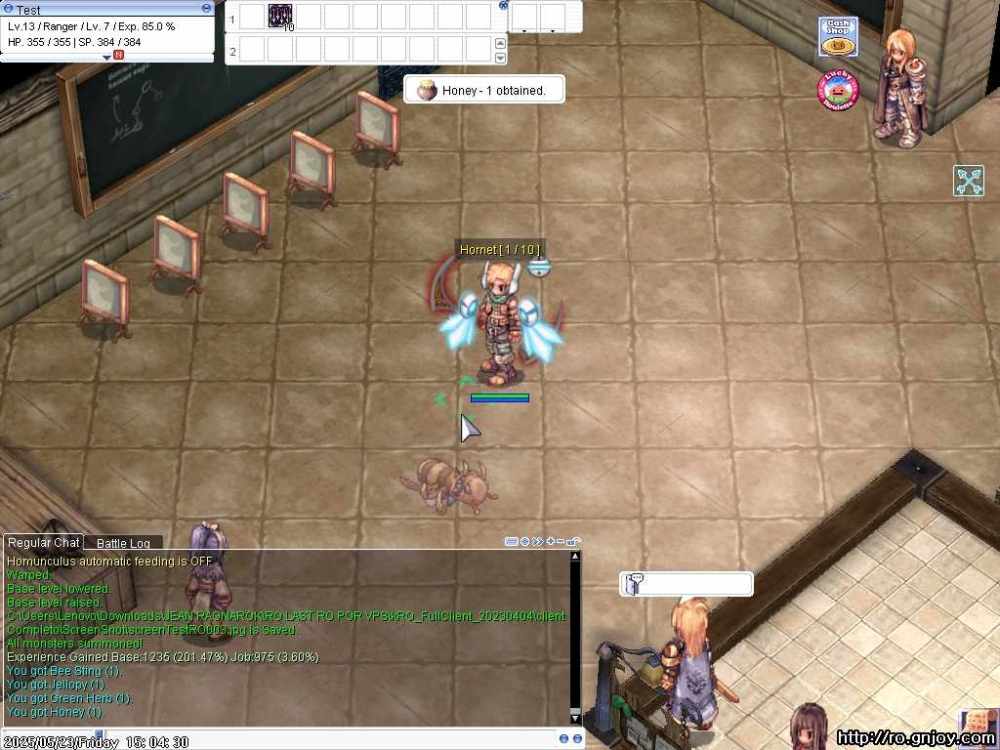
Bueno sin ofender a Euphy creador de este npc de cazeria, ° Quisiera que me ayudaran a encontrar y elegir los monstruos a cazar, debido que están al azar. ° También una opción de % probabilidad similar a la probabilidad de drop de cartas, ejemplo: Usuario: THOMY a matado 1000 Zombies sin embargo por la probabilidad de drop kill de un 50%, solo lleva 500 kill en conteo. ya que cada kill tiene 50%. ° Finalmente si me ayudan agregar el conteo, como está visiblemte en la imagen, "el conteo arriba en el personaje (Honet [1/10])", está en color amarillo. monster_hunting_euphy.txt
 1 point
 -
@Racaae puede hacer lo de @JASHI11?1 point
-
We added: -> Ripple XRP to payments gateway -> Solana to payments gateway get the updates here https://github.com/xpayapi/FluxCP-Addons If you have any inquiries, please let us know1 point
-
Los scripts de Euphy y tr0n usan variables con OnNPCKillEvent y el color del texto es fijo. Para mostrar los números de muertes en color amarillo, necesitarás usar el sistema oficial de misiones (setquest / checkquest / erasequest), donde cada muerte cuenta para los miembros del grupo, pero la probabilidad siempre es del 100%. Para agregar una nueva misión personalizada, abre el archivo: import/quest_db.yml (o import/quest_db.txt si tu rAthena está desactualizado). Ejemplo: - Id: 7148 Title: The training course 'conquer the orc village!' - A real battle 1 Targets: - Mob: ORC_BABY Count: 10 Y el archivo en tu carpeta del cliente: System/OngoingQuestInfoList (o data/questid2display.txt si tu ejecutable del cliente es antiguo). Ejemplo: [7148] = { Title = "¡Conquista el Pueblo de los Orcos!", Description = { "Pueden ser crías, pero se convierten en feroces Guerreros orco. Caza 10 Bebés orco en el Pueblo de los Orcos." }, Summary = "" }, Luego, usa el ID de la misión en el NPC. Ejemplo: prontera,150,150,4 script Cazador Simple 123,{ if(checkquest(7148) == -1) { // Misión no iniciada mes "[Cazador Simple]"; mes "¡Necesito ayuda cazando monstruos!"; mes "¿Puedes cazar 10 Bebés orco para mí?"; next; if(select("Aceptar:Rechazar") == 1) { mes "[Cazador Simple]"; mes "¡Genial! Regresa cuando hayas terminado."; setquest 7148; close; } mes "[Cazador Simple]"; mes "Tal vez la próxima vez entonces."; close; } else if(checkquest(7148,HUNTING) == 2) { // Caza completada mes "[Cazador Simple]"; mes "¡Excelente trabajo! Aquí tienes tu recompensa."; getexp 5000,0; erasequest 7148; close; } else if(checkquest(7148) == 1) { // Misión activa pero no completada mes "[Cazador Simple]"; mes "¡Sigue cazando! Aún no has terminado."; close; } } moc_para01,39,36,5 script Gestor de Misiones#2024 732,{ mes "[^FF7700Gestor de Misiones^000000]"; mes "Hola, por favor selecciona una misión"; while (true) { switch(select((.hunting)?" ~ Misión de Cacería":"", (.collection)?" ~ Misión de Recolección":"")) { case 1: set .@huntmenu$, ""; for(set .@i,0; .@i < .huntingquestcount; set .@i,.@i+1){ if (.@i) set .@huntmenu$,.@huntmenu$ + ":"; if (gettimetick(2) < getd((.@i+1) + "_hunting_delay")) .@c$ = "^808080"; else .@c$ = "^000000"; set .@huntmenu$, .@huntmenu$ + .@c$ + "[Nv " + getd("." +(.@i+1)+"_huntingmin") + "-" + getd("." +(.@i+1)+"_huntingmax") + "] " + getd("." + (.@i+1) + "_huntingname$"); } set @selection,select(.@huntmenu$); clear; if (.quest_repeat == true) { if(gettimetick(2) < getd(@selection + "_hunting_delay")){ mes "[^FF7700Gestor de Misiones^000000]"; mes "¡Lo siento, debes esperar 24 horas antes de repetir esta misión!"; mes "Por favor espera hasta ^0000FF"+Time2Str(getd(@selection + "_hunting_delay"))+"^000000."; close; } } else { if (getd(@selection + "_hunting_repeat") == true){ mes "[^FF7700Gestor de Misiones^000000]"; mes "Ya completaste esta misión."; mes "Por favor elige otra."; close; } } mes "[^FF7700Gestor de Misiones^000000]"; .@size = getarraysize(getd("."+ @selection + "_huntingmob")); if (.@size == 2) mes "Por favor caza y elimina a ^FF0000"+getd("."+@selection+"_huntingmob[1]")+" " + getmonsterinfo(getd("."+@selection+"_huntingmob[0]"),MOB_NAME)+"^000000."; else { mes "Por favor caza y elimina los siguientes monstruos:"; for(set .@j, 0; .@j < .@size; set .@j,.@j+2) mes "- ^FF0000"+getd("."+@selection+"_huntingmob["+(.@j+1)+"]")+" " + getmonsterinfo(getd("."+@selection+"_huntingmob["+.@j+"]"),MOB_NAME)+"^000000"; } next; mes "[^FF7700Gestor de Misiones^000000]"; mes "Recompensas:"; if (getd("." +@selection+"_huntingexp[0]")) mes "^0000FF" + F_InsertComma(getd("." +@selection+"_huntingexp[0]"))+" EXP Base^000000"; if (getd("." +@selection+"_huntingexp[1]")) mes "^0000FF" + F_InsertComma(getd("." +@selection+"_huntingexp[1]"))+" EXP de Clase^000000"; if (getd("." +@selection+"_huntingzeny")) mes "Zeny: ^0000FF"+getd("." +@selection+"_huntingzeny")+"^000000"; if (getd("." +@selection+"_huntingprize[0]")) { for(.@i = 0; .@i < getarraysize(getd("." +@selection+"_huntingprize")); .@i++) mes getd("." +@selection+"_huntingamount") + " " + getitemname((getd("." +@selection+"_huntingprize["+.@i+"]"))); } switch(select("- Aceptar Misión", "- Entregar Misión Completada", "- Cancelar")) { case 1: clear; if (isbegin_quest(getd("." + @selection+"_huntingid"))) goto havetaken; if (BaseLevel >= getd("." +@selection+"_huntingmin") && BaseLevel <= getd("." +@selection+"_huntingmax")){ mes "[^FF7700Gestor de Misiones^000000]"; mes "Misión aceptada."; set h_run, true; set currentquest$, @selection; setquest getd("." + @selection+"_huntingid"); close; } else{ mes "[^FF7700Gestor de Misiones^000000]"; mes "No cumples con el nivel requerido para esta misión."; close; } case 2: clear; switch(checkquest(getd("." +@selection+"_huntingid"),HUNTING)) { case -1: goto nottaken; case 2: mes "[^FF7700Gestor de Misiones^000000]"; mes "¡Bien hecho!"; mes "Aquí están tus recompensas."; if(getd("." +@selection+"_huntingprize[0]")) { for(.@i = 0; .@i < getarraysize(getd("." +@selection+"_huntingprize")); .@i++) getitem(getd("." +@selection+"_huntingprize["+.@i+"]"),getd("." +@selection+"_huntingamount")); } set Zeny, Zeny+getd("." +@selection+"_huntingzeny"); getexp getd("." +@selection+"_huntingexp[0]"),getd("." +@selection+"_huntingexp[1]"); erasequest getd("." +@selection+"_huntingid"); setd(@selection + "_hunting_delay"),gettimetick(2)+.quest_delay; setd(@selection + "_hunting_repeat"),true; set @selection, ""; set h_run, false; end; default: mes "[^FF7700Gestor de Misiones^000000]"; mes "Aún no has derrotado a todos los monstruos."; close; } case 3: end; } case 2: clear; mes "[^FF7700Gestor de Misiones^000000]"; mes "El gremio siempre necesita más recursos."; mes "Por favor, selecciona el área en la que deseas ayudar hoy."; set .@collectmenu$, ""; for( set .@i,0; .@i < .collectionquestcount; set .@i,.@i+1){ if (.@i) set .@collectmenu$,.@collectmenu$ + ":"; if (gettimetick(2) < getd((.@i+1) + "_collection_delay")) .@c$ = "^808080"; else .@c$ = "^000000"; set .@collectmenu$, .@collectmenu$ + .@c$ + "[Nv " + getd("." +(.@i+1)+"_collectionmin") + "-" + getd("." +(.@i+1)+"_collectionmax") + "] " + getd("." + (.@i+1) + "_collectionname$"); } set @selection,select(.@collectmenu$); clear; if(.quest_repeat == true){ if(gettimetick(2) < getd(@selection + "_collection_delay")){ mes "[^FF7700Gestor de Misiones^000000]"; mes "¡Lo siento, debes esperar 24 horas antes de repetir esta misión!"; mes "Por favor espera hasta ^0000FF"+Time2Str(getd(@selection + "_collection_delay"))+"^000000."; close; } } else{ if(getd(@selection + "_collection_repeat") == true){ mes "[^FF7700Gestor de Misiones^000000]"; mes "Ya completaste esta misión."; mes "Por favor elige otra."; close; } } mes "[^FF7700Gestor de Misiones^000000]"; mes "Necesitamos lo siguiente:"; set .@size, getarraysize(getd("."+ @selection + "_collectionitem")); for( set .@j, 0; .@j < .@size; set .@j,.@j+2){ .@a = countitem(getd("."+@selection+"_collectionitem["+.@j+"]")); if (.@a < getd("."+@selection+"_collectionitem["+(.@j+1)+"]")) .@c$ = "^FF0000"; else .@c$ = ""; mes .@c$ + getd("."+@selection+"_collectionitem["+(.@j+1)+"]") + " " + getitemname(getd("."+@selection+"_collectionitem["+.@j+"]")) + ": " + "(" + .@a + "/"+getd("."+@selection+"_collectionitem["+(.@j+1)+"]") + ")^000000"; } next; mes "[^FF7700Gestor de Misiones^000000]"; mes "Recompensa:"; if (getd("." +@selection+"_collectionexp["+0+"]")) mes "^0000FF" + F_InsertComma(getd("." +@selection+"_collectionexp["+0+"]")) + " EXP Base^000000"; if (getd("." +@selection+"_collectionexp["+1+"]")) mes "^0000FF" + F_InsertComma(getd("." +@selection+"_collectionexp["+1+"]")) + " EXP de Clase^000000"; if (getd("." +@selection+"_collectionzeny")) mes "Zeny: ^0000FF"+getd("." +@selection+"_collectionzeny")+"^000000"; if (getd("." +@selection+"_collectionprize[0]")) { for(.@i = 0; .@i < getarraysize(getd("." +@selection+"_collectionprize")); .@i++) mes getd("." +@selection+"_collectionamount") + " " + getitemname((getd("." +@selection+"_collectionprize["+.@i+"]"))); } if (BaseLevel < getd("." +@selection+"_collectionmin") || BaseLevel > getd("." +@selection+"_collectionmax")) { next; mes "[^FF7700Gestor de Misiones^000000]"; mes "No cumples con el nivel requerido para esta misión."; } else { if(select("- Entregar objetos", "- Volver") == 1) { clear; set .@size, getarraysize(getd("."+@selection + "_collectionitem")); for( set .@k,0; .@k < .@size; set .@k,.@k+2) { if(countitem(getd("."+@selection+"_collectionitem["+.@k+"]"))>=getd("."+@selection+"_collectionitem["+(.@k+1)+"]")){ set .@checkitem,.@checkitem+2; } } if(.@checkitem<.@size){ mes "[^FF7700Gestor de Misiones^000000]"; mes "No tienes todos los objetos necesarios."; mes F_Rand("¿Olvidaste el objeto en el almacenamiento?","Tal vez intenta con otra misión.",""); break; } for( set .@delcount,0; .@delcount < .@size; set .@delcount,.@delcount+2){ delitem getd("."+@selection+"_collectionitem["+.@delcount+"]"),getd("."+@selection+"_collectionitem["+(.@delcount+1)+"]"); } mes "[^FF7700Gestor de Misiones^000000]"; mes "¡Bien hecho!"; mes "Aquí están tus recompensas."; if(getd("." +@selection+"_collectionprize[0]")) { for(.@i = 0; .@i < getarraysize(getd("." +@selection+"_collectionprize")); .@i++) getitem(getd("." +@selection+"_collectionprize["+.@i+"]"),getd("." +@selection+"_collectionamount")); } set Zeny,Zeny+getd("." +@selection+"_collectionzeny"); getexp getd("." +@selection+"_collectionexp["+0+"]"),getd("." +@selection+"_collectionexp["+1+"]"); setd(@selection + "_collection_delay"),gettimetick(2)+.quest_delay; setd(@selection + "_collection_repeat"),true; set @selection, ""; close; } else { clear; mes "[^FF7700Gestor de Misiones^000000]"; mes F_Rand("¿No fue de tu agrado?","¿Solo estás mirando?","¡Vamos a encontrar la misión adecuada para ti!"); } } break; case 3: close; } if (rand(3) == 1) mes "¿Qué tal una misión de " + F_Rand("cacería","recolección","aventura","ayuda") + " hoy?"; } OnInit: function AddCollection; function AddHunting; questinfo QTYPE_DAILYQUEST, QMARK_NONE; //Activate/Deactivate quest categories (true/1 - activated, false/0 - deactivated) set .collection, true; set .hunting, true; //Quest Delay (seconds) //24 hours = 86400 seconds set .quest_delay, 120; //Activate/Deactivate repeatable quests (true/1 - activated, false/0 - deactivated) set .quest_repeat, true; //Activate/Deactivate party support (true/1 - activated, false/0 - deactivated) set .party_support, true; //Max range for party support (+- x & y coordinations) set .party_range, 25; //Checks if quests are loaded (prevents out of index) if(.questsloaded==true) end; set .questsloaded, true; //Add Hunting Quests here (You can add as many required mobs as you want) //AddHunting("<Quest Name>",<Quest ID>,<Min Lvl>,<Max Lvl>,<Reward|Item ID>,<Reward|Item Amount>,<Zeny Reward>,<Base EXP>,<Job EXP>,<Monster ID>,<Monster Amount>,...); AddHunting("Prontera Field 01",11340,1,21,"608|609|501|502",1,0,2100,2100,1063,10); AddHunting("Prontera Field 02",11341,1,51,"610",1,0,27300,14700,1063,3,1113,3,1031,3); AddHunting("Descendencia de los orcos",7148,30,99,"610",1,0,27300,14700,1686,10); //Add Collection Quests here (You can add as many required items as you want) //AddCollection("<Quest Name>",<Min Lvl>,<Max Lvl>,<Reward|Item ID>,<Reward|Item Amount>,<Zeny Reward>,<Base EXP>,<Job EXP>,<Item ID>,<Item Amount>,...); AddCollection("Foliage Gathering",1,11,"502",1,0,2100,2100,705,10,707,10,7100,10,706,1); AddCollection("Herb Gathering",1,21,"611|612|613|614",1,0,2100,2100,507,8,508,8,509,8,510,8,511,8,621,3); AddCollection("Flower Gathering",1,31,"607",1,0,2100,2100,704,10,708,10,703,10,709,10); AddCollection("Vegetable Gathering",1,41,"607",1,0,2100,2100,515,10,516,10,535,10); end; function AddCollection{ set .collectionquestcount,.collectionquestcount+1; setd ("." +.collectionquestcount+"_collectionname$", getarg(0)); setd ("." +.collectionquestcount+"_collectionmin", getarg(1)); setd ("." +.collectionquestcount+"_collectionmax", getarg(2)); explode(getd(".@" +.collectionquestcount+"_collectionprize$"), getarg(3) + "", "|"); for(.@i = 0; .@i < getarraysize(getd(".@" +.collectionquestcount+"_collectionprize$")); .@i++) setd ("."+.collectionquestcount+"_collectionprize["+.@i+"]",atoi(getd(".@" +.collectionquestcount+"_collectionprize$["+.@i+"]"))); //setd ("." +.collectionquestcount+"_collectionprize", getarg(3)); setd ("." +.collectionquestcount+"_collectionamount", getarg(4)); setd ("." +.collectionquestcount+"_collectionzeny", getarg(5)); set .@argcount, 6; set .@size, getarraysize(getd("."+ .collectionquestcount + "_collectionexp")); setd ("." +.collectionquestcount+"_collectionexp["+.@size+"]",getarg(.@argcount)); setd ("." +.collectionquestcount+"_collectionexp["+(.@size+1)+"]",getarg(.@argcount+1)); set .@argcount, .@argcount+2; set .@size, getarraysize(getd("."+ .collectionquestcount + "_collectionitem")); while(getarg(.@argcount,-1)!=-1 && getarg(.@argcount+1,-1)!=-1){ setd ("."+.collectionquestcount+"_collectionitem["+.@size+"]",getarg(.@argcount)); setd ("."+.collectionquestcount+"_collectionitem["+(.@size+1)+"]",getarg(.@argcount+1)); set .@argcount,.@argcount+2; set .@size, .@size+2; } return; } function AddHunting{ set .huntingquestcount,.huntingquestcount+1; setd ("." +.huntingquestcount+"_huntingname$", getarg(0)); setd ("." +.huntingquestcount+"_huntingid", getarg(1)); setd ("." +.huntingquestcount+"_huntingmin", getarg(2)); setd ("." +.huntingquestcount+"_huntingmax", getarg(3)); explode(getd(".@" +.huntingquestcount+"_huntingprize$"), getarg(4) + "", "|"); for(.@i = 0; .@i < getarraysize(getd(".@" +.huntingquestcount+"_huntingprize$")); .@i++) setd ("."+.huntingquestcount+"_huntingprize["+.@i+"]",atoi(getd(".@" +.huntingquestcount+"_huntingprize$["+.@i+"]"))); setd ("." +.huntingquestcount+"_huntingamount", getarg(5)); setd ("." +.huntingquestcount+"_huntingzeny", getarg(6)); set .@size, getarraysize(getd("."+ .huntingquestcount + "_huntingexp")); set .@argcount, 7; setd ("." +.huntingquestcount+"_huntingexp["+.@size+"]",getarg(.@argcount)); setd ("." +.huntingquestcount+"_huntingexp["+(.@size+1)+"]",getarg(.@argcount+1)); set .@argcount, .@argcount+2; set .@size, getarraysize(getd("."+ .huntingquestcount + "_huntingmob")); while(getarg(.@argcount,-1)!=-1 && getarg(.@argcount+1,-1)!=-1){ setd ("."+.huntingquestcount+"_huntingmob["+.@size+"]",getarg(.@argcount)); setd ("."+.huntingquestcount+"_huntingmob["+(.@size+1)+"]",getarg(.@argcount+1)); set .@argcount, .@argcount+2; set .@size, .@size+2; } return; } havetaken: clear; mes "[^FF7700Gestor de Misiones^000000]"; mes "Lo siento, ya tienes esta misión activa."; close; nottaken: clear; mes "[^FF7700Gestor de Misiones^000000]"; mes "Parece que aún no has aceptado esta misión."; close; }1 point
-
This python script splits mob_db.yml into two files. mob_db_regular.yml containing only the regular map monsters. mob_db_extra.yml containing all other monsters (e.g., instance, event, script, non-spawning). Use at your own risk and do not claim this python script as yours. split.zip1 point
-
Stop crying already. First of all, you're not the only one with a brain who can think. Second, is it really my fault if I had the same idea and acted on it? And lastly, did I even get any code from you? I didn’t even know that thing had already been released. If you really think your idea was stolen, you should’ve registered it with the USCO to avoid this kind of drama. Anyway, I'm not here to argue with you. Like I said, I didn’t know someone else already had the same idea. Then all of a sudden, you’re here crying about it—haha. Let’s move on, bro. You’re not the only one gifted with a brain who can come up with ideas. Let others shine too don’t act like you own all the knowledge. Peace, bro. Next time, if you’re working on something, make sure to register it with the USCO right away.1 point
-
It's on server side -> Try find it on conf folder. (Maybe item or player)1 point
-
I have updated it to be compatible with the latest rAthena version https://github.com/hiphop9/rathena202506141 point
-
Oh I remembered it now. It was WARP patch something about party / friend windows, just go check it out you will get rid this crash for sure.1 point
-
I created a new command for the game's visual effects. There's already /effect, which allows us to no longer see any visual effects in the game. My command lets us choose which effects we no longer want to see. Example: "@nofx 89 on" will disable the storm gust effect. The command works very well. I'd like to know how to make my modifications available so that if the community finds it useful, it can be integrated into a future update.1 point
-
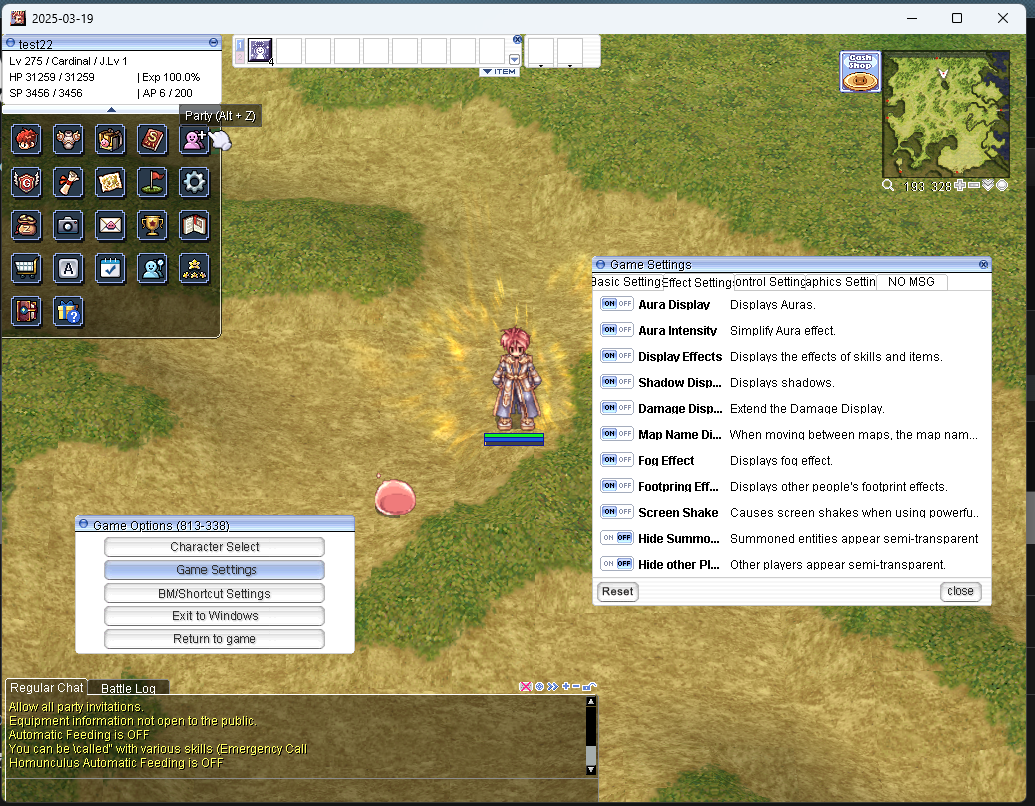
Its because these two most recent Client versions are still encrypted, not unpacked. What your Anti-Virus software can't parse, it will sometimes mark as a dangerous file. Anyway, I recommend anyone using resources from this thread that were posted by @Skylove to use client version 2025-03-19 for now, it's the only the one posted that allows patches to be applied to it via WARP. The 2 most recent released clients ( 2025-05-08 and 2025-06-04) are not that too different from what 2025-03-19 functionally provides. This also goes without saying, for future clients that will be further released, exercise caution and patience.1 point
-
Hello, this is a SRC edit and custom sprite of MVP monsters. It just uses the frame where they appear dead. This is actually a great idea adding a small tomb next to the MVP. Thanks for the suggestion!1 point
-
File Name: itemoption File Submitter: keitenai File Submitted: 21 Nov 2016 File Category: Utilities Content Author: keitenai @ command itemoption Script Information: This script allows you to apply random option on a selected equipped item. The Option types can be found in const.txt : LINK!! The Value is the rate of the option type effect. eg: `10` = 10% bonus attack Index location is the Option Slot location. 0 = First item option slot 1 = Second item option slot 2 = Third item option slot 3 = Fourth item option slot 4 = Fifth item option slot NOTE that you will not see the Option type's description (Client Side) if the Option Slots are not filled by sequence (missed a slot). With this i added a security check that if you missed/jump an index slot, the script will automatically fix it for you. @ itemoption makes it easier to apply random option in your item quite easily. Compatible with : rAthena 633a642 Download : itemoption.txt Hope you find this useful itemoption.txt
 1 point
 -
Ill forward this to him, hope it goes well to both of you.1 point
-
Link: https://github.com/TBlazeWarriorT/TBlazeWarriorT-Utility-Scripts/tree/main/NP%2B%2B rAthena Autocomplete Screenshots:
 1 point
 -
Good day! Just want to share the script that i made so far, it's called city investment, this quest is from Kro. The quest is to hunt or to deliver things to npc. devided into 3 clases, A, B, C quest. and the quest will be randomly given every day at 4 am. each day only be able to do 1 quest delivery and 1 hunting boss quest. Hunting boss quest will be reset every wednesday 4 am, after you done quest, you will gain achievement point. the more you do quest your level of alliance will be increase, and you can do higher rank of delivery quest and get more token. The token can be trade to union gear. for full detail you can read it here City Investment & Union Gears [Hazy Forest] or watch my video . This script i made it based on playing Kro.1 point
-
That is because the client now uses bodystyle to display job sprites instead of job. Run a query script in your database table "char" to copy the job column into the body column. Before 2023 clients, bodystyle's only used up to value 1 for alternate costumes. Now they can be filled with whatever the job ID and the sprite will display that. Your previous chars were still using bodystyle 0 or 1 -- which are Sprite ID of Novice and Swordsman UPDATE `char` SET body = class; Run this in query.1 point
-
Edit: Drive link removed - msg me on discord Skylove Github mirror, download while its up I included the bodystyle fix diff. Msg me on discord for others. chainflex#5343 Help each other out and don't gatekeep or else the sellers win.1 point
-
does it read any files in the ragnarok folder? for example if there is a file added, GarudaHS automatically eliminates the file I'll try to save the page first, and I'll try it in the future. thanks for this GameGuard1 point
-
For hex editing: Find = 00 00 F0 43 00 00 Example: Zoom 75% = 00 00 4C 44 00 00 Zoom 50% = 00 00 FF 43 00 00 How to change Zoom 75% to default And Indoor RSW Disalbe to default Thank you Skylove.  For hex editing: Find = 00 00 F0 43 00 00 Example: Zoom 75% = 00 00 4C 44 00 00 Zoom 50% = 00 00 FF 43 00 00 And Indoor RSW Disalbe to default In the hex editor, search for the string ndoorRswTable.txt (hex: 00 6E 64 6F 6F 72 52 73 77 54 61 62 6C 65 2E 74 78 74) and replace it with indoorRswTable.txt (hex: 69 6E 64 6F 6F 72 52 73 77 54 61 62 6C 65 2E 74 78 74)1 point
-
Hello rAthena Board, I saw that a lot of People were requesting iRO Daily Quest Scripts,so I started making them. I already finished 3 of them and I'm going to script the other 3 ,too if the rAthena users want me to. ALL CREDITS FOR THE QUEST IDEAS ARE GOING TO iRO! CREDITS FOR SCRIPTING THEM'RE GOING TO ME. DO NOT STEAL THIS WORK AND CLAIM IT AS YOURS!! Thank you for a really nice Server for testing the Scripts The Server Owner,knows that I mean him. Thank you for testing them! All the iRO Daily Quests here in 1 txt document Information about the Quests : http://www.ragnarok-guide.com/ragnarok-daily-quest/#.T4I_Qftzpz5 View the Script : // = ALL iRO DAILY QUESTS in this file,100 % Working // = MADE BY RIKIMARU on rAthena.org // = Profile Link : // = http://rathena.org/board/user/434-rikimaru/ // = ENJOY THIS SCRIPT! //=================================================================================== // //=====// /==/ /==/ /==/ // // // /==/ /==/ /=/ /==/ // //=====// /==/ /=/ /==============/ /========/ /==//===/ /==/ /==/ // //=////// /==/ /==//=/ /==/ /==/==/==/==/==/ / / / /==/ /==/ /==/ // // == /==/ /==//=/ /==/ /==/ /==/ /==/ ======/ / /==/ /==/ /==/ // // == /==/ /==/ /=/ /==/ /==/ /==/ /==/ / /===/ / /==/ /==/ /==/ // // == /==/ /==/ /=/ /==/ /==/ /==/ /==/ / /===/ / /==/ /==/=====/==/ // // == /==/ /==/ /=/ /==/ /==/ /==/ /==/ /========/ /==/ /==///////==/ // ================ rAthena Script ================================================== // ============== Information ======================================================= // = iRO Daily Quest : Alberta Cargo // = Made by : // = Rikimaru //===== Current Version: =============================================== //= 1.1 //===== Compatible With: =============================================== //= any rAthena SVN //===== Description: =================================================== //= The iRO Daily Quest : Alberta Cargo //= Usefull for having fun in a Server with a Mini Quest //= Has a counter of 24 Hours until the Players can do the Quest agian. //===== Additional Comments: =========================================== //= 1.0 Finished Scripting the Quest [Rikimaru] //= 1.1 Fixed a little Bug [Rikimaru] //====================================================================== //============== DO NOT REMOVE MY CREDITS AND CLAIM MY WORK AS YOURS === alberta,105,52,3 script [Quest] Port Manager 855,{ set .@npcname$,"^0000FF[ [Quest] Port Manager ]^000000"; if(gettimetick(2) - carfingor < (60 * 60 * 24)) { mes .@npcname$; mes "I'm sorry but you have to wait"; mes "24 Hours until you can do the Quest again!"; close; } if(qcargo6==1) { mes .@npcname$; mes "Congrats!"; getitem 501,20; getitem 502,5; getitem 503,10; getitem 504,10; getitem 505,10; getitem 608,1; set BaseExp,+1046821; set cquest,0; set carfingor,gettimetick(2); set qcargo6,0; close; } if(qcargo5==1) { mes .@npcname$; mes "Congrats!"; getitem 501,20; getitem 502,5; getitem 503,10; getitem 504,10; getitem 505,10; set BaseExp,+565471; set cquest,0; set carfingor,gettimetick(2); set qcargo5,0; close; } if(qcargo4==1) { mes .@npcname$; mes "Congrats!"; getitem 501,20; getitem 502,5; getitem 503,10; getitem 504,10; set BaseExp,+178601; set cquest,0; set carfingor,gettimetick(2); set qcargo4,0; close; } if(qcargo3==1) { mes .@npcname$; mes "Congrats!"; getitem 501,20; getitem 502,5; getitem 503,10; set BaseExp,+18293; set cquest,0; set carfingor,gettimetick(2); set qcargo3,0; close; } if(qcargo2==1) { mes .@npcname$; mes "Congrats!"; getitem 501,20; getitem 502,5; set BaseExp,+1642; set cquest,0; set carfingor,gettimetick(2); set qcargo2,0; close; } if(qcargo1==1) { mes .@npcname$; mes "Congrats!"; getitem 501,20; set BaseExp,+142; set cquest,0; set carfingor,gettimetick(2); set qcargo1,0; close; } if(BaseLevel >= 98) { mes .@npcname$; mes "Hello "+strcharinfo(0)+","; mes "do you want to accept the Job?"; next; switch(select("Yes,sure:No,sorry:Cancel")) { case 1: mes .@npcname$; mes "Awesome,find the Deadly Cargo [6]"; mes "and bring it to me,and you'll"; mes "get a reward."; next; mes .@npcname$; mes "The Deadly Cargo [6] is somewhere"; set cquest,1; mes "here in Alberta!"; close; case 2: mes .@npcname$; mes "Okay goodbye!"; close; case 3: close; } } if(BaseLevel >= 81 && BaseLevel <=97) { mes .@npcname$; mes "Hello "+strcharinfo(0)+","; mes "do you want to accept the Job?"; next; switch(select("Yes,sure:No,sorry:Cancel")) { case 1: mes .@npcname$; mes "Awesome,find the Deadly Cargo [5]"; mes "and bring it to me,and you'll"; mes "get a reward."; next; mes .@npcname$; mes "The Deadly Cargo [5] is somewhere"; set cquest,1; mes "here in Alberta!"; close; case 2: mes .@npcname$; mes "Okay goodbye!"; close; case 3: close; } } if(BaseLevel >= 61 && BaseLevel <=80) { mes .@npcname$; mes "Hello "+strcharinfo(0)+","; mes "do you want to accept the Job?"; next; switch(select("Yes,sure:No,sorry:Cancel")) { case 1: mes .@npcname$; mes "Awesome,find the Deadly Cargo [4]"; mes "and bring it to me,and you'll"; mes "get a reward."; next; mes .@npcname$; mes "The Deadly Cargo [4] is somewhere"; set cquest,1; mes "here in Alberta!"; close; case 2: mes .@npcname$; mes "Okay goodbye!"; close; case 3: close; } } if(BaseLevel >= 41 && BaseLevel <=60) { mes .@npcname$; mes "Hello "+strcharinfo(0)+","; mes "do you want to accept the Job?"; next; switch(select("Yes,sure:No,sorry:Cancel")) { case 1: mes .@npcname$; mes "Awesome,find the Deadly Cargo [3]"; mes "and bring it to me,and you'll"; mes "get a reward."; next; mes .@npcname$; mes "The Deadly Cargo [3] is somewhere"; set cquest,1; mes "here in Alberta!"; close; case 2: mes .@npcname$; mes "Okay goodbye!"; close; case 3: close; } } if(BaseLevel >= 21 && BaseLevel <=40) { mes .@npcname$; mes "Hello "+strcharinfo(0)+","; mes "do you want to accept the Job?"; next; switch(select("Yes,sure:No,sorry:Cancel")) { case 1: mes .@npcname$; mes "Awesome,find the Deadly Cargo [2]"; mes "and bring it to me,and you'll"; mes "get a reward."; next; mes .@npcname$; mes "The Deadly Cargo [2] is somewhere"; set cquest,1; mes "here in Alberta!"; close; case 2: mes .@npcname$; mes "Okay goodbye!"; close; case 3: close; } } if(BaseLevel >= 1 && BaseLevel <=20) { mes .@npcname$; mes "Hello "+strcharinfo(0)+","; mes "do you want to accept the Job?"; next; switch(select("Yes,sure:No,sorry:Cancel")) { case 1: mes .@npcname$; mes "Awesome,find the Deadly Cargo [1]"; mes "and bring it to me,and you'll"; mes "get a reward."; next; mes .@npcname$; mes "The Deadly Cargo [1] is somewhere"; set cquest,1; mes "here in Alberta!"; close; case 2: mes .@npcname$; mes "Okay goodbye!"; close; case 3: close; } } mes .@npcname$; mes "........"; close; } // ========================= End of the first NPC ================================================= alberta,186,174,3 script Deadly Cargo [1] 1191,{ set .@npcname$,"^FF0000[ Deadly Cargo [1] ]^000000"; if(cquest==1) { mes .@npcname$; mes "Go back to the Port Manager!"; set qcargo1,1; close; } mes .@npcname$; mes "........"; close; } alberta,232,103,3 script Deadly Cargo [2] 1191,{ set .@npcname$,"^FF0000[ Deadly Cargo [2] ]^000000"; if(cquest==1) { mes .@npcname$; mes "Go back to the Port Manager!"; set qcargo2,1; close; } mes .@npcname$; mes "........"; close; } alberta,247,90,3 script Deadly Cargo [3] 1191,{ set .@npcname$,"^FF0000[ Deadly Cargo [3] ]^000000"; if(cquest==1) { mes .@npcname$; mes "Go back to the Port Manager!"; set qcargo3,1; close; } mes .@npcname$; mes "........"; close; } alberta,247,67,3 script Deadly Cargo [4] 1191,{ set .@npcname$,"^FF0000[ Deadly Cargo [4] ]^000000"; if(cquest==1) { mes .@npcname$; mes "Go back to the Port Manager!"; set qcargo4,1; close; } mes .@npcname$; mes "........"; close; } alberta,245,43,3 script Deadly Cargo [5] 1191,{ set .@npcname$,"^FF0000[ Deadly Cargo [5] ]^000000"; if(cquest==1) { mes .@npcname$; mes "Go back to the Port Manager!"; set qcargo5,1; close; } mes .@npcname$; mes "........"; close; } alberta,123,227,3 script Deadly Cargo [6] 1191,{ set .@npcname$,"^FF0000[ Deadly Cargo [6] ]^000000"; if(cquest==1) { mes .@npcname$; mes "Go back to the Port Manager!"; set qcargo6,1; close; } mes .@npcname$; mes "........"; close; } // =============================== End of all the NPC's ========================================= // ====================== Have fun with this Script. Yours ~ Rikimaru =========================== // //=====// /==/ /==/ /==/ // // // /==/ /==/ /=/ /==/ // //=====// /==/ /=/ /==============/ /========/ /==//===/ /==/ /==/ // //=////// /==/ /==//=/ /==/ /==/==/==/==/==/ / / / /==/ /==/ /==/ // // == /==/ /==//=/ /==/ /==/ /==/ /==/ ======/ / /==/ /==/ /==/ // // == /==/ /==/ /=/ /==/ /==/ /==/ /==/ / /===/ / /==/ /==/ /==/ // // == /==/ /==/ /=/ /==/ /==/ /==/ /==/ / /===/ / /==/ /==/=====/==/ // // == /==/ /==/ /=/ /==/ /==/ /==/ /==/ /========/ /==/ /==///////==/ // ================ rAthena Script ================================================== // ============== Information ======================================================= // = iRO Daily Quest : Army Supply // = Made by : // = Rikimaru //===== Current Version: =============================================== //= 2.4 //===== Compatible With: =============================================== //= any rAthena SVN //===== Description: =================================================== //= The iRO Daily Quest : Army Supply //= Usefull for having fun in a Server with a Mini Quest //= Has a counter of 20 Hours until the Players can do the Quest agian. //===== Additional Comments: =========================================== //= 1.9 Fixed the Injured Recruit NPC [Rikimaru] //= 2.0 Added the NPC Display from Injured to Revived [Rikimaru] //= 2.1 Added the 2nd and 3rd Army Soldiers [Rikimaru] //= 2.2 Fixed a few Bugs in the NPC's [Rikimaru] //= 2.3 Added the 20 Hours Timer and fixed the Script Description [Rikimaru] //= 2.4 Fixed the 20 Hours Timer [Rikimaru] //====================================================================== //============== DO NOT REMOVE MY CREDITS AND CLAIM MY WORK AS YOURS === prontera,146,187,5 script [Quest] Army Officer 105,{ set .@npcname$,"^0000FF[ [Quest] Army Officer]^000000"; if(armyquest==1) { mes .@npcname$; mes "There are a few"; mes "Soldiers,waiting for"; mes "help in Morocc!"; next; mes .@npcname$; mes "From Baselevel 61-80 you"; mes "have to help the"; mes "Injured Recruit."; next; mes .@npcname$; mes "From Baselevel 81-97 you"; mes "have to help the"; mes "Injured Veteran"; next; mes .@npcname$; mes "From Baselevel 98 or higher"; mes "you'll have to help the Injured Elite"; next; mes .@npcname$; mes "Bring them White Potions"; mes "or bring them Yggdrasil"; mes "Berries. Thank you for"; mes "your Help!"; close; } if(BaseLevel >= 61) { mes .@npcname$; mes "Hello "+strcharinfo(0)+",I'm"; mes "the Army Officer!"; next; mes .@npcname$; mes "There are a few"; mes "Soldiers,waiting for"; mes "help in Morocc!"; next; mes .@npcname$; mes "From Baselevel 61-80 you"; mes "have to help the"; mes "Injured Recruit."; next; mes .@npcname$; mes "From Baselevel 81-97 you"; mes "have to help the"; mes "Injured Veteran"; next; mes .@npcname$; mes "From Baselevel 98 or higher"; mes "you'll have to help the Injured Elite"; next; mes .@npcname$; mes "Bring them White Potions"; mes "or bring them Yggdrasil"; mes "Berries. Thank you for"; mes "your Help!"; set armyquest,1; close; } mes .@npcname$; mes "Hello "+strcharinfo(0)+",get"; mes "a Higher Baselevel please."; mes "You have to be Baselevel"; mes "61 or Higher!"; close; } // ======================= End of 1st NPC ====================================== // ===================== other NPC's coming now ================================ morocc,172,68,5 script Injured Recruit 849,{ set .@npcname$,"^0000FF[ Injured Recruit ]^000000"; if(gettimetick(2) - helped1 < (60 * 60 * 20)) { mes .@npcname$; mes "Sorry but you have to wait"; mes "Until 20 Hours are over!"; close; } if(armyquest==1 && BaseLevel <= 80 && BaseLevel >= 61) { mes .@npcname$; mes "... Uggh ..."; mes "Help me ...."; mes "with some...."; mes "healing stuff. Please..."; next; switch(select("-Yggdrasil Berries:-White Potion:-Cancel")) { case 1: if(countitem(607) <1) goto l_noitem; delitem 607,1; next; mes .@npcname$; mes "Wooooow..."; setnpcdisplay("Injured Recruit","Revived Recruit",813); sleep2 5000; next; mes .@npcname$; mes "Thank you for the Help."; set BaseExp,+160000; set JobExp,+100000; set helped1,gettimetick(2); setnpcdisplay("Revived Recruit","Injured Recruit",849); close; case 2: if(countitem(504) <1) goto l_noitem; delitem 504,1; next; mes .@npcname$; mes "Wooooow..."; setnpcdisplay("Injured Recruit","Revived Recruit",813); sleep2 5000; next; mes .@npcname$; mes "Thank you for the Help."; set BaseExp,+80000; set JobExp,+50000; set helped1,gettimetick(2); setnpcdisplay("Revived Recruit","Injured Recruit",849); close; case 3: close; } l_noitem: mes .@npcname$; mes "You don't have the item...Get it fast please."; close; } mes .@npcname$; mes "... Uggh..."; close; } // ====================== End of 2nd NPC ====================================== // =================== Beginning of 3rd NPC =================================== morocc,174,68,5 script Injured Veteran 849,{ set .@npcname$,"^0000FF[ Injured Veteran ]^000000"; if(gettimetick(2) - helped2 < (60 * 60 * 20)) { mes .@npcname$; mes "Sorry but you have to wait"; mes "Until 20 Hours are over!"; close; } if(armyquest==1 && BaseLevel <= 97 && BaseLevel >= 81) { mes .@npcname$; mes "... Uggh ..."; mes "Help me ...."; mes "with some...."; mes "healing stuff. Please..."; next; switch(select("-Yggdrasil Berries:-White Potion:-Cancel")) { case 1: if(countitem(607) <1) goto l_noitem; delitem 607,1; next; mes .@npcname$; mes "Wooooow..."; setnpcdisplay("Injured Veteran","Revived Veteran",813); sleep2 5000; next; mes .@npcname$; mes "Thank you for the Help."; set BaseExp,+500000; set JobExp,+150000; set helped2,gettimetick(2); setnpcdisplay("Revived Veteran","Injured Veteran",849); close; case 2: if(countitem(504) <1) goto l_noitem; delitem 504,1; next; mes .@npcname$; mes "Wooooow..."; setnpcdisplay("Injured Veteran","Revived Veteran",813); sleep2 5000; next; mes .@npcname$; mes "Thank you for the Help."; set BaseExp,+200000; set JobExp,+80000; set helped2,gettimetick(2); setnpcdisplay("Revived Veteran","Injured Veteran",849); close; case 3: close; } l_noitem: mes .@npcname$; mes "You don't have the item...Get it fast please."; close; } mes .@npcname$; mes "... Uggh..."; close; } // ====================== End of 3rd NPC ====================================== // =================== Beginning of 4th NPC =================================== morocc,176,68,5 script Injured Elite 849,{ set .@npcname$,"^0000FF[ Injured Elite ]^000000"; if(gettimetick(2) - helped3 < (60 * 60 * 20)) { mes .@npcname$; mes "Sorry but you have to wait"; mes "Until 20 Hours are over!"; close; } if(armyquest==1 && BaseLevel <= 98) { mes .@npcname$; mes "... Uggh ..."; mes "Help me ...."; mes "with some...."; mes "healing stuff. Please..."; next; switch(select("-Yggdrasil Berries:-White Potion:-Cancel")) { case 1: if(countitem(607) <1) goto l_noitem; delitem 607,1; next; mes .@npcname$; mes "Wooooow..."; setnpcdisplay("Injured Elite","Revived Elite",813); sleep2 5000; next; mes .@npcname$; mes "Thank you for the Help."; set BaseExp,+1046821; set JobExp,+300000; set helped3,gettimetick(2); setnpcdisplay("Revived Elite","Injured Elite",849); close; case 2: if(countitem(504) <1) goto l_noitem; delitem 504,1; next; mes .@npcname$; mes "Wooooow..."; setnpcdisplay("Injured Elite","Revived Elite",813); sleep2 5000; next; mes .@npcname$; mes "Thank you for the Help."; set BaseExp,+200000; set JobExp,+80000; set helped3,gettimetick(2); setnpcdisplay("Revived Elite","Injured Elite",849); close; case 3: close; } l_noitem: mes .@npcname$; mes "You don't have the item...Get it fast please."; close; } mes .@npcname$; mes "... Uggh..."; close; } // =========================== End of 4th NPC Script ================================ // ====================== End of the whole Daily Quest ============================== // ================= Have fun with this Script. Yours Rikimaru ====================== // //=====// /==/ /==/ /==/ // // // /==/ /==/ /=/ /==/ // //=====// /==/ /=/ /==============/ /========/ /==//===/ /==/ /==/ // //=////// /==/ /==//=/ /==/ /==/==/==/==/==/ / / / /==/ /==/ /==/ // // == /==/ /==//=/ /==/ /==/ /==/ /==/ ======/ / /==/ /==/ /==/ // // == /==/ /==/ /=/ /==/ /==/ /==/ /==/ / /===/ / /==/ /==/ /==/ // // == /==/ /==/ /=/ /==/ /==/ /==/ /==/ / /===/ / /==/ /==/=====/==/ // // == /==/ /==/ /=/ /==/ /==/ /==/ /==/ /========/ /==/ /==///////==/ // ================ rAthena Script ================================================== // ============== Information ======================================================= // = iRO Daily Quest : Church Donation // = Made by : // = Rikimaru //===== Current Version: =============================================== //= 1.2 //===== Compatible With: =============================================== //= any rAthena SVN //===== Description: =================================================== //= The iRO Daily Quest : Church Donation //= Usefull for having fun in a Server with a Mini Quest //= Has a counter of 24 Hours until the Players can do the Quest agian. //===== Additional Comments: =========================================== //= 1.1 Finished adding the stats food effects. [Rikimaru] //= 1.2 Fixed a few Bugs in the Script [Rikimaru] //====================================================================== //============== DO NOT REMOVE MY CREDITS AND CLAIM MY WORK AS YOURS === prontera,165,191,3 script [Quest] Church Worker 790,{ set .@npcname$,"^0000FF[ [Quest] Church Worker ]^000000"; if(gettimetick(2) - donatedalready < (60 * 60 * 24)) { mes .@npcname$; mes "Sorry,but you have to wait 24 Hours,before you"; mes "can do the Quest again!"; close; } if(BaseLevel >= 60 && BaseLevel <= 80) { mes .@npcname$; mes "Hello "+strcharinfo(0)+",do"; mes "you want to get special"; mes "Buffs for 40.000 Zenny?"; next; switch(select("Yes,sure:No,bye:Cancel")) { case 1: mes .@npcname$; mes "Let me check everything."; if(Zeny < 40000) goto L_nozeny; set Zeny,Zeny - 40000; set BaseExp,+80000; set JobExp,+50000; sc_start SC_STRFood,180000,5; sc_start SC_AGIFood,180000,5; sc_start SC_VITFood,180000,5; sc_start SC_INTFood,180000,5; sc_start SC_DEXFood,180000,5; sc_start SC_LUKFood,180000,5; set donatedalready,gettimetick(2); next; mes .@npcname$; mes "Okay,thank you and have fun!"; close; } } if(BaseLevel >=81 && BaseLevel <=96) { mes .@npcname$; mes "Hello "+strcharinfo(0)+",do"; mes "you want to get special"; mes "Buffs for 80.000 Zenny?"; next; switch(select("Yes,sure:No,bye:Cancel")) { case 1: mes .@npcname$; mes "Let me check everything."; if(Zeny < 80000) goto L_nozeny; set Zeny,Zeny - 80000; set BaseExp,+200000; set JobExp,+60000; sc_start SC_STRFood,180000,6; sc_start SC_AGIFood,180000,6; sc_start SC_VITFood,180000,6; sc_start SC_INTFood,180000,6; sc_start SC_DEXFood,180000,6; sc_start SC_LUKFood,180000,6; set donatedalready,gettimetick(2); next; mes .@npcname$; mes "Okay,thank you and have fun!"; close; } } if(BaseLevel >=97 && BaseLevel <=99) { mes .@npcname$; mes "Hello "+strcharinfo(0)+",do"; mes "you want to get special"; mes "Buffs for 200.000 Zenny?"; next; switch(select("Yes,sure:No,bye:Cancel")) { case 1: mes .@npcname$; mes "Let me check everything."; if(Zeny < 200000) goto L_nozeny; set Zeny,Zeny - 200000; set BaseExp,+400000; set JobExp,+100000; sc_start SC_STRFood,180000,7; sc_start SC_AGIFood,180000,7; sc_start SC_VITFood,180000,7; sc_start SC_INTFood,180000,7; sc_start SC_DEXFood,180000,7; sc_start SC_LUKFood,180000,7; set donatedalready,gettimetick(2); next; mes .@npcname$; mes "Okay,thank you and have fun!"; close; } } mes .@npcname$; mes "Hello,you can use my Service,"; mes "when you're at least Baselevel 60"; close; L_nozeny: mes .@npcname$; mes "Sorry,but you need more Zeny!"; close; } // ==================================== End of the Scripts ======================================= // ============================= Have fun with the Scripts. Yours,Rikimaru ======================= // //=====// /==/ /==/ /==/ // // // /==/ /==/ /=/ /==/ // //=====// /==/ /=/ /==============/ /========/ /==//===/ /==/ /==/ // //=////// /==/ /==//=/ /==/ /==/==/==/==/==/ / / / /==/ /==/ /==/ // // == /==/ /==//=/ /==/ /==/ /==/ /==/ ======/ / /==/ /==/ /==/ // // == /==/ /==/ /=/ /==/ /==/ /==/ /==/ / /===/ / /==/ /==/ /==/ // // == /==/ /==/ /=/ /==/ /==/ /==/ /==/ / /===/ / /==/ /==/=====/==/ // // == /==/ /==/ /=/ /==/ /==/ /==/ /==/ /========/ /==/ /==///////==/ // ================ rAthena Script ================================================== // ============== Information ======================================================= // = iRO Daily Quest : No more Lonley Knights Delivery // = Made by : // = Rikimaru //===== Current Version: =============================================== //= 1.7 //===== Compatible With: =============================================== //= any rAthena SVN //===== Description: =================================================== //= The iRO Daily Quest : No more Lonley Knights Delivery //= Usefull for having fun in a Server with a Mini Quest //= Has a counter of 20 Hours until the Players can do the Quest agian. //===== Additional Comments: =========================================== //= 1.6 Finished Scripting all NPC's [Rikimaru] //= 1.7 Fixed a few mistakes in the Script [Rikimaru] //====================================================================== //============== DO NOT REMOVE MY CREDITS AND CLAIM MY WORK AS YOURS === alberta,122,55,5 script [Quest] Messenger Girl 862,{ set .@npcname$,"^0000FF[ [Quest] Messenger Girl ]^000000"; if(BaseLevel >= 81) { mes .@npcname$; mes "Hello "+strcharinfo(0)+",I"; mes "need your help."; next; mes .@npcname$; mes "Could you please send a "; mes "Message to Sir Grevious?"; mes "He's somewhere in"; mes "the Turtle Island"; next; switch(select("Yes:No:Cancel")) { case 1: mes .@npcname$; mes "Okay thank you!"; mes "go and find him."; set message5,1; close; case 2: mes .@npcname$; mes "Okay bye!"; close; case 3: close; } } if(BaseLevel <= 80 && BaseLevel >= 61) { mes .@npcname$; mes "Hello "+strcharinfo(0)+",I"; mes "need your help."; next; mes .@npcname$; mes "Could you please send a "; mes "Message to Sir Midetz?"; mes "He's somewhere in"; mes "Izlude."; next; switch(select("Yes:No:Cancel")) { case 1: mes .@npcname$; mes "Okay thank you!"; mes "go and find him."; set message4,1; close; case 2: mes .@npcname$; mes "Okay bye!"; close; case 3: close; } } if(BaseLevel <= 60 && BaseLevel >= 41) { mes .@npcname$; mes "Hello "+strcharinfo(0)+",I"; mes "need your help."; next; mes .@npcname$; mes "Could you please send a "; mes "Message to Sir Lion?"; mes "He's somewhere in"; mes "Prontera"; next; switch(select("Yes:No:Cancel")) { case 1: mes .@npcname$; mes "Okay thank you!"; mes "go and find him."; set message3,1; close; case 2: mes .@npcname$; mes "Okay bye!"; close; case 3: close; } } if(BaseLevel <= 40 && BaseLevel >= 21) { mes .@npcname$; mes "Hello "+strcharinfo(0)+",I"; mes "need your help."; next; mes .@npcname$; mes "Could you please send a "; mes "Message to Sir Richard?"; mes "He's somewhere in"; mes "the Treasure Land."; next; switch(select("Yes:No:Cancel")) { case 1: mes .@npcname$; mes "Okay thank you!"; mes "go and find him."; set message2,1; close; case 2: mes .@npcname$; mes "Okay bye!"; close; case 3: close; } } mes .@npcname$; mes "Hello "+strcharinfo(0)+",I"; mes "need your help."; next; mes .@npcname$; mes "Could you please send a "; mes "Message to Sir Donovan?"; mes "He's somewhere here"; mes "in Alberta."; next; switch(select("Yes:No:Cancel")) { case 1: mes .@npcname$; mes "Okay thank you!"; mes "go and find him."; set message1,1; close; case 2: mes .@npcname$; mes "Okay bye!"; close; case 3: close; } } // ======================== End of 1st NPC ============================================== // ==================== Other NPC's coming now ========================================== alberta,56,80,5 script Sir Donovan 65,{ set .@npcname$,"^0000FF[sir Donovan]^000000"; if(gettimetick(2) - sendm1 < (60 * 60 * 20)) { mes .@npcname$; mes "Sorry but you have to wait"; mes "Until 20 Hours are over!"; close; } if(message1==1) { mes .@npcname$; mes "You got a Message for me?"; mes "Thank you. Take the Exp!"; set BaseExp,+141; set JobExp,+100; set sendm1,gettimetick(2); close; } mes .@npcname$; mes "Hello..."; close; } // ================== End of the NPC ==================================================== alb2trea,62,69,5 script Sir Richard 65,{ set .@npcname$,"^0000FF[sir Richard]^000000"; if(gettimetick(2) - sendm2 < (60 * 60 * 20)) { mes .@npcname$; mes "Sorry but you have to wait"; mes "Until 20 Hours are over!"; close; } if(message2==1) { mes .@npcname$; mes "You got a Message for me?"; mes "Thank you. Take the Exp!"; set BaseExp,+1500; set JobExp,+1000; set sendm2,gettimetick(2); close; } mes .@npcname$; mes "Hello..."; close; } // ================== End of the NPC ==================================================== prontera,109,116,5 script Sir Lion 65,{ set .@npcname$,"^0000FF[sir Lion]^000000"; if(gettimetick(2) - sendm3 < (60 * 60 * 20)) { mes .@npcname$; mes "Sorry but you have to wait"; mes "Until 20 Hours are over!"; close; } if(message3==1) { mes .@npcname$; mes "You got a Message for me?"; mes "Thank you. Take the Exp!"; set BaseExp,+16509; set JobExp,+10000; set sendm3,gettimetick(2); close; } mes .@npcname$; mes "Hello..."; close; } // ================== End of the NPC ==================================================== izlude,123,173,5 script Sir Midetz 65,{ set .@npcname$,"^0000FF[sir Midetz]^000000"; if(gettimetick(2) - sendm4 < (60 * 60 * 20)) { mes .@npcname$; mes "Sorry but you have to wait"; mes "Until 20 Hours are over!"; close; } if(message4==1) { mes .@npcname$; mes "You got a Message for me?"; mes "Thank you. Take the Exp!"; set BaseExp,+160308; set JobExp,+100000; set sendm4,gettimetick(2); close; } mes .@npcname$; mes "Hello..."; close; } // ================== End of the NPC ==================================================== tur_dun01,188,118,5 script Sir Grevious 65,{ set .@npcname$,"^0000FF[sir Grevious]^000000"; if(gettimetick(2) - sendm5 < (60 * 60 * 20)) { mes .@npcname$; mes "Sorry but you have to wait"; mes "Until 20 Hours are over!"; close; } if(message5==1) { mes .@npcname$; mes "You got a Message for me?"; mes "Thank you. Take the Exp!"; set BaseExp,+500000; set JobExp,+150000; set sendm5,gettimetick(2); close; } mes .@npcname$; mes "Hello..."; close; } // ================== End of the NPC ==================================================== // =============== Have fun with this Script. Yours,Rikimaru ============================ // //=====// /==/ /==/ /==/ // // // /==/ /==/ /=/ /==/ // //=====// /==/ /=/ /==============/ /========/ /==//===/ /==/ /==/ // //=////// /==/ /==//=/ /==/ /==/==/==/==/==/ / / / /==/ /==/ /==/ // // == /==/ /==//=/ /==/ /==/ /==/ /==/ ======/ / /==/ /==/ /==/ // // == /==/ /==/ /=/ /==/ /==/ /==/ /==/ / /===/ / /==/ /==/ /==/ // // == /==/ /==/ /=/ /==/ /==/ /==/ /==/ / /===/ / /==/ /==/=====/==/ // // == /==/ /==/ /=/ /==/ /==/ /==/ /==/ /========/ /==/ /==///////==/ // ================ rAthena Script ================================================== // ============== Information ======================================================= // = iRO Daily Quest : Find my Lost Dogs // = Made by : // = Rikimaru //===== Current Version: =============================================== //= 1.4 //===== Compatible With: =============================================== //= any rAthena SVN //===== Description: =================================================== //= The iRO Daily Quest : Find my Lost Dogs //= Usefull for having fun in a Server with a Mini Quest //= Has a counter of 24 Hours until the Players can do the Quest agian. //===== Additional Comments: =========================================== //= 1.3 Finished Scripting all NPC's [Rikimaru] //= 1.4 Fixed a saved Variable Typo [Rikimaru] //====================================================================== //============== DO NOT REMOVE MY CREDITS AND CLAIM MY WORK AS YOURS === brasilis,298,307,3 script [Quest] Angelo 50,{ set .@npcname$,"^0000FF[ [Quest] Angelo ]^000000"; if(gettimetick(2) - puppyfound < (60 * 60 * 24)) { mes .@npcname$; mes "I'm sorry but you have to wait"; mes "24 Hours until you can do the Quest again!"; close; } if(Puppy1==1 && Puppy2==1 && Puppy3==1) { mes .@npcname$; mes "Awesome you found them!"; mes "Take some Exp as a reward."; set BaseExp,+50000; set JobExp,+50000; set puppyfound,gettimetick(2); set gofindpuppy,0; set Puppy1,0; set Puppy2,0; set Puppy3,0; next; mes .@npcname$; mes "Goodbye!"; close; } if(BaseLevel >= 70) { mes .@npcname$; mes "Oh God thank you!"; mes "Hello "+strcharinfo(0)+","; mes "I really need your help!"; next; mes .@npcname$; mes "My Puppies ran away."; mes "They're somewhere in"; mes "the field up here."; next; mes .@npcname$; mes "Could you please find"; mes "them for me?"; next; switch(select("Yes,sure:No,sorry:Cancel")) { case 1: mes .@npcname$; mes "Okay come back when you found them!"; set gofindpuppy,1; close; case 2: mes .@npcname$; mes "Okay bye!"; close; case 3: close; } } mes .@npcname$; mes "Get to Baselevel 70 to"; mes "Start my Quest!"; close; } // ====================== Now the Puppies are coming ================================== bra_fild01,110,135,5 script Puppy 1 81,{ set .@npcname$,"^0000FF[ Puppy 1 ]^000000"; if(gofindpuppy==1) { mes .@npcname$; mes "Woof... Woof..."; set Puppy1,1; mes "["+strcharinfo(0)+"]"; mes "Found one. Going back"; mes "to Angelo later "; next; mes "If you found the three"; mes "Puppies,then go"; mes "back to Angelo!"; close; } mes .@npcname$; mes "Woof...Woof..."; close; } bra_fild01,39,204,5 script Puppy 2 81,{ set .@npcname$,"^0000FF[ Puppy 2 ]^000000"; if(gofindpuppy==1) { mes .@npcname$; mes "Woof... Woof..."; set Puppy2,1; mes "["+strcharinfo(0)+"]"; mes "Found one. Going back"; mes "to Angelo later "; next; mes "If you found the three"; mes "Puppies,then go"; mes "back to Angelo!"; close; } mes .@npcname$; mes "Woof...Woof..."; close; } bra_fild01,307,147,3 script Puppy 3 81,{ set .@npcname$,"^0000FF[ Puppy 3 ]^000000"; if(gofindpuppy==1) { mes .@npcname$; mes "Woof... Woof..."; set Puppy3,1; mes "["+strcharinfo(0)+"]"; mes "Found one. Going back"; mes "to Angelo later "; next; mes "If you found the three"; mes "Puppies,then go"; mes "back to Angelo!"; close; } mes .@npcname$; mes "Woof...Woof..."; close; } // ========================== End of all the Scripts ========================================== // ===================== Have fun with the Scripts. Yours,Rikimaru ============================ // //=====// /==/ /==/ /==/ // // // /==/ /==/ /=/ /==/ // //=====// /==/ /=/ /==============/ /========/ /==//===/ /==/ /==/ // //=////// /==/ /==//=/ /==/ /==/==/==/==/==/ / / / /==/ /==/ /==/ // // == /==/ /==//=/ /==/ /==/ /==/ /==/ ======/ / /==/ /==/ /==/ // // == /==/ /==/ /=/ /==/ /==/ /==/ /==/ / /===/ / /==/ /==/ /==/ // // == /==/ /==/ /=/ /==/ /==/ /==/ /==/ / /===/ / /==/ /==/=====/==/ // // == /==/ /==/ /=/ /==/ /==/ /==/ /==/ /========/ /==/ /==///////==/ // ================ rAthena Script ================================================== // ============== Information ======================================================= // = iRO Daily Quest : Swab the Deck // = Made by : // = Rikimaru //===== Current Version: =============================================== //= 1.4 //===== Compatible With: =============================================== //= any rAthena SVN //===== Description: =================================================== //= The iRO Daily Quest : Swab the Deck //= Usefull for having fun in a Server with a Mini Quest //= Has a counter of 20 Hours until the Players can do the Quest agian. //===== Additional Comments: =========================================== //= 1.3 Finished Scripting all NPC's [Rikimaru] //= 1.4 Fixed a saved Variable Typo [Rikimaru] //====================================================================== //============== DO NOT REMOVE MY CREDITS AND CLAIM MY WORK AS YOURS === alberta,104,60,5 script [Quest] First Mate 748,{ //============================= Settings ========================== set .@npcname$,"[ [Quest] First Mate ]"; set .BeadID,6222; //======================= End ===================================== if(countitem(6221) > 0 && gettimetick(2) - exchangedalready > (60 * 60 * 20)) { mes .@npcname$; mes "Hey,how many Mystic Leaf Cat Balls"; mes "do you want to exchange to Shiny Beads?"; next; mes .@npcname$; mes "Input the Amount of the Mystic Leaf Cat Balls,which you want to exchange."; mes "If you input 0 , you're going to cancel the deal."; next; input @beadamount; if (@beadamount == 0) { close; } mes .@npcname$; mes "Do you really want to exchange"; mes ":"+ @beadamount +" Mystic Leaf Cat Balls"; mes "for "+ @beadamount +" Shiny Beads?"; next; switch(select("Yes!:No!")) { case 1: mes .@npcname$; mes "Okay converting... ... ..."; if(countitem(6221) < @beadamount) goto l_noitem; delitem 6221,@beadamount; getitem .BeadID,@beadamount; set BaseExp,+50000000;// CHANGE THE EXP AMOUNT!! set JobExp,+40000000;// CHANGE THE EXP AMOUNT!! set exchangedalready,gettimetick(2); next; mes .@npcname$; mes "Okay you can exchange the Shiny Beads at the Second Mate."; close; case 2: mes .@npcname$; mes "Okay goodbye!"; close; } l_noitem: mes .@npcname$; mes "I'm sorry,but you're missing some items!"; close; } mes .@npcname$; mes "Hey , do you want to do the Daily Quest?"; next; switch(select("Yes,sure!:No,bye!:Cancel")) { case 1: mes .@npcname$; mes "Okay you have to go to the alberta Ship"; mes "and enter one of the Portals and Catch A rat!"; next; mes .@npcname$; mes "If you catch it,you'll get a Mystic Cat Ball,"; mes "if you got it,come back to me,if you failed,"; mes "come back to me and get a new Cat Ball,to"; mes "catch the rats!"; next; mes .@npcname$; mes "So,here take this,"; mes "and come back when you finished."; getitem 12408,1; close; case 2: mes .@npcname$; mes "Okay,goodbye!"; close; case 3: close; } } // ============================ End of the First Mate Script =================================== alberta,107,59,5 script [Quest] Second Mate 100,{ set .@npcname$,"^0000FF[ [Quest] Second Mate ]^000000"; set .BeadID,6222; setarray @ItemID[0],5170,5773,5691,505,5578,5692; setarray @Cost[0],50,50,50,1,30,50; setarray @itemcount[0],1,1,1,2,1,1; mes .@npcname$; mes "Hello ["+strcharinfo(0)+"],do"; mes "you want to buy some items?"; mes "You'll have to give me Shiny"; mes "Beads for the Items!"; next; if (select("Yes,sure","No,nevermind!") == 2) close; next; mes .@npcname$; mes "Item = Cost"; for( set .@i, 0; .@i < getarraysize(@ItemID); set .@i, .@i + 1 ) { mes "^0000ff"+@itemcount[.@i]+"x "+getitemname(@ItemID[.@i])+"^000000 = ^00aa00"+@Cost[.@i]+"^000000"; if( .@i < 1 ) set .@menu$, getitemname(@ItemID[.@i]); else set .@menu$, .@menu$+":"+getitemname(@ItemID[.@i]); } next; select(.@menu$); set @choice, @menu - 1; mes @npcname$; if(countitem(.BeadID) <@Cost[@choice]) { mes "You need more Shiny Beads for "+@itemcount[@choice]+"x '"+getitemname(@ItemID[@choice])+"'"; close; } mes "Are u realy sure to trade "+@itemcount[@choice]+"x '^ff0000"+getitemname(@ItemID[@choice])+"^000000' for ^00aa00"+@Cost[@choice]+"^000000 Shiny Beads?"; if(select("No! Cancel!:Yes, Trade me!") == 1 ) { mes "Canceled the Trade"; close; } set .@new, .BeadID - @Cost[@choice]; if( .@new < 0 ) set .@new, 0; delitem .BeadID,@Cost[@choice]; getitem @ItemID[@choice], @itemcount[@choice]; mes "The Trade was succesfull. Have fun with the Item!"; close; } Download to all Quests : http://www.mediafire.com/?zwisgfnj0xx0yap I hope that a lot of people stop making topics now,where they request theese Quests. and remember to say thanks!1 point
-
Looking at your gravity-esc maps is always a pleasure. please continue to grow the world of RO for us with all those immersive maps. Can't wait to include them into my server!1 point
-
Instead of the default tomb sprite appearing upon MVP death, this modification customizes each MVP to display their unique MVP dead sprite on their tomb. This enhancement adds a more immersive and personalized touch to the game experience. Features: Customized MVP tomb sprites for all MVPs. Enhanced visual appeal and immersion. Easy integration with your existing rAthena setup. I've spent considerable time choosing each dead MVP's tomb sprite accurately reflects their character and enhances the overall gameplay experience. This is small but impactful visual upgrade. Let me know your thoughts! I'm eager to hear feedback and any suggestions for further improvements. mvp tomb.mp41 point
-
It's been a while since my initial release of those descriptions, and a lot of things need to be changed. A few mistakes here and there, but also plenty of mechanics changed on rAthena whose descriptions need to match that. Yes, I'm looking at you, Enchant Deadly Poison. Let's not drag this too long, yeah? Here's some patch notes: Typos fixed on the following skills: Shield Chain, Cart Boost, Cart Termination, Watery Evasion/Suiton Updated Cart Boost to account for the new interaction between this skill and Please Don't Forget Me(it no longer cancels the effect) Weaponry Research: Includes information about the Hidden Bonus(battle.cpp, line 3269) Raid: The debuff only applies in Renewal Venom Splasher: The timer information was completely wrong. Corrected and now also includes cooldown, additional information added on comments Jupitel Thunder: Was missing any information regarding damage Explosion Spirits/Critical Explosion: Corrected information, the SP recovery is disabled, not halved Blitz Beat: Corrected damage on information, improved wording Head Crush: Corrected ambiguous information about bleeding Shield Boomerang: Information about damage calculation Shield Chain: Massively expanded on the information and comments, including comparisons between this skill and Shield Boomerang Dispel: Clarification on the fact that MDEF reducing the chance is a myth that never existed Land Mine: Damage information completely wrong, fixed now including Mercenary version Freezing Trap: Added information on damage and scaling Blast Mine: Damage informationm missing, durations wrong too, fixed now Claymore Trap: Damage information missing, fixed now Gravitation Field: Included information about the secret property of the skill, where damage ticks count as auto attacks Throw Zeny: Accurate information about reduction versus players and bosses Final Strike: Added a a note, pointing out that Hercules uses a stronger formula for the skill Grand Cross: Greatly improved description Throw Kunai: Changed to reflect changes on rAthena(no longer misses, pseudo elemental) Throw Shuriken: Same as above(even more nerfed than kunais, why did you guys ever do this?) Steal: Massively improved description with more information and insight on High DEX/Low DEX Envenom: Improved damage descriptions Left/Right Hand Mastery: Recent information about the skill's inner workings Enchant Deadly Poison: Updated to the latest details of the skill, post the recent rework Next update I'll include the monster skills that were requested. I'd also like to expand upon this by adding quick reference pages in-game, containing information such as Status Effects, monster skills, etc. I updated the first post to have the latest version, but I'll leave it here as well just in case. skilldescript.lub
 1 point
 -
case MO_BODYRELOCATION: if(sc && (sc->getSCE(SC_SPIDERWEB) || sc->getSCE(SC_ANKLE))) break; if (unit_movepos(src, x, y, 2, 1)) { Hello. Solved it! Thanks @pajodex @Katakuri1 point
-
- script Samepl -1,{ OnInit: bindatcmd "test",strnpcinfo(3) + "::OnAtcommand"; end; OnAtcommand: if (getmapusers(.@atcmd_parameters$[0]) != -1) { message strcharinfo(0), "Map not found."; } else if (getmapflag(.@atcmd_parameters$[0], MF_NOWARPTO) && getgmlevel() < 99) { message strcharinfo(0), "You are not authorized to warp to this map."; } else if (getmapflag(.@atcmd_parameters$[0], MF_NOWARP) && getgmlevel() < 99) { message strcharinfo(0), "You are not authorized to warp from your current map."; } else { message strcharinfo(0), "Warped to " + .@atcmd_parameters$[0]; warp .@atcmd_parameters$[0], 0, 0; } end; } just add the mapflag MF_NOWARPTO to any map that you want prevent player to warp into those maps. or change the warp atcommand to enforce random warp https://github.com/rathena/rathena/blob/master/src/map/atcommand.cpp#L600 mapindex = mapindex_name2idx(map_name, nullptr); x = 0; y = 0;1 point
-
Here you go # This file is a part of rAthena. # Copyright(C) 2021 rAthena Development Team # https://rathena.org - https://github.com/rathena # # This program is free software: you can redistribute it and/or modify # it under the terms of the GNU General Public License as published by # the Free Software Foundation, either version 3 of the License, or # (at your option) any later version. # # This program is distributed in the hope that it will be useful, # but WITHOUT ANY WARRANTY; without even the implied warranty of # MERCHANTABILITY or FITNESS FOR A PARTICULAR PURPOSE. See the # GNU General Public License for more details. # # You should have received a copy of the GNU General Public License # along with this program. If not, see <http://www.gnu.org/licenses/>. # ########################################################################### # Statpoint Database ########################################################################### # # Statpoint Settings # ########################################################################### # - Level BaseLevel required. # Points Total status points given from BaseLevel 1 to 'Level'. ########################################################################### Header: Type: STATPOINT_DB Version: 1 Body: - Level: 1 Points: 48 - Level: 2 Points: 51 - Level: 3 Points: 54 - Level: 4 Points: 57 - Level: 5 Points: 60 - Level: 6 Points: 64 - Level: 7 Points: 68 - Level: 8 Points: 72 - Level: 9 Points: 76 - Level: 10 Points: 80 - Level: 11 Points: 85 - Level: 12 Points: 90 - Level: 13 Points: 95 - Level: 14 Points: 100 - Level: 15 Points: 105 - Level: 16 Points: 111 - Level: 17 Points: 117 - Level: 18 Points: 123 - Level: 19 Points: 129 - Level: 20 Points: 135 - Level: 21 Points: 142 - Level: 22 Points: 149 - Level: 23 Points: 156 - Level: 24 Points: 163 - Level: 25 Points: 170 - Level: 26 Points: 178 - Level: 27 Points: 186 - Level: 28 Points: 194 - Level: 29 Points: 202 - Level: 30 Points: 210 - Level: 31 Points: 219 - Level: 32 Points: 228 - Level: 33 Points: 237 - Level: 34 Points: 246 - Level: 35 Points: 255 - Level: 36 Points: 265 - Level: 37 Points: 275 - Level: 38 Points: 285 - Level: 39 Points: 295 - Level: 40 Points: 305 - Level: 41 Points: 316 - Level: 42 Points: 327 - Level: 43 Points: 338 - Level: 44 Points: 349 - Level: 45 Points: 360 - Level: 46 Points: 372 - Level: 47 Points: 384 - Level: 48 Points: 396 - Level: 49 Points: 408 - Level: 50 Points: 420 - Level: 51 Points: 433 - Level: 52 Points: 446 - Level: 53 Points: 459 - Level: 54 Points: 472 - Level: 55 Points: 485 - Level: 56 Points: 499 - Level: 57 Points: 513 - Level: 58 Points: 527 - Level: 59 Points: 541 - Level: 60 Points: 555 - Level: 61 Points: 570 - Level: 62 Points: 585 - Level: 63 Points: 600 - Level: 64 Points: 615 - Level: 65 Points: 630 - Level: 66 Points: 646 - Level: 67 Points: 662 - Level: 68 Points: 678 - Level: 69 Points: 694 - Level: 70 Points: 710 - Level: 71 Points: 727 - Level: 72 Points: 744 - Level: 73 Points: 761 - Level: 74 Points: 778 - Level: 75 Points: 795 - Level: 76 Points: 813 - Level: 77 Points: 831 - Level: 78 Points: 849 - Level: 79 Points: 867 - Level: 80 Points: 885 - Level: 81 Points: 904 - Level: 82 Points: 923 - Level: 83 Points: 942 - Level: 84 Points: 961 - Level: 85 Points: 980 - Level: 86 Points: 1000 - Level: 87 Points: 1020 - Level: 88 Points: 1040 - Level: 89 Points: 1060 - Level: 90 Points: 1080 - Level: 91 Points: 1101 - Level: 92 Points: 1122 - Level: 93 Points: 1143 - Level: 94 Points: 1164 - Level: 95 Points: 1185 - Level: 96 Points: 1207 - Level: 97 Points: 1229 - Level: 98 Points: 1251 - Level: 99 Points: 1273 - Level: 100 Points: 1295 - Level: 101 Points: 1318 - Level: 102 Points: 1341 - Level: 103 Points: 1364 - Level: 104 Points: 1387 - Level: 105 Points: 1410 - Level: 106 Points: 1434 - Level: 107 Points: 1458 - Level: 108 Points: 1482 - Level: 109 Points: 1506 - Level: 110 Points: 1530 - Level: 111 Points: 1555 - Level: 112 Points: 1580 - Level: 113 Points: 1605 - Level: 114 Points: 1630 - Level: 115 Points: 1655 - Level: 116 Points: 1681 - Level: 117 Points: 1707 - Level: 118 Points: 1733 - Level: 119 Points: 1759 - Level: 120 Points: 1785 - Level: 121 Points: 1812 - Level: 122 Points: 1839 - Level: 123 Points: 1866 - Level: 124 Points: 1893 - Level: 125 Points: 1920 - Level: 126 Points: 1948 - Level: 127 Points: 1976 - Level: 128 Points: 2004 - Level: 129 Points: 2032 - Level: 130 Points: 2060 - Level: 131 Points: 2089 - Level: 132 Points: 2118 - Level: 133 Points: 2147 - Level: 134 Points: 2176 - Level: 135 Points: 2205 - Level: 136 Points: 2235 - Level: 137 Points: 2265 - Level: 138 Points: 2295 - Level: 139 Points: 2325 - Level: 140 Points: 2355 - Level: 141 Points: 2386 - Level: 142 Points: 2417 - Level: 143 Points: 2448 - Level: 144 Points: 2479 - Level: 145 Points: 2510 - Level: 146 Points: 2542 - Level: 147 Points: 2574 - Level: 148 Points: 2606 - Level: 149 Points: 2638 - Level: 150 Points: 2670 - Level: 151 Points: 2703 - Level: 152 Points: 2736 - Level: 153 Points: 2769 - Level: 154 Points: 2802 - Level: 155 Points: 2835 - Level: 156 Points: 2869 - Level: 157 Points: 2903 - Level: 158 Points: 2937 - Level: 159 Points: 2971 - Level: 160 Points: 3005 - Level: 161 Points: 3040 - Level: 162 Points: 3075 - Level: 163 Points: 3110 - Level: 164 Points: 3145 - Level: 165 Points: 3180 - Level: 166 Points: 3216 - Level: 167 Points: 3252 - Level: 168 Points: 3288 - Level: 169 Points: 3324 - Level: 170 Points: 3360 - Level: 171 Points: 3397 - Level: 172 Points: 3434 - Level: 173 Points: 3471 - Level: 174 Points: 3508 - Level: 175 Points: 3545 - Level: 176 Points: 3583 - Level: 177 Points: 3621 - Level: 178 Points: 3659 - Level: 179 Points: 3697 - Level: 180 Points: 3735 - Level: 181 Points: 3774 - Level: 182 Points: 3813 - Level: 183 Points: 3852 - Level: 184 Points: 3891 - Level: 185 Points: 3930 - Level: 186 Points: 3970 - Level: 187 Points: 4010 - Level: 188 Points: 4050 - Level: 189 Points: 4090 - Level: 190 Points: 4130 - Level: 191 Points: 4171 - Level: 192 Points: 4212 - Level: 193 Points: 4253 - Level: 194 Points: 4294 - Level: 195 Points: 4335 - Level: 196 Points: 4377 - Level: 197 Points: 4419 - Level: 198 Points: 4461 - Level: 199 Points: 4503 - Level: 200 Points: 4545 - Level: 201 Points: 4588 - Level: 202 Points: 4631 - Level: 203 Points: 4674 - Level: 204 Points: 4717 - Level: 205 Points: 4760 - Level: 206 Points: 4804 - Level: 207 Points: 4848 - Level: 208 Points: 4892 - Level: 209 Points: 4936 - Level: 210 Points: 4980 - Level: 211 Points: 5025 - Level: 212 Points: 5070 - Level: 213 Points: 5115 - Level: 214 Points: 5160 - Level: 215 Points: 5205 - Level: 216 Points: 5251 - Level: 217 Points: 5297 - Level: 218 Points: 5343 - Level: 219 Points: 5389 - Level: 220 Points: 5435 - Level: 221 Points: 5482 - Level: 222 Points: 5529 - Level: 223 Points: 5576 - Level: 224 Points: 5623 - Level: 225 Points: 5670 - Level: 226 Points: 5718 - Level: 227 Points: 5766 - Level: 228 Points: 5814 - Level: 229 Points: 5862 - Level: 230 Points: 5910 - Level: 231 Points: 5959 - Level: 232 Points: 6008 - Level: 233 Points: 6057 - Level: 234 Points: 6106 - Level: 235 Points: 6155 - Level: 236 Points: 6205 - Level: 237 Points: 6255 - Level: 238 Points: 6305 - Level: 239 Points: 6355 - Level: 240 Points: 6405 - Level: 241 Points: 6456 - Level: 242 Points: 6507 - Level: 243 Points: 6558 - Level: 244 Points: 6609 - Level: 245 Points: 6660 - Level: 246 Points: 6712 - Level: 247 Points: 6764 - Level: 248 Points: 6816 - Level: 249 Points: 6868 - Level: 250 Points: 6920 - Level: 251 Points: 6973 - Level: 252 Points: 7026 - Level: 253 Points: 7079 - Level: 254 Points: 7132 - Level: 255 Points: 7185 - Level: 256 Points: 7304 - Level: 257 Points: 7423 - Level: 258 Points: 7542 - Level: 259 Points: 7661 - Level: 260 Points: 7780 - Level: 261 Points: 7899 - Level: 262 Points: 8018 - Level: 263 Points: 8137 - Level: 264 Points: 8256 - Level: 265 Points: 8375 - Level: 266 Points: 8494 - Level: 267 Points: 8613 - Level: 268 Points: 8732 - Level: 269 Points: 8851 - Level: 270 Points: 8970 - Level: 271 Points: 9089 - Level: 272 Points: 9208 - Level: 273 Points: 9327 - Level: 274 Points: 9446 - Level: 275 Points: 9565 - Level: 276 Points: 9684 - Level: 277 Points: 9803 - Level: 278 Points: 9922 - Level: 279 Points: 10041 - Level: 280 Points: 10160 - Level: 281 Points: 10279 - Level: 282 Points: 10398 - Level: 283 Points: 10517 - Level: 284 Points: 10636 - Level: 285 Points: 10755 - Level: 286 Points: 10874 - Level: 287 Points: 10993 - Level: 288 Points: 11112 - Level: 289 Points: 11231 - Level: 290 Points: 11350 - Level: 291 Points: 11469 - Level: 292 Points: 11588 - Level: 293 Points: 11707 - Level: 294 Points: 11826 - Level: 295 Points: 11945 - Level: 296 Points: 12064 - Level: 297 Points: 12183 - Level: 298 Points: 12302 - Level: 299 Points: 12421 - Level: 300 Points: 12540 - Level: 301 Points: 12659 - Level: 302 Points: 12778 - Level: 303 Points: 12897 - Level: 304 Points: 13016 - Level: 305 Points: 13135 - Level: 306 Points: 13254 - Level: 307 Points: 13373 - Level: 308 Points: 13492 - Level: 309 Points: 13611 - Level: 310 Points: 13730 - Level: 311 Points: 13849 - Level: 312 Points: 13968 - Level: 313 Points: 14087 - Level: 314 Points: 14206 - Level: 315 Points: 14325 - Level: 316 Points: 14444 - Level: 317 Points: 14563 - Level: 318 Points: 14682 - Level: 319 Points: 14801 - Level: 320 Points: 14920 - Level: 321 Points: 15039 - Level: 322 Points: 15158 - Level: 323 Points: 15277 - Level: 324 Points: 15396 - Level: 325 Points: 15515 - Level: 326 Points: 15634 - Level: 327 Points: 15753 - Level: 328 Points: 15872 - Level: 329 Points: 15991 - Level: 330 Points: 16110 - Level: 331 Points: 16229 - Level: 332 Points: 16348 - Level: 333 Points: 16467 - Level: 334 Points: 16586 - Level: 335 Points: 16705 - Level: 336 Points: 16824 - Level: 337 Points: 16943 - Level: 338 Points: 17062 - Level: 339 Points: 17181 - Level: 340 Points: 17300 - Level: 341 Points: 17419 - Level: 342 Points: 17538 - Level: 343 Points: 17657 - Level: 344 Points: 17776 - Level: 345 Points: 17895 - Level: 346 Points: 18014 - Level: 347 Points: 18133 - Level: 348 Points: 18252 - Level: 349 Points: 18371 - Level: 350 Points: 18490 - Level: 351 Points: 18609 - Level: 352 Points: 18728 - Level: 353 Points: 18847 - Level: 354 Points: 18966 - Level: 355 Points: 19085 - Level: 356 Points: 19204 - Level: 357 Points: 19323 - Level: 358 Points: 19442 - Level: 359 Points: 19561 - Level: 360 Points: 19680 - Level: 361 Points: 19799 - Level: 362 Points: 19918 - Level: 363 Points: 20037 - Level: 364 Points: 20156 - Level: 365 Points: 20275 - Level: 366 Points: 20394 - Level: 367 Points: 20513 - Level: 368 Points: 20632 - Level: 369 Points: 20751 - Level: 370 Points: 20870 - Level: 371 Points: 20989 - Level: 372 Points: 21108 - Level: 373 Points: 21227 - Level: 374 Points: 21346 - Level: 375 Points: 21465 - Level: 376 Points: 21584 - Level: 377 Points: 21703 - Level: 378 Points: 21822 - Level: 379 Points: 21941 - Level: 380 Points: 22060 - Level: 381 Points: 22179 - Level: 382 Points: 22298 - Level: 383 Points: 22417 - Level: 384 Points: 22536 - Level: 385 Points: 22655 - Level: 386 Points: 22774 - Level: 387 Points: 22893 - Level: 388 Points: 23012 - Level: 389 Points: 23131 - Level: 390 Points: 23250 - Level: 391 Points: 23369 - Level: 392 Points: 23488 - Level: 393 Points: 23607 - Level: 394 Points: 23726 - Level: 395 Points: 23845 - Level: 396 Points: 23964 - Level: 397 Points: 24083 - Level: 398 Points: 24202 - Level: 399 Points: 24321 - Level: 400 Points: 24440 - Level: 401 Points: 24559 - Level: 402 Points: 24678 - Level: 403 Points: 24797 - Level: 404 Points: 24916 - Level: 405 Points: 25035 - Level: 406 Points: 25154 - Level: 407 Points: 25273 - Level: 408 Points: 25392 - Level: 409 Points: 25511 - Level: 410 Points: 25630 - Level: 411 Points: 25749 - Level: 412 Points: 25868 - Level: 413 Points: 25987 - Level: 414 Points: 26106 - Level: 415 Points: 26225 - Level: 416 Points: 26344 - Level: 417 Points: 26463 - Level: 418 Points: 26582 - Level: 419 Points: 26701 - Level: 420 Points: 26820 - Level: 421 Points: 26939 - Level: 422 Points: 27058 - Level: 423 Points: 27177 - Level: 424 Points: 27296 - Level: 425 Points: 27415 - Level: 426 Points: 27534 - Level: 427 Points: 27653 - Level: 428 Points: 27772 - Level: 429 Points: 27891 - Level: 430 Points: 28010 - Level: 431 Points: 28129 - Level: 432 Points: 28248 - Level: 433 Points: 28367 - Level: 434 Points: 28486 - Level: 435 Points: 28605 - Level: 436 Points: 28724 - Level: 437 Points: 28843 - Level: 438 Points: 28962 - Level: 439 Points: 29081 - Level: 440 Points: 29200 - Level: 441 Points: 29319 - Level: 442 Points: 29438 - Level: 443 Points: 29557 - Level: 444 Points: 29676 - Level: 445 Points: 29795 - Level: 446 Points: 29914 - Level: 447 Points: 30033 - Level: 448 Points: 30152 - Level: 449 Points: 30271 - Level: 450 Points: 30390 - Level: 451 Points: 30509 - Level: 452 Points: 30628 - Level: 453 Points: 30747 - Level: 454 Points: 30866 - Level: 455 Points: 30985 - Level: 456 Points: 31104 - Level: 457 Points: 31223 - Level: 458 Points: 31342 - Level: 459 Points: 31461 - Level: 460 Points: 31580 - Level: 461 Points: 31699 - Level: 462 Points: 31818 - Level: 463 Points: 31937 - Level: 464 Points: 32056 - Level: 465 Points: 32175 - Level: 466 Points: 32294 - Level: 467 Points: 32413 - Level: 468 Points: 32532 - Level: 469 Points: 32651 - Level: 470 Points: 32770 - Level: 471 Points: 32889 - Level: 472 Points: 33008 - Level: 473 Points: 33127 - Level: 474 Points: 33246 - Level: 475 Points: 33365 - Level: 476 Points: 33484 - Level: 477 Points: 33603 - Level: 478 Points: 33722 - Level: 479 Points: 33841 - Level: 480 Points: 33960 - Level: 481 Points: 34079 - Level: 482 Points: 34198 - Level: 483 Points: 34317 - Level: 484 Points: 34436 - Level: 485 Points: 34555 - Level: 486 Points: 34674 - Level: 487 Points: 34793 - Level: 488 Points: 34912 - Level: 489 Points: 35031 - Level: 490 Points: 35150 - Level: 491 Points: 35269 - Level: 492 Points: 35388 - Level: 493 Points: 35507 - Level: 494 Points: 35626 - Level: 495 Points: 35745 - Level: 496 Points: 35864 - Level: 497 Points: 35983 - Level: 498 Points: 36102 - Level: 499 Points: 36221 - Level: 500 Points: 36340 - Level: 501 Points: 36459 - Level: 502 Points: 36578 - Level: 503 Points: 36697 - Level: 504 Points: 36816 - Level: 505 Points: 36935 - Level: 506 Points: 37054 - Level: 507 Points: 37173 - Level: 508 Points: 37292 - Level: 509 Points: 37411 - Level: 510 Points: 37530 - Level: 511 Points: 37649 - Level: 512 Points: 37768 - Level: 513 Points: 37887 - Level: 514 Points: 38006 - Level: 515 Points: 38125 - Level: 516 Points: 38244 - Level: 517 Points: 38363 - Level: 518 Points: 38482 - Level: 519 Points: 38601 - Level: 520 Points: 38720 - Level: 521 Points: 38839 - Level: 522 Points: 38958 - Level: 523 Points: 39077 - Level: 524 Points: 39196 - Level: 525 Points: 39315 - Level: 526 Points: 39434 - Level: 527 Points: 39553 - Level: 528 Points: 39672 - Level: 529 Points: 39791 - Level: 530 Points: 39910 - Level: 531 Points: 40029 - Level: 532 Points: 40148 - Level: 533 Points: 40267 - Level: 534 Points: 40386 - Level: 535 Points: 40505 - Level: 536 Points: 40624 - Level: 537 Points: 40743 - Level: 538 Points: 40862 - Level: 539 Points: 40981 - Level: 540 Points: 41100 - Level: 541 Points: 41219 - Level: 542 Points: 41338 - Level: 543 Points: 41457 - Level: 544 Points: 41576 - Level: 545 Points: 41695 - Level: 546 Points: 41814 - Level: 547 Points: 41933 - Level: 548 Points: 42052 - Level: 549 Points: 42171 - Level: 550 Points: 42290 - Level: 551 Points: 42409 - Level: 552 Points: 42528 - Level: 553 Points: 42647 - Level: 554 Points: 42766 - Level: 555 Points: 42885 - Level: 556 Points: 43004 - Level: 557 Points: 43123 - Level: 558 Points: 43242 - Level: 559 Points: 43361 - Level: 560 Points: 43480 - Level: 561 Points: 43599 - Level: 562 Points: 43718 - Level: 563 Points: 43837 - Level: 564 Points: 43956 - Level: 565 Points: 44075 - Level: 566 Points: 44194 - Level: 567 Points: 44313 - Level: 568 Points: 44432 - Level: 569 Points: 44551 - Level: 570 Points: 44670 - Level: 571 Points: 44789 - Level: 572 Points: 44908 - Level: 573 Points: 45027 - Level: 574 Points: 45146 - Level: 575 Points: 45265 - Level: 576 Points: 45384 - Level: 577 Points: 45503 - Level: 578 Points: 45622 - Level: 579 Points: 45741 - Level: 580 Points: 45860 - Level: 581 Points: 45979 - Level: 582 Points: 46098 - Level: 583 Points: 46217 - Level: 584 Points: 46336 - Level: 585 Points: 46455 - Level: 586 Points: 46574 - Level: 587 Points: 46693 - Level: 588 Points: 46812 - Level: 589 Points: 46931 - Level: 590 Points: 47050 - Level: 591 Points: 47169 - Level: 592 Points: 47288 - Level: 593 Points: 47407 - Level: 594 Points: 47526 - Level: 595 Points: 47645 - Level: 596 Points: 47764 - Level: 597 Points: 47883 - Level: 598 Points: 48002 - Level: 599 Points: 48121 - Level: 600 Points: 48240 - Level: 601 Points: 48359 - Level: 602 Points: 48478 - Level: 603 Points: 48597 - Level: 604 Points: 48716 - Level: 605 Points: 48835 - Level: 606 Points: 48954 - Level: 607 Points: 49073 - Level: 608 Points: 49192 - Level: 609 Points: 49311 - Level: 610 Points: 49430 - Level: 611 Points: 49549 - Level: 612 Points: 49668 - Level: 613 Points: 49787 - Level: 614 Points: 49906 - Level: 615 Points: 50025 - Level: 616 Points: 50144 - Level: 617 Points: 50263 - Level: 618 Points: 50382 - Level: 619 Points: 50501 - Level: 620 Points: 50620 - Level: 621 Points: 50739 - Level: 622 Points: 50858 - Level: 623 Points: 50977 - Level: 624 Points: 51096 - Level: 625 Points: 51215 - Level: 626 Points: 51334 - Level: 627 Points: 51453 - Level: 628 Points: 51572 - Level: 629 Points: 51691 - Level: 630 Points: 51810 - Level: 631 Points: 51929 - Level: 632 Points: 52048 - Level: 633 Points: 52167 - Level: 634 Points: 52286 - Level: 635 Points: 52405 - Level: 636 Points: 52524 - Level: 637 Points: 52643 - Level: 638 Points: 52762 - Level: 639 Points: 52881 - Level: 640 Points: 53000 - Level: 641 Points: 53119 - Level: 642 Points: 53238 - Level: 643 Points: 53357 - Level: 644 Points: 53476 - Level: 645 Points: 53595 - Level: 646 Points: 53714 - Level: 647 Points: 53833 - Level: 648 Points: 53952 - Level: 649 Points: 54071 - Level: 650 Points: 54190 - Level: 651 Points: 54309 - Level: 652 Points: 54428 - Level: 653 Points: 54547 - Level: 654 Points: 54666 - Level: 655 Points: 54785 - Level: 656 Points: 54904 - Level: 657 Points: 55023 - Level: 658 Points: 55142 - Level: 659 Points: 55261 - Level: 660 Points: 55380 - Level: 661 Points: 55499 - Level: 662 Points: 55618 - Level: 663 Points: 55737 - Level: 664 Points: 55856 - Level: 665 Points: 55975 - Level: 666 Points: 56094 - Level: 667 Points: 56213 - Level: 668 Points: 56332 - Level: 669 Points: 56451 - Level: 670 Points: 56570 - Level: 671 Points: 56689 - Level: 672 Points: 56808 - Level: 673 Points: 56927 - Level: 674 Points: 57046 - Level: 675 Points: 57165 - Level: 676 Points: 57284 - Level: 677 Points: 57403 - Level: 678 Points: 57522 - Level: 679 Points: 57641 - Level: 680 Points: 57760 - Level: 681 Points: 57879 - Level: 682 Points: 57998 - Level: 683 Points: 58117 - Level: 684 Points: 58236 - Level: 685 Points: 58355 - Level: 686 Points: 58474 - Level: 687 Points: 58593 - Level: 688 Points: 58712 - Level: 689 Points: 58831 - Level: 690 Points: 58950 - Level: 691 Points: 59069 - Level: 692 Points: 59188 - Level: 693 Points: 59307 - Level: 694 Points: 59426 - Level: 695 Points: 59545 - Level: 696 Points: 59664 - Level: 697 Points: 59783 - Level: 698 Points: 59902 - Level: 699 Points: 60021 - Level: 700 Points: 60140 - Level: 701 Points: 60259 - Level: 702 Points: 60378 - Level: 703 Points: 60497 - Level: 704 Points: 60616 - Level: 705 Points: 60735 - Level: 706 Points: 60854 - Level: 707 Points: 60973 - Level: 708 Points: 61092 - Level: 709 Points: 61211 - Level: 710 Points: 61330 - Level: 711 Points: 61449 - Level: 712 Points: 61568 - Level: 713 Points: 61687 - Level: 714 Points: 61806 - Level: 715 Points: 61925 - Level: 716 Points: 62044 - Level: 717 Points: 62163 - Level: 718 Points: 62282 - Level: 719 Points: 62401 - Level: 720 Points: 62520 - Level: 721 Points: 62639 - Level: 722 Points: 62758 - Level: 723 Points: 62877 - Level: 724 Points: 62996 - Level: 725 Points: 63115 - Level: 726 Points: 63234 - Level: 727 Points: 63353 - Level: 728 Points: 63472 - Level: 729 Points: 63591 - Level: 730 Points: 63710 - Level: 731 Points: 63829 - Level: 732 Points: 63948 - Level: 733 Points: 64067 - Level: 734 Points: 64186 - Level: 735 Points: 64305 - Level: 736 Points: 64424 - Level: 737 Points: 64543 - Level: 738 Points: 64662 - Level: 739 Points: 64781 - Level: 740 Points: 64900 - Level: 741 Points: 65019 - Level: 742 Points: 65138 - Level: 743 Points: 65257 - Level: 744 Points: 65376 - Level: 745 Points: 65495 - Level: 746 Points: 65614 - Level: 747 Points: 65733 - Level: 748 Points: 65852 - Level: 749 Points: 65971 - Level: 750 Points: 66090 - Level: 751 Points: 66209 - Level: 752 Points: 66328 - Level: 753 Points: 66447 - Level: 754 Points: 66566 - Level: 755 Points: 66685 - Level: 756 Points: 66804 - Level: 757 Points: 66923 - Level: 758 Points: 67042 - Level: 759 Points: 67161 - Level: 760 Points: 67280 - Level: 761 Points: 67399 - Level: 762 Points: 67518 - Level: 763 Points: 67637 - Level: 764 Points: 67756 - Level: 765 Points: 67875 - Level: 766 Points: 67994 - Level: 767 Points: 68113 - Level: 768 Points: 68232 - Level: 769 Points: 68351 - Level: 770 Points: 68470 - Level: 771 Points: 68589 - Level: 772 Points: 68708 - Level: 773 Points: 68827 - Level: 774 Points: 68946 - Level: 775 Points: 69065 - Level: 776 Points: 69184 - Level: 777 Points: 69303 - Level: 778 Points: 69422 - Level: 779 Points: 69541 - Level: 780 Points: 69660 - Level: 781 Points: 69779 - Level: 782 Points: 69898 - Level: 783 Points: 70017 - Level: 784 Points: 70136 - Level: 785 Points: 70255 - Level: 786 Points: 70374 - Level: 787 Points: 70493 - Level: 788 Points: 70612 - Level: 789 Points: 70731 - Level: 790 Points: 70850 - Level: 791 Points: 70969 - Level: 792 Points: 71088 - Level: 793 Points: 71207 - Level: 794 Points: 71326 - Level: 795 Points: 71445 - Level: 796 Points: 71564 - Level: 797 Points: 71683 - Level: 798 Points: 71802 - Level: 799 Points: 71921 - Level: 800 Points: 72040 - Level: 801 Points: 72159 - Level: 802 Points: 72278 - Level: 803 Points: 72397 - Level: 804 Points: 72516 - Level: 805 Points: 72635 - Level: 806 Points: 72754 - Level: 807 Points: 72873 - Level: 808 Points: 72992 - Level: 809 Points: 73111 - Level: 810 Points: 73230 - Level: 811 Points: 73349 - Level: 812 Points: 73468 - Level: 813 Points: 73587 - Level: 814 Points: 73706 - Level: 815 Points: 73825 - Level: 816 Points: 73944 - Level: 817 Points: 74063 - Level: 818 Points: 74182 - Level: 819 Points: 74301 - Level: 820 Points: 74420 - Level: 821 Points: 74539 - Level: 822 Points: 74658 - Level: 823 Points: 74777 - Level: 824 Points: 74896 - Level: 825 Points: 75015 - Level: 826 Points: 75134 - Level: 827 Points: 75253 - Level: 828 Points: 75372 - Level: 829 Points: 75491 - Level: 830 Points: 75610 - Level: 831 Points: 75729 - Level: 832 Points: 75848 - Level: 833 Points: 75967 - Level: 834 Points: 76086 - Level: 835 Points: 76205 - Level: 836 Points: 76324 - Level: 837 Points: 76443 - Level: 838 Points: 76562 - Level: 839 Points: 76681 - Level: 840 Points: 76800 - Level: 841 Points: 76919 - Level: 842 Points: 77038 - Level: 843 Points: 77157 - Level: 844 Points: 77276 - Level: 845 Points: 77395 - Level: 846 Points: 77514 - Level: 847 Points: 77633 - Level: 848 Points: 77752 - Level: 849 Points: 77871 - Level: 850 Points: 77990 - Level: 851 Points: 78109 - Level: 852 Points: 78228 - Level: 853 Points: 78347 - Level: 854 Points: 78466 - Level: 855 Points: 78585 - Level: 856 Points: 78704 - Level: 857 Points: 78823 - Level: 858 Points: 78942 - Level: 859 Points: 79061 - Level: 860 Points: 79180 - Level: 861 Points: 79299 - Level: 862 Points: 79418 - Level: 863 Points: 79537 - Level: 864 Points: 79656 - Level: 865 Points: 79775 - Level: 866 Points: 79894 - Level: 867 Points: 80013 - Level: 868 Points: 80132 - Level: 869 Points: 80251 - Level: 870 Points: 80370 - Level: 871 Points: 80489 - Level: 872 Points: 80608 - Level: 873 Points: 80727 - Level: 874 Points: 80846 - Level: 875 Points: 80965 - Level: 876 Points: 81084 - Level: 877 Points: 81203 - Level: 878 Points: 81322 - Level: 879 Points: 81441 - Level: 880 Points: 81560 - Level: 881 Points: 81679 - Level: 882 Points: 81798 - Level: 883 Points: 81917 - Level: 884 Points: 82036 - Level: 885 Points: 82155 - Level: 886 Points: 82274 - Level: 887 Points: 82393 - Level: 888 Points: 82512 - Level: 889 Points: 82631 - Level: 890 Points: 82750 - Level: 891 Points: 82869 - Level: 892 Points: 82988 - Level: 893 Points: 83107 - Level: 894 Points: 83226 - Level: 895 Points: 83345 - Level: 896 Points: 83464 - Level: 897 Points: 83583 - Level: 898 Points: 83702 - Level: 899 Points: 83821 - Level: 900 Points: 83940 - Level: 901 Points: 84140 - Level: 902 Points: 84340 - Level: 903 Points: 84540 - Level: 904 Points: 84740 - Level: 905 Points: 84940 - Level: 906 Points: 85140 - Level: 907 Points: 85340 - Level: 908 Points: 85540 - Level: 909 Points: 85740 - Level: 910 Points: 85940 - Level: 911 Points: 86140 - Level: 912 Points: 86340 - Level: 913 Points: 86540 - Level: 914 Points: 86740 - Level: 915 Points: 86940 - Level: 916 Points: 87140 - Level: 917 Points: 87340 - Level: 918 Points: 87540 - Level: 919 Points: 87740 - Level: 920 Points: 87940 - Level: 921 Points: 88140 - Level: 922 Points: 88340 - Level: 923 Points: 88540 - Level: 924 Points: 88740 - Level: 925 Points: 88940 - Level: 926 Points: 89140 - Level: 927 Points: 89340 - Level: 928 Points: 89540 - Level: 929 Points: 89740 - Level: 930 Points: 89940 - Level: 931 Points: 90140 - Level: 932 Points: 90340 - Level: 933 Points: 90540 - Level: 934 Points: 90740 - Level: 935 Points: 90940 - Level: 936 Points: 91140 - Level: 937 Points: 91340 - Level: 938 Points: 91540 - Level: 939 Points: 91740 - Level: 940 Points: 91940 - Level: 941 Points: 92140 - Level: 942 Points: 92340 - Level: 943 Points: 92540 - Level: 944 Points: 92740 - Level: 945 Points: 92940 - Level: 946 Points: 93140 - Level: 947 Points: 93340 - Level: 948 Points: 93540 - Level: 949 Points: 93740 - Level: 950 Points: 93940 - Level: 951 Points: 94140 - Level: 952 Points: 94340 - Level: 953 Points: 94540 - Level: 954 Points: 94740 - Level: 955 Points: 94940 - Level: 956 Points: 95140 - Level: 957 Points: 95340 - Level: 958 Points: 95540 - Level: 959 Points: 95740 - Level: 960 Points: 95940 - Level: 961 Points: 96140 - Level: 962 Points: 96340 - Level: 963 Points: 96540 - Level: 964 Points: 96740 - Level: 965 Points: 96940 - Level: 966 Points: 97140 - Level: 967 Points: 97340 - Level: 968 Points: 97540 - Level: 969 Points: 97740 - Level: 970 Points: 97940 - Level: 971 Points: 98140 - Level: 972 Points: 98340 - Level: 973 Points: 98540 - Level: 974 Points: 98740 - Level: 975 Points: 98940 - Level: 976 Points: 99140 - Level: 977 Points: 99340 - Level: 978 Points: 99540 - Level: 979 Points: 99740 - Level: 980 Points: 99940 - Level: 981 Points: 100140 - Level: 982 Points: 100340 - Level: 983 Points: 100540 - Level: 984 Points: 100740 - Level: 985 Points: 100940 - Level: 986 Points: 101140 - Level: 987 Points: 101340 - Level: 988 Points: 101540 - Level: 989 Points: 101740 - Level: 990 Points: 101940 - Level: 991 Points: 102140 - Level: 992 Points: 102340 - Level: 993 Points: 102540 - Level: 994 Points: 102740 - Level: 995 Points: 102940 - Level: 996 Points: 103140 - Level: 997 Points: 103340 - Level: 998 Points: 103540 - Level: 999 Points: 1037401 point
-
A mysterious frozen lake in the midst of forests and mountains in the sunshine. .•°'°•.•°'°•.•°'°•.•°'°•.•°'°•.•°'°•.•°'°•.•°'°•.•°'°•.•°'°•.•°'°•.•°'°•.•°'°•.•°'°•.•°'°•.•°'°•.•°'°•.•°'°•.•°'°•.•°'°•.•°'°•.•°'°•.•°'°•.•°'°•.•°'°•.•°'°•.•°'°•. ice2xlake Please rate it if the map is good enough ~~ This map can be downloaded here https://rathena.org/board/files/file/4487-w0w_map_collection/1 point
-
the ROLSG is a simple tool yet effective when you don't have an internet connection. Probably when you're editing on offline or no connection. So +1 to this.1 point
-
its in the GRF file and for pservers that is up how about the newbie that dont know how to use GRF? im here to help the newbie and these is a tool/app that is easy to use1 point