Leaderboard


Popular Content
Showing content with the highest reputation on 12/31/21 in all areas
-
Happy New Year rAthena, Thanks for Everyone. such a good community. hope we still help each other for so many years. more power rAthena, HAPPY NEW YEAR AGAIN! LETS MAKE 2022 GREAT!!!2 points
-
function Slot { set .@s$,getitemname(getarg(0)); switch(.ShowSlot) { case 1: if (!getitemslots(getarg(0))) return .@s$; case 2: if (getiteminfo(getarg(0), ITEMINFO_TYPE) == 4 || getiteminfo(getarg(0), ITEMINFO_TYPE) == 5) return .@s$+" ["+getitemslots(getarg(0))+"]"; default: return .@s$; } } To function Slot { set .@s$,getitemname(getarg(0)); switch(.ShowSlot) { case 1: if (!getitemslots(getarg(0))) break; case 2: if (getiteminfo(getarg(0), ITEMINFO_TYPE) == 4 || getiteminfo(getarg(0), ITEMINFO_TYPE) == 5) .@s$+=" ["+getitemslots(getarg(0))+"]"; } return "<ITEM>" + .@s$ + "<INFO>" + getarg(0) + "</INFO></ITEM>"; }2 points
-

Version 1.8.4.7
49907 downloads
Hey everyone, This is a GRF tool I started to develop for my own personnal use, but I thought I'd share it since I've upgraded the UI. Its primary goal is to be easy to use while offering a wide variety of options and customizations. The software is quite stable and can handle large operations easily. How to install Download the zip archive provided from the download link at the bottom of this description or directly from there : http://www.mediafire.com/?aflylbhblrzpz0h Install the application with GRF Editor Installer.exe; if you are missing a .NET Framework you will be prompted to download it. Once you are done, you can start the program from the link on your desktop. Key features Overall speed is faster (or at least equal) than any GRF tool. Common operations : add, delete, merge, extract, preview, save. Undo and redo for any operation. It can open any GRF file. Clean and very interactive interface. Saving formats supported : 0x200, 0x103 and 0x102 (through the Settings page) and conversion to the Thor format. Instant filter and search options (example : "map .gat"). File association and context menus integration for .grf, .gpf, .rgz and .thor (through the Settings page). Can rebuild separated images into one file easily. Drag and drop (with the ALT key, can be modified in the Settings page). This is a big part of the software; most of the items can be moved around within the application itself or from/to Windows Explorer. Tools Sprite editor : a simple sprite editor with powerful features. Semi-transparent images can be added, you can easily change the order or replace images, etc. This tool can convert images in the wrong type by showing you multiple solutions (merging a new palette, dithering the image by using current palette, using the closest color, and a few more). Grf validation : allows you to validate a GRF with multiple settings. It can detect corrupted GRF entries, invalid sprites, empty files, non-GRF files, duplicate files and a lot more. Flat maps maker : generates flat maps from .gat and .rsw files. Useful to generate WoE maps or to fasten up the loading time. Patch maker : generates a GRF patch based on two different GRFs. Hash viewer : shows the hash code (both CRC32 and MD5) for files. Image converter : converts an image to any format requested (BMP, PNG, JPG, TGA). GrfCL : used to create batch files (.bat) which can automate tasks on GRF files. See the content in GrfCL.rar in the download for more information. This tool can be customized from the sources as well. Palette recolorer : creates new sprites by changing their colors (this tool is now deprecated). Client database editor : allows modifications of the database client files (txt and lua) with easy and simple tools. Work in progress. Grf encryption The encryption feature has been enabled again. It's similar to what it used to be and it has been tested on client versions ranging from 2012-08-01 to 2014-02-05. Some error messages will be displayed if necessary. If you have an issue, copy the error message (with the code, if there's one) and send me the client executable with the cps.dll file generated by GRF Editor. There shouldn't be compatibility issues anymore though! Thor files Thor files are patches used by Thor Patcher ( http://thor.aeomin.net/ ). Because of their similarity with the GRF file structure, they have been integrated within GRF Editor. The primary utility of this feature is that it allows you to add encrypted files to a Thor patch. All the other options can be achieved by using Thor Maker. You'll find the necessary steps below, but test your patches before sending them off to players (I've done a lot of testing on my end, but better be safe). If you're using SecureGRF, then make a new GRF, add the files and encrypt it. In GRF Editor, open the encrypted GRF you just made, use "Save as" and name the new file with a .thor extension. That's it, if you want to change the output directory, click on the root node of the project and select the tab "Container options". You can select the output mode and the GRF to merge the patch with. Simply save again if you change these properties. If you're using GRF Editor's encryption, then make a new Thor file (File > New > New Thor) and add the files you want to patch it with. Right-click on the files you want to encrypt and use Encryption > Encrypt. Technical stuff Requires .Net Framework 3.5 (SP1) Client Profile to run (3.5 or more will work as well). Automatically converts file name encoding to their proper values (you can change the encoding). Data virtualization is used as much as possible to preview files, meaning the files aren't completely loaded. Right-clicking an item will bring up the available options with that file. Preview file formats : txt, log, xml, lua, lub, bmp, png, tga, jpp, db, ebm, pal, gnd, rsw, gat, rsm, str, spr, act, imf, fna and wav. Services are "crash ready", meaning that you will be warned about a failed operation and no work will be lost (the application won't close and crash). It tries to continue operating even if it meets unsual conditions. Operations can be cancelled by clicking on the button near the progress bar. The warning level can be changed to avoid messages like "Please select a folder first." When prompted with an error, use Ctrl-C to copy the current dialog's content. Some screenshots! 1) Previewing an act file, while showing the search feature 2) Preview of a model file (rsm) 3) Preview of GrfCL with the MakeGrf command 4) Preview of maps 5) Preview of Grf validation 6) Search feature (press Ctrl-F or Ctrl-H to bring up within a text editor) Got a feedback? I'd gladly hear you out and fix issues you have with the program.Free1 point -
1 point
-
Happy Holidays to your loved ones and family!1 point
-
Merry Christmas Guys!! ???1 point
-
Merry X'Mas!1 point
-
Smith Armor I decided to release this little mod as support to this new forum. Yay i'll be the first one making a source edit in here. Back on topic... This little mod will allow WhiteSmiths to have a new skill "Smith Armor" which will allow users to create elemental armors in the same way as they did with weapons. It will work in a similar fashion as to forge new Weapons. Just check the following screenshots to see how it will work. Steps 1- Go to yourserver/src/map/skill.h and find the following: ALL_REVERSEORCISH, ALL_WEWISH, ALL_SONKRAN, And paste below this: WS_SMITH_ARMOR = 998, Then save the file. 2- Go to yourserver/src/map/skill.c and find the following: } else { // Weapon Forging - skill bonuses are straight from kRO website, other things from a jRO calculator [DracoRPG] And replace it with this: } else if(itemdb_isequiptype(nameid) == 1){ // Weapon Forging - skill bonuses are straight from kRO website, other things from a jRO calculator [DracoRPG] Find this: if(pc_search_inventory(sd,989) > 0) make_per+= 1000; // Emperium Anvil: +10 else if(pc_search_inventory(sd,988) > 0) make_per+= 500; // Golden Anvil: +5 else if(pc_search_inventory(sd,987) > 0) make_per+= 300; // Oridecon Anvil: +3 else if(pc_search_inventory(sd,986) > 0) make_per+= 0; // Anvil: +0? if(battle_config.wp_rate != 100) make_per = make_per * battle_config.wp_rate / 100; } Then paste below this: else { // Calc Smith Armor bonus make_per = sd->status.job_level*20 + status->dex*10 + status->luk*10; make_per += pc_checkskill(sd,skill_id)*500; // Smithing skills bonus: +5/+10/+15 if(pc_search_inventory(sd,989) > 0) make_per+= 1000; // Emperium Anvil: +10 else if(pc_search_inventory(sd,988) > 0) make_per+= 500; // Golden Anvil: +5 else if(pc_search_inventory(sd,987) > 0) make_per+= 300; // Oridecon Anvil: +3 else if(pc_search_inventory(sd,986) > 0) make_per+= 0; // Anvil: +0? if(battle_config.wp_rate != 100) make_per = make_per * battle_config.wp_rate / 100; } Save this file. 3- Go to yourserver/src/map/itemdb.h and find this: int itemdb_isequip2(struct item_data *); Paste below this: int itemdb_isequiptype(int); Save this file. 4- Go to yourserver/src/map/itemdb.c and find this: /*========================================== * Alternate version of itemdb_isequip *------------------------------------------*/ int itemdb_isequip2(struct item_data *data) { nullpo_ret(data); switch(data->type) { case IT_WEAPON: case IT_ARMOR: case IT_AMMO: return 1; default: return 0; } } Then paste below this: /*========================================== * Return if weapon, armor or ammo. //by JakeRed *------------------------------------------*/ int itemdb_isequiptype(int nameid) { int type=itemdb_type(nameid); switch (type) { case IT_WEAPON: return 1; case IT_ARMOR: return 2; case IT_AMMO: return 3; default: return 0; } } Save this file. 5- Go to yourserver/db/skill_db.txt and find the following: 477,0,6,4,0,0x1,0,10,1,no,0,0,0,weapon,0, WS_WEAPONREFINE,Upgrade Weapon Then paste below this: 998,0,0,0,0,0,0,1,0,no,0,0,0,weapon,0, WS_SMITH_ARMOR,Smith Armor Save this file. 6- Go to yourserver/db/produce.txt and find this; //===== Elemental Converters === ItemLV=23 ===== //-- Fire Elemental Converter <-- SA_CREATECON & 1 Blank Scroll, 3 Scorpion Tail 12114,23,1007,1,7433,1,904,3 //-- Water Elemental Converter <-- SA_CREATECON & 1 Blank Scroll, 3 Snail's Shell 12115,23,1007,1,7433,1,946,3 //-- Earth Elemental Converter <-- SA_CREATECON & 1 Blank Scroll, 3 Horn 12116,23,1007,1,7433,1,947,3 //-- Wind Elemental Converter <-- SA_CREATECON & 1 Blank Scroll, 3 Rainbow Shell 12117,23,1007,1,7433,1,1013,3 //============================================== Then paste below this: //---- Armors ----------------------- //-- Tights <-- WS_SMITH_ARMOR & 1 Porcellio card, 3 Scorpion Tail <--- Examples of recipes for armors 2330,3,998,1,4337,1,904,3 //-- Chain Mail <-- WS_SMITH_ARMOR & 1 Porcellio card, 5 Scorpion Tail <--- Example of recipes for armors 2314,3,998,1,4437,1,904,5 //============================================== Save this file and recompile your server, if everything is correct it will not show any error. In produce.txt change the recipes and add as many recipes as you want to your skill. In step 2 you can change the chances of sucess and also if you want to ask for other items besides (Golden Anvil, Emperium Anvil,Oridecon Anvil) . Now that we ended with our server side modifications, we need to modify the Client, so here are the steps to modify the client side. 1- Go to yourdatafolder/lua files/skillid.lua and find this: KN_CHARGEATK = 1001, CR_SHRINK = 1002, AS_SONICACCEL = 1003, Above add this: WS_SMITH_ARMOR = 998, Save your file. 2- Go to yourdatafolder/lua files/skilltreeview.lua and find this: [JOBID.JT_BLACKSMITH_H] = { [21] = SKID.WS_CARTBOOST, [28] = SKID.WS_CARTTERMINATION, [22] = SKID.WS_MELTDOWN, [25] = SKID.WS_OVERTHRUSTMAX, [23] = SKID.WS_WEAPONREFINE }, And replace it with this: [JOBID.JT_BLACKSMITH_H] = { [21] = SKID.WS_CARTBOOST, [28] = SKID.WS_CARTTERMINATION, [22] = SKID.WS_MELTDOWN, [25] = SKID.WS_OVERTHRUSTMAX, [35] = SKID.WS_SMITH_ARMOR, [23] = SKID.WS_WEAPONREFINE }, Save your file. 3- Go to yourdatafolder/lua files/skillinfolist.lua and find: [sKID.WS_WEAPONREFINE] = { "WS_WEAPONREFINE"; SkillName = "Weapon Refine", MaxLv= 10, _NeedSkillList = { { SKID.BS_WEAPONRESEARCH,10 } } }, Paste below this: [sKID.WS_SMITH_ARMOR] = { "WS_SMITH_ARMOR"; SkillName = "Smith Armor", MaxLv = 1, _NeedSkillList = { { SKID.WS_WEAPONREFINE,10 } } }, Save the file. 4- Go to yourdatafolder/lua files/skilldescript.lua and find: [sKID.WS_WEAPONREFINE] = {[/b] [b] "Weapon Refine", "Max Level:^777777 10 ^000000", "Type:^000099 Passive ^000000", "Target:^777777 Self ^000000", "Effect:^777777 Enables you to refine weapons. Unlike Forging, this skill doesn't depend on DEX and LUK, but only on the character's job level.", "At job level 50, you have about the same chances of upgrading as Hollgrehenn.", "At job 70, you have an about 10% better success chance than Hollgrehenn.", "For level 1 Weapons, Phracon is needed.", "For level 2 Weapons, Emveretarcon is needed.", "For level 3/4 Weapons, Oridecon is needed. ^000000", "[LV 1]^777777 Up to +1 ^000000", "[LV 2]^777777 Up to +2 ^000000", "[LV 3]^777777 Up to +3 ^000000", "[LV 4]^777777 Up to +4 ^000000", "[LV 5]^777777 Up to +5 ^000000", "[LV 6]^777777 Up to +6 ^000000", "[LV 7]^777777 Up to +7 ^000000", "[LV 8]^777777 Up to +8 ^000000", "[LV 9]^777777 Up to +9 ^000000", "[LV 10]^777777 Up to +10 ^000000", }, Paste below this: [sKID.WS_SMITH_ARMOR] = {[/b] [b] "Smith Armor", "Max Level:^777777 1 ^000000", "Type:^000099 Passive ^000000", "Catalyst:^777777 Varies ^000000", "Effect:^777777 Allows character to forge Armors using a hammer. Skill Value is (5*SkillLV)%. Anvil, JobLV, DEX and LUK (in this order) further increase this chance. ^000000", "^000000[LV 1]^777777", "Tights", "1 Porcellio Card", "3 Scorpion Tails", "Chain Mail", "1 Porcellio Card", "5 Scorpion Tails", "^6699ffForging formula:", "Base % chance: Skill Value + JobLV * 0.2 + DEX * 0.1 + LUK * 0.1 + 50", "Normal Anvil +0%", "Oridecon Anvil +3%", "Golden Anvil +5%", "Emperium Anvil +10%", "LV 1 Weapon -0%", "LV 2 Weapon -20%", "LV 3 Weapon -30%", "Per Star Crumb -15%", "Elemental Stone -20% ^000000", }, Save the file. 5- Go to yourdatafolder/textures/À¯ÀúÀÎÅÍÆäÀ̽º/item/ and paste the icon for the skill provided in the following link: http://www.mediafire...om165c1&thumb=4 Test it and it must to work correctly. In order to get the skill Smith Armor it will be necessary to get Weapon Refine level 10. Change your killdescript.lua according to your likings. PS: If you dont know how to compile a server use the Wiki and "learn". PS2: It seems i'm unable to upload files compressed, so i had to upload it to mediafire. Regards, Client Side: http://www.mediafire...iadvqrec1yhgrjy Diff files: Smith_Armor_eAthena-trunk_14993.patch Smith_Armor_RR_Mod_rev_79.patch Smith_Armor_3CeAM-trunk_652.patch1 point
-
Version 1.0.1
2964 downloads
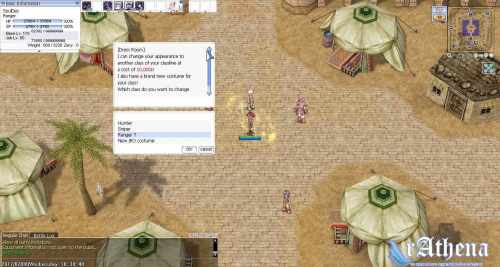
This NPC let your players change their appearance to other classes in their class line plus their jRO costume at a price. For example, a sniper can change his/her appearance to hunter and ranger (plus jRO ranger costume).Free1 point -

Version 1.2.5
10978 downloads
Heya, This tool is an action file editor, it edits Act and Spr files. You will find similarities with ActOR in its design, but it should be much more enjoyable to edit animations ;]. Special thanks to Nebraskka for testing this software in its early days. All the suggestions and feedbacks made this software much better. How to install Download the zip archive provided from the download link at the bottom of this description or directly from there : http://www.mediafire.com/file/uoymx2vni249mlu Install the application with Act Editor Installer.exe; if you are missing a .NET Framework you will be prompted to download it. Once you are done, you can start the program from the link on your desktop. Key features The software has many, many features available. It would take too long to describe each one of them, so I've only focussed on the more impotant ones. You can undo and redo everything, scripts included. You can edit and add sounds easily. Powerful and easy to use palette editor. Sprite types have been abstracted - you don't have to worry or care about that. Animation speed can be changed easily. Most components have a drag and drop feature. Advanced scripting engine (C# language). The scripts can also be used to customize the software menus. Error checking when saving the act/spr to avoid invalid files. The sprite version will be automatically downgraded if RLE compression is not available. Frame interpolation (inbetweening/tweening) is possible via the Animation menu. Prompts you with an image converter dialog if the added image is invalid. Allows advanced edition for actions and frames via their respective menus. You can load files from GRFs directly (and save in the GRFs directly as well). Technical stuff Requires .Net Framework 3.5 (SP1) Client Profile to run (3.5 or more will work as well). When prompted with an error, use the "Copy exception" button to copy the debugging info. I will need this to fix the issue you're encountering. The editor's primary window The interface is really straightforward and similar to ActOR. I'll only focus on new elements! Rendering mode : This option changes the behavior of how layers are rendered. If you use 'Editor', you'll clearly see all the pixels when zooming in. If you use 'Ingame', it will use a linear scaling instead, which is closer to what the client does. References : These allow you to know where your item will be positionned (the yellow marker is the anchor, see below). Color mask : To edit the color of a layer, simply click on the color rectangle. You can also drag and drop the colors between different layers to quickly modify many of them. Common shortcuts : You can manipulate layers by using common shortcuts. More can be found from the Edit menu. These below are only the primary ones. Ctrl-A : Select all layers. Ctrl-C : Copy the selected layers. Ctrl-V : Paste the copied layers. Ctrl-X : Cut the selected layers. Alt-C : Copy current action. Alt-V : Paste current action. Advanced action and frame editions These expose all the available methods of the editor. You can remove a range of frames or copy a frame 10 times very quickly and easily. This dialog is found in Action/Frame > Advanced edit... Anchors You can edit anchors from the editor directly. Anchors are points that connect frames together, from different act files. Here's an example without and with anchors : This is mostly useful when you're using reference sprites (on the right panel). Clicking on the anchor button will let you choose where to attach the sprite (this is set semi-automatically for you though). You can edit those from the Anchors menu, but it is recommended to start from a pre-existing act to avoid doing this tedious process. Palette editor The palette editor allows you to quickly recolor sprites with an intuitive interface. Only indexed images can be edited (it's a palette editor after all) and three modes are available. The gradient mode changes an existing gradient to another color while keeping the original saturation and brightness of the colors - this makes the gradients blend in better. If there are no gradient (usually because it's a custom sprite), there's always the Adjust color mode. This one changes all color from a specified range to another one (Photoshop has a similar feature, which does work better). You can click on the image (on the left) to automatically select the palette indexes. These will be highlighted for a few seconds to show you what you're about to edit. Interpolation (tweening) This script can be accessed via Animation > Interpolate frames. This process fills the images between two frames by detecting the changes applied to the layers. Here's a simple example of how it can be used : Script engine The script engine can be accessed via Scripts > Script Runner. This is a big feature of Act Editor, it allows you to automate all your work with the act and much more. Click on the Help button for guides and available methods (don't hesitate to try out a script; if an error occurs the act will be reversed to its previous state). The documentation doesn't cover all of the available options and methods for obvious reasons (the .net framework is huge). Doc example : The language used by the script engine is C#. If you're not familiar with it, simply check out the script samples (Scripts > Open scripts folder)! I won't go into details here, questions can be asked in the support thread regarding addiotional features and methods. If you believe your script should be added in the program, send it to me and I'll probably add it. Customizable The settings dialog allows you to modify all colors in the editor easily. You'll also find the sound resources (GRFs and folders) that can be set up in the Sound tab. The Shell integration tab can associate the .act files with the software to edit them more easily. Don't hesitate to give me a feedbacks or suggestions!Free1 point