Leaderboard


Popular Content
Showing content with the highest reputation on 12/30/18 in all areas
-
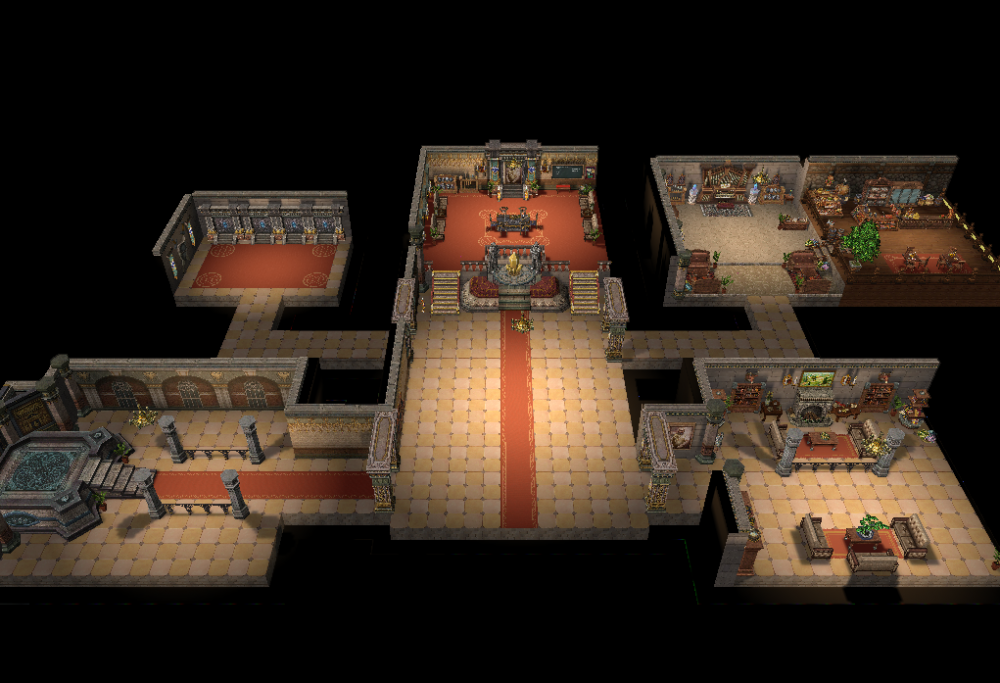
Good Day Rathena people! Here is a guild hall from ROM! the textures are original from ROM Textures. Enjoy~

 5 points
 -
So here's the story why i created something like this. well all of us surely want some custom items so we took some from other servers grf. and yes, A LOT OF THEM. but come on..... If you took hundreds of them, you will surely take time to edit the following 1. Item Names 2. accessoryid.lub 3. accname.lub 4. iteminfo.lua .. (well i haven't created this one yet since im still thinking of a way to make one faster) So what i created will help you to do the things i mentioned above. For now it's still on the make, and i want to ask if there are things you still want to make easy. Just reply!. This is still on beta, so currently NO BROWSE BUTTON but will surely put it there. and also "save file to" for generating lub.2 points
-
The dependencies seemed to be just copied from the wiki. Debian Stretch (9) does already include gcc/g++ 6 in the standard package manager, so there is no need to install anything unstable. Also I am really not a fan of using PHPMyAdmin in production. It‘s said to be optional but still i think making the database accessible from the internet is never a good idea.1 point
-
Try using this... 2018-06-20eRagexeRE.zip1 point
-
If you are allowed to enter the instance, it will say you don't need to reset it. For Sarah Memories "Sarah Memories","15002","501","10","1000000" 15002 is the sarah memory cooldown For Faceworm "Faceworm Nest","12325","502","20","2000000" 12325 is the Faceworm Nest Cooldown You can check quest id from their Instance Script1 point
-
The thing is, we don't quite understand what are you guys need. can you please be more specific. EDIT: Okay so i re-read it, and somehow i know what you guys want. let me take a few minutes. EDIT 2: Here's what you guys need P.S Dont forget to upvote if i helped prontera,154,177,5 script Yumi Haruka 811,{ mes .name$; mes "Hello, i can reset an instance."; mes "What instance do you want to reset?"; next; for(.@i=0;.@i<getarraysize(.instances$);.@i+=5) set .@menu$,.@menu$+.instances$[.@i]+":"; set .@ans,select(.@menu$)-1; set .@instance$,.instances$[.@ans*5]; set .@qid,atoi(.instances$[(.@ans*5)+1]); set .@item,atoi(.instances$[(.@ans*5)+2]); set .@amt,atoi(.instances$[(.@ans*5)+3]); set .@zeny,atoi(.instances$[(.@ans*5)+4]); next; if(checkquest(.@qid,PLAYTIME)==2 || checkquest(.@qid,PLAYTIME) < 0){ mes .name$; mes "Eh? You don't need to reset this instance. You are already allowed to enter it."; end; } mes .name$; mes "So you want to reset ^FF0000"+.@instance$+"^000000?"; mes "It will cost you: "; if(.@item) mes ""+.@amt+"x ^0000FF"+getitemname(.@item)+"^000000"; if(.@zeny) mes "and ^0000FF"+.@zeny+"^000000 Zeny!"; mes "Would you like to reset now?"; next; if(select("Yes, Please Reset:No sorry")==2){ mes .name$; mes "Okay, Please come at me again once you decided"; end; } close2; if(.@item && countitem(.@item)<.@amt) goto L_NotEnough; if(.@zeny && Zeny<.@zeny) goto L_NotEnough; if(.@item) delitem .@item,.@amt; Zeny-=.@zeny; erasequest .@qid; message strcharinfo(0),"Instance has been Reset!"; end; L_NotEnough: mes .name$; mes "Sorry! But unfortunately, You don't have the requirements to reset the instance"; end; OnInit: // Instance Name, Quest ID, Item ID for Reset,Item Amount, Zeny Amount set .name$,"[ Yumi ]"; setarray .instances$[0], "Endless Tower","60200","501","10","100000", "Nidhogg Nest","3135","502","30","0", "Sealed Shrine","3045","0","0","999999"; end; }1 point
-

Version 1.0.0
318 downloads
Here are the new mobs of episode Biotechnology Research Institute, 5 new monsters from Kro.Free1 point -
Version 1.0.0
479 downloads
Here is a kinda RO2 Skin I made long time ago. FreeFree1 point -

Version 1.2.5
13619 downloads
Heya, This tool is an action file editor, it edits Act and Spr files. You will find similarities with ActOR in its design, but it should be much more enjoyable to edit animations ;]. Special thanks to Nebraskka for testing this software in its early days. All the suggestions and feedbacks made this software much better. How to install Download the zip archive provided from the download link at the bottom of this description or directly from there : http://www.mediafire.com/file/uoymx2vni249mlu Install the application with Act Editor Installer.exe; if you are missing a .NET Framework you will be prompted to download it. Once you are done, you can start the program from the link on your desktop. Key features The software has many, many features available. It would take too long to describe each one of them, so I've only focussed on the more impotant ones. You can undo and redo everything, scripts included. You can edit and add sounds easily. Powerful and easy to use palette editor. Sprite types have been abstracted - you don't have to worry or care about that. Animation speed can be changed easily. Most components have a drag and drop feature. Advanced scripting engine (C# language). The scripts can also be used to customize the software menus. Error checking when saving the act/spr to avoid invalid files. The sprite version will be automatically downgraded if RLE compression is not available. Frame interpolation (inbetweening/tweening) is possible via the Animation menu. Prompts you with an image converter dialog if the added image is invalid. Allows advanced edition for actions and frames via their respective menus. You can load files from GRFs directly (and save in the GRFs directly as well). Technical stuff Requires .Net Framework 3.5 (SP1) Client Profile to run (3.5 or more will work as well). When prompted with an error, use the "Copy exception" button to copy the debugging info. I will need this to fix the issue you're encountering. The editor's primary window The interface is really straightforward and similar to ActOR. I'll only focus on new elements! Rendering mode : This option changes the behavior of how layers are rendered. If you use 'Editor', you'll clearly see all the pixels when zooming in. If you use 'Ingame', it will use a linear scaling instead, which is closer to what the client does. References : These allow you to know where your item will be positionned (the yellow marker is the anchor, see below). Color mask : To edit the color of a layer, simply click on the color rectangle. You can also drag and drop the colors between different layers to quickly modify many of them. Common shortcuts : You can manipulate layers by using common shortcuts. More can be found from the Edit menu. These below are only the primary ones. Ctrl-A : Select all layers. Ctrl-C : Copy the selected layers. Ctrl-V : Paste the copied layers. Ctrl-X : Cut the selected layers. Alt-C : Copy current action. Alt-V : Paste current action. Advanced action and frame editions These expose all the available methods of the editor. You can remove a range of frames or copy a frame 10 times very quickly and easily. This dialog is found in Action/Frame > Advanced edit... Anchors You can edit anchors from the editor directly. Anchors are points that connect frames together, from different act files. Here's an example without and with anchors : This is mostly useful when you're using reference sprites (on the right panel). Clicking on the anchor button will let you choose where to attach the sprite (this is set semi-automatically for you though). You can edit those from the Anchors menu, but it is recommended to start from a pre-existing act to avoid doing this tedious process. Palette editor The palette editor allows you to quickly recolor sprites with an intuitive interface. Only indexed images can be edited (it's a palette editor after all) and three modes are available. The gradient mode changes an existing gradient to another color while keeping the original saturation and brightness of the colors - this makes the gradients blend in better. If there are no gradient (usually because it's a custom sprite), there's always the Adjust color mode. This one changes all color from a specified range to another one (Photoshop has a similar feature, which does work better). You can click on the image (on the left) to automatically select the palette indexes. These will be highlighted for a few seconds to show you what you're about to edit. Interpolation (tweening) This script can be accessed via Animation > Interpolate frames. This process fills the images between two frames by detecting the changes applied to the layers. Here's a simple example of how it can be used : Script engine The script engine can be accessed via Scripts > Script Runner. This is a big feature of Act Editor, it allows you to automate all your work with the act and much more. Click on the Help button for guides and available methods (don't hesitate to try out a script; if an error occurs the act will be reversed to its previous state). The documentation doesn't cover all of the available options and methods for obvious reasons (the .net framework is huge). Doc example : The language used by the script engine is C#. If you're not familiar with it, simply check out the script samples (Scripts > Open scripts folder)! I won't go into details here, questions can be asked in the support thread regarding addiotional features and methods. If you believe your script should be added in the program, send it to me and I'll probably add it. Customizable The settings dialog allows you to modify all colors in the editor easily. You'll also find the sound resources (GRFs and folders) that can be set up in the Sound tab. The Shell integration tab can associate the .act files with the software to edit them more easily. Don't hesitate to give me a feedbacks or suggestions!Free1 point