Leaderboard


Popular Content
Showing content with the highest reputation on 04/07/23 in all areas
-
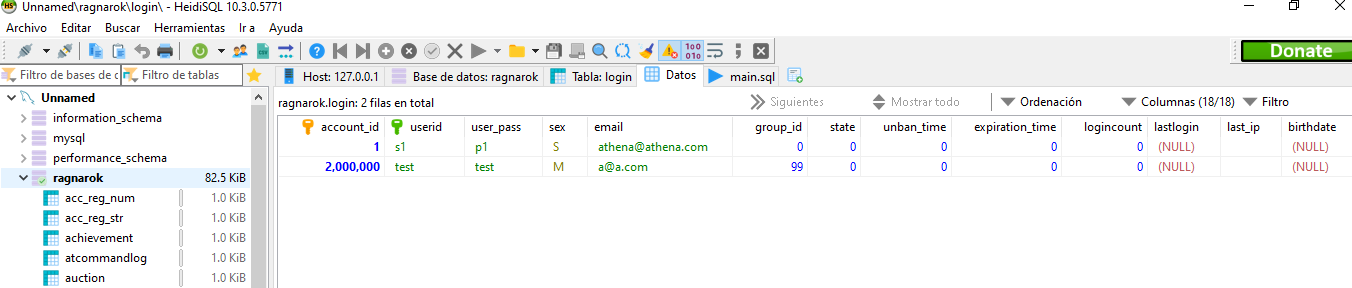
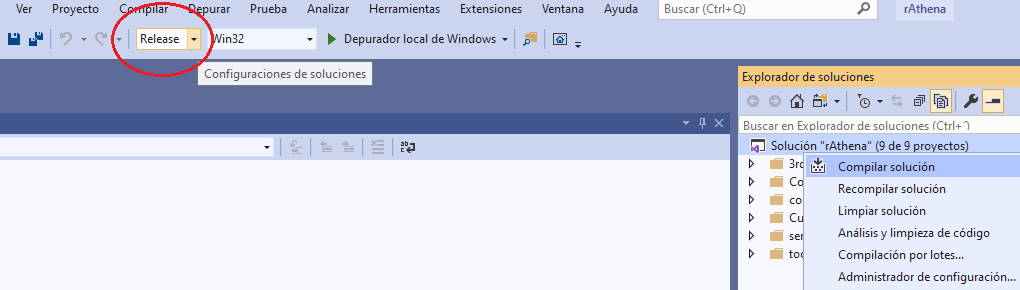
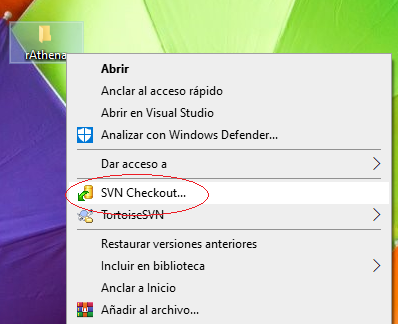
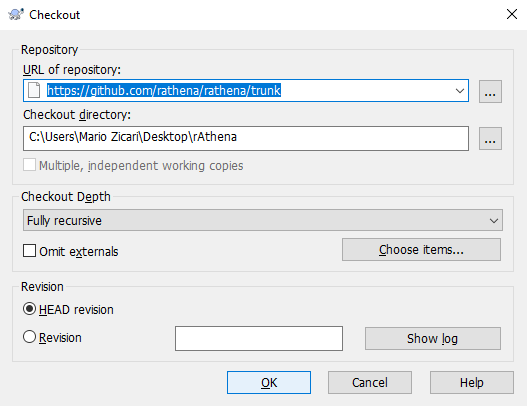
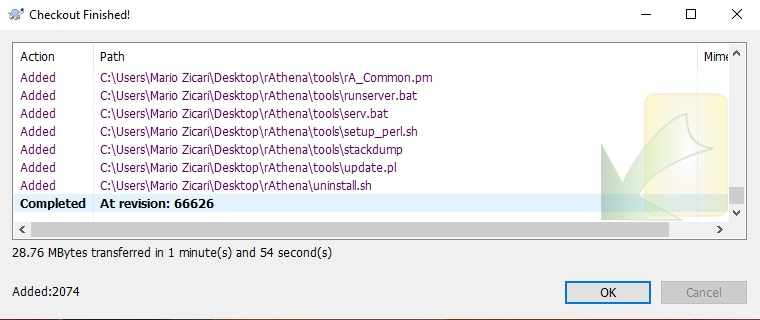
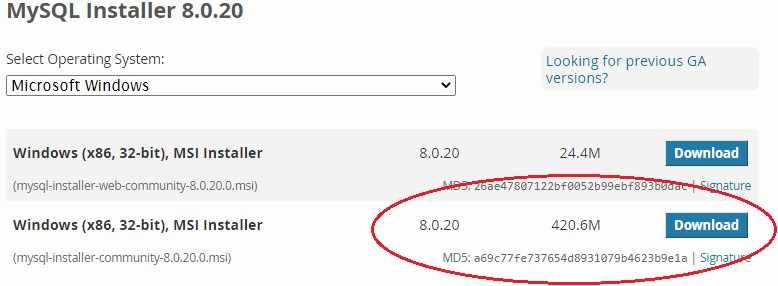
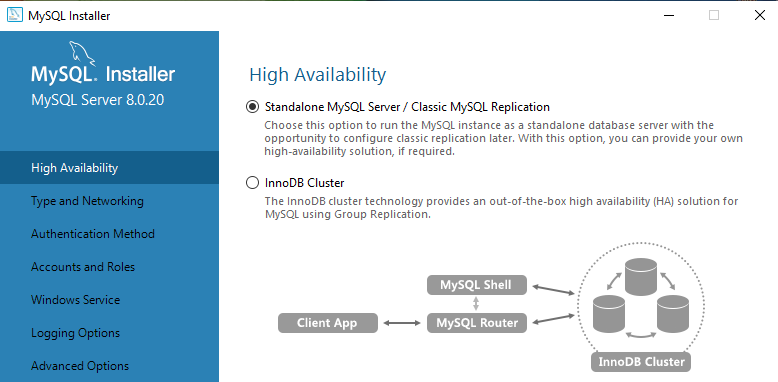
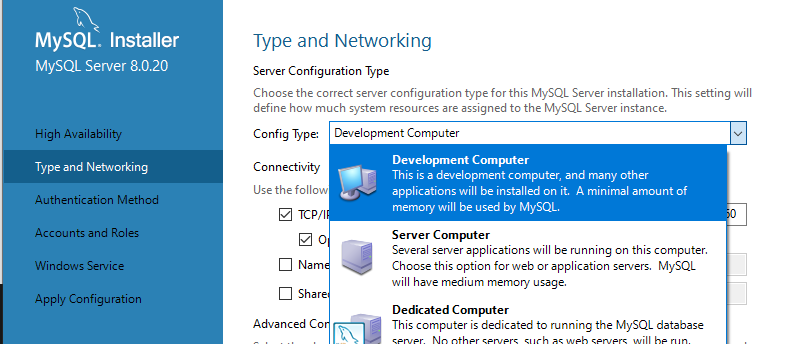
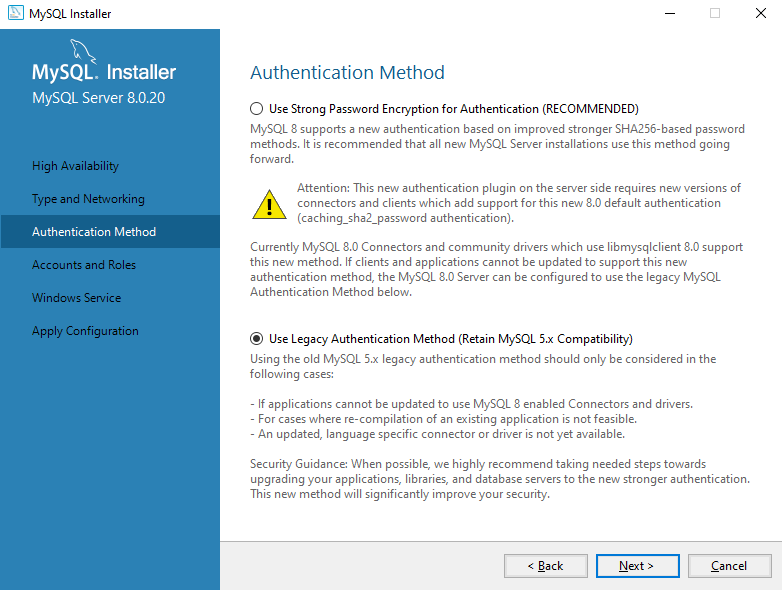
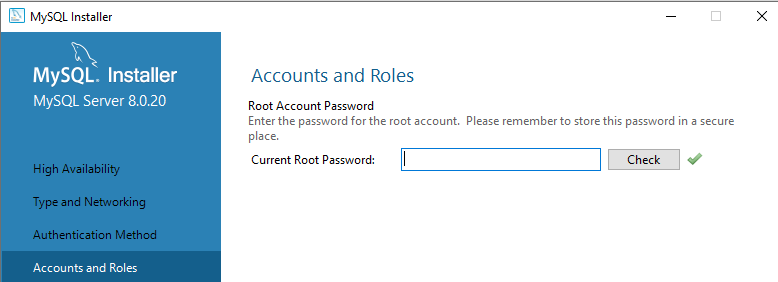
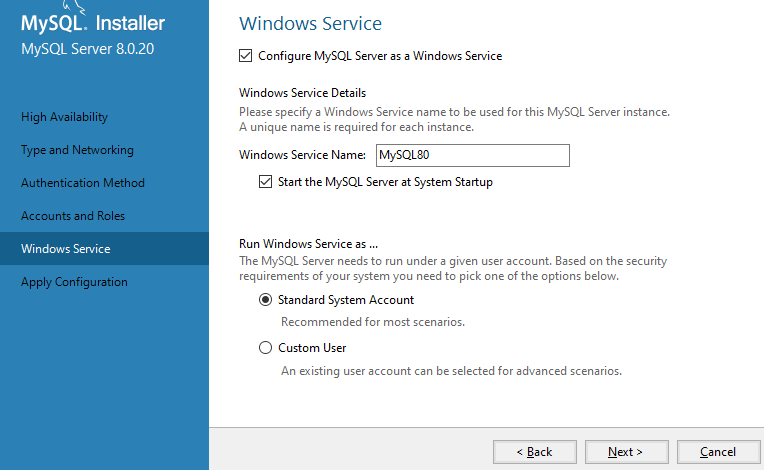
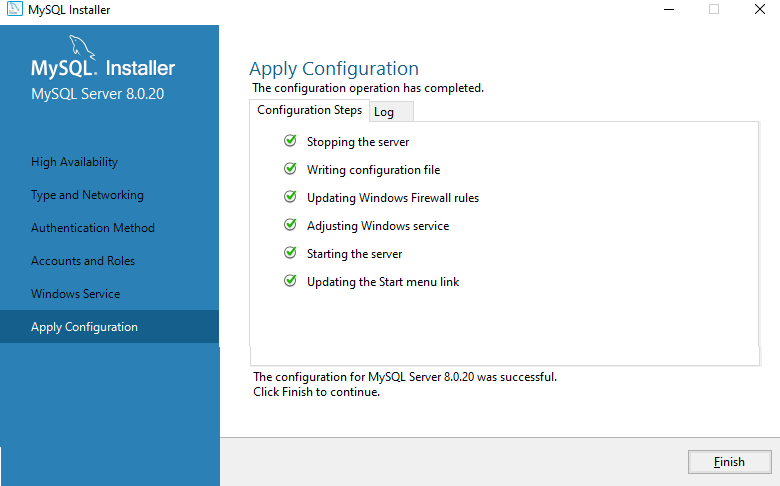
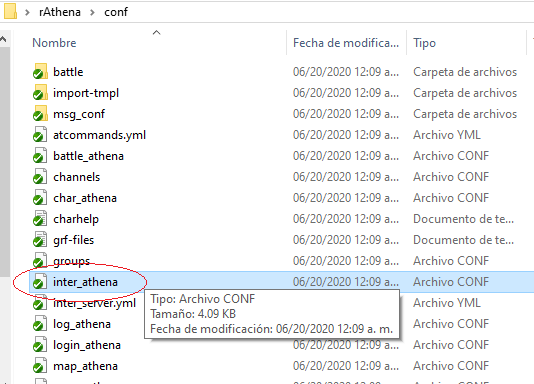
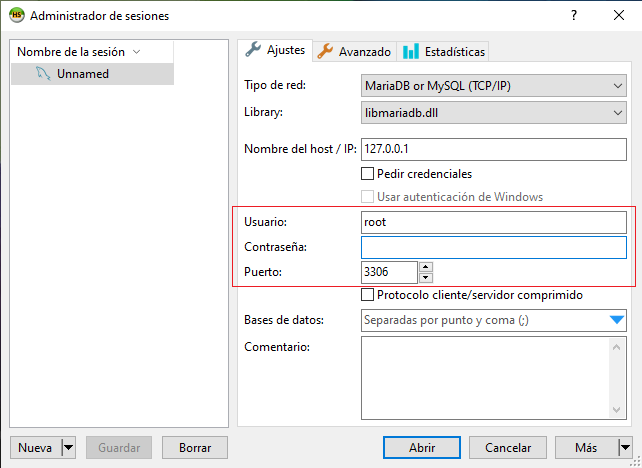
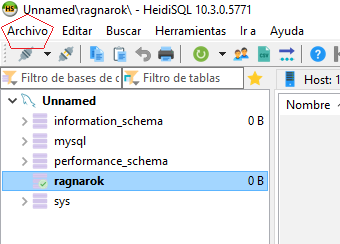
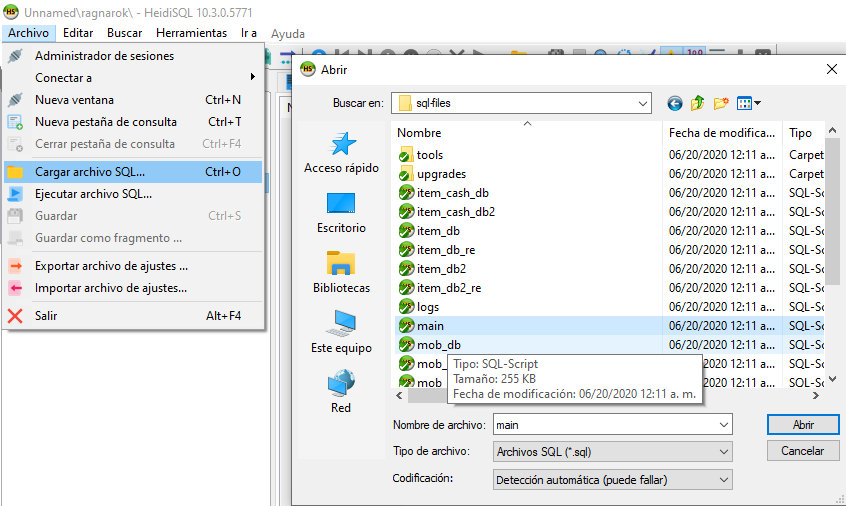
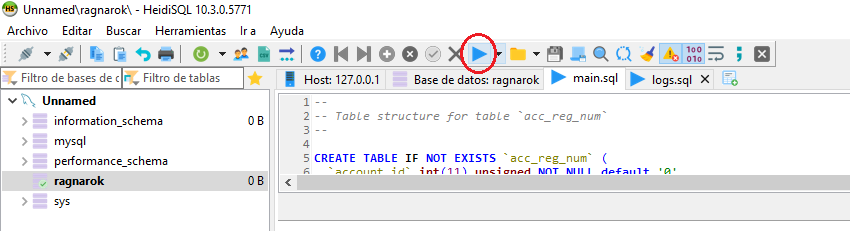
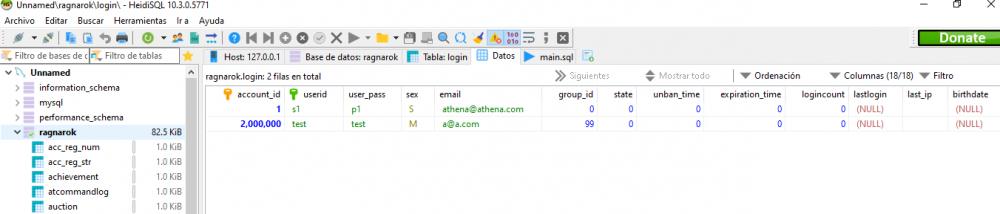
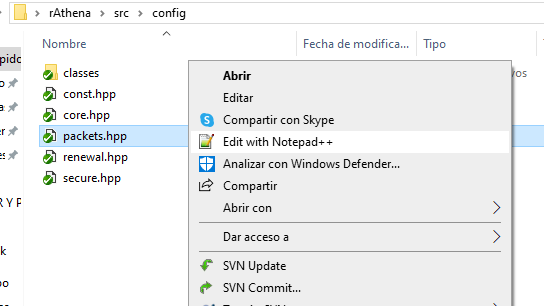
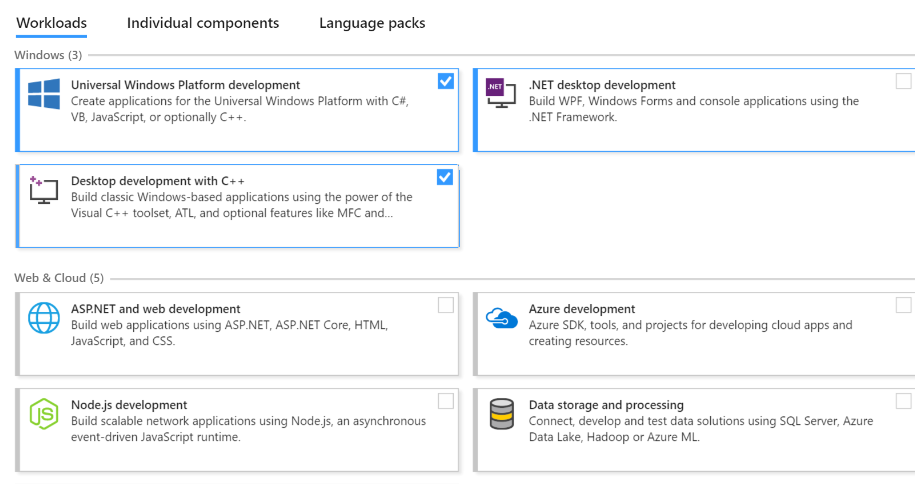
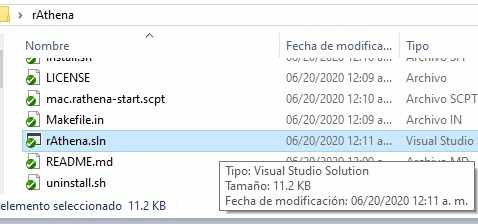
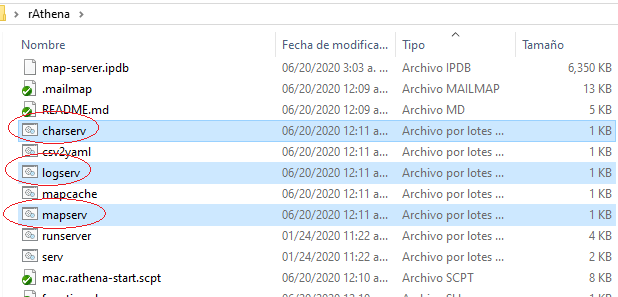
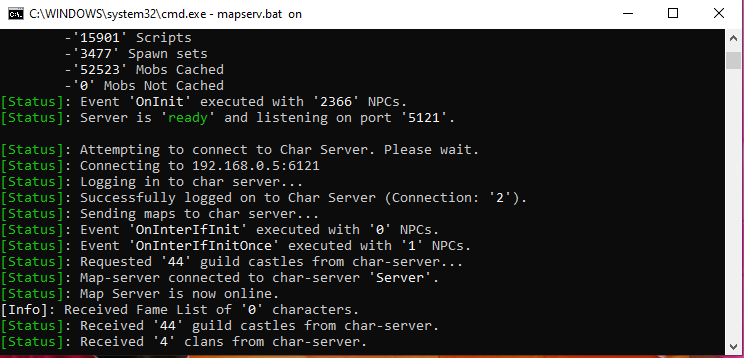
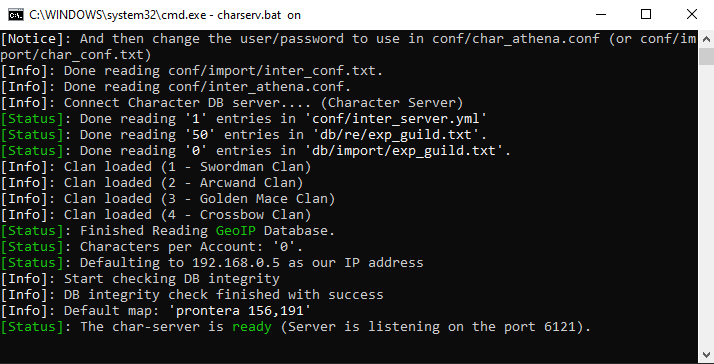
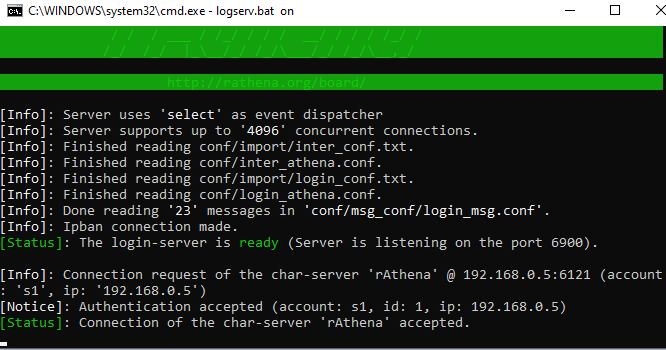
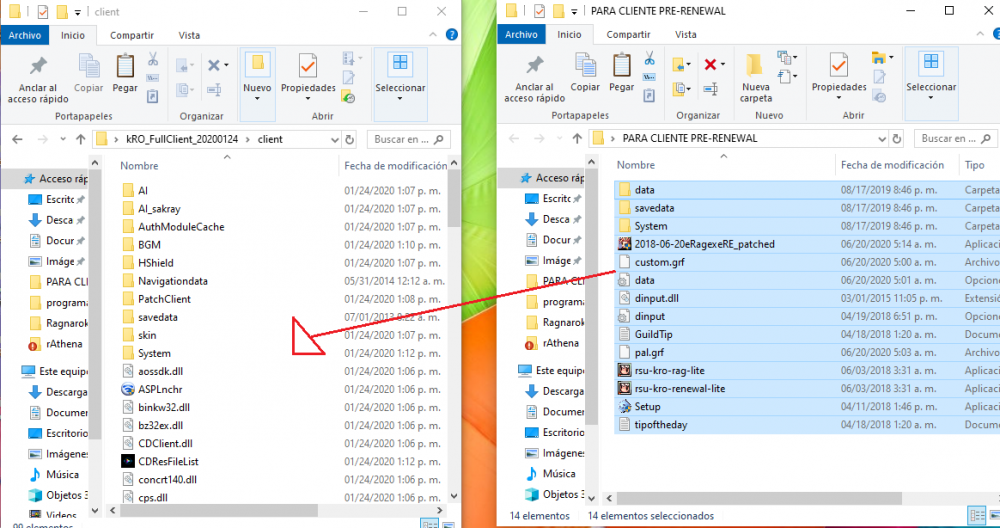
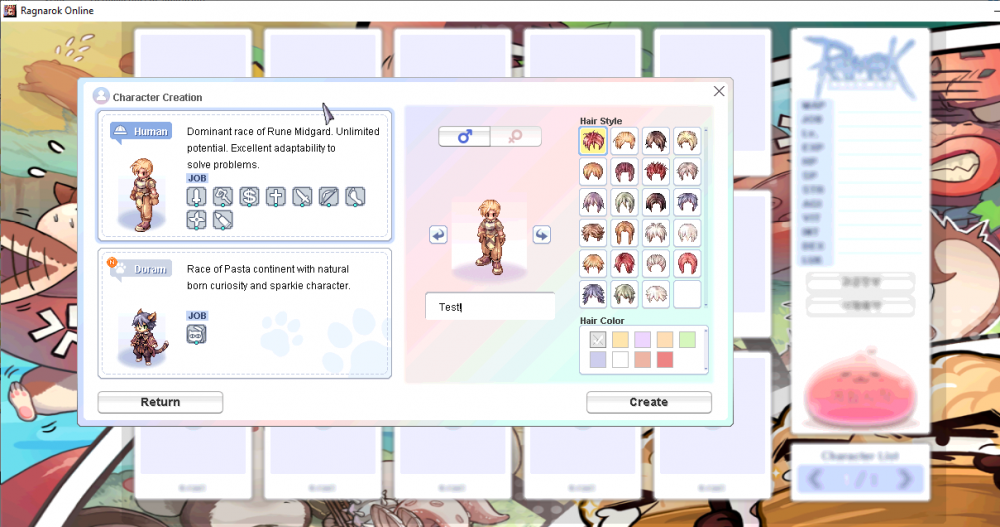
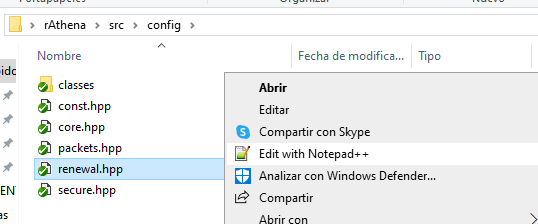
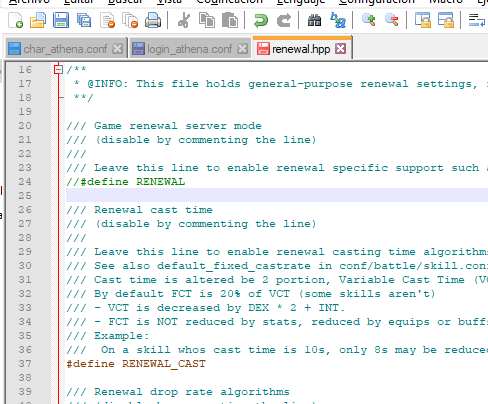
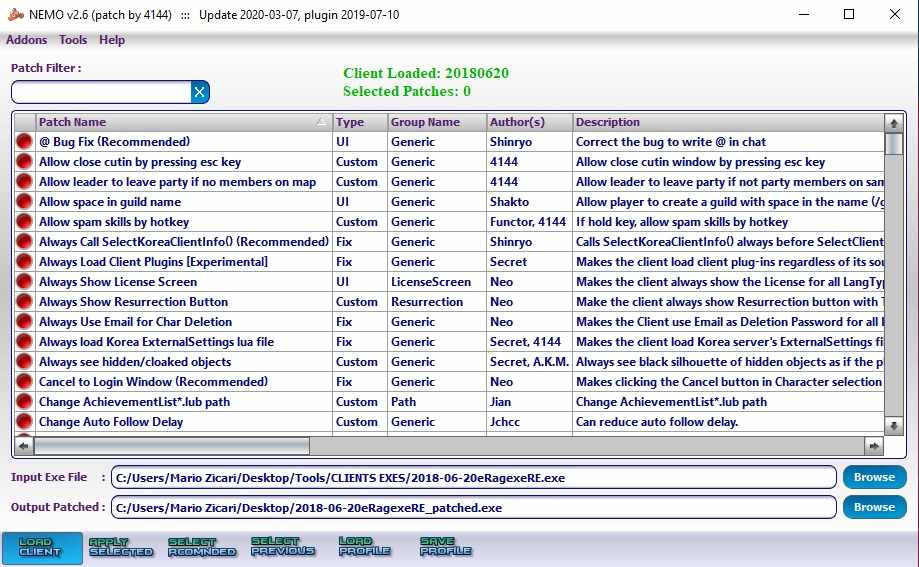
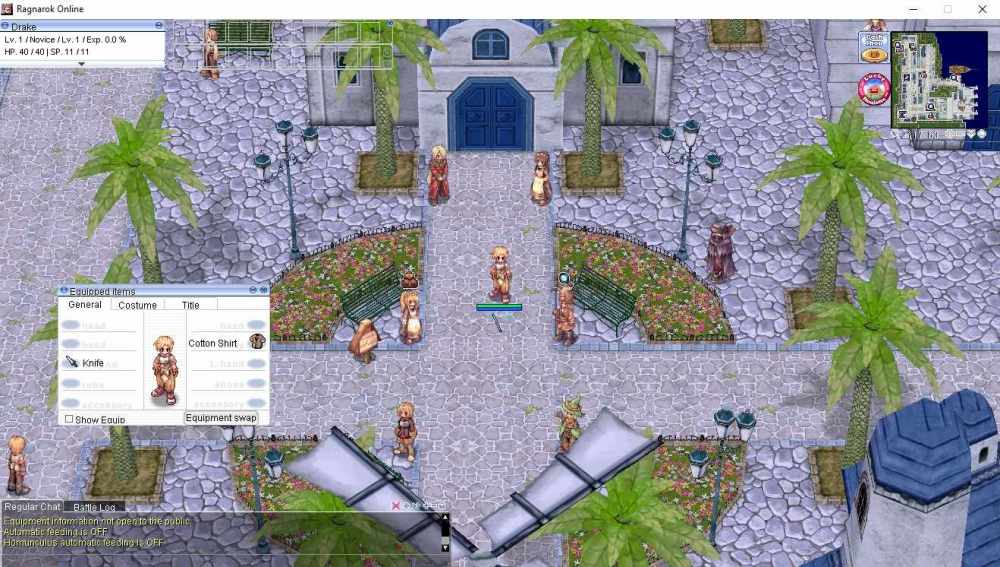
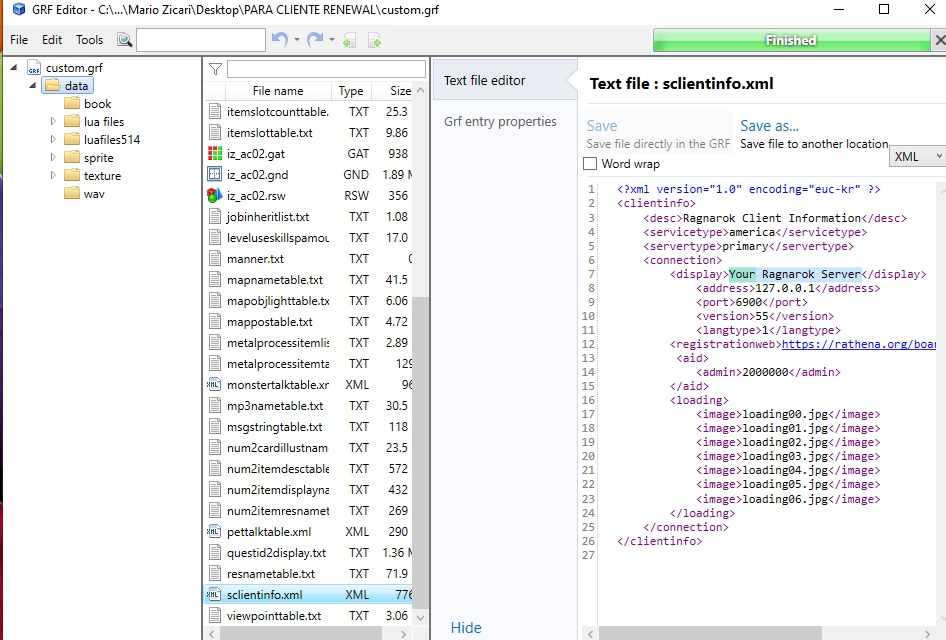
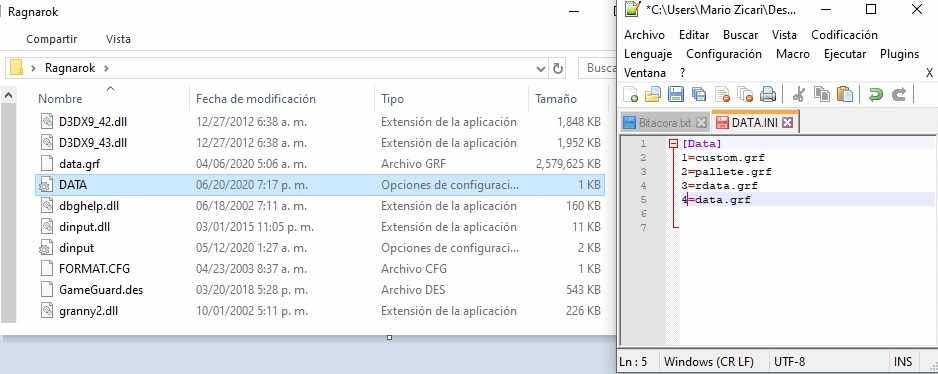
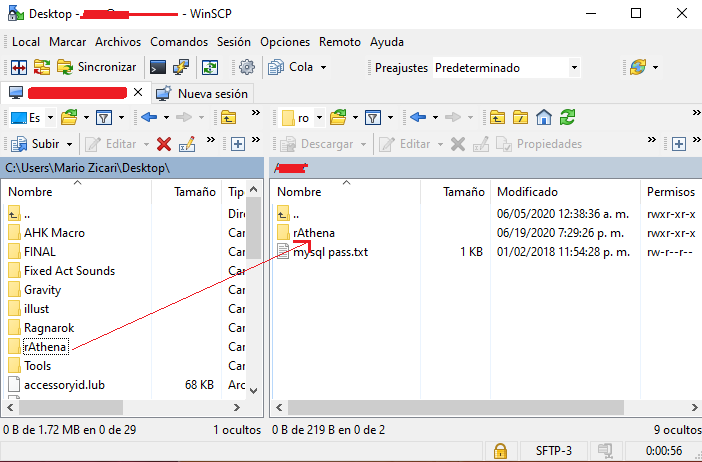
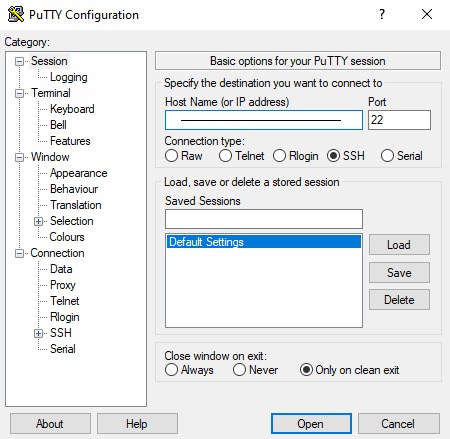
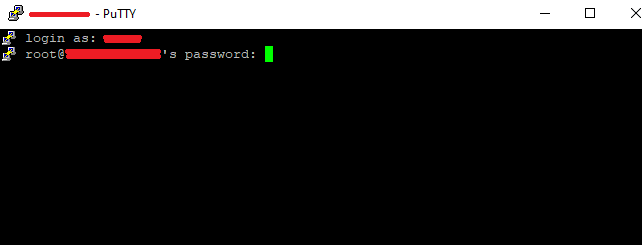
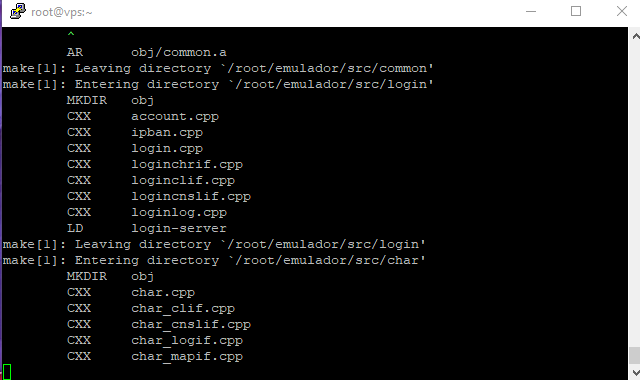
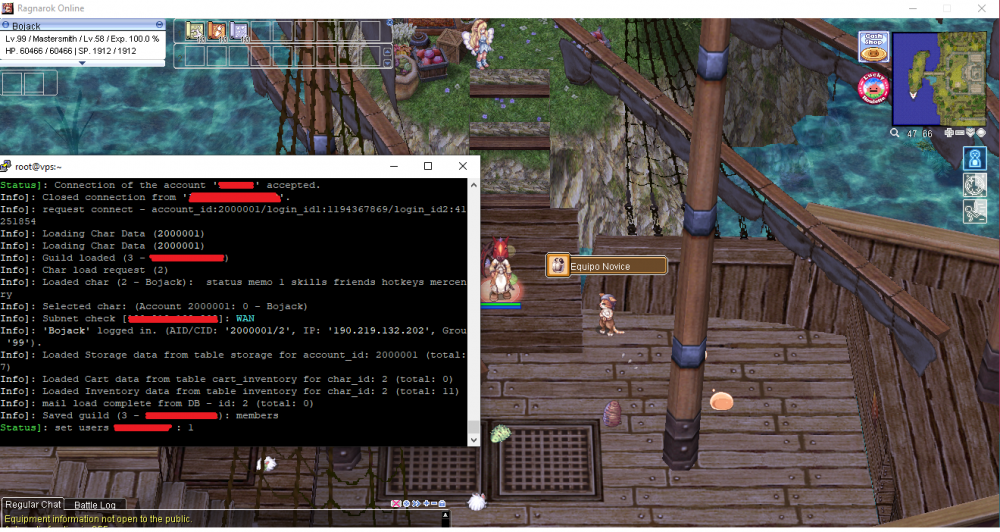
1- DESCARGAR NUESTRO EMULADOR Lo primero que necesitaremos es nuestro emulador rAthena ultima revisión y para ello debemos descargar Tortoise SvN aqui: https://tortoisesvn.net/downloads.html Una vez descargamos el Tortoise Svn nos vamos al escritorio y creamos una carpeta con nombre rAthena, a dicha carpeta le damos click derecho y elegimos la opcion SVN Checkout... Se abrirá la ventana de CheckOut y en el URL of repository colocamos https://github.com/rathena/rathena/trunk y en Revision ponemos HEAD Al darle Ok, el programa empezara a descargar el emulador a la carpeta rAthena, si todo salio bien habrás descargado con éxito tu emulador con la ultima revisión del repositorio. 2- CREAR NUESTRO SERVIDOR Una vez descargado el emulador, necesitaremos crear nuestra base de datos SQL en nuestro ordenador, con las credenciales del servidor, para ello vamos a necesitar el programa MySql Nos dirigimos a este link https://dev.mysql.com/downloads/installer/ y elegimos la opción mas pesada de 420 MB. Al momento de instalarlo nos irán saliendo las opciones de configuración, en la de High Availability marcamos la primera opción, Standalone MySQL Server y le damos next En la Opcion Type and Networkimg elegimos Development Computer y NO TOCAMOS ABSOLUTAMENTE MAS NADA DENTRO DE ESTA CONFIGURACION! le damos Next y entraremos en el Methodo de Autenticacion, aqui solamente marcamos Use Legacy y le damos al Next En Account & Roles, para el password de Root pondremos como pasword ragnarok en minúsculas, ragnarok es la que contraseña que viene por defecto en el inter athena conf del emulador. En Windows Service dejamos todo como esta y le damos next En la siguiente ventana, le damos a EXECUTE para que se empiezen a aplicar todas las configuraciones, Cuando todos los ganchos están en verde indica que se instalo bien tu servidor, En este punto, tienes instalado tu servidor local en tu computadora y esta corriendo. 3- DESIGNAR EL NOMBRE CORRECTO DE NUESTRO SERVIDOR ROOT EN LOS COMPONENTES DEL SERVIDOR Ya que tenemos nuestro servidor Root en la computadora, nos vamos a nuestro folder de emulador rAthena, buscamos la carpeta conf, y dentro encontraremos el archivo inter_athena, como este es un archivo de texto le damos a editar, y nos vamos a la parte de Global SQL Settings En la linea 31, en login_server_id reemplazamos ragnarok por root, pues root es el servidor SQL que instalamos en nuestro ordenador, y deberá quedar así: // MySQL Login server login_server_ip: 127.0.0.1 login_server_port: 3306 login_server_id: root login_server_pw: ragnarok login_server_db: ragnarok login_codepage: login_case_sensitive: no En la parte de ipban_db_id también cambiamos el ragnarok y ponemos root, debera quedar asi: ipban_db_ip: 127.0.0.1 ipban_db_port: 3306 ipban_db_id: root ipban_db_pw: ragnarok ipban_db_db: ragnarok ipban_codepage: En el char_server_id reemplazamos ragnarok y ponemos root, debera quedar asi: // MySQL Character server char_server_ip: 127.0.0.1 char_server_port: 3306 char_server_id: root char_server_pw: ragnarok char_server_db: ragnarok El map_server_id también le reeplazamos el ragnarok y le ponemos el nombre root ya que este es el nombre dado por nuestro servidor sql, deberá quedar asi: // MySQL Map Server map_server_ip: 127.0.0.1 map_server_port: 3306 map_server_id: root map_server_pw: ragnarok map_server_db: ragnarok Por ultimo pero no menos importantes los logs, en log_db_id reemplazamos ragnarok por root, debiendo quedar así: // MySQL Log Database log_db_ip: 127.0.0.1 log_db_port: 3306 log_db_id: root log_db_pw: ragnarok log_db_db: ragnarok log_codepage: log_login_db: loginlog CHAR_ATHENA Ya que terminamos de ajustar el inther athena conf, nos vamos al char_athena conf, esta parte es importante porque aquí seteamos el mapa de inicio de nuestros personajes creados. Eliges el mapa de inicio de tus novice para renewal o pre renewal.. Te recomiendo usar una data renewal si vas a usar un punto de partida renewal, NO PUEDES ser renewal sin data renewal pues se te pondra la pantalla negra cuando logees tu char... mas adelante te enseñare como configurar tu emulador para renewal o pre-renewal Dentro de char_athena también desactivamos algo bastante molesto llamado pincode, solo basta encontrar la linea que dice pincode_enabled y ponemos no, deberá quedar así: //=================================== // Pincode system //=================================== // NOTE: Requires client 2011-03-09aragexeRE or newer. // A window is opened before you can select your character and you will have to enter a pincode by using only your mouse. // Default: yes pincode_enabled: no LOGIN_ATHENA Aquí solo necesitamos ajustar una sola cosa! y es el poder Habilitar la creación de nuestro personaje con _M o _F En la linea 54 de este file ponemos yes en la opcion "//Can you use _M/_F to make new accounts o the server? Debera quedar así: // Can you use _M/_F to make new accounts on the server? // Note: This only works if client side password encryption is not enabled. new_account: yes terminamos las configuraciones del emulador por ahora. 4- GESTIONAR NUESTRA BASE DE DATOS Una vez configurado el inter_athena.conf char_athena.conf y login_athena.conf necesitaremos un programa para crear nuestra BASE DE DATOS, yo recomiendo altamente el programa HeidiSQL por su facilidad de uso, este es el primero que use cuando empece a crear servers, y nunca me ha fallado. Link de descarga aqui: https://www.heidisql.com/download.php Una vez tenemos Instalado Heidi!, procedemos a crear la base de datos de nuestro servidor, elegimos Nueva, Aquí Lo importante es mantener el usuario root ya que ese es el nombre de nuestro servidor de datos sql, en contraseña debemos poner ragnarok en minuscula, pues es la clave que elegimos al instalar mysql y son las claves de los componentes que vienen por defecto en el inter_atena.conf. Al nombre de la sesión le puedes poner el que mas te guste, yo lo dejare en unnamed para guiarlos mejor. Cuando la tenemos creada le damos a abrir, hacemos click derecho sobre Unnamed o el nombre de sesion que le hayas dado, eliges crear nuevo, y le das click a base de datos. Es MUY MUY IMPORTANTE que el nombre de la base de datos sea ragnarok pues es el mismo nombre que tienen los componentes del server en el inter_atena.conf que previamente configuramos ok? Una vez creada la base de datos ragnarok la seleccionamos y nos vamos a la pestaña archivo Al abrir la pestaña archivo seleccionamos cargar archivo SQL, y se nos abrirá la ventana de exploración, en la cual elegimos rAthena, luego sql-files y elegimos main y logs con control, una vez seleccionados main y logs le damos a abrir. Una vez abiertas dirígete a la pestaña main, y ejecutala dandole click al triangulo azul, veras como se van cargando las tablas en la base de datos ragnarok Una vez terminada de cargar las main, selecciona la de logs y procede con lo mismo, click al triangulo para ejecutar, la tabla logs es importante ya que esta registra los movimientos de items, objetos comandos, en fin es como una bitacora que ni so se carga el emulador se la pasara enviando warnings. Otros sql-files que podrias cargar dentro de la db ragnarok serian el roulette_default_data por si quieres implementar la ruleta en tu servidor, pero los premios y requisitos de la ruleta se configuran en esa misma tabla y no en scripts. Cuando se ha cargado todo, presiona f5, esto recargara las tablas, en pocas palabras actualizara o refrescara heidi y MAGIA puedes ir a la tabla login, y luego a la pestaña datos, la account_id 1 es del sistema y esa no la puedes ocupar para tu char, alli van a parar los chars que creas en tu server, para ser ADMIN con todos los comandos debes ponerte 99 el el group id. Ya tenemos servidor, y base de datos. 5- COMPATIBILIZAR EL EJECUTABLE Y COMPILAR NUESTRO EMULADOR Antes de Encender nuestro emulador debemos configurarlo y luego compilarlo. El cliente o ejecutable que recomiendo es 2018-06-20eRagexeRE.exe pues es el que considero mas estable, este ejecutable lo puedes descargar en el post de MathReaper Para compatibilizar el exe con el emulador debes ir a tu carpeta rAthena y elegir la carpeta SCR, (ya estamos en territorios de alto riesgo), dentro de la carpeta scr nos vamos a la carpeta config y abrimos packets.hpp Para tener una mejor experiencia editando estos archivos, recomiendo el programa notepad++ lo puedes descargar aqui: https://notepad-plus-plus.org/downloads/ al abrir packets.hpp encontraremos la linea que tiene asignada la versión del exe #ifndef PACKETVER /// Do NOT edit this line! To set your client version, please do this instead: /// In Windows: Add this line in your src\custom\defines_pre.hpp file: #define PACKETVER YYYYMMDD /// In Linux: The same as above or run the following command: ./configure --enable-packetver=YYYYMMDD #define PACKETVER 20200401 #endif en el #define PACKETVER 20200401 debemos cambiar y asignar el exe que les recomendé en este caso el 20180620 el texto deberá quedar así #ifndef PACKETVER /// Do NOT edit this line! To set your client version, please do this instead: /// In Windows: Add this line in your src\custom\defines_pre.hpp file: #define PACKETVER YYYYMMDD /// In Linux: The same as above or run the following command: ./configure --enable-packetver=YYYYMMDD #define PACKETVER 20180620 #endif Para Evitar la Black Screen del Exe al seleccionar tu personaje deberás editar y agregar tu packet version en el siguiente archivo: SCR/CUSTOM/ defines_post.hpp defines_pre.hpp si lo vas a hacer pre renwal editas el defines_pre.hpp si lo vas a hacer renewal entonces edintas el defines_post.hpp // Copyright (c) rAthena Dev Teams - Licensed under GNU GPL // For more information, see LICENCE in the main folder #ifndef CONFIG_CUSTOM_DEFINES_PRE_HPP #define CONFIG_CUSTOM_DEFINES_PRE_HPP /** * rAthena configuration file (http://rathena.org) * For detailed guidance on these check http://rathena.org/wiki/SRC/config/ **/ #define PACKETVER 20180620 #endif /* CONFIG_CUSTOM_DEFINES_PRE_HPP */ RENEWAL O PRE? El emulador viene RENEWAL por defecto, si queremos ser pre renewal tenemos que ir a la carpeta SCR de nuestro rAthena, luego a la carpeta config y abrimos renewal.hpp Una vez abierto lo único que debemos hacer es comentar la parte que dice #define Renewal, comentar no es mas que colocar dos slashes // al inicio del define de renewal! como muestra la imagen para deshabilitar todas las características de renewal solo basta con dejar el texto asi: //#define Renewal COMPILACION Una vez hecho todos estos cambio debemos compilar nuestro emulador! Para compilar el emulador necesitas tener instalado el Visual Studio Community, lo podrás conseguir en este link: https://visualstudio.microsoft.com/es/downloads/ Al momento de instalarlo deberás elegir las herramientas C+ yo recomiendo la universal windows platform development y desktop developtment with C++. el resto nisiquiera la vamos a mirar. Una vez tenemos el Visual Instalado nos vamos a la carpeta de nuestro emulador y abrimos la solución, de nombre rAthena.sln Una vez Abierta la solución!, ASEGURATE DE ELEGIR RELEASE como lo muestro en la IMAGEN y no Debug, luego click derecho en Solución rAthena y click a Compilar Solución, ahora deberás esperar que se compilen todos los proyectos Si tu compilación fue exitosa tendrás correctos todos los resultados Ya puedes abrir tu emulador, para ello ve a la carpeta rAthena y abre individualmente los proyectos loginserv charserv y mapserv Si quieres ahorrarte el trabajo de abrir siempre los 3 componentes del server cada vez que inicies tu emulador, abre solamente runserver, lamentablemente esto viene bugeado, y no se ha corregido, por lo cual tuve que editarlo para que funcionara, si lo quieres, PUEDES DESCARGAR ESTOS CON TODA CONFIANZA Y METERLOS EN TU CARPETA RATHENA, Reemplazando los que vienen por defecto, con esto podras abrir el emulador usando solo runserver. pero necesitaras estos 2 archivos que voy a poner aqui abajo: runserver.bat y serv.bat Si seguiste bien todas las indicaciones, tendrás abierto un emulador optimo y sin ningún error!. 6- CREAR NUESTRO CLIENTE Y DIFFEAR NUESTRO EXE PARA EMPEZAR A JUGAR NUESTRO EMULADOR Antes que nada necesitas el KRO COMPLETO, EL JUEGO RAGNAROK , Lo puedes descargar aquí mismo, Nuestro administrador Akkarin nos compartió el ultimo cliente en este topic: Una ves terminado de descargar y extraer el KRO Limpio, necesitaras crear los archivos de tu propio cliente, Estos archivos del cliente son los GRF y la Data Traducida que tiene Archivos Luas, Descripcion de Objetos, Quests, Entre Otros, y son los que deberás exportar a tu Ragnarok Limpio. Tengo a Disposición un RAR Limpio, con los archivos necesarios y básicos para un cliente, consta de 2 GRF's uno llamado Custom y Otro llamado Pal, tambien tiene un exe pre difeado que puedes usar para ir testeando tu servidor. Si tu servidor va a ser Pre Renewal, con los items, mapas, y descripciones de pre renewal deberas bajar este rar de mi unidad Drive: - https://drive.google.com/file/d/1M8gvEWnumjPwNwzXLrACBYYAqE3ptoRp/view?usp=sharing Si tu servidor va a ser RENEWAL con la descripcion de items, y mapas renewal deberas bajar este rar de mi unidad Drive: https://drive.google.com/file/d/18Pn4Zw0q_-yBTkE9n30JN8hGLGmL6iyo/view?usp=sharing Al descargar y extraerse, lo único que deberás hacer copiarlo todo y pegarlo a la carpeta del ro limpio. TODO LO QUE TE PIDA REEMPLAZAR LO REEMPLAZAS! estos archivos podrás editarlos o preservarlos por si quieres crear un instalador para tu usuarios. Si tienes el emulador encendido, puedes intentar entrar a tu servidor ejecutando el exe pre diffeado que acabas de pegar en tu ragnarok limpio, el de nombre 2018-06-20eRagexeRE_patched que te incluí en el RAR, Si te sale THE EXE HAS CHANGED al principio, cierra y vuelve a abrir, esto pasa una sola vez y te indica que el ejecutable que se usa es el de tu servidor y no el de Kro, Cuando abras podrás crear tu personaje, lo que indica que estas en el servicio correcto. Si quieres diffear tu propio ejecutable deberás descargar nemo Patcher en este Link: https://gitlab.com/4144/Nemo/ En imput exe file subes el ejecutable que hayas descargado, recuerda que debe ser la misma versión que definiste en tu emulador, en output es donde se va a generar el ejecutable diffeado, pones Load Client y se cargaran todos los parches posibles para el exe. Algunos diff Recomendados y Otros necesarios para que el cliente arranque sin problemas son: @ Bug Fix (Recommended) Allow close cutin by pressing esc key Allow space in guild name Always Load Client Plugins [Experimental] Always Show Resurrection Button Always Use Email for Char Deletion Always load Korea ExternalSettings lua file Cancel to Login Window (Recommended) Change RecommendedQuestInfoList*.lub path aqui escribes system\OngoingQuestInfoList Change character display deletion time from actual date to relative date Change minimal screen resolution limit Change new char name field height AQUI PONES 17 esto muestra el nombre correctamente al momento de crear tu personaje Chat Flood Remove Limit Custom Window Title aqio pones el nombre que le quieres dar a tu ventana de ragnarok Disable 1rag1 type parameters (Recommended) Disable Help Message on Login (Recommended) Disable Swear Filter Disconnect to Login Window Enable /who command (Recommended) Enable DNS Support (Recommended) Enable Effect for all Maps [Experimental] Enable Emblem hover for BG Enable Monster Tables Enable Multiple GRFs (Recommended) solo el recommended Enable Shortcut All Item Enable Title Bar Menu botones en tu ventana de ragnarok Enable guild while in clan si quieres guild mientras estas en clan, deberas modificar el script de clans en rathena para pasar este filtro Enforce Official Login Background Extend Chat Box Extend Chat Room Box Extend Npc Dialog Box Extend PM Box Fix Camera Angles (Recommended) Fix Homunculus attack AI Fix achievement counters for each type of achievement Por si habilitaras achievements Fix act delay for act files with many frames Fix item description bug Hide build info in client (Recommended) Hide packets from peek (Recommended) Hide zero date (1969-01-01) in guild members window Ignore /account: command line argument Ignore Lua Errors --- esto lo puedes desactivar cuando tengas tu cliente terminado Ignore Missing Palette Error --- esto lo puedes desactivar cuando tengas tu cliente terminado Ignore Resource Errors --- esto lo puedes desactivar cuando tengas tu cliente terminado Increase Headgear ViewID Ponle 4000, asumiento que meteras hat custom, ragnarok ya supero las 2000 IDS Increase Zoom Out 75% o max como quieras Increase hair style limit for human only in game (old) Load Custom lua file instead of iteminfo*.lub (Recommended) aqui debes poner System/iteminfo.lua Only First Login Background Read msgstringtable.txt (Recommended) Remove Gravity Ads (Recommended) Remove Gravity Logo (Recommended) Remove Hourly Announce (Recommended) Remove Serial Display (Recommended) Remove wrong chars from cash shop Restore Cash Shop Icon Restore Login Window (Recommended) Show Register Button boton de redireccion al enlace de registro de chars que hayas puesto en tu sclientinfo Show Replay Button aqui se reproduciran las partidas que grabes en tu ragnarok Skip License Screen Skip some hidden menu icon buttons si desactivaste botones este parche hara que se acomoden los espacios vacios entre botones ocultos Translate Client (Recommended) Use Ascii on All LangTypes (Recommended) Use Default Web Browser In Cashshop Use Default Web Browser for URL Use Normal Guild Brackets (Recommended) Use Official Cloth Palettes Necesario para que se muestren las paletas de colores Use Plain Text Descriptions (Recommended) Use Ragnarok Icon Use Tilde for Matk Los Diff que de ningún modo debes activar: Always Call SelectKoreaClientInfo() (Recommended) Aunque Diga recomended NO LO HABILITES Change Walk To Delay Incomodo, acelera la resuesta de clicks hara que camines hacia un npc aun despues de abrir su dialogo HKLM To HKCU NO LO HABILITES Skip Service Selection Screen NO LO HABILITES si rompes el protocolo de seleccion de servicio no podras abrir el select char window EDICIÓN DE GRF Y SCLIENTINFO El programa para editar tu grf sera GRF EDITOR de Tokei, este programa es el equivalente a un arma forjada por el mismo Hefesto, así recuerda darle un upvote si llegas a descargarlo Con este programa abres tu Custom.grf y podrás visualizar los archivos del GRF de tu servidor, recuerda que siempre que vayas a aplicar un cambio, deberás tener el exe del ragnarok cerrado. En la carpeta data de tu Custom.grf se encuentra el sclientinfo.xml, en el campo Display editas El nombre del servidor que se mostrara cuando abras tu ejecutable, podrás asignar o remover las ropas de game master, tambien podrás cambiar el link del web de registro al que te dirige el boton register. Si vas a subir tu emulador a un host deberas editar el sclientinfo y poner la ip en donde esta montado tu servidor. El orden de lectura de los GRF se asigna en un archivo llamado Data.ini y el orden debera ir asi: [Data] 1=custom.grf 2=palette.grf 3=rdata.grf 4=data.grf Como ha notado, el grf de palettes está aislado, si bien no es muy pesado, esta lleno de miles de archivos pals, si llegaras a descargar las paletas de kamishi te recomiendo usar un grf exclusivo de paletas y no mezclarlo con tu custom pues estanos hablado de mas de 40mil archivos que tomaran bastante tiempo en empaquetarse. ---------------------------------------------------------------------------------------------------------------------------------------------------------------------- Montar el Servidor a un Host Hasta Este Punto de la guía! ya tienes tu Servidor Local, Tu Emulador Funcional sin errores, Tu cliente con Exe y GRF custom. Para Montar tu emulador a un host recomiendo el programa WinSCP https://winscp.net/eng/download.php Abres Winscp y colocas las credenciales que te entrego tu proveedor de servicios Host Pasas el Emulador a la carpeta raiz de tu host Cambias los datos de tu char_athena.conf en este file editas el // Login Server IP y el // Character Server IP pones la ip del host. Edita tambien el // Server Communication username and password. Porque el default S1 Y P1 todos lo conocen, este debe coinicidir con la de tu main sql. En login_athena.conf no se editan ips. pero puedes volver a habilitar o deshabilitar la creacion de chars usando _M o _F, esto por si quieres que los registros sean únicamente por Control Panel // Can you use _M/_F to make new accounts on the server? // Note: This only works if client side password encryption is not enabled. new_account: no En map_athena.conf Colocas el mismo server comunication username y password que tienes en tu sql y en tu char_athena.conf, el default es S1 y P1 pero tu elige uno que nadie conozca. // Interserver communication passwords, set in account.txt (or equiv.) userid: passwd: En inter_athena.conf Aqui no se editan ips ni puertos, aquí solamente se se colocan las credenciales de las _db: y _pw: correspondientes a las que tienes creadas en la base de datos de tu proveedor de servicios. // MySQL Login server login_server_ip: 127.0.0.1 login_server_port: 3306 login_server_id: root login_server_pw: login_server_db: login_codepage: login_case_sensitive: no ipban_db_ip: 127.0.0.1 ipban_db_port: 3306 ipban_db_id: root ipban_db_pw: ipban_db_db: ipban_codepage: // MySQL Character server char_server_ip: 127.0.0.1 char_server_port: 3306 char_server_id: root char_server_pw: char_server_db: // MySQL Map Server map_server_ip: 127.0.0.1 map_server_port: 3306 map_server_id: root map_server_pw: map_server_db: // MySQL Log Database log_db_ip: 127.0.0.1 log_db_port: 3306 log_db_id: root log_db_pw: log_db_db: log_codepage: log_login_db: loginlog Abrir y Compilar tu emulador remotamente Para abrir tu emulador cargado al host, necesitaras un programa llamado Putty que puedes descargar aqui https://www.putty.org/ Al abrirlo en el campo Host Name or IP adress colocas la Ip de tu host y le das OPEN Ya estas dentro de tu vps, y el te va a solicitar el user y el password que te proporciono el Host, debes tener cuidado al colocar el password porque no se van a mostrar los typing en la consola. Al entrar exitosamente tendras un display de los comandos preparados por su proveedor, generalmente son ON, OFF, PREPARAR, COMPILAR etc. Con los que puedes arrancar, detener, reiniciar o compilar el emulador que tienes cargado en el host. Deberas compilar y iniciar el emulador después de haber editado los confs con los datos del host. Aqui vemos el trabajo de compilación mediante vps Aqui vemos como ha iniciado el servidor, debe estar lleno de status y no errores Aqui un logeo exitoso Recuerda editar tu sclientinfo y ponerle la ip de tu provedor de host.


 1 point
 -
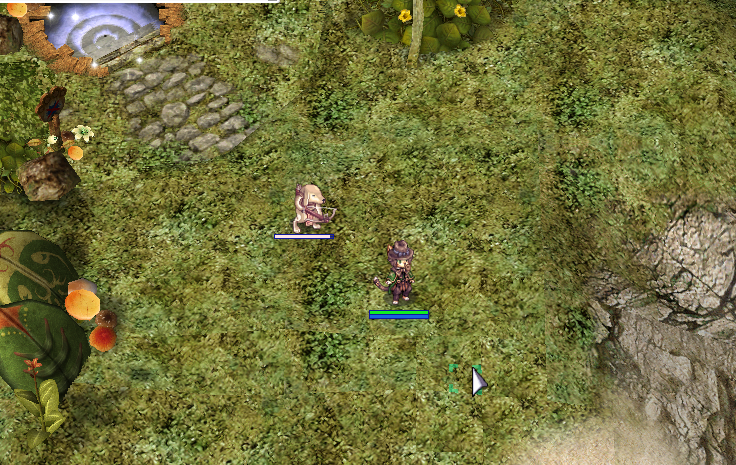
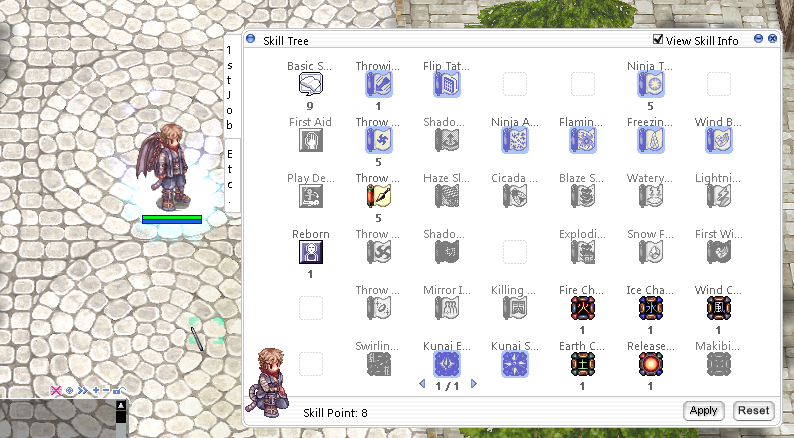
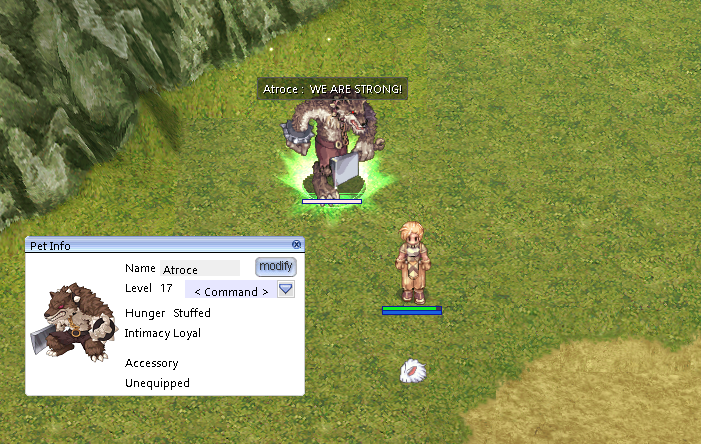
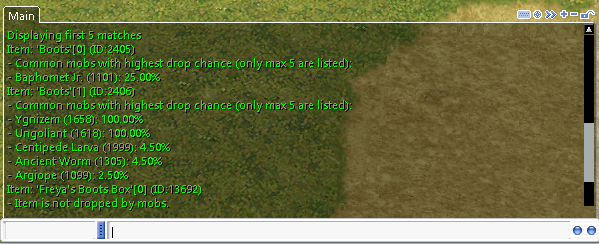
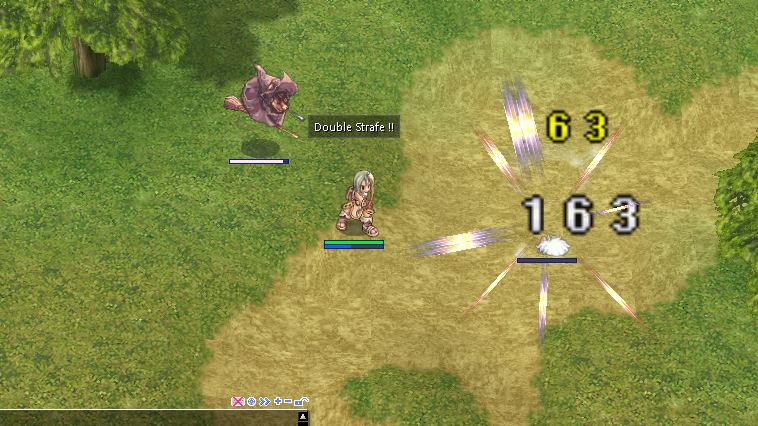
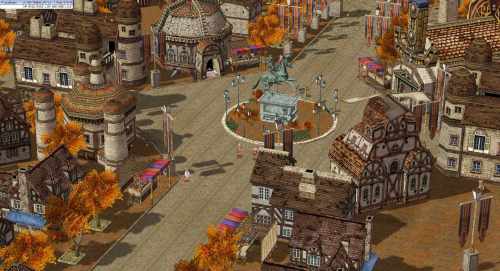
I just wanted to stop in to say thanks to the Dev team for continuing to support this great game after all these years. RO was a very important game to me in my youth and to see that the community is still active after all this time is amazing. Back in the old days, I always considered running my own server, but I only finally bit the bullet on it recently. I never suspected that the entire server backend would be open-source! As such, I modded the bejeezus out of it. For starters, my server is PRE-RE, however, I backported almost all of the new content from Renewal into it. Here is my Doram character in Malangdo. It's actually pretty easy to pull renewal content into PRE-RE, since they use the same server backend. To pull renewal enemies into pre-re is as simple as grabbing them from db/re's mob-db and mob-skill-db and pulling them into pre-re's mob-db / mob-skill-db. Of course, renewal enemies have slightly different stats, in particular their "max attack" is their "matk" value and their def and mdef values are usually way too high, but that's easily fixed with SDE. Ditto for items and cards, using item-db. As far as the maps are concerned, they're already all in the game, they just don't have warps, so you just need to grab the npc/warps files from renewal and pull them into pre-re. Many renewal dungeons are instances, so you can either pull the instance into pre-re, or do what I did and turn the instance dungeons into normal dungeon floors by adding warps and recreating their mob tables. As for the Doram, it's fairly easy to add them too, I'll probably make a post explaining how to do it at some point. The main thing you have to do is remove your service_korea folder from your prere grf file, which will allow the one from renewal that allows the creation of Doram to be used instead. Then there's a flag in the server settings somewhere that you have to modify so the server won't reject character creation requests for Doram. I'll write up something on this later. The biggest thing I added by far is the ability to rebirth as Super Novice, Star Gladiator, Soul Linker, Ninja, Gunslinger, and Summoner. It always annoyed me that the classes added after the first 12 never got the ability to rebirth, so I did it myself. It's not possible (or at least I can't figure out how to do it) to add new classes to the game since class sprites are hardcoded in the client file, so instead the way I did this is that when you rebirth as one of the new classes, it unlocks a new "quest skill" which is a pre-requisite for their transcendent abilities. The game also checks to see if you have this skill when it determines if you are transcendent (say, for equipping transcendent only armor or getting the 25% max hp / sp bonuses), and it also uses it to force you to the transcendent exp tables. I'd love to share the code for this, but there's so many code changes that it probably can't be done without me just zipping up my entire codebase, which is also somewhat out of date. By I encourage other intrepid coders to experiment! A reborn Ninja's new skill tree. Note the presence of a few Kagerou skills, despite the fact that he is a still a Ninja. The "reborn" skill in the bottom left is the new quest skill that makes this possible. For Ninja / Gunslinger / Star Gladiator / Soul Linker, they get a few skills from their next job as transcendent skills, with many alterations (for example, Soul Linker gains Espa and Eswhoo, but they don't require spirit energy to use, since it's not available. In exchange they have much less power). Summoner gets his post level 100 skills as transcendent skills, since the max level cap is 99. Super Novice gets to become Expanded Super Novice. I also added the ability for Novices to use bows, which required me to make a custom animation for this. The dream of Bow Super Novice is finally real! Beyond this, I also added like a hundred new pets. They all have custom portraits and speech lines. I put up a guide on how to add custom pets elsewhere on the forum if you want to do this. This poor Lunatic is NOT ready for what's about to happen. And then I manually rebalanced the effect of every card in the game and manually tweaked the exp and drop rates of almost every monster in the game. My server is technically 10x, but the beginning feels like 5x or so, while the late game feels more like 20x, because lategame monsters give more exp. I also fixed a ton of bugs and made a number of enhancements, for example if you use the whodrops command, it now shows exact matches first, so if you do "whodrops boots" you actually see slotted boots now! At this point, there's probably some room for debate as to whether or not this game is still Ragnarok Online or something else entirely, but I'm having fun with it. The only problem is that now my regular job seems boring by comparison. Having complete control over the codebase for one of the best games of all time is pretty much impossible to top. Oh well. Everyone reaches the pinnacle of their career sooner or later. I'm sorry if this sounded like a giant advertisement. Actually, my server will probably never be open to the general public. However, where my code is easily distributable I'll probably make some of it available. I've already put up a couple topics sharing some of the files I've written, and I'll probably try to put up a few more once everything is adequately tested (I've also crashed my server about a hundred times already).
 1 point
 -
Need the latest kRO Install folder for your private server? Look no further! ----> Download <---- Latest: 2023-04-04 Installation: Official kRO Updated: 04/04/2023 Download Link: https://mega.nz/folder/jUsDgRxQ#ttLmLjPY9p9cfU5_ShWVCw Package contains RSU RO Patcher Lite for kRO and kRO RE by [Ai4rei] This package is maintained by [Akkarin] Note: Due to continued abuse of my webservers, the files have been moved to MEGA. You can download an extractable .zip of an installed kRO directory, or you can download the official installer from kRO's website. Note: If you require older maps that are compatible with 2021 and older clients, download the 2021 .zip. A fan of this topic? Hit the rep button1 point
-
![More information about "Verdant Prontera [by Tarq]"](https://rathena.org/board/screenshots/monthly_2022_06/1.thumb.jpg.1151f82e2841583495f6faf1d44395b9.jpg)
Version 1.0.0
1419 downloads
Hello Friends, I'm a mapper and I also do map services (contact-me if you're interested in my job) I recently had this Prontera ripped and now I need to make it free for everyone. I hope y'all like it! If anyone wanna support me, please DM me.Free1 point -
Version 3.3.1
2668 downloads
Prontera Seasons by Olrox is a must in every RO server in the world. summer, spring, fall and winter are ready for your players. This file was the most downloaded in rAthena for years, until by a sudden it got lost. I´m uploading this file back by request of my followers. 3.3.1 Rounded center model fixed and textures remapped Fixed shadows Trees were fixedFree1 point -
Interesting, the error makes it seem like you need a variable. Try doing something like .@cid = getcharid(2); if (countinarray(.grbbid[0],.@cid) == 1 && .grbbday[inarray(.grbbid,.@cid)] < 40){1 point
-
countinarray accept 2 variables [or arrays] if you want to use this code do this .@acc_id = getcharid(2); if (countinarray(.grbbid[0],.@acc_id) == 1 && .grbbday[inarray(.grbbid,getcharid(2))] < 40){1 point
-
3812 downloads
This is just a compilation of aura's I've had for quite a few years. I figured since you don't really see many aura's anymore I'd upload all of them from old projects I used to have. IDK who owns all of these so if anyone can look through them and maybe shoot me a pm I'll be able to change this post to give credit where due.Free1 point