Leaderboard


Popular Content
Showing content with the highest reputation on 11/24/24 in all areas
-
Hello, I'm back with a new theme with a simple concept. Unlike the Aira theme, some users may not be able to use it because it is very complex and must have several requirements on the server. This theme is with pure css and js, without sass and minify, Hopefully this new theme is compatible with all existing server specifications even though it only uses LAMP. features we will provide • Blog • Cash Shop Item ( Manual add item ) • Quest Shop Item ( Manual add item ) • Streamer ( Manual add item ) • Referrals ( Manual checking & Approve ) • NPC (Manual Add) • YPanel If you want any features to be added or suggestion, please comment in the comments column. If the desired feature can be added, we will add it. If you can't open the sidenav, just click on the logo on the header, then the sidenav will appear. The themes we will create are not for sale, we provide them for FREE The theme we created is still in progress please be patiant Screenrecording_20241123_183259.mp42 points
-

Version 1.8.9.7
57298 downloads
Hello everyone, GRF Editor is an open-source tool for editing GRF files (https://github.com/Tokeiburu/GRFEditor). It offers a wide variety of features and customizations. The software is very stable and responsive, it can handle large operations without lagging your computer. How to install Download the zip archive provided from the download link at the bottom of this description or directly from there: http://www.mediafire.com/?aflylbhblrzpz0h Install the application with GRF Editor Installer.exe; if you are missing a .NET Framework you will be prompted to download it. Once you are done, you can start the program from the link on your desktop. Key features Overall speed is faster (or at least equal) than any GRF tool. Common operations: add, delete, merge, extract, preview, save. Undo and redo for any operation. It can open any GRF file format. Clean and very interactive interface. Saving formats supported : 0x300, 0x200, 0x103 and 0x102 (through the Settings page) and conversion to the Thor format. Instant filter and search options (example : "map .gat"). File association and context menus integration for .grf, .gpf, .rgz and .thor (through the Settings page). Can rebuild separated images into one file easily. Drag and drop (with the ALT key, can be modified in the Settings page). This is a big part of the software; most of the items can be moved around within the application itself or from/to Windows Explorer. If drag and drop does not work, it is most likely because you've started the program using administrator privileges. GRF Editor does not requires administrator privileges to run. Tools Grf validation: allows you to validate a GRF with multiple settings. It can detect corrupted GRF entries, invalid sprites, empty files, non-GRF files, duplicate files and a lot more. Flat maps maker: generates flat maps from .gat and .rsw files. Useful to generate WoE maps or to fasten up the loading time. Patch maker: generates a GRF patch based on two different GRFs. Hash viewer: shows the hash code (both CRC32 and MD5) for files. Image converter: converts an image to any format requested (BMP, PNG, JPG, TGA). GrfCL: used to create batch files (.bat) which can automate tasks on GRF files. See the content in GrfCL.rar in the download for more information. This tool can be customized from the sources as well. Grf encryption The encryption feature has been enabled again. It's similar to what it used to be and it has been tested on client versions ranging from 2012-08-01 to 2024-01-01. Some error messages will be displayed if necessary. If you have an issue, copy the error message (with the code, if there's one) and send me the client executable with the cps.dll file generated by GRF Editor. There shouldn't be compatibility issues anymore though! Thor files Thor files are patches used by Thor Patcher ( https://github.com/rathena/rathena/wiki/Thor-Patcher ). Because of their similarity with the GRF file structure, they have been integrated within GRF Editor. The primary utility of this feature is that it allows you to add encrypted files to a Thor patch. All the other options can be achieved by using Thor Maker. You'll find the necessary steps below, but test your patches before sending them off to players (I've done a lot of testing on my end, but better be safe). If you're using SecureGRF, then make a new GRF, add the files and encrypt it. In GRF Editor, open the encrypted GRF you just made, use "Save as" and name the new file with a .thor extension. That's it, if you want to change the output directory, click on Edit > Edit Grf/Thor settings. You can select the output mode and the GRF to merge the patch with. Simply save again if you change these properties. If you're using GRF Editor's encryption, then make a new Thor file (File > New > New Thor) and add the files you want to patch it with. Right-click on the files you want to encrypt and use Encryption > Encrypt. Technical stuff Requires .Net Framework 4.0 to run (4.0 or more will work as well). Automatically converts file name encoding to the currently selected encoding (you can change the encoding in the Settings page). Data virtualization is used as much as possible to preview files, meaning the files aren't completely loaded. Right-clicking an item will bring up the available options with that file. Preview file formats: txt, log, xml, lua, lub, bmp, png, tga, jpp, db, ebm, pal, gnd, rsw, gat, rsm, str, spr, act, imf, fna, bson, csv, ezv and wav. Services are "crash ready", meaning that you will be warned about a failed operation and no work will be lost (the application won't close and crash). It tries to continue operating even if it meets unsual conditions. Operations can be cancelled by clicking on the button near the progress bar. The warning level can be changed to avoid messages like "Please select a folder first." When prompted with an error, use Ctrl-C to copy the current dialog's content. Some screenshots! 1) Previewing an act file, while showing the search feature 2) Preview of a model file (rsm or rsm2) 3) Preview of GrfCL 4) Preview of maps 5) Preview of Grf validation 6) Search feature (press Ctrl-F or Ctrl-H to bring up within a text editor) Got a feedback? I'd gladly hear you out and fix issues you have with the program.Free1 point -
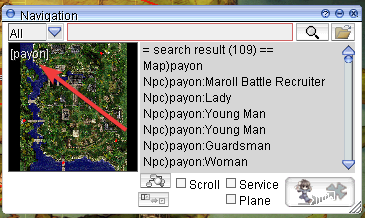
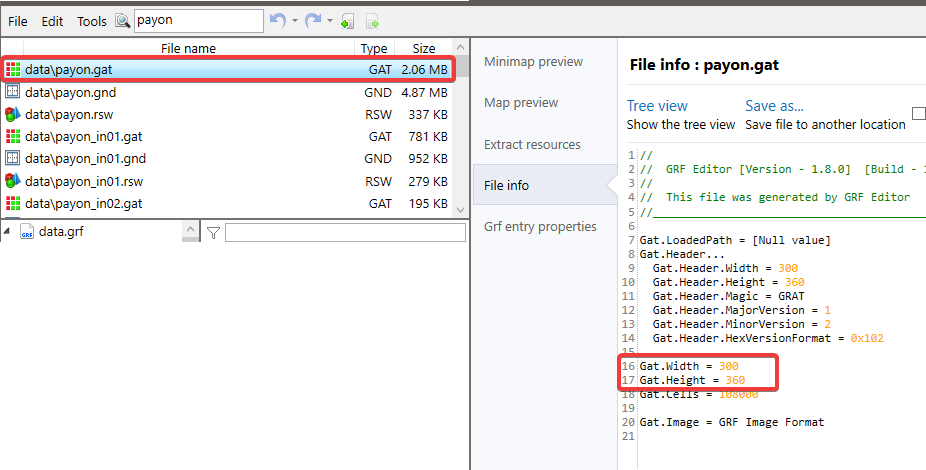
Adding custom maps to RO server - Part 1. In this Part you will learn how to add your custom maps to your Ragnarok server. · Clientside: Download/create the map you want to add to your Ragnarok Server. a. You should have 3 files of the map. i. [mapname].gat ii. [mapname].rsw iii. [mapname].bmp Place your .gat and .rsw files inside your GRF within data\ as well as your .bmp file inside your data\texture\À¯ÀúÀÎÅÍÆäÀ̽º\map\ directory. Go to your data\mapnametable.txt and add the Area display name of your map in the following format “[mapname].rsw#Map Display Name#”, without the quotation marks. · Serverside: Now go to your server directory and do the following: a. Go to your db\import\ directory and open map_index.txt - (!) Do not confuse it with db\map_index.txt i. In the text file add at the bottom of the file [mapname]<tab>{index(1250+)} - Once done, Save and close the file. b. Now go to your conf\import\ directory and open map_conf.txt: i. Once there - add your maps like so: map: [mapname] - Once done, Save and close the file. Once the above steps are done. Download either WeeMapCache or MapCacheEditor in order to add your [map].gat file to your map_cache.dat a. Open your server Project and recompile it. Congratulations, you have now successfully added a new map to your server. In part 2 of the guide, we will be adding the custom map to your world map view. Adding custom maps to your RO server - Part 2. In Part 2 of the guide, you will be learning how to add your custom map to World map view and Kafra move animations - The good news is: It's all client-side. Go to data\mappostable.txt a) At the top of the file you should see #@ (probably 12@), change that to 13@ (That is the array size of the mappostable) b) Scroll down to the bottom of the file and add the the map you want to add (as well as its coordinates on the map where it should appear) in the following format [index]#[mapname].rsw#x¹#y¹#x²#y²# i) **x¹, y¹, x², y² stand for the start and end coordinates of the map box which gets drawn on the world map. Navigate to data\luafiles514\lua files\worldviewdata\ a) Find files worldviewdata_table.lub as well as worldviewdata_language.lub (if your files are inside a GRF, extract them). i) Open your worldviewdata_language.lub and add the following line: MSI_###_[MAPNAME] = "Map Display Name", (if you’re adding it at the end of the array, don’t forget to remove the comma, as it’s the last element of the array. ii) Now open your worldviewdata_table.lub and add the following line: {###, "[mapname].rsw", x¹, y¹, x², y², WORLD_MSGID.MSI_###_[MAPNAME], ""} (!) IMPORTANT - the ### number at the start of this array appears to be corresponding to a general “block” location on the map. e.g.: If you’re adding a map somewhere in the Payon area, you would want this number to be “111”, however if you’re adding it in the area of Rachel, you’d want the number to be “105”. – In short, whenever you’re adding maps, always take a look at the numbers of the maps close to your new map, use those numbers. If your map doesnt appear on the worldmap, this is more than often the culprit behind it! Go to data\luafiles514\lua files\datainfo\ - (Optional) This is where you will be adding the kafra teleporting service animations. b) Open the file kaframovemapservicelist.lub and add Kafra teleport service information to your map as well as KafraMinimapPos I am not certain what the parameters in this array do, if anyone has any idea, please let me know ? Adding custom maps to your RO server - Part 3. In Part 3 of this guide, you will be learning how to add links between your maps and/or NPCs within the maps for your navigation system! (!) Important - Before you can start with Part 3, you will be required to know how to: *navigate through your GRF, **Implement your custom maps, ***Add your custom maps to the Ragnarok world map! Firstly, what you want to do, is go to your data\luafiles514\lua files\ and extract your entire \navigation\ folder. Naturally - remember to make a backup of it before you start working on it. Once you have the folder extracted, what you want to do first of all is to add your custom map to the navi_map_krpri.lub. To do that, open up the file, scroll all the way down the list and add your map in the following format: { "[mapname]", "Display name", ID, xSize, ySize } (!) Important things to note - (!) The "Display name" is going to be name displayed over your map like so: (!)There are 3 values for the IDs (I am not 100% certain about what they are exactly, will need to research it more - then I will update the information here) 5001 is used for standard maps, such as Towns, Fields, Dungeons. 5002 appears to be used for maps which have clone counterparts? Lastly 5003 is used for indoor maps. (!) xSize and ySize correspond to thevalues of gat.Width as well as gat.Height Secondly, we will be adding connections between neighbouring maps. To do that, you want to open navi_link.lub and add connections to; as well as from the neighbouring maps in the following format: { "[yourmap]" , [index], 200, 99999, "[yourmapname]_[destmapname]_[index]", "", xCoord, yCoord, "payo2", destCoord_x, destCoord_y}, e.g.: { "pay_arche", 14056, 200, 99999, "pay_arche_payon_706", "", 81, 17, "payon", 228, 327 }, { "payon", 15327, 200, 99999, "payon_pay_arche_1977", "", 228, 329, "pay_arche", 81, 22 }, (i) - Because of the way the navi_link.lub is built I decided to write a small program which will make adding connections between new custom maps and old ones cleaner and hopefully easier ? - Perhaps I will also expand it to also editing the other navi files. P.S: If you believe that guide is useful, but could be improved upon, please do drop your suggestion. - You can also contact me either via PM on the forums or adding me on Discord - Shinsei#3451 I will be adding further parts of the navigation guide over the next couple of days. Hope it helps!
 1 point
 -
try using this map files if your client read grf put the file into your custom grf and then put your grf name at the first line in data.ini1 point
-
Hello, The same thing happened to me, when trying to download the latest version of the emulator, to be later adapted to pre-renewal. The real problem is that the map_cache.dat file in the db \ pre-re folder comes with the new map and not the old one. What to do is the following: 1.- update the map that is by the old map that I attached in this post to the map_cache.dat file. 2.- Add the map to the GRF file of your personalized client, because the maps, both the client and the server must be exactly the same, otherwise, the same thing that you have reported in this will happen again theme created. I hope this helps you. Old Maps.zip1 point
-
1 point
-
Create a folder called data. Inside data place the map files. Create a folder in data called texture and then a folder in texture called À¯ÀúÀÎÅÍÆäÀ̽º. Inside À¯ÀúÀÎÅÍÆäÀ̽º create a folder called map and drop izlude's minimap bmp file in there. Using GRYFF_SVN add the directory data and it will pull in all of the directories and files. A message will pop asking about ASCII and korean character translation. Just click YES. Then right click the folder and save as. Give it some name and you have a GRF file. Drop the GRF file in your RO folder and edit the data.ini to call your new GRF before data.grf by giving it a higher priority (higher priority = lower number. ex) GRF.. = 0 has a higher priority than GRF = 1. When you run your client it should show the old izlude map now. Note: Dont forget to recache your old izlude map .GATs to map_cache.1 point