


Shinsei
-
Posts
9 -
Joined
-
Last visited
-
Days Won
3
Content Type
Profiles
Forums
Downloads
Jobs Available
Server Database
Third-Party Services
Top Guides
Store
Everything posted by Shinsei
-
[WIP] NaviLinker (under construction) - Thoughts?
Shinsei replied to Shinsei's topic in Project Concepts & In Progress
Hm, you do have a point ? I'll take a look into it, but first I want to get it done to function like so. Afterwards I'll be looking into optimizing and expanding. Thanks Thanks, glad to hear ? -
[WIP] NaviLinker (under construction) - Thoughts?
Shinsei replied to Shinsei's topic in Project Concepts & In Progress
Glad to hear that ? -
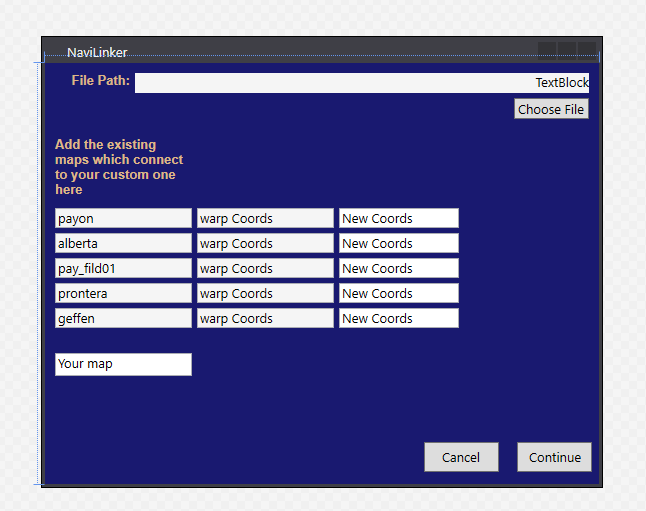
Hello everyone! I'm currently working on a small program. The concept here is that a person can use it in order to edit their navi_link_krpri.lub / navi_link_krsak.lub files in an orderly manner. The way the program is going to work - is that it's going to be taking in entries (from which maps your custom map should be accessible) as well as the in-and-out coordinates. It will then create entries within the file, following the pattern of how it's currently built, therefore not breaking the current incrementing index values inside of it. My question to you guys is - What are your thoughts on it? Reckon it's a good idea? If yes, should I perhaps also expand it - so that the user can also use it to edit other "navi_*" files? I personally believe it would make adding navigation data to the Projects a lot easier. ?
-
That's weird. True that map_index.txt file did already exist in the \import\ folder. However there was no "import:" pointer to it in \db\ file - Also I personally didn't have the maps_athena.txt file or the "import:" pointer to it in the \conf\ directory. That's also the reason why I described that part like I did in the guide.
-
@Mina-chan I believe there shouldn't be any problem with the method which you are using to add your custom maps. (I just personally have been doing it as I've described) The world map files are also within your GRF, the only thing is that the files from worldviewdata are .lub files, which can't be edited within GRF (at least as far as I'm aware) therefore in order to edit them, you need to first extract, and then when you're done - import them back into GRF. In short - no there should be no conflicts. Edit: As Akkarin mentioned above, it is better to use the imports, to avoid unnecessary conflicts. I've edited the part of the guide to fit that convention of doing things on the server-side
-
What is it that you don't understand here exactly? If you can clarify, I can try to put it in different words.... Maybe with images?
-
Ah yes, I got it. I'll edit the guide so that people don't continue doing it that way ?
-
Thank you - Also, could you possibly clarify what do you mean exactly by "full use" of the directory? I'm not certain I understand what you mean there.
-
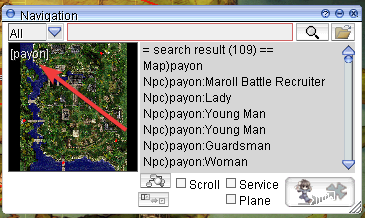
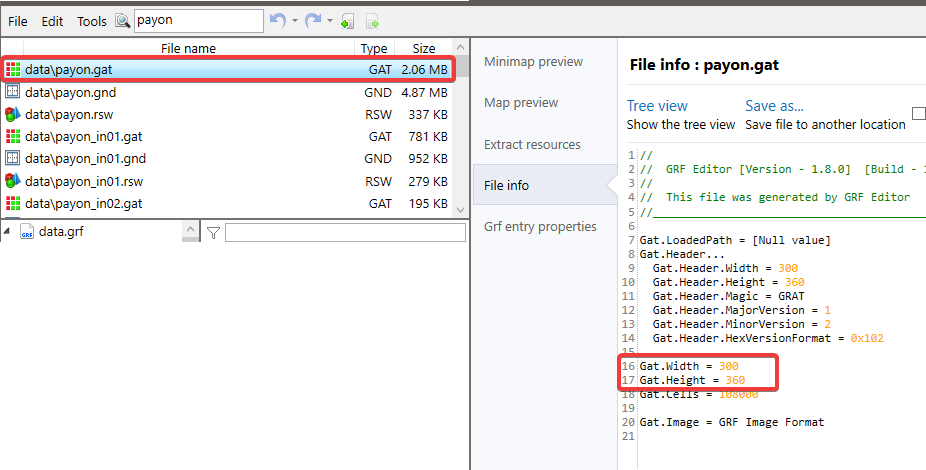
Adding custom maps to RO server - Part 1. In this Part you will learn how to add your custom maps to your Ragnarok server. · Clientside: Download/create the map you want to add to your Ragnarok Server. a. You should have 3 files of the map. i. [mapname].gat ii. [mapname].rsw iii. [mapname].bmp Place your .gat and .rsw files inside your GRF within data\ as well as your .bmp file inside your data\texture\À¯ÀúÀÎÅÍÆäÀ̽º\map\ directory. Go to your data\mapnametable.txt and add the Area display name of your map in the following format “[mapname].rsw#Map Display Name#”, without the quotation marks. · Serverside: Now go to your server directory and do the following: a. Go to your db\import\ directory and open map_index.txt - (!) Do not confuse it with db\map_index.txt i. In the text file add at the bottom of the file [mapname]<tab>{index(1250+)} - Once done, Save and close the file. b. Now go to your conf\import\ directory and open map_conf.txt: i. Once there - add your maps like so: map: [mapname] - Once done, Save and close the file. Once the above steps are done. Download either WeeMapCache or MapCacheEditor in order to add your [map].gat file to your map_cache.dat a. Open your server Project and recompile it. Congratulations, you have now successfully added a new map to your server. In part 2 of the guide, we will be adding the custom map to your world map view. Adding custom maps to your RO server - Part 2. In Part 2 of the guide, you will be learning how to add your custom map to World map view and Kafra move animations - The good news is: It's all client-side. Go to data\mappostable.txt a) At the top of the file you should see #@ (probably 12@), change that to 13@ (That is the array size of the mappostable) b) Scroll down to the bottom of the file and add the the map you want to add (as well as its coordinates on the map where it should appear) in the following format [index]#[mapname].rsw#x¹#y¹#x²#y²# i) **x¹, y¹, x², y² stand for the start and end coordinates of the map box which gets drawn on the world map. Navigate to data\luafiles514\lua files\worldviewdata\ a) Find files worldviewdata_table.lub as well as worldviewdata_language.lub (if your files are inside a GRF, extract them). i) Open your worldviewdata_language.lub and add the following line: MSI_###_[MAPNAME] = "Map Display Name", (if you’re adding it at the end of the array, don’t forget to remove the comma, as it’s the last element of the array. ii) Now open your worldviewdata_table.lub and add the following line: {###, "[mapname].rsw", x¹, y¹, x², y², WORLD_MSGID.MSI_###_[MAPNAME], ""} (!) IMPORTANT - the ### number at the start of this array appears to be corresponding to a general “block” location on the map. e.g.: If you’re adding a map somewhere in the Payon area, you would want this number to be “111”, however if you’re adding it in the area of Rachel, you’d want the number to be “105”. – In short, whenever you’re adding maps, always take a look at the numbers of the maps close to your new map, use those numbers. If your map doesnt appear on the worldmap, this is more than often the culprit behind it! Go to data\luafiles514\lua files\datainfo\ - (Optional) This is where you will be adding the kafra teleporting service animations. b) Open the file kaframovemapservicelist.lub and add Kafra teleport service information to your map as well as KafraMinimapPos I am not certain what the parameters in this array do, if anyone has any idea, please let me know ? Adding custom maps to your RO server - Part 3. In Part 3 of this guide, you will be learning how to add links between your maps and/or NPCs within the maps for your navigation system! (!) Important - Before you can start with Part 3, you will be required to know how to: *navigate through your GRF, **Implement your custom maps, ***Add your custom maps to the Ragnarok world map! Firstly, what you want to do, is go to your data\luafiles514\lua files\ and extract your entire \navigation\ folder. Naturally - remember to make a backup of it before you start working on it. Once you have the folder extracted, what you want to do first of all is to add your custom map to the navi_map_krpri.lub. To do that, open up the file, scroll all the way down the list and add your map in the following format: { "[mapname]", "Display name", ID, xSize, ySize } (!) Important things to note - (!) The "Display name" is going to be name displayed over your map like so: (!)There are 3 values for the IDs (I am not 100% certain about what they are exactly, will need to research it more - then I will update the information here) 5001 is used for standard maps, such as Towns, Fields, Dungeons. 5002 appears to be used for maps which have clone counterparts? Lastly 5003 is used for indoor maps. (!) xSize and ySize correspond to thevalues of gat.Width as well as gat.Height Secondly, we will be adding connections between neighbouring maps. To do that, you want to open navi_link.lub and add connections to; as well as from the neighbouring maps in the following format: { "[yourmap]" , [index], 200, 99999, "[yourmapname]_[destmapname]_[index]", "", xCoord, yCoord, "payo2", destCoord_x, destCoord_y}, e.g.: { "pay_arche", 14056, 200, 99999, "pay_arche_payon_706", "", 81, 17, "payon", 228, 327 }, { "payon", 15327, 200, 99999, "payon_pay_arche_1977", "", 228, 329, "pay_arche", 81, 22 }, (i) - Because of the way the navi_link.lub is built I decided to write a small program which will make adding connections between new custom maps and old ones cleaner and hopefully easier ? - Perhaps I will also expand it to also editing the other navi files. P.S: If you believe that guide is useful, but could be improved upon, please do drop your suggestion. - You can also contact me either via PM on the forums or adding me on Discord - Shinsei#3451 I will be adding further parts of the navigation guide over the next couple of days. Hope it helps!
- 22 replies
-
- 16
-

-

-

-
