Leaderboard


Popular Content
Showing content with the highest reputation on 06/23/17 in all areas
-

Version 1.2.0.0
8474 downloads
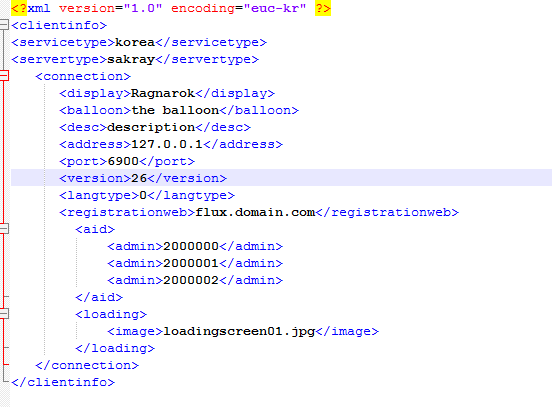
Heya! This is a new project I've made aiming to manage the various databases as easily as possible. This tool was initially developped using Client database editor's engine, a tool from GRF Editor. It has been adapted to support more database formats and many of the features have been improved. How to install Download the zip archive provided from the download link at the top right corner of this description or directly from there : http://www.mediafire.com/download/p0zhcc8ipa6cjt3 . Install the application with SDE Installer.exe; if you are missing a .NET Framework you will be prompted to download it. Once you are done, you can start the program from the link on your desktop. Features Both rAthena and Hercules' formats are supported by the application. Many conversions between rAthena and Hercules are possible. Converting items can be done simply by right-clicking on the elements and selecting "Copy entries to clipboard (ServerType)". Undo and redo commands are available, as well as navigation commands (quite useful when switching tabs a lot). There are many shortcuts within the application, all of which are shown when right-clicking items or going through the menus. I do plan on adding more as well. The databases are 'merged' between each other to offer an easier view. This is true mostly for the item and mob databases. Flag fields can be entered with either an hexadecimal value or an integer value. You will have to add "0x" if you want to enter an hexadecimal number though. For Windows XP users, the program's layout may change a bit. The Aero theme is applied to make sure the application looks like it should. Getting started Create a new project from File > New project. Go in the settings tab and set the path of your database. If you're using pre-renewal, then drop the pre-re folder in the "Server DB path" box (drop the re folder otherwise). Don't drop your "db" folder, it simply won't work! Save your project file to avoid redoing this step everytime you reload the application by going in File > Save project info. The project info file is automatically saved, so you don't need to save it everytime you do a modification in the settings. If you associate .sde files with this tool, you will be able to start up your project from the project file directly (which is more convenient). The last setting is the resource files and it is optional. Simply drag and drop a GRF in the paths list. This will add icons in the items list view (it will also make the application slower when scrolling for that list). Easy input fields All the fields are easy to set and most of them have tooltips. For example, to edit the drops of a mob, simply right-click on the items and change the drop value (both float and integer values are accepted in the field : typing 5.20 is the same as typing 520). How to save the database There are multiple ways to save the database : quick save, full save and export. Quick save keeps the commands you've applied on the database (Ctrl-S), this is the saving option you should be using. Full save (Ctrl-Shift-S) does not keep the commands and you will not be able to undo any operations afterwards. Export (File > Export to db/SQL) exports the database to another folder and this is normally used to convert databases. When saving, the comments are preserved as much as possible, but this is not always possible. For example, the items table from Hercules is always rewritten, so the comments will be lost in this file. Unmodified tables will not be saved. Disabling a tab will also prevent the associated table from being rewritten/saved. This can be achieved by right-clicking on a tab and selecting "Disable 'table name'". SQL support You can export your current database to SQL from File > Export to SQL > ... The first option in the list is the current database format. The other options are used for conversions between rAthena and Hercules. Backups system The application automatically creates backups everytime you save the database (can be disabled in Settings > Enable backups manager). You can revert to a previous date by going in Tools > Backups manager. This tool's purpose is to make sure you never lose any important data (as well as preventing data corruption). Merging or adding lines from another database It is possible to merge databases by going in Edit > Add item from raw db line. Simply copy and paste the lines from the database you want to add. You must select the corresponding table before doing so, of course. (Known bug : adding lines with invalid parameters will put the database in an invalid state). Synchronize with client database files If "Synchronize with client database files" is checked in the Settings tab, you'll be able to turn on all the following features. Bind item tabs together (suggested by UltraCat) This feature enables you to quickly alternate between the Item and Client Items tabs. Whenever you switch table, it will autoselect the item previously selected. The text search filter will also be applied to all three tables (Item/Item2/Client Items). Subfilters (such as item description, script, etc) will be ignored if the item isn't included in the search result. Manage view IDs automatically (suggested by UltraCat) This feature allows you to completely ignore the view IDs for headgears and costumes. Only the identified resource's field is taken into account when synchronizing with the client databases, so make sure you set at least this field! You must also set up the lua paths; go in any item table and click on the wheel next to the "View ID" field. This will bring up a dialog to setup the paths (preferably, the files should be located in your data folder to avoid saving the GRF all the time). They will be automatically decompiled if necessary. If everything has been properly set, the View ID field for the headgears and costumes will be grayed out. When saving, you'll notice some view IDs will be switched around, but SDE will try to keep your original IDs as much as possible. The view names will be changed to the item's Aegis Name (has no effect ingame). Mob sprites edition In the mob tables, you will find a wheel button, similar to the view IDs. Setting up the paths will allow you to see the mob sprites as they will appear ingame (except for granny models, like emperium for instance). The "..." button can let you select the sprites from the mob folder in the GRFs (or data folder). Preview images With the client tables synchronization, the preview image for items in the list view will be properly displayed. This is handy for custom items. Notepad++ support There is support for Notepad++ to easily find items in a text (or conf) database. Right-click an item and use "Select in Notepad++". Search feature The search engine is the same used as CDE, so it should make it easy to find an item. There is also a hidden search option : if you type "[number_of_slots] 4" it will give all the items with 4 slots or "[refineable] true" will give you all refineable items. This can be applied to any attribute in the table which are not shown in the search panel. Todo list Import from SQL (is that even necessary?). Automatically create a table from a file. Batch files / command line methods (would be similar to GrfCL). Known bug : exporting mob_skill_db from Hercules to SqlRenewalHercules doesn't seem to be parsing properly (for this file only). Type safety (check for invalid inputs, use the same SQL rules when loading the databases). Hope you enjoy this tool! The sources will be available on githut for the next release. If you have a feedback or suggestions, let me know and I'll probably add them to the software. Sources https://github.com/Tokeiburu/RagnarokSDEFree1 point -
Hello everyone, this is a continuation for my Server-side guide, however, this time, this is a client-side guide instead. No virus can be located at any link located in download spoiler section. So first, before we begin, I would like to tell you that I will not be accompanying you while making a client. Again, this guide is quite long and I expect you to read and absorb it properly. I would be very disappointed and will IGNORE if you have an error that is stated just below. Anyway, moderators, or etc. may change/edit it freely and any suggestions/reports/etc. are highly suggested or required. Again, I will have an example of my own, thus you do not need to follow it. If you find this helpful, see my signature (Not the PayPal, instead the reputation etc. and please don't make a bad thought about it, it's just for some reasons for the others to know that it is working.) Anyhow, this guide WILL WORK at any CLIENT and is not a one-sided client guide only. What to download: Old rev : New rev: I. Letting your Client listen to the server and to the client itself. How to run your server: FAQ: Now you're done. Again, if you have any questions regarding this, please kindly do so, or if you have any suggestions or request to change kindly do so. Again, I really recommend if you follow my server-guide which is stated above. Anyway, good luck on making your server. I hope you'll be able to help the Ragnarok Community. Long live Ragnarok! Best Regards, Freya Edited 22/08/2018: Slashed out one website ; Placed more details.


 1 point
 -
Version 2.2.0
40929 downloads
Third Job Costumes + New Classes The Correction With the advent of jRO releasing new Job Costumes, and also, the new classes from the Taekwon branch, many of server owners want to replace the vanilla sprites or even, implement the bodystyle system. But, there's a catch! Originally jRO, and now, even kRO spriters, have made it completely off of the default pattern of palette. In a classic example, you can notice the pattern of the RO palettes. What matters is the position of the colours, as an example, for all jobs, the white-ish tones will be always on the same row, so we can use it to create custom palettes. See how it works: But jRO didn't follow the classic pattern, making it incompatible with custom palettes (@Kamishi ones included). So, I edited frame by frame of each job sprite, of each gender, mounted or not, correcting them, converting them in a way so many of the previously created palettes will work. This package includes: Alternate Outfits: Alternate Royal Guard M/F + Gryffon Battlemount + Lion Mount Alternate Ranger M/F + Warg Battlemount + Ostrich Mount Alternate Minstrel/Wanderer + Ostrich Mount Alternate ArchBishop M/F + Alpaca Mount Alternate Warlock M/F + Fox Mount Alternate Mechanic M/F + Savage Mount Alternate Genetic M/F + Savage Mount Alternate Guillotine Cross M/F + Hyena Mount Alternate Shadow Chaser M/F + Hyena Mount Alternate Sorcerer M/F + Fox Mount Alternate Sura M/F + Alpaca Mount Alternate Rune Knight M/F + Dragon Battlemount + Lion Mount New Classes Star Emperor M/F + Wolf Mount Soul Reaper M/F + Wolf Mount As requested by @Emistry, I also added an extra, making it more compatible to default palettes: Kagerou/Oboro + Frog Mount Following the another @Emistry's request, all files are now already on GRFs. The previous version had no Cashmount palette included, this one fixes the issue. Only the already released costumes are supported at this moment. The Rune Knight seems to be the last of them, it's over a year from the first release! As a final part of the package, I'm including Classic Palettes for all Alternate Costumes. Enjoy the final product!Free1 point -
Just change the name " yourVariable " to anything else like " warpQuest01 "1 point
-
please check my message1 point
-
Here's another way to do it with script commands: // Identify all unidentified items getinventorylist; for( set .@i,0; .@i < @inventorylist_count; set .@i, .@i +1 ) { if ( @inventorylist_identify[.@i] == 1 ) continue; delitem2 @inventorylist_id[.@i],1,0,0,0,0,0,0,0; getitem @inventorylist_id[.@i],1; set .@count, .@count +1; } if (.@count) dispbottom .@count +" items identified.";1 point