Leaderboard
Popular Content
Showing content with the highest reputation on 06/10/17 in all areas
-
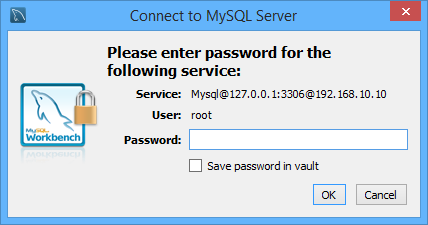
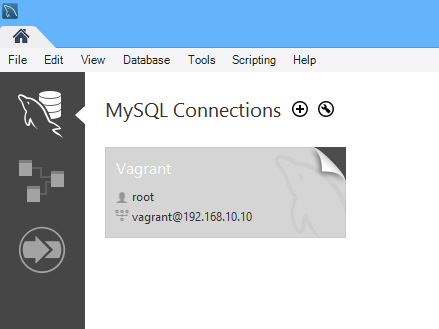
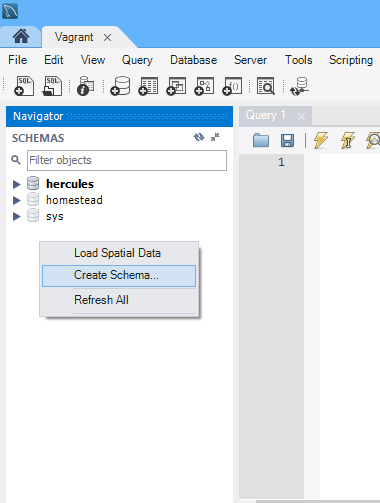
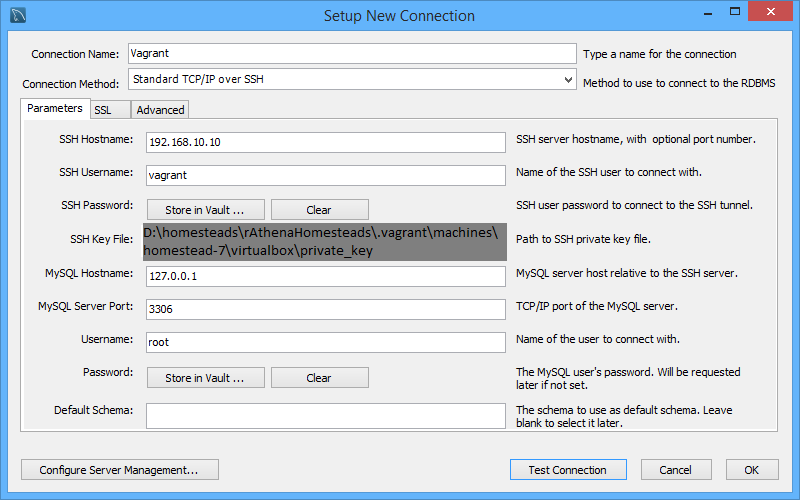
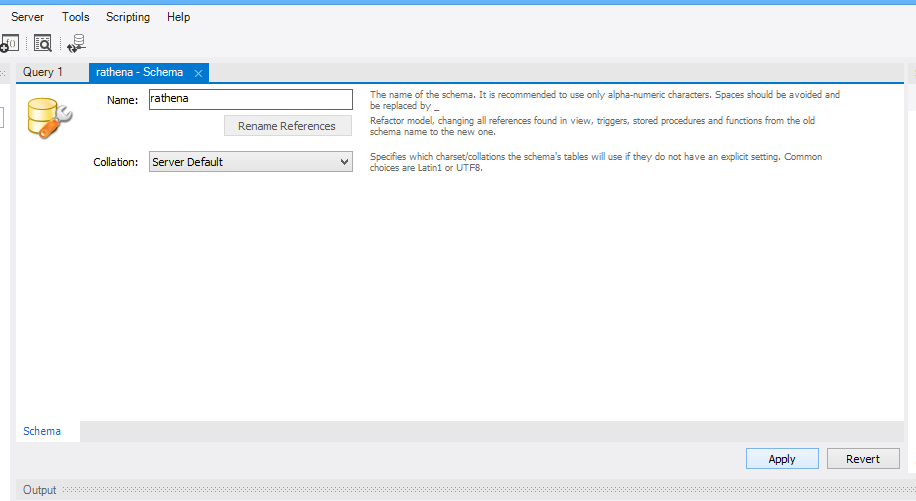
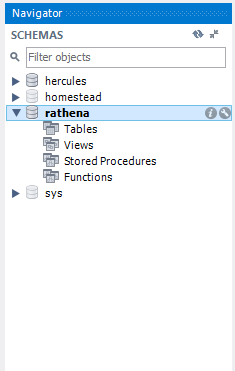
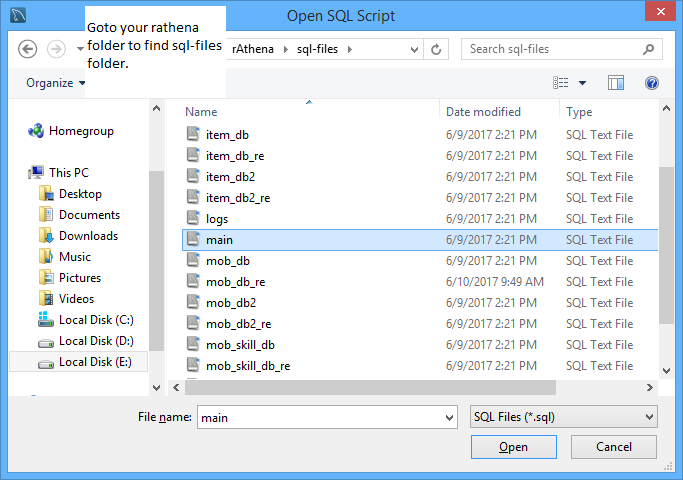
Introduction Vagrant has been widely used for running the Linux distribution environments on top of Windows platform for the sake of consistency on development setup among developers since they can share the exact Linux distro setting within their team. Vagrant helps the developer to automate the process of setup the particular environment such as LAMP and it can be deployed into production server later which reduce the time of manually setup instead of focusing on developing the system. Vagrant also helps reduces "meddling" the host system files since vagrant contained the intended setup inside guest system. So every time the developer format his/her computer or buying new PC/Workstation/Laptop, he/she can quickly restore his/her development environment inside the new computer. Some of you might want to use gcc/g++ compiler instead of Microsoft Visual Studio or Cygwin or you might want to practice setting up the server locally before deploying it into VPS/Dedicated server etc. So this guide suits your needs. In this guide, I will show you how to use Laravel Homestead box for compiling rAthena. **NOTES** You can use any vagrant boxes as well although in this case, I am using Homestead because it came together with LAMP preconfigured and I am still developing custom vagrantfile and in the future, I might release rAthena boxes for speeding up the process. For the time being just bear with this one. Preliminary Download these files first Virtual Box: https://www.virtualbox.org/wiki/Downloads Vagrant: https://www.vagrantup.com/downloads.html Cmder: http://cmder.net **Preferably choose "Download full" MySQL Workbench: https://dev.mysql.com/downloads/workbench/ Atom/Notepad++/Any your preferred editor: https://atom.io / https://notepad-plus-plus.org Installing Virtual Box, Vagrant, MySQL Workbench and those editor should be self-explanatory. Just keep clicking "Yes" and "Finish". However, for cmder, you can extract it into any place you want as shown below: C:\cmder Create the shortcut of Cmder.exe from inside cmder folder and paste it into your desktop for the sake of easy access. Configure Vagrant 1. Run your Cmder.exe shortcut and install Vagrant plugins for VirtualBox Guest Additions using below command. vagrant plugin install vagrant-vbguest 2. Generate ssh key using below command. ssh-keygen -t rsa 3. It will show these lines, just press enter to accept the path to store your ssh key. Generating public/private rsa key pair. Enter file in which to save the key (/c/Users/YOUR_USERNAME/.ssh/id_rsa): 4. Enter your any passphrase key and insert the same key for the second one. Created directory '/c/Users/YOUR_USERNAME/.ssh'. Enter passphrase (empty for no passphrase): Enter same passphrase again: Configure Laravel Homestead 1. Download the Laravel Homestead box using below command and choose virtualbox as provider. Wait until it finish downloading. Its gonna take a while depending on your internet connection speed. vagrant box add laravel/homestead 2. It is preferably to change into another disk for your homestead folder. Example as show below. C:\Users\Zarey λ cd .. C:\Users λ cd .. C:\ λ D: D:\ λ mkdir homesteads D:\ λ cd homesteads 3. Clone the homestead repository into your preferable folder like shown previously. D:\homesteads λ git clone https://github.com/laravel/homestead.git rAthenaHomesteads 4. Enter rAthenaHomesteads folder and run following command. D:\homesteads λ cd rAthenaHomesteads D:\homesteads\rAthenaHomesteads (master) λ bash init.sh 5. Open the generated Homestead.yaml inside rAthenaHomesteads folder using your favorite editor. Use below setting as your guidance. As you can see, I create SourceCodes folder inside my drive E which is the place I keep rAthena server. Customize it according to your needs. Don't forget to save your changes. You can also refer this official documentations for Laravel Homestead. --- ip: "192.168.10.10" memory: 2048 cpus: 1 provider: virtualbox authorize: c:/Users/YOUR_USERNAME/.ssh/id_rsa.pub keys: - c:/Users/YOUR_USERNAME/.ssh/id_rsa folders: - map: e:/SourceCodes to: /home/vagrant/Codes sites: - map: homestead.app to: /home/vagrant/Codes/WebDevs/blog/public databases: - homestead # blackfire: # - id: foo # token: bar # client-id: foo # client-token: bar # ports: # - send: 50000 # to: 5000 # - send: 7777 # to: 777 # protocol: udp 6. It is time to run your homestead box. Inside your rAthenaHomestead folder, run the below command to start the homestead box. Its gonna take a while and you can ignore the warning about insecure key. vagrant up 7. Now you can enter the homestead box via ssh using below command. vagrant ssh Compile rAthena server 1. At this point, you can refer rAthena wiki for the compiling process. However, I am gonna show the step that I used for this guide. Since you already inside the homestead box for the first time, it is recommended to update and upgrade your homestead box. Choose the option "keep the installed ..." every time it popup when upgrading the homestead box. So that the preconfigured settings inside homestead box are keep intact unless you know what you are doing. Use below commands to update and upgrade your homestead box. sudo apt update sudo apt upgrade 2. Exit from your homestead and restart your homestead box before you enter again using below commands. Its gonna take a while. exit vagrant halt vagrant up vagrant ssh 3. Install the following packages using below command. Although some packages might already installed, it is no harm to use below command just to avoid the missing packages. sudo apt install git make gcc g++ libmysqlclient-dev zlib1g-dev libpcre3-dev 4. Go to Codes folder and clone the rAthena repository. **NOTES** You might wondering why I didn't clone the repo first before enter the homestead box? It is because I want to avoid using dos2unix whenever some bad interpreter occurred. vagrant@homestead:~$ cd Codes vagrant@homestead:~/Codes$ git clone https://github.com/rathena/rathena.git 5. Go to rathena folder and compile it accordingly. vagrant@homestead:~/Codes$ cd rathena vagrant@homestead:~/Codes/rathena$ ./configure && make clean && make server Setup rAthena configuration 1. Configure the rAthena networking & anything you need inside conf folder. Please note the IP address for your rAthena is based on what you set inside Homestead.yaml, in this case it would be 196.168.10.10. Below are my examples. - conf/import/char_conf.txt userid: serv1 passwd: perv1 login_ip: 192.168.10.10 char_ip: 192.168.10.10 start_zeny: 500 - conf/import/inter_conf.txt // MySQL Login server login_server_ip: 127.0.0.1 login_server_port: 3306 login_server_id: root login_server_pw: secret login_server_db: rathena login_codepage: login_case_sensitive: no ipban_db_ip: 127.0.0.1 ipban_db_port: 3306 ipban_db_id: root ipban_db_pw: secret ipban_db_db: rathena ipban_codepage: // MySQL Character server char_server_ip: 127.0.0.1 char_server_port: 3306 char_server_id: root char_server_pw: secret char_server_db: rathena // MySQL Map Server map_server_ip: 127.0.0.1 map_server_port: 3306 map_server_id: root map_server_pw: secret map_server_db: rathena // MySQL Log Database log_db_ip: 127.0.0.1 log_db_port: 3306 log_db_id: root log_db_pw: secret log_db_db: rathena log_codepage: log_login_db: loginlog - conf/import/map_conf.txt userid: serv1 passwd: perv1 char_ip: 192.168.10.10 map_ip: 192.168.10.10 *** NOTES *** It is not recommended to use root account to access the database, please create the specific account for your server if possible. Above is just for the example. Setup rAthena database via MySQL Workbench Although you may use the command line method provided by rAthena wiki, if you like to use GUI method via MySQL Workbench, here are the steps you may follow. *** NOTES *** Below examples are using root account for database. Please create new account accordingly. You can find the option to create new account on Server > Users and Privileges menu which you can only access via root account. 1. Open the MySQL Workbench from Start > All Programs > MySQL > MySQL Workbench 6.3 CE 2. Click the "+" sign on the right of "MySQL Connections" and fill the form as shown below. 3. Click "Test Connection" button, and enter the "secret" for password. If there is "Can't connect error appear" try click "Ok" and the popup asking password should be appeared. 4. Click the "Vagrant" to access the database connection 5. Right click and select "Create Schema 6. Type "rathena" for the name or any name for your database and click "Apply" 7. Click "Apply" and "Finish" after that. 8. Double click the rathena on schemas to select it. 9. Use "Ctrl+Shift+O" to select the sql files from your rAthena server folder. 10. Use "Ctrl+Shift+Enter" to execute the sql files that you just opened. Repeat all 9-10 steps for all sql files. 11. Right click on schemas and select "Refresh All" to see all loaded tables inside your database. 12. Right click on login table to edit the appropriate details. Based on previous steps, I change the s1 & p1 into serv1 & perv1. You can insert new row for your new account as well. Don't forget to click "Apply" button to save the changes you just made inside the table. Then click "Apply" & "Finish" whenever the pop windows appeared. At this point, you may follow other people guides for setting up the client side. Use below command to run the rAthena server. ./athena-start start Good luck! *** NOTES *** Homestead SSH access username is "vagrant@IP_Address" (my example would be "[email protected]" and password is "vagrant" Homestead database username is "vagrant" and password is "secret" Credits, Resources & References rAthena Github & Wikis: https://github.com/rathena/rathena & https://github.com/rathena/rathena/wiki Laravel Homestead Official Docs: https://laravel.com/docs/5.4/homestead Tutorial to connect vagrant database with MySQL Workbench via ssh: https://ttmm.io/tech/vagrant-windows/ Another Laravel Homestead on Windows 10 tutorial: https://medium.com/@eaimanshoshi/i-am-going-to-write-down-step-by-step-procedure-to-setup-homestead-for-laravel-5-2-17491a423aa2 points
-
Hello, guys! Today I want to share with you my project. I called it RagnaTos. I really love 2002 RO, and for me there is no alternative to this game. RO2 GotW, RO2 LoTs was a failure. The most interesting option is ToS, but only graphic side. Very beautiful art which looks like classic RO (thanks An Jeong-won). And the Idea of my project is to injecting some graphics from ToS to RO. I started with body sprite, and choose my favorite archer class. And this is the result: No pixel art. Because 3D models are used in ToS But more detailed sprites It is possible to increase framerate. And therefore more smoothly char's movements And it's going to be a one problem. Very bid spr, grf files. Because frame-by-frame animation used in RO. I have no idea how that would affect the game. So let's compare classic RO archer with ToS archer: What's next?If I'll continue working with this project: Add more sprites to spr file for increase framerate. Try to inject other class' sprite or gender. Moved here. Thanks!1 point
-
Version 2.2.0
40928 downloads
Third Job Costumes + New Classes The Correction With the advent of jRO releasing new Job Costumes, and also, the new classes from the Taekwon branch, many of server owners want to replace the vanilla sprites or even, implement the bodystyle system. But, there's a catch! Originally jRO, and now, even kRO spriters, have made it completely off of the default pattern of palette. In a classic example, you can notice the pattern of the RO palettes. What matters is the position of the colours, as an example, for all jobs, the white-ish tones will be always on the same row, so we can use it to create custom palettes. See how it works: But jRO didn't follow the classic pattern, making it incompatible with custom palettes (@Kamishi ones included). So, I edited frame by frame of each job sprite, of each gender, mounted or not, correcting them, converting them in a way so many of the previously created palettes will work. This package includes: Alternate Outfits: Alternate Royal Guard M/F + Gryffon Battlemount + Lion Mount Alternate Ranger M/F + Warg Battlemount + Ostrich Mount Alternate Minstrel/Wanderer + Ostrich Mount Alternate ArchBishop M/F + Alpaca Mount Alternate Warlock M/F + Fox Mount Alternate Mechanic M/F + Savage Mount Alternate Genetic M/F + Savage Mount Alternate Guillotine Cross M/F + Hyena Mount Alternate Shadow Chaser M/F + Hyena Mount Alternate Sorcerer M/F + Fox Mount Alternate Sura M/F + Alpaca Mount Alternate Rune Knight M/F + Dragon Battlemount + Lion Mount New Classes Star Emperor M/F + Wolf Mount Soul Reaper M/F + Wolf Mount As requested by @Emistry, I also added an extra, making it more compatible to default palettes: Kagerou/Oboro + Frog Mount Following the another @Emistry's request, all files are now already on GRFs. The previous version had no Cashmount palette included, this one fixes the issue. Only the already released costumes are supported at this moment. The Rune Knight seems to be the last of them, it's over a year from the first release! As a final part of the package, I'm including Classic Palettes for all Alternate Costumes. Enjoy the final product!Free1 point -
1 point
-
it's #define PACKET_OBFUSCATION or something like that. comment that line out1 point
-
It might be cause of packet obsession If you are not using it try disabling it by commenting // in core.h and recompile1 point
-
No. rAthena already drop make sql command if I am not mistaken. Source: Makefile.in sql: $(SERVER_DEPENDS) @echo "-!- 'make sql' is now deprecated. Please run 'make server' to continue. -!-"1 point
-
prontera,150,150,5 script Stat Dealer 99,{ set .@item,7720; // Adjust the item id here set .@name$,"[Stat Dealer]"; //Name of NPC in Dialogue can be changed here mes .@name$; mes "Good-day, I'm here to sell you Stat Points, each 10 Stat Points will cost you 1 "+getitemname(.@item)+" (id: "+.@item+")"; if(countitem(.@item) < 1) goto L_NoPay; next; mes .@name$; mes "How many "+getitemname(.@item)+" would you like to use?"; mes "You have ^00FF00"+countitem(.@item)+"^000000 "+getitemname(.@item)+""; mes "Use '0' to cancel transaction."; input .@input; if(.@input == 0) close; if(.@input > countitem(.@item)) goto L_NoPay; next; mes .@name$; mes "You would like to purchase "+.@input*10+" Status Points with "+.@input+" "+getitemname(.@item)+""; switch(select("Yes:No")){ case 1: mes .@name$; mes "Transaction is completed, just the last few steps.."; next; mes .@name$; mes "Transaction is completed, just the last few steps.."; mes ".."; next; mes .@name$; mes "Transaction is completed, just the last few steps.."; mes ".."; mes "..."; next; mes .@name$; mes "Transaction is completed, just the last few steps.."; mes ".."; mes "..."; mes "...."; next; delitem .@item,.@input; set StatusPoint, StatusPoint + (.@input*10); mes .@name$; mes "Transaction is completed, just the last few steps.."; mes ".."; mes "..."; mes "...."; mes "Transaction has been completed."; mes "Have a nice day."; close; case 2: mes .@name$; mes "Have a nice day."; close; } L_NoPay: mes "I'm sorry but you don't have the required payment to proceed"; close; }1 point
-
Please upgrade your sql database using upgrade sql files in sql-files/upgrades This particular error will be solved by upgrading using this file https://github.com/rathena/rathena/blob/master/sql-files/upgrades/upgrade_20160814.sql1 point
-
1 point
-
Yes you have a lot of ways to convert them in unity. Look at our tools in downloads to convert rsm to any universal 3d format then you can use them in unity.1 point
-
Great work if only this was a release. I like the demon guy with the orb, did you make that?1 point
-
30 frames per movement. True ToS frame rate. Disclaimer: I didn't care about optimizing, performance and possible lug, all at the maximum. In total, for running in all 8 directions: 240 frames, 150 sprites. And I was wrong about files size. It's about 1.6 MB now. Head still as headgear. Original head sprites are disappears after 9th frame and just blinking while moving 30 frames. Looking for solution. Visible items. So, it's really bad news. It's required to edit every visible headgears, shields, weapons for a new sprite. Good news is almost all headgears are half-compatible with new sprite. And needs just adding 30 frames for every animation (need test attacking, picking, dead statuses), and can be solved by script, may be. I just picked some for example. So, that's all for now. Enjoy my video I'm testing headgears and running: And my questions: Is any solution for render all 30 frames of head? Not only first 9. About frame rate. How it would affect for performance and gameplay? Next step I think to try animate an attacking moves. Thanks!1 point


