

Leaderboard


Popular Content
Showing content with the highest reputation on 04/12/19 in all areas
-
My custom Launcher created 100% by me Login Launcher + Update + Account Manager + Vote 4 Points + Donate No need to go to the server site ? What do you think? Suggestions? OLD3 points
-
Hello rAthena Community I'm Earnestinence, and i'll be guiding you to setup rAthena and run Ragnarok Programs you need to install before we start Downloads: Github : https://desktop.github.com/ MySQL (When installing: make sure to check 'Use Legacy Authentication Method; Retain MySQL 5.x compatibility' ) : http://www.mysql.com/downloads/mysql/ MySQL Workbench : http://www.mysql.com/downloads/workbench/ Note: remember the username and password you set when installing ! Latest Clean kRO Full Client : by: @Akkarin Microsoft Visual Studio ( MVS ) : https://www.visualstudio.com/downloads/ Visual Studio is a code editor supporting and C andC++ compiler. more info Click here by @Aleos Notepad ++ : https://notepad-plus-plus.org/download/ Note: Notepad++ source code editor and Notepad replacement ( or just use notepad ) 2015-11-04a unpacked client: https://mega.nz/#!w84jRRjZ!iWjU1Qfsez_3nbTtqQuFWHsbda2IglPi7TBnzZWmJtI by: @Napster rAthena support all the clients listed in the packet files : read more Required Files: After you download and install GitHub download these files using GitHub File > Clone Repository rAthena ( server ) : https://github.com/rathena/rathena.git English Translated System & Data Folders RE/PRE: by @zackdreaver For Renewal: https://github.com/zackdreaver/ROenglishRE For Pre-Renewal : https://github.com/zackdreaver/ROenglishPRE NEMO Client Patcher : https://github.com/MStr3am/NEMO.git For more info see this topic by @NeoMind Client Setup : http://nn.ai4rei.net/dev/opensetup/ Client setup for Ragnarok Online by @Ai4rei ========================================== Setting up rAthena Server-Side: See video time-line: 00:02 Step 1: Download/Clone rAthena Source Open GitHub. Click Clone repository. Click URL tap. Copy and paste this URL: https://github.com/rathena/rathena.git Choose the downloading path. Click Clone and wait for it do finish downloading. Step 2: Configuring rAthena See video time-line: 00:35 open rathena/conf/import/char_conf.txt Add these lines : userid: username passwd: password login_ip: 127.0.0.1 char_ip: 127.0.0.1 [Optional] To change server name add this line : server_name: YourDesiredServerName Note: If you want to change anything in char_athena.conf, use the import-tmpl directory to avoid future issues when updating. ( just add the respective value you want ). rathena/conf/import/map_conf.txt Add these lines: userid: username passwd: password char_ip: 127.0.0.1 map_ip: 127.0.0.1 Note: If you want to change anything in map_athena.conf, use the import-tmpl directory to avoid future issues when updating. ( just add the respective value you want ). rathena/conf/import/inter_conf.txt Add these lines login_server_db: rathena ipban_db_db: rathena char_server_db: rathena map_server_db: rathena log_db_db: rathena_logs Note: If you want to change anything in map_athena.conf, use the import-tmpl directory to avoid future issues when updating. ( just add the respective value you want ). Note: I use rathena as my main database which contain all main tables (like: chars, login, guilds, etc... ). However, I like to separate my logs to rAthena_logs . Step 3: Compiling rAthena See video time-line: 02:16 Locate rathena/rAthena.sln Locate and right click rAthena.sln open with > Microsoft Visual Studio 2017 ( or 2013 / 2015 ) Wait for the MVS to load the project, when it's ready select Solution 'rAthena' (8 projects) and then right click and Click 'Clean Solution' First when clean finish successfully click on 'build Solution' Wait for it to finish, make sure the log below finish successfully Step 4: Setting SQL Database ( make sure MySQL installed and running ) See video time-line: 03:13 open MySQL Workbench log in : Using the username 'root 'and the password you set when you first install MySQL ( If you don't remember the password, you can reconfigure MySQL using MySQL installer ) once you logged in create new user account and grant Administrator Privileges: - See video time-line: 04:17 In The Left Side click on Users and Privileges At The Bottom click on Add account Set Login Name : ragnarok Set Password : ragnarok Set Confirm Password : ragnarok At The Top Menu Click Administrative Roles: and then check DBA Click Apply logout by clicking on X at the top of the current tap and then login using the new user account ragnarok with password ragnarok See video time-line: 05:00 Creating databases/schema : See video time-line: 05:26 Click on create new database/schema Set the Name: rathena ( this will be our main database/schema ) Set Charset: utf8 ( Now this's is important you need to check this ) Click apply, apply and then finish Now Click on create new database/schema Set the Name: rathena_logs ( this will be our logs database/schema ) Set Charset: utf8 ( Now this's is important you need to check this ) Click apply, apply and then finish import rathena SQL files to rathena & rathena_logs databases: See video time-line: 06:16 Double click on rathena database/schema we've just created Click on locate rathena folder and go to rathena/sql-files and click on main.sql Click on the light icon * wait for the tablet to be executed * Double click on rathena_logs database/schema we've just created Click on locate rathena folder and go to rathena/sql-files and click on logs.sql Click on the light icon * wait for the tablet to be executed * change the username and password of the server: See video time-line: 07:03 Now next/around rathena database right click on a blank area and click refresh all ( in order to view the tables we've just created or just relog ) Click on rathena database/schema > tables > locate login table.. now click on tables and locate login table then right click and click on select Rows - Limit 1000 Double click on s1 and change it to username then hit enter ( we put the userid: username in rathena/conf/import-tmpl/char_conf.txt and map_conf.txt make sure you use the same one you put in these files ) Double click on p1 and change it to password then hit enter ( we put the passwd: password in rathena/conf/import-tmpl/char_conf.txt and map_conf.txt make sure you use the same one you put in these files ) Click apply, apply and then finish Step 5 ( running the server ) Running rAthena server See video time-line: 07:35 locate rathena folder rathena/ click on runserver ( less than 8 mins without any errors ) ================================================== Client Side Running & patch ragnarok online client open Official kRO Client/ Updating kRO Files: Locate and run rsu-kro-rag-lite.exe and wait for it to finish and then rsu-kro-renewal-lite.exe and wait for it to finish updating .. Adding translated system/data files Locate ROenglishRE or ROenglishPRE and copy Data & System folders , GuildTip & Tipoftheday and paste these files into the official kro client folder ( Replace the files when asked ) Setting up clientinfo.xml : locate official kRO client folder open folder data/ and edit file clientinfo.xml change the version to 55 <version>55</version> (This might not be needed anymore.) set the langtype to 1 < To be able to write in English. ( refer to this page to find your preferred language beside English: https://github.com/rathena/rathena/wiki/Clientinfo.xml ). set admin sprite for any account you want, just put the account id <aid> <admin>2000000</admin> </aid> Copy and paste the setup file into the the official kRO client folder Patching the Client 2015-11-04 load the client and select recommended and click enter for data.ini and then CHANGE/EDIT system/iteminfo.lub to system/iteminfo.lua and check read data folder first, ignore missing palettes, ignore resource errors and then customize the client as you want Here's my additional patches: >>> Custom Window Title ( name you server ) Disable Swear Filter Disconnect to Login Window Enable Title Bar Menu Read Data Folder First Show Cancel To Service Select Ignore Missing Palette Error Ignore Resource Errors Use Ragnarok Icon ( ragnarok icon for the client ) <<< copy the new 2015-11-04aRagexe_patched and paste it your official kRO client folder now the client is ready, just run the game using 2015-11-04aRagexe_patched and Enjoy to create a male account just type ex: admin_f for female - admin_m for male and don't forget to set the account group id 99 to get full GM permissions Issue #1: Closed connection from '127.0.0.1'. Solve: go to your rathena/src/custom/defines_pre.hpp and open it with notepad++ ( or any notepad ) add this line #define PACKETVER 20151104 ======================================================== As of 28-7-2018: the topic is fully updated and support MySQL 8.x ======================================================== For further questions or concerns regarding the tutorial, Do NOT hesitate to contact me in this topic. - Earnestinence1 point
-
View File FREE SKIN THOR PATCHER [CODED] SKIN; STATUS SERVER; RSS FEED; PSD; GUIDE RSSFEED Webfiles\status\inc\rssConfig.php 'news' => 'http://g1.globo.com/dynamo/carros/rss2.xml', 'event' => 'http://g1.globo.com/dynamo/ciencia-e-saude/rss2.xml', 'update' => 'http://g1.globo.com/dynamo/concursos-e-emprego/rss2.xml', STATUS SERVER Webfiles\status\status.php $status = new ServerStatus( "LOCALHOST", "LOCALHOST", "USERNAME", "PASSWORD", "DATABASE" ); Do not remove the credits, thank you. Please do not sell this product. Design Elfin Submitter Elfin Submitted 04/06/2019 Category Patchers Video Content Author Elfin1 point
-
This is a tutorial on how to Open Port on Google Cloud for your rAthena server to be online! Linux only for now How to Open Ports on Google Cloud VPS for rAthena Linux Machines First, go to your Google Cloud Dashboard Click Networking > VPC Network > Firewall Rules After that, click Create Firewall Rule On name, put a Name you desire On the Targets, change it to: All instances in the Network Put 0.0.0.0/0 on Source IP Ranges On Protocol and ports, choose Specified Protocols and Ports Place these default ports: tcp: 5121,6121,6900; udp: 5121,6121,6900; If you have different ports, change it! ( 5121: Map 6121: Char 6900: Login ) ( Optional ) On your firewalls, add those Ports, UDP and TCP1 point
-
.@r = getrefine(); skill "SM_MAGNUM",10; bonus2 bHPRegenRate,5000,10000; bonus2 bSPRegenRate,100,10000; if(BaseLevel < 99){ bonus bStr,.@r*3; bonus bFlee,.@r*5; } else { bonus bStr,.@r*10; bonus bFlee,.@r*15; }1 point
-
Remove the character since it eats a lot of space and make use of the right side space for the player information, rather than putting it near the exit button :))1 point
-
Version 1.0
3756 downloads
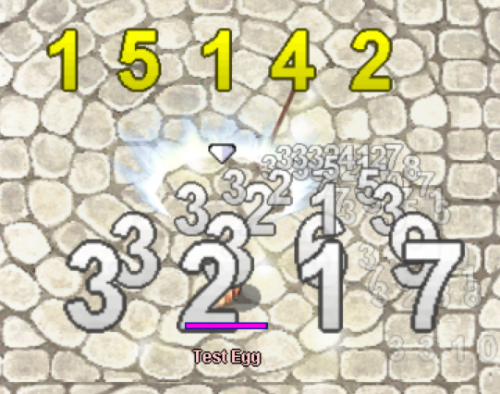
Hi all, This is a basic damage font alternative which can be used to bring a little more high definition resolution to Ragnarok! I made this purely because I was tired of staring at the hideously stretched and over-pixelated damage numbers while I was doing some testing. Feel free to give it a try! There is a slightly wider spacing between digits that I wasn't able to close off because the client must determine spacing/positionings between, but if you want to reduce some of the spacing I have provided another .act file suffixed "_larger" which reduces the spacing but makes the damage text a bit larger. ThanksFree1 point
