Leaderboard


Popular Content
Showing content with the highest reputation on 01/18/18 in Posts
-
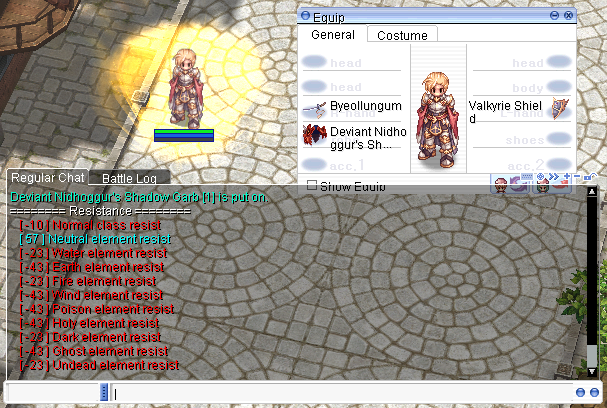
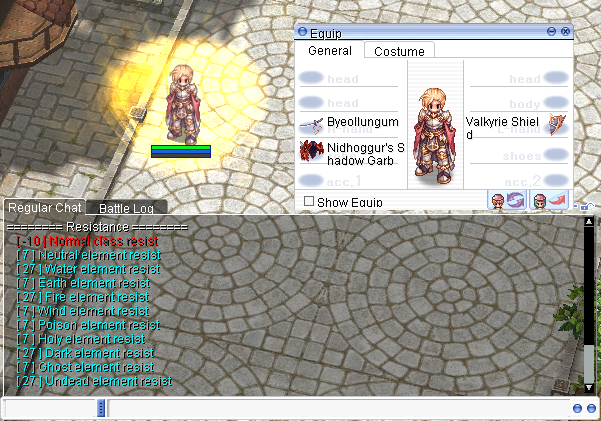
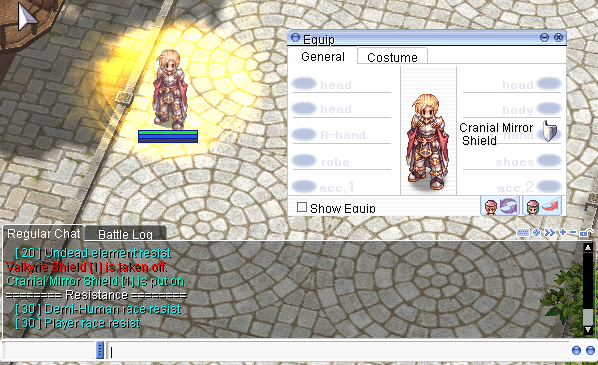
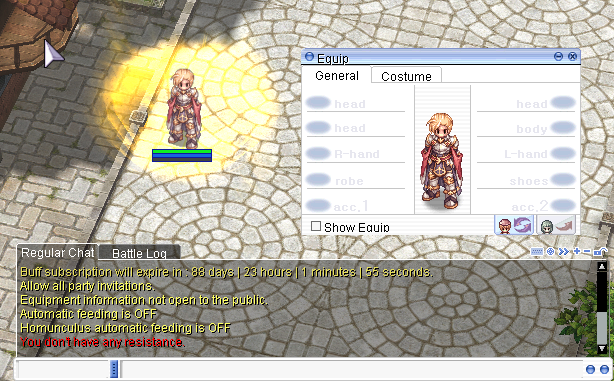
File Name: [email protected] File Submitter: keitenai File Submitted: 1 Dec 2017 File Category: Src Modification Content Author: keitenai Updated: 31 July 2022 Information: @ resist will check the current values of resistance from each Element / Race / Size / Class. Thanks to @Santafe for the idea of this command. 1. Download the Diff file. 2. Patch the diff to your rAthena 3. Recompile your server. 4. RUN THE SERVER! Compatible with: rAthena 97b5f3b ( as of July 31, 2022 ) Download : keitenai_@resist_command_V2.diff

 1 point
 -
AndRO is a self-written RO client for Android that is compatible with rAthena, eAthena, and Hercules. To run it, you need a working game client on your device and a running server. App will use GRF list from DATA.INI and server list from clientinfo.xml. Default packet version is 20171227. You can change it by specifying <version>YYYYMMDD</version> tag in your client's data/clientinfo.xml For obvious reasons it doesn't support gepard and stuff. Just plain ro protocol. Download link: http://roworkshop.com/andro You may also want to customize your client's data/clientinfo.xml for AndRO by adding some of the additional options that AndRO supports: http://roworkshop.com/andro/main/clientinfo.html1 point
-
Hi again, i bring this tool to my fellow mappers out there!. Browedit Manager [v0151] ~Download~ (Mediafire) ~Download~ (Dropbox) ~Download~ (Mega) Usage: Just uncompress to any folder and read the following manual: Changes on 0.151: - Added save last settings used function for "Add Custom Texture" and "Add Custom Model". - Implemented "View Files" buttons for fast access to custom files. - Implemented "Add Custom Model". - Fixed a couple of minor bugs, added workfiles to avoid the basic missing textures/models messages, running through settings again will fix this!. Changes on 0.141: - Fixed a couple of bugs with add custom texture functions. Changes on 0.14: I changed a couple of icons of the editor: Lightning Sounds Effects - Added Some new colors to Background/No Tile selection!. - Implemented Categories/Subcategories in Add Custom Texture!. Main Menu Build Version: Select the Version of Browedit to Launch.(I only bundled the 2 versions i use, 586 and 620, i don't think you'll need anything else.) Start Browedit: Launch the selected Version of Browedit!.(Requires to run through settings first!) Open (RO Directory): Open the RO Directory that was setup on the Settings window!.(Requires to run trough settings first!) Settings: Sends you to Settings Window!.(Required to run this program!) Add Custom Texture: Sends you to Add Custom Texture Window!.(Requires to run through settings first!) Exit Manager: Closes Program!.(Doesn't close Browedit Windows!) Settings RO Directory: Setup your RO Directory!.(Directory where you have your data.grf and/or rdata.grf as well as choosing the files to be used. ) Background Color: Select the color you want to use as a background inside Browedit!.(Purple (Default)!) Empty Tile Color: Select the color you want to use for the tiles that have no texture yet inside Browedit!.(Purple (Default)!, Originally was a bright yellow, i recommend to change the default!) Resolution: Select Browedit's Resolution!.(800x600 (Default)!, I only included resolutions of Power by 2 that i've tested, widescreen resolutions tend to glitch!) Camera Smoothing: Select Browedit's Camera Smoothing value!.(0.6 (Default)!, I tried a lot of variants but i cannot tell much difference about this, i recommend to leave at default.!) Save Files And Return: Saves the changes you made to Settings and returns to Main Menu window!.(After this, buttons on the Main Menu will be available!.) Add Custom Texture RO Directory: Shows you the current RO directory in use by browedit!. Texture Sub-Folder: Type the sub-folder you want to use in the RO directory (if you select Copy to Texture to RO Folder the sub-folder will be created if it doesn't exist!) Copy Texture to RO Folder: Copies your new texture file to your RO Directory!.(By default it's unchecked assuming your new texture is already on data\texture\!) Texture Directory: Browse for your new texture!.(By default it'll show you your RO directory, if you have your new texture somewhere else, be sure to check Copy Texture to RO Folder!) Texture ID Name: Specify an ID Name for your new texture!.(By default it copies your filename, Uncheck Same Name if you want to change the ID Name!) Category Name: Specify a Main Category inside browedit's texture browser! (Case Sensitive!!, custom by default). Sub-Category Name: Specify a Sub-Category for your Main Category inside browedit's texture browser! (Case Sensitive!!) Engage!: Processes your new texture!.(Adds it to Browedit and copies to RO Directory if choosen!) Return to Main Menu!: Returns you to Main Menu!. Add New Map RO Directory: Shows you the current RO directory in use by browedit!. Map Dimensions: Select the dimensions of your new map! (the map aspect is shown in the image above!). Map Name: Type your new map name! (There are server-side/client limitations!). Engage!: Processes your new map!. Return to Main Menu!: Returns you to Main Menu!. Add Custom Model RO Directory: Shows you the current RO directory in use by browedit!. Model Sub-Folder: Type the sub-folder you want to use in the RO directory (if you select Copy Model to RO Folder the sub-folder will be created if it doesn't exist!) Model Directory: Browse for your new model!.(By default it'll show you your RO directory, if you have your new model somewhere else, be sure to check Copy Model to RO Folder!) Category Name: Specify a Main Category inside browedit's model browser! (Case Sensitive!!, custom by default). Sub-Category Name: Specify a Sub-Category for your Main Category inside browedit's model browser! (Case Sensitive!!) Engage!: Processes your new custom model!. Return to Main Menu!: Returns you to Main Menu!. Notes: - Removed the ugly Hamtaro almost from everywhere! and replaced it with a cutter Poring chewing a pencil! - Contains 2 working revisions of Browedit (And plugins) within the package, 586 (which i personally use to Map) and 620 (which i only use to automatic gat calculation). - It's probable i'll post Video tutorials on how to use these 2 revisions in order to achieve similar Gravity's quality maps sometime in the future!. - As you well know, you cannot create new maps from scratch from Browedit, it's neccesary to look for an already existing map with the desired dimensions, clean it and then start mapping, the function Add New Map saves you that trouble as i added a pack of several different clean maps from where to pick from!. Copyright Notes: This tool only helps mappers to manage their Borf's Browedit settings, i'm in NO way claiming intellectual or physical or whatever crap over this program!!, for all intends and purposes this program is just an Add On to Browedit!. As always, Leave your suggestions and opinions!. Enjoy~! ~Nuckelavee1 point
-
ive been reading your replies to your support questions recently , you cant run a server without having minimum knowledge , i know that you are new with and stuff ( which you mentioned multiple times ) , you better read wiki/ docs folder so you can at least understand the answers you getting for you questions, most of the questions you are asking are already answered multiple time in rathena , you just need read and understand, stop expecting SPOON FEED1 point
-
you can check logs in your fluxcp ( logging using admin account) / check pick log table in your mysql db1 point
-
You can change it by using any HEX editor. // 2015-11-04aRagexe 4B51CE change 6A FF 6A 00 50 8D 4D D8 E8 85 B8 B7 FF to 90 90 90 90 90 90 90 90 90 90 90 90 90 4B5291 change 6A FF 6A 00 50 8D 4D D8 E8 C2 B7 B7 FF to 90 90 90 90 90 90 90 90 90 90 90 90 90 6FAFB0 change 20 28 00 00 5B 20 54 6F 20 00 00 00 29 20 5D 20 3A 20 to 20 00 00 00 5B 20 54 6F 20 00 00 00 5D 20 3A 20 00 00 // 2016-02-03aRagexeRE 4D209E change 6A FF 6A 00 50 8D 4D D8 E8 95 08 B6 FF to 90 90 90 90 90 90 90 90 90 90 90 90 90 4D2161 change 6A FF 6A 00 50 8D 4D D8 E8 D2 07 B6 FF to 90 90 90 90 90 90 90 90 90 90 90 90 90 71D994 change 20 28 00 00 5B 20 54 6F 20 00 00 00 29 20 5D 20 3A 20 to 20 00 00 00 5B 20 54 6F 20 00 00 00 5D 20 3A 20 00 001 point
-
Login in fluxcp using admin account> go to players account details> click on modify account, add credits>click save1 point
-
{ bonus bAspdRate,BaseLevel/10; bonus bMaxHP,(-40*(BaseLevel/10));},{},{}1 point
-
Made it work for my 2013 client, heres the src edit i did to ur src diff : /*========================================= * Check values of resistance to elements * [ Keitenai ] *-----------------------------------------*/ ACMD_FUNC(resist) { char output[CHAT_SIZE_MAX]; int i; struct { const char* format; int value; } output_table[] = { { " [ %d ] Neutral resist", 0 }, { " [ %d ] Water resist", 0 }, { " [ %d ] Earth resist", 0 }, { " [ %d ] Fire resist", 0 }, { " [ %d ] Wind resist", 0 }, { " [ %d ] Poison resist", 0 }, { " [ %d ] Holy resist", 0 }, { " [ %d ] Dark resist", 0 }, { " [ %d ] Ghost resist", 0 }, { " [ %d ] Undead resist", 0 }, { NULL, 0 } }; memset(output, '\0', sizeof(output)); clif_displaymessage(sd->fd, "========= Resistance Values ========="); output_table[0].value = sd->subele[ELE_NEUTRAL]; output_table[1].value = sd->subele[ELE_WATER]; output_table[2].value = sd->subele[ELE_EARTH]; output_table[3].value = sd->subele[ELE_FIRE]; output_table[4].value = sd->subele[ELE_WIND]; output_table[5].value = sd->subele[ELE_POISON]; output_table[6].value = sd->subele[ELE_HOLY]; output_table[7].value = sd->subele[ELE_DARK]; output_table[8].value = sd->subele[ELE_GHOST]; output_table[9].value = sd->subele[ELE_UNDEAD]; for (i = 0; output_table[i].format != NULL; i++) { sprintf(output, output_table[i].format, output_table[i].value); clif_displaymessage(fd, output); } return 0; } Note: ELE_ALL isnt required, tested on :Nydhrogg's garb; it auto assigns +7 to all the eles besides that, subele(ELE_ALL) isnt present in the 2013 version1 point
-
Okay so i fixed my own problem.. @mhielo12 also maybe yours. the problem on the diff is on the Vending.c the thing about it says we don't have enough items because its looking on our cart.. not on our inventory.. =) replace all the cart.u.items_inventory -> inventory.u.items_inventory there are 4 cart.u.items_inventory on the diff. so you will see them easily.1 point
-
Hi ! Yes, but currently writing plugin system is not on priority list because the client needs basic functionality There'll be one later1 point