Leaderboard


Popular Content
Showing content with the highest reputation on 05/10/25 in all areas
-
KRO : https://github.com/hiphop9/ROClient_en 2025-03-19_Ragexe_1742361965(EN) -PATH- @ Bug Fix(Recommended) Add Close Button Custom Window Title Disable 1rag1 Params(Recommended) Disalbe Filename Check(Recommended) Disable Help Message Disable Indoor RSW Disalbe Swear Filter Enable 44khz Audio Enable DNS Suport Enable Multiple GRF(Recommended) Fix NPC Dialog Scroll Increase Zoom Out 75% Read Data Folder First(Recommended) Remove Hard Coded Address & Port(Recommended) Restore Clientinfo.xml(Recommended) Restore Old Login Packet(Recommended) externalsettings Korea patch Show Replay Button Skip License Screen Translations client EnableWho EnableShowName AlwaysAscii CallKoreaClientInfo PlainTextDesc HideBuildInfo TranslateClient NoGGuard CustomItemInfoLub CustomAchieveLub CustomTownInfoLub CustomTipboxLub CustomMapInfoLub CustomOngQuestInfoLub CustomRcmdQuestInfoLub NoNagle OpenToServiceSelect GuildBrackets NoGravityAds NoGravityLogo FixLatestNCWin This is distributed for testing purposes only. Please do not request additional patches!! I am not a seller!! Therefore, if you plan to operate or commercialize a server, do not contact me!!
 1 point
 -
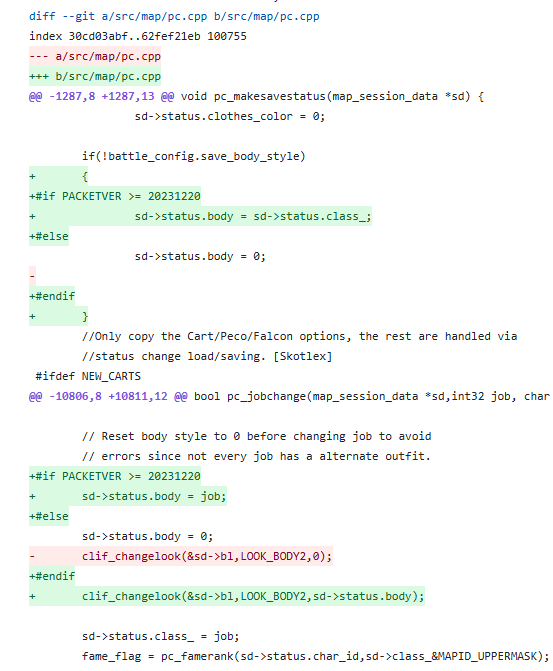
pc.cpp +#if PACKETVER >= 20231220 + sd->status.body = job; +#else sd->status.body = 0; - clif_changelook(&sd->bl,LOOK_BODY2,0); +#endif + clif_changelook(&sd->bl,LOOK_BODY2,sd->status.body); Check this part!! It seems like everyone is talking about it but leaving out one important detail! https://github.com/Jhonvaliense/ROClient_en/blob/main/20231220%2B CLIENT bodystylefix.diff
 1 point
 -
That is because the client now uses bodystyle to display job sprites instead of job. Run a query script in your database table "char" to copy the job column into the body column. Before 2023 clients, bodystyle's only used up to value 1 for alternate costumes. Now they can be filled with whatever the job ID and the sprite will display that. Your previous chars were still using bodystyle 0 or 1 -- which are Sprite ID of Novice and Swordsman UPDATE `char` SET body = class; Run this in query.1 point
-
프록시 x32dbg 활성화1 point
-
ChatRepeat hex! 83 7D 08 02 7C 49 6A 00 7C > EB1 point
-

Version 1.0.8
105 downloads
Rsm Editor is a tool to edit RSM1 and RSM2 model files from Ragnarok Online. How to install Download the zip archive provided from the download link on this page. Install the application with Rsm Editor Installer.exe; if you are missing a .NET Framework you will be prompted to download it (the tool requires .NET 4.0). Once you are done, you can start the program from the link on your desktop. If you are opening the software for the first time, you'll be prompted with a setting resource window. You can either add a data folder or a list or GRFs from this window. This will be used for loading textures on your models. Key features Can edit both RSM1 and RSM2 file formats. When saving, you can also downgrade or upgrade the model version. The tool uses a different technique for version conversion which should give very accurate results. Position, scale and texture keyframes cannot be converted. Undo and redo for any operation. Quaternions are translated into Euler angles using the YXZ order. Merging different models can be done by right-clicking a mesh node or by drag and dropping another mesh directly. Easy texture modification for each mesh. Enable to set two-faced polygons for the entire model (to avoid invinsible faces in-game). Files can be associated with the tool through Windows (there will not be a setting for this within the software). Backups are created while you are editing the mesh. You can view the list via Debug > Backups manager... Automatically fixes mesh names and root node upon saving. There is no conversion to fbx and vice versa at the moment. Useful shortcuts All shortcuts can be modified via File > Settings > Shortcuts. Pressing Enter on a mesh will center the camera around it. You can quickly duplicate a mesh with Ctrl-C/Ctrl-V. You can hold the Shift key to snap the Gizmo when applying a transformation. You can also hold Shift when selecting a frame. You can select a mesh directly by holding Alt while clicking on it in the viewport. You can enable the wireframe view by pressing F8 or View > Wireframe view. This is useful when positioning meshes. Modifying transform origin The origin position is used for the rotation and scale transformations. To modify, press F1 or View > Show origin, then move the white gizmo. Modifying textures or normals If you click on the model rather than a mesh, you'll have a few more options. Smooth normals is the recommended method. The list of textures can be edited directly. The textures shown in this node are for all meshes together. If you edit the texture locally from your data folder, you can reload the model textures by using Ctrl-R or Transform > Reload model. Animation transform If you've already made an animation for a mesh and you want to apply a rotation (or translation) to all keyframes, you can do so by using the animation transform feature. Press F7 or Animation > Animation transform. This mode applies the transformation to all keyframes at the same time. Keyframes edit You can select multiple keyframes by holding down Shift+LeftMouseButton in the timeline view. You can unselect specific keys by pressing Ctrl+LeftMouseButton. You can move the selected frames by holding down LeftMouseButton. You can copy and paste keys with Ctrl-C/Ctrl-V. You can select all keys with Ctrl-A or deselect all with Ctrl-D. Gizmo orientation By pressing F4 or View > Change gizmo orientation, you can change between global or local orientation. Local orientation sets the gizmo to the current mesh transformation, while global ignores all mesh transformations. Each mesh has local transformations and global transformations (this is unrelated to the gizmo orientation). The difference is that local transformations do not apply to children (not entirely true for RSM2 though). Keyframe transformations always apply to children.Free1 point -

Version 1.8.9.7
56572 downloads
Hello everyone, GRF Editor is an open-source tool for editing GRF files (https://github.com/Tokeiburu/GRFEditor). It offers a wide variety of features and customizations. The software is very stable and responsive, it can handle large operations without lagging your computer. How to install Download the zip archive provided from the download link at the bottom of this description or directly from there: http://www.mediafire.com/?aflylbhblrzpz0h Install the application with GRF Editor Installer.exe; if you are missing a .NET Framework you will be prompted to download it. Once you are done, you can start the program from the link on your desktop. Key features Overall speed is faster (or at least equal) than any GRF tool. Common operations: add, delete, merge, extract, preview, save. Undo and redo for any operation. It can open any GRF file format. Clean and very interactive interface. Saving formats supported : 0x300, 0x200, 0x103 and 0x102 (through the Settings page) and conversion to the Thor format. Instant filter and search options (example : "map .gat"). File association and context menus integration for .grf, .gpf, .rgz and .thor (through the Settings page). Can rebuild separated images into one file easily. Drag and drop (with the ALT key, can be modified in the Settings page). This is a big part of the software; most of the items can be moved around within the application itself or from/to Windows Explorer. If drag and drop does not work, it is most likely because you've started the program using administrator privileges. GRF Editor does not requires administrator privileges to run. Tools Grf validation: allows you to validate a GRF with multiple settings. It can detect corrupted GRF entries, invalid sprites, empty files, non-GRF files, duplicate files and a lot more. Flat maps maker: generates flat maps from .gat and .rsw files. Useful to generate WoE maps or to fasten up the loading time. Patch maker: generates a GRF patch based on two different GRFs. Hash viewer: shows the hash code (both CRC32 and MD5) for files. Image converter: converts an image to any format requested (BMP, PNG, JPG, TGA). GrfCL: used to create batch files (.bat) which can automate tasks on GRF files. See the content in GrfCL.rar in the download for more information. This tool can be customized from the sources as well. Grf encryption The encryption feature has been enabled again. It's similar to what it used to be and it has been tested on client versions ranging from 2012-08-01 to 2024-01-01. Some error messages will be displayed if necessary. If you have an issue, copy the error message (with the code, if there's one) and send me the client executable with the cps.dll file generated by GRF Editor. There shouldn't be compatibility issues anymore though! Thor files Thor files are patches used by Thor Patcher ( https://github.com/rathena/rathena/wiki/Thor-Patcher ). Because of their similarity with the GRF file structure, they have been integrated within GRF Editor. The primary utility of this feature is that it allows you to add encrypted files to a Thor patch. All the other options can be achieved by using Thor Maker. You'll find the necessary steps below, but test your patches before sending them off to players (I've done a lot of testing on my end, but better be safe). If you're using SecureGRF, then make a new GRF, add the files and encrypt it. In GRF Editor, open the encrypted GRF you just made, use "Save as" and name the new file with a .thor extension. That's it, if you want to change the output directory, click on Edit > Edit Grf/Thor settings. You can select the output mode and the GRF to merge the patch with. Simply save again if you change these properties. If you're using GRF Editor's encryption, then make a new Thor file (File > New > New Thor) and add the files you want to patch it with. Right-click on the files you want to encrypt and use Encryption > Encrypt. Technical stuff Requires .Net Framework 4.0 to run (4.0 or more will work as well). Automatically converts file name encoding to the currently selected encoding (you can change the encoding in the Settings page). Data virtualization is used as much as possible to preview files, meaning the files aren't completely loaded. Right-clicking an item will bring up the available options with that file. Preview file formats: txt, log, xml, lua, lub, bmp, png, tga, jpp, db, ebm, pal, gnd, rsw, gat, rsm, str, spr, act, imf, fna, bson, csv, ezv and wav. Services are "crash ready", meaning that you will be warned about a failed operation and no work will be lost (the application won't close and crash). It tries to continue operating even if it meets unsual conditions. Operations can be cancelled by clicking on the button near the progress bar. The warning level can be changed to avoid messages like "Please select a folder first." When prompted with an error, use Ctrl-C to copy the current dialog's content. Some screenshots! 1) Previewing an act file, while showing the search feature 2) Preview of a model file (rsm or rsm2) 3) Preview of GrfCL 4) Preview of maps 5) Preview of Grf validation 6) Search feature (press Ctrl-F or Ctrl-H to bring up within a text editor) Got a feedback? I'd gladly hear you out and fix issues you have with the program.Free1 point