


mrgeiszer
-
Posts
32 -
Joined
-
Last visited
Content Type
Profiles
Forums
Downloads
Jobs Available
Server Database
Third-Party Services
Top Guides
Store
Posts posted by mrgeiszer
-
-
Hello again my scripter friends,
I just need some help with this script I just want to make sure if this script is working since there's no error detected when I load it to my server.
The script source i just used is from here:
credit to the owner of the script.
here's the modified script that I'm working on:
//Automated Poring Catcher Script ===================================================================

-	script	pctrigger	-1,{

OnMinute00: // Change on how many minutes the event will auto start.
	if(gettime(3) == 0 || gettime(3) == 3 || gettime(3) == 6 || gettime(3) == 9 || gettime(3) == 12 || gettime(3) == 15)
	donpcevent "pcatch::OnEventStart";
	end;

}

-	script	pcatch	-1,{

OnEventStart:
	killmonster "poring_w01.gat","All";
	announce "Pikachu : Let's have a Poring Catcher Event now.",0;
	sleep 3000;
	announce "Pikachu : If you want to join, come at the middle of Prontera, enter the warp portal.",0;
	enablenpc "PoringCatcher";
	sleep 2000;
	announce "Pikachu : prizes are 1 Box of Lv10 Blessing & AGI scroll + 1 Proof Of Donation Ticket.",0;
	sleep 3000;
	announce "Pikachu : The portal is going to close in one minute.",0;
	sleep 2000;
	announce "Pikachu : Poring Catcher Event will start at the moment.",0;
	sleep 5000;
	announce "Pikachu : If you want to join, come at the middle of Prontera, enter the warp portal.",0;
	sleep 2000;
	announce "Pikachu : prizes are 1 Box of Lv10 Blessing & AGI scroll + 1 Proof Of Donation Ticket.",0;
	sleep 2000;
	announce "Pikachu : The portal is going to close in one minute.",0;
	sleep 60000;
	announce "Pikachu : Time's up. Portal is closed and will open again after an half-hour.",0;
	disablenpc "PoringCatcher";


	if(getmapusers("poring_w01") == 0)
	{
		disablenpc "Poring Banker";
		announce "Event Poring Catcher didn't start because no players found in map.",0;
		end;
	}


OnInit:
	//disablenpc "Poring Banker";
	//disablenpc "PoringCatcher";
	donpcevent "Poring Banker::OnEnable";
	end;
}

//Poring Catcher Portal ======================================================================
prontera,155,180,0	warp	PoringCatcher	2,2,poring_w01,105,128

//============================================================================================
//Poring Catcher Event Script ================================================================

-	script	Poring Banker	-1,{

OnEnable:
	mapannounce "poring_w01","Pikachu :  The Poring Catcher Event will start shortly",0;
	sleep2 10000;
	mapannounce "poring_w01","Pikachu :  I will be summoning 100 porings with different names kill the real poring",0;
	sleep2 10000;
	mapannounce "poring_w01","Pikachu :  What are we waiting for?..Let's Catch some Porings!!...",0;
	sleep2 10000;
	goto L_Start;
	end;

L_Start:
	if(getmapusers("poring_w01") == 0) goto L_None;
	if(getmapusers("poring_w01") >= 1) {

	mapannounce "poring_w01","Pikachu :  Get ready at the count of 5 we will start!....",0;
	sleep2 6000;
	mapannounce "poring_w01","Pikachu :  5",0;
	sleep2 5000;
	mapannounce "poring_w01","Pikachu :  4",0;
	sleep2 4000;
	mapannounce "poring_w01","Pikachu :  3",0;
	sleep2 3000;
	mapannounce "poring_w01","Pikachu :  2",0;
	sleep2 2000;
	mapannounce "poring_w01","Pikachu :  1",0;
	donpcevent "Poringsummoner::OnSummon";
	end;
	}

	L_None:
	disablenpc "Poring Banker";
	killmonster "poring_w01.gat","All";
	end;
}

//SUMMONER OF PORINGS ================================================================
-	script	Poringsummoner	-1,{

OnSummon:
   if(getmapusers("poring_w01") == 0) goto L_2None;
   monster "poring_w01.gat",0,0,"Poring",1002,1,"poringwin::OnMobKilled";
   monster "poring_w01.gat",0,0,"Pouring",1002,10,"poringlose::OnMobKilled";
   monster "poring_w01.gat",0,0,"Proing",1002,10,"poringlose::OnMobKilled";
   monster "poring_w01.gat",0,0,"Poirng",1002,10,"poringlose::OnMobKilled";
   monster "poring_w01.gat",0,0,"Poing",1002,10,"poringlose::OnMobKilled";
   monster "poring_w01.gat",0,0,"I'm not a Poring",1002,5,"poringlose::OnMobKilled";
   monster "poring_w01.gat",0,0,"Gnirop",1002,1,"poringlose::OnMobKilled";
   monster "poring_w01.gat",0,0,"Poring",1113,1,"poringlose::OnMobKilled";
   monster "poring_w01.gat",0,0,"Poring",1062,1,"poringlose::OnMobKilled";
   monster "poring_w01.gat",0,0,"Por|ng",1002,10,"poringlose::OnMobKilled";
   monster "poring_w01.gat",0,0,"Por1ng",1002,10,"poringlose::OnMobKilled";
   monster "poring_w01.gat",0,0,"Porong",1002,10,"poringlose::OnMobKilled";
   monster "poring_w01.gat",0,0,"P0ring",1002,10,"poringlose::OnMobKilled";
   monster "poring_w01.gat",0,0,"P@ring",1002,10,"poringlose::OnMobKilled";
   monster "poring_w01.gat",0,0,"Porng",1002,1,"poringlose::OnMobKilled";
   end;

L_2None:
	disablenpc "Poring Banker";
	killmonster "poring_w01.gat","All";
	end;
}

//PORING WIN Function ================================================================
-	script	poringwin	-1,{

OnMobKilled:
   killmonster "poring_w01.gat","All";
   atcommand "@doommap";
   getitem 7179,1; // POD Ticket
   getitem 13697,1;  //Lv 10 Blessing Scroll
   getitem 12914,1; // Lv 10 Increase AGI scroll
   announce "Poring Banker: We have a winner! well done " + strcharinfo(0) + " - prizes got are 1 box of Lv10 Blessing & AGI scroll & 1 POD ticket!.",0;
   warp "SavePoint",0,0;
   end;
}

//PORINGS LOSE Function ================================================================
-	script	poringlose	-1,{

OnMobKilled:
   dispbottom "Your out of the game, You did not catch the right Poring !";
   percentheal -99,-99;
   warp "SavePoint",0,0;
   end;
}


//Mapflags ================================================================
poring_w01	mapflag	nowarp
poring_w01	mapflag	nowarpto
poring_w01	mapflag	noteleport
poring_w01	mapflag	nosave
poring_w01	mapflag	nomemo
poring_w01	mapflag	nobranch
poring_w01	mapflag	noloot
poring_w01	mapflag	noskill
poring_w01	mapflag	nopenalty
no errors found but i won't start the event. Did I missed something? please help TIY
-
thank you @LearningRO and @Mice for the help super appreciate it much. One last thing how about for cash point?
what script code I will add? tyi.
-
yes thats it hehehe
-
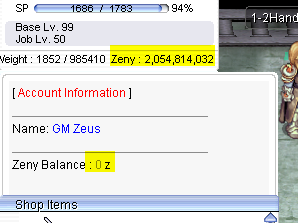
Hello masters and legendary scripters,
Just need help with this script. Basically, I just want to have an overview of how much Zeny the player who buys on the NPC. TYI
like the image here.
here's my script btw...
//====================================================================
- shop 1hs_Shop2 -1,1102:100,1105:1500,1108:2900,1111:10000,1114:17000,1120:51000,1124:20000,1125:24000,1127:49000,1128:50000,1130:20000,1131:20000,1132:20000,1133:20000,1134:20000,1135:20000,1136:20000,1137:20000,1138:20000,1139:20000,1140:20000,1141:20000,1142:20000,1143:20000,1144:20000,1145:45000,1147:42000,1148:20000,1149:60000,1191:150000
- shop 2hs_Shop2 -1,1152:150000,1155:150000,1158:150000,1162:150000,1164:150000,1165:150000,1166:150000,1167:150000,1168:150000,1170:150000,1171:150000,1172:150000,1175:150000,1176:150000,1177:150000,1178:150000,1179:150000,1180:150000,1181:150000,1182:150000,1183:150000,1184:150000,1185:150000,1189:150000,1192:150000,1193:150000,1196:150000,1197:150000
- shop 1ha_Shop2 -1,1302:15000,1305:15000,1309:150000,1306:150000,1307:150000
- shop 2ha_Shop2 -1,1352:15000,1363:15000,1380:15000,1358:15000,1383:15000,1371:15000,1364:15000,1369:15000,1355:150000,1366:150000,1365:150000,1367:150000,1368:150000,1361:150000,1384:150000turbo_room,77,138,5 script Weapon Shop 470,{
cutin "3rd_rune_knight",2;
mes "[ ^00B2EEWeapon Shop^000000 ]";
mes "^8b8b8b____________________________^000000";
mes "Please select what type of";
mes "Weapon you're going to see.";
next;
// Menu Selection
switch(select("Swords:Axes")){
Case 1: // Swords
mes "[ ^00B2EEWeapon Shop^000000 ]";
mes "^8b8b8b____________________________^000000";
mes "Please select if ^FF00001-Handed^000000 or ^0000FF2-Handed^000000.";
next;
switch(select("1-Handed Sword:2-Handed Sword")){
Case 1:
mes "[ ^00B2EEWeapon Shop^000000 ]";
mes "^8b8b8b____________________________^000000";
mes "Please select what type of";
mes "Weapon you're going to see.";
next;
callfunc "1hs_Shop1",0;
end;
Case 2:
mes "[ ^00B2EEWeapon Shop^000000 ]";
mes "^8b8b8b____________________________^000000";
mes "Please select what type of";
mes "Weapon you're going to see.";
next;
callfunc "2hs_Shop1",0;
end;
}
Case 2: // Axes
mes "[ ^00B2EEWeapon Shop^000000 ]";
mes "^8b8b8b____________________________^000000";
mes "Please select if ^FF00001-Handed^000000 or ^0000FF2-Handed^000000.";
next;
switch(select("1-Handed Axe:2-Handed Axe")){
Case 1:
mes "[ ^00B2EEWeapon Shop^000000 ]";
mes "^8b8b8b____________________________^000000";
mes "Please select what type of";
mes "Weapon you're going to see.";
next;
callfunc "1ha_Shop1",0;
end;
Case 2:
mes "[ ^00B2EEWeapon Shop^000000 ]";
mes "^8b8b8b____________________________^000000";
mes "Please select what type of";
mes "Weapon you're going to see.";
next;
callfunc "2ha_Shop1",0;
end;
}}
}//Call function scripts ============================================================
function script 1hs_Shop1 {
mes "[ ^FF0000Account Information^000000 ]";
mes "^8b8b8b____________________________^000000";
mes "Name: ^0000FF"+strcharinfo(0)+"^000000";
mes "Zeny Balance : ^8b8b8b"+#Zeny+"^000000 z";
callshop "1hs_Shop2",1;
end;
}
function script 2hs_Shop1 {
mes "[ ^FF0000Account Information^000000 ]";
mes "^8b8b8b____________________________^000000";
mes "Name: ^0000FF"+strcharinfo(0)+"^000000";
mes "Zeny Balance : ^8b8b8b"+#Zeny+"^000000 z";
callshop "2hs_Shop2",1;
end;
}
function script 1ha_Shop1 {
mes "[ ^FF0000Account Information^000000 ]";
mes "^8b8b8b____________________________^000000";
mes "Name: ^0000FF"+strcharinfo(0)+"^000000";
mes "Zeny Balance : ^8b8b8b"+#Zeny+"^000000 z";
callshop "1ha_Shop2",1;
end;
}
function script 2ha_Shop1 {
mes "[ ^FF0000Account Information^000000 ]";
mes "^8b8b8b____________________________^000000";
mes "Name: ^0000FF"+strcharinfo(0)+"^000000";
mes "Zeny Balance : ^8b8b8b"+#Zeny+"^000000 z";
callshop "2ha_Shop2",1;
end;
} -
On 8/10/2024 at 4:58 PM, gamingmagic said:
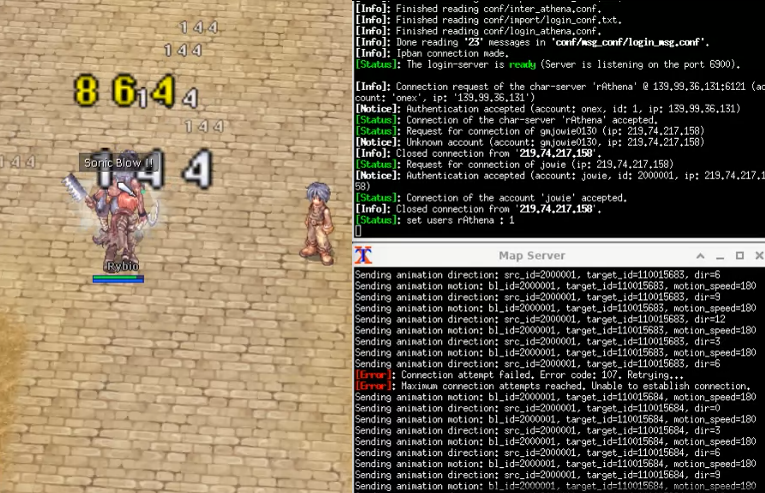
Sonic Blow and Arrow Vulcan v3.patch for 2018/12/19 Up Client
thanks to ckx_, syon, gidz, sadre
-
Submitter
-
Submitted08/06/24
-
Category
-
Video
-
Content AuthorGamingmagic
how to install it?
-
-
anyone po pwede maka help? need ko lang naman po malaman pano install yung fluxCP sa Openserver.exe yun lang po TYI
-
pede mo ba ako dun i-guide on how? Discord ID: mrgeiszer
-
Di ko alam if tama yung category sa forum pero pano mag install ng fluxcp sa Openserver.exe nag search nako sa google pati dito sa forum pero walang malinaw na guide pano ma install fluxcp s openserver.. patulong po mga lodi salamat...
ganyan lng lumalabas

-
23 hours ago, Chaos92 said:
Nemo/WARP have patch for skipped hidden menu icon buttons.
thanks it worked though, btw is there a way to install fluxcp using openserver i tried to search on google but no luck i just need like detailed tutorial on how to install fluxcp to openserver

-
anyone knows how to fix this? T_T
and not sure if my post is in the correct category >_<

-
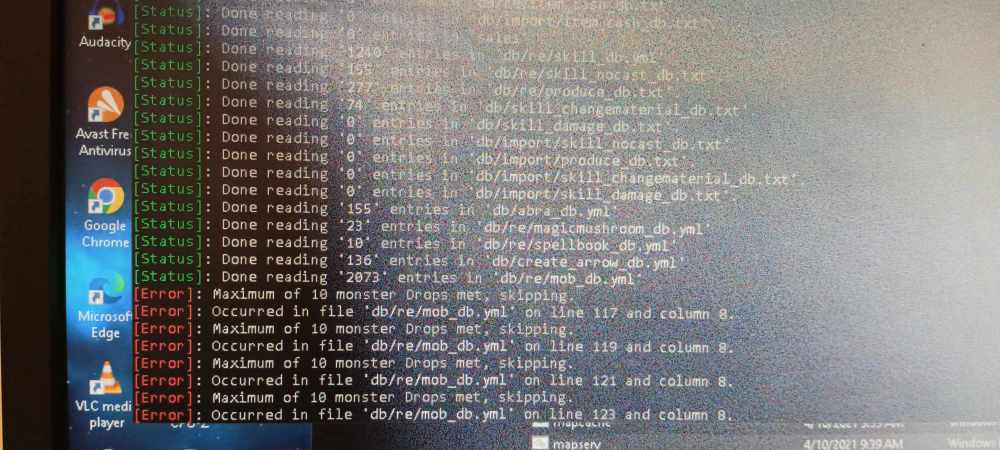
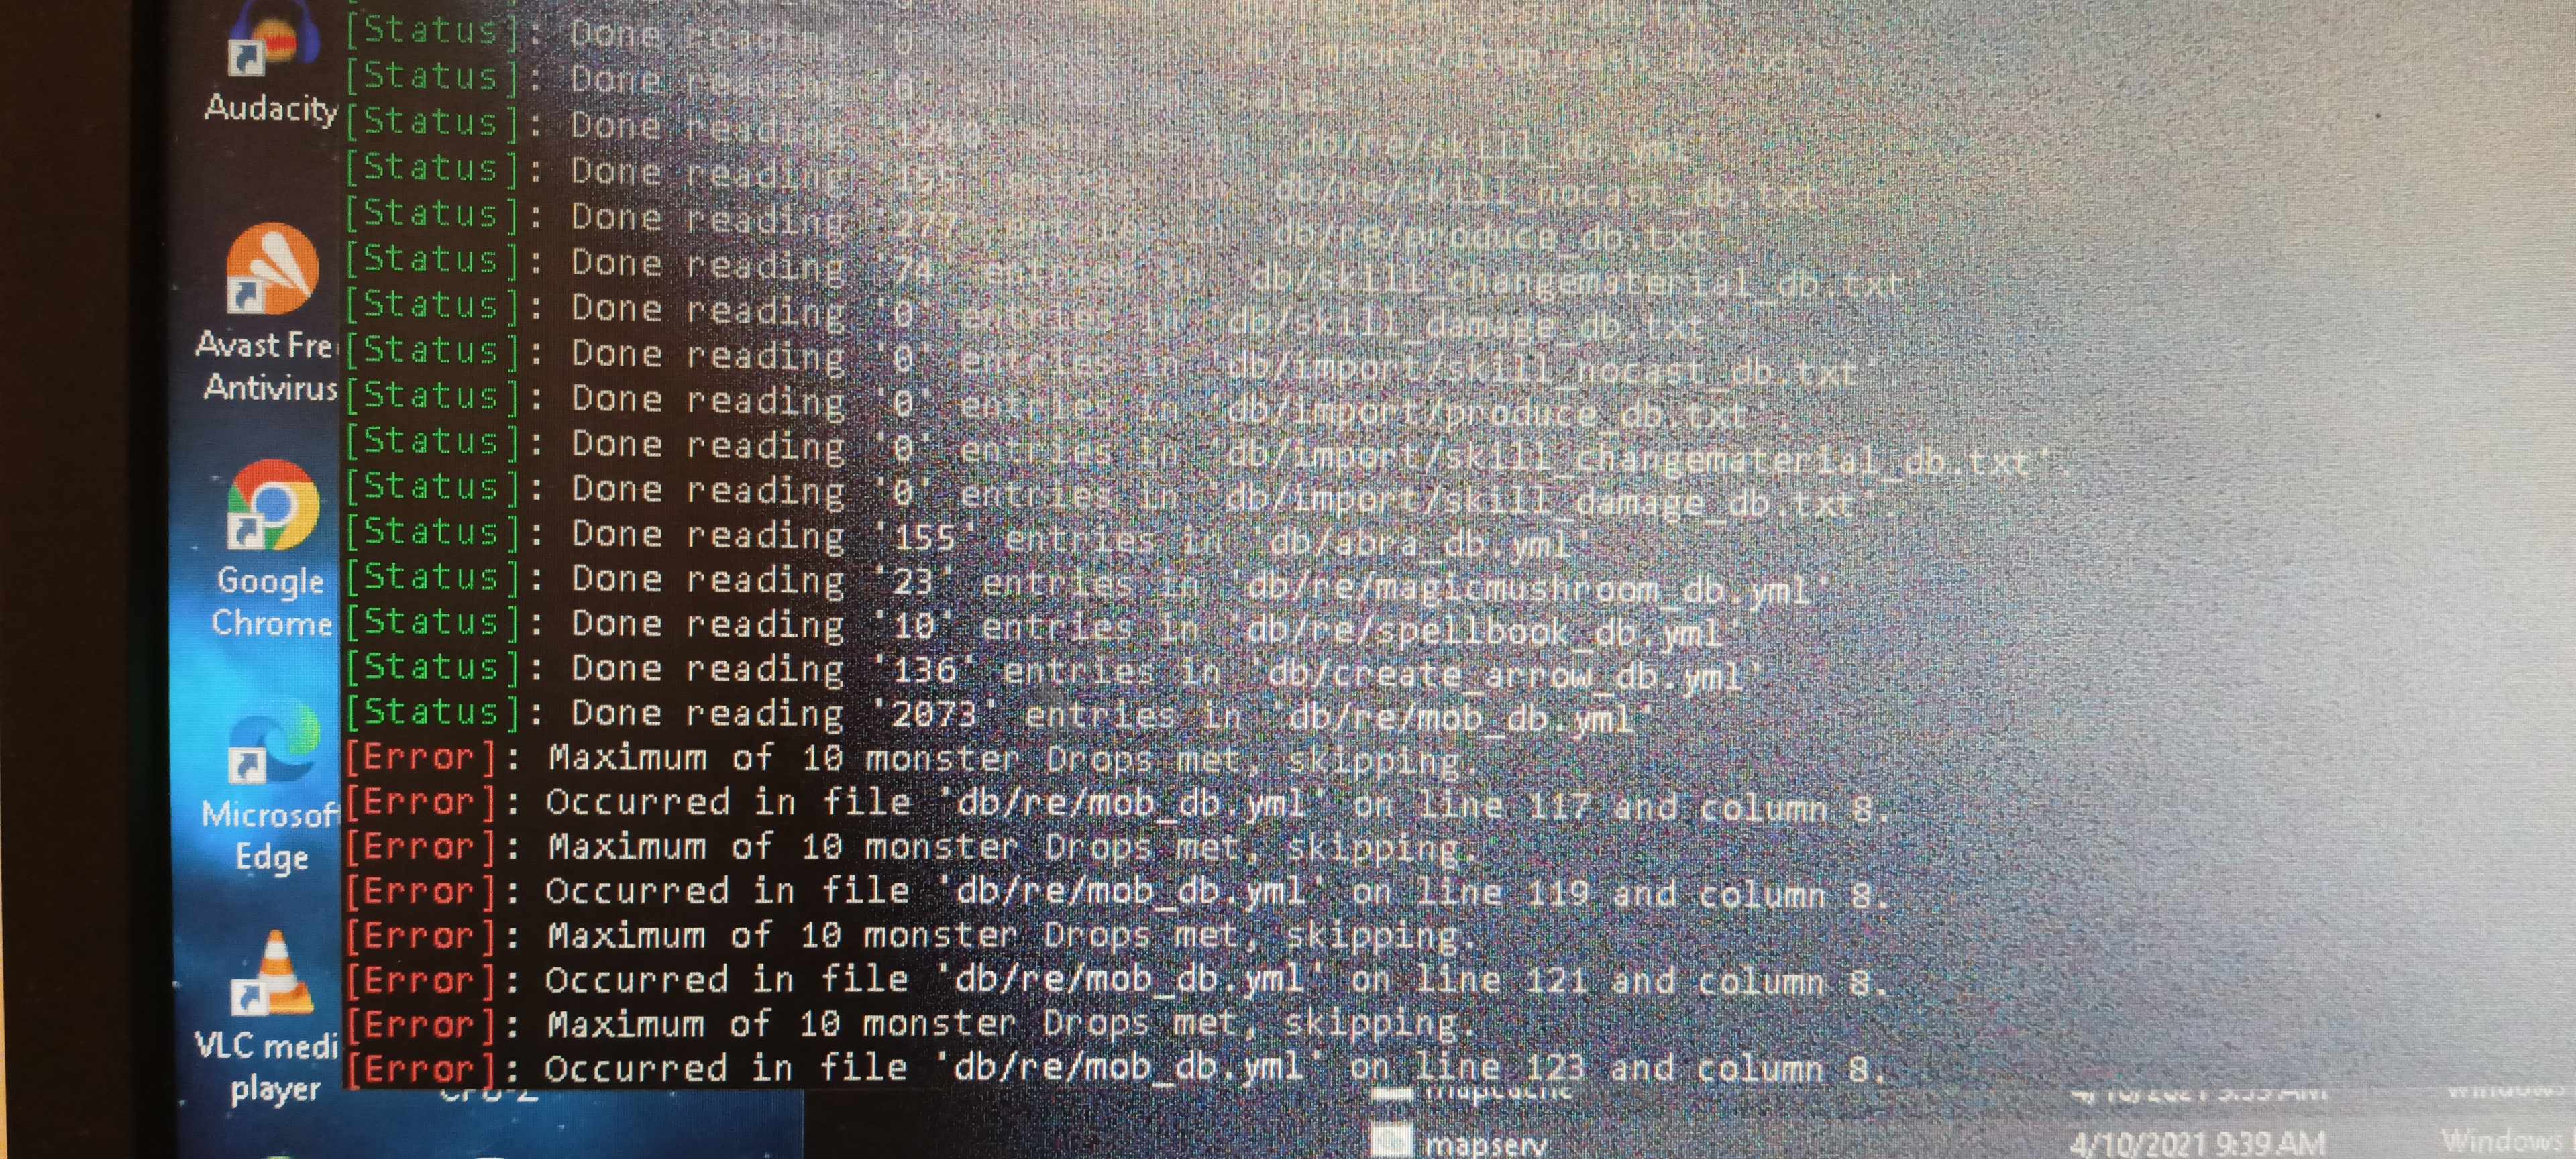
can anyone help me with this error on the server side, i didn't touch any of the data in mod_db.yml but suddenly got that error on the map server..
-
its not showing the hired npc i used an existing mob 1802 - High Priest Mob
-
-
8 hours ago, Jayz said:
You want to make fake player in the dungeon and field? use mob_avail.yml
hi thanks for response... sorry for a dumb question can you teach me how to use or do it in mob_avail.yml?? tia
-
 1
1
-
-
please help as the title says, or a mob with player sprite that fights a mob monster... any guides or script thanks in advance...
-
is there any way i can make npc attack to mob or mob that is using player sprite to attack a mob monster, basically what i want is to make like an ai fighting a monster to looks like a player frighting it... any guides on how to do it will be much appreciated.... thanks in advance!!
-
i believe its working now its just the matter of wait...
 sorry just I'm idiot, please close this thread as resolved TIA
-
Hello everyone, I'm kind of working in this script, but I'm not quite sure if its working or what.. please help
here's the full script...
//Bossnia Map 1 Gold Farm
//==================================================
//Bossnia Map bossnia_01
//==================================================
prontera,156,176,3 script Gold Farm 88,{mes "[ Farmer ]";
mes "Happy farming!";
next;
warp "bossnia_01" ,0,0;
close;OnInit:
disablenpc "Gold Farm";
hideonnpc "Gold Farm";
end;
OnMinute10:
hideoffnpc;
announce "Farmer: Gold Farm Room Activated in the center of prontera!",bc_blue;
sleep2 10000;
announce "Farmer: Come on hurry, NPC room will last only a minute.",bc_blue;
sleep2 10000;
enablenpc "Gold Farm";
initnpctimer;
end;OnTimer50000:
announce "Farmer: Last 10 seconds.",bc_blue;
end;
OnTimer55000:
announce "Farmer: 5.",bc_blue;
end;
OnTimer56000:
announce "Farmer : 4.",bc_blue;
end;
OnTimer57000:
announce "Farmer : 3.",bc_blue;
end;
OnTimer58000:
announce "Farmer: 2.",bc_blue;
end;
OnTimer59000:
announce "Farmer: 1.",bc_blue;
end;
OnTimer60000:
announce "Farmer: Time's up. Gold Room will open again in 10 minutes.",bc_blue;
end;
OnTimer67000:
disablenpc "Gold Farm";
hideoffnpc;
stopnpctimer;
end;
}
//==================================================
//MOB Monster here
//==================================================
bossnia_01,0,0,0,0 monster Dokebi 1110,50,0,0,0
bossnia_01,0,0,0,0 monster Grand Peco 1369,30,0,0,0
bossnia_01,0,0,0,0 monster Mineral 1614,17,0,0,0
bossnia_01,0,0,0,0 monster Am Mut 1301,3,0,0,0
//================================================== -
On 2/25/2016 at 9:14 AM, Haziel said:
Third Job Costumes & New Classes: Corrected
Third Job Costumes + New Classes
The Correction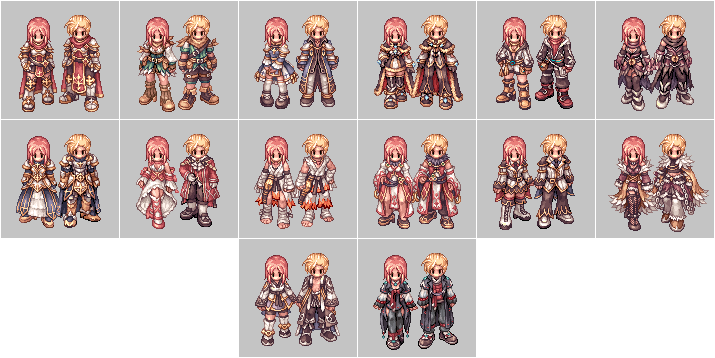
With the advent of jRO releasing new Job Costumes, and also, the new classes from the Taekwon branch, many of server owners want to replace the vanilla sprites or even, implement the bodystyle system.
But, there's a catch! Originally jRO, and now, even kRO spriters, have made it completely off of the default pattern of palette.In a classic example, you can notice the pattern of the RO palettes.
What matters is the position of the colours, as an example, for all jobs, the white-ish tones will be always on the same row, so we can use it to create custom palettes.See how it works:
http://hazielgraphics.com/images/guides/corjob1.png
But jRO didn't follow the classic pattern, making it incompatible with custom palettes (@Kamishi ones included).
http://hazielgraphics.com/images/guides/corjob2.png
So, I edited frame by frame of each job sprite, of each gender, mounted or not, correcting them, converting them in a way so many of the previously created palettes will work.
This package includes:Alternate Outfits:
- Alternate Royal Guard M/F + Gryffon Battlemount + Lion Mount
- Alternate Ranger M/F + Warg Battlemount + Ostrich Mount
- Alternate Minstrel/Wanderer + Ostrich Mount
- Alternate ArchBishop M/F + Alpaca Mount
- Alternate Warlock M/F + Fox Mount
- Alternate Mechanic M/F + Savage Mount
- Alternate Genetic M/F + Savage Mount
- Alternate Guillotine Cross M/F + Hyena Mount
- Alternate Shadow Chaser M/F + Hyena Mount
- Alternate Sorcerer M/F + Fox Mount
- Alternate Sura M/F + Alpaca Mount
- Alternate Rune Knight M/F + Dragon Battlemount + Lion Mount
New Classes
- Star Emperor M/F + Wolf Mount
- Soul Reaper M/F + Wolf Mount
As requested by @Emistry, I also added an extra, making it more compatible to default palettes:
- Kagerou/Oboro + Frog Mount
Following the another @Emistry's request, all files are now already on GRFs.
The previous version had no Cashmount palette included, this one fixes the issue.
Only the already released costumes are supported at this moment.The Rune Knight seems to be the last of them, it's over a year from the first release!
As a final part of the package, I'm including Classic Palettes for all Alternate Costumes.
Enjoy the final product!
-
Submitter
-
Submitted02/24/2016
-
Category
-
Content AuthorGravity Corp
this will cover or overwrite the old sprite of the 3rd jobs? tia
-
anyone please help!
On 4/6/2023 at 12:47 AM, WhiteEagle said:Use db/import/mob_avail.yml
any format? or example thanks TIA
up
-
@Racaae do you know what script codes that an npc using player sprite can attack a mob? tia
-
Just now, hendra814 said:
Are you mean monster vs monster npc?
yes but the other monster is using the player sprite is it possible? tia
-
anyone can share or help me if this is possible, if there's a script for this? TIA
PS: basically its like a normal player but npc using player sprite attacking a mob on the filed or dungeon, it will looks like a normal player kind of
-
11 hours ago, Racaae said:
Yes you can
//Examples
	setunitdata(getnpcid(0), UNPC_HAIRSTYLE, 2);
	setunitdata(getnpcid(0), UNPC_HAIRCOLOR, 5);
	setunitdata(getnpcid(0), UNPC_HEADTOP, 547);
	setunitdata(getnpcid(0), UNPC_HEADMIDDLE, 0);
	setunitdata(getnpcid(0), UNPC_HEADBOTTOM, 0);
	setunitdata(getnpcid(0), UNPC_CLOTHCOLOR, 1);
	setunitdata(getnpcid(0), UNPC_ROBE, 4);
thank you for this it works perfectly for my npc


H> Auto Poring Catcher Event Script
in Scripting Support
Posted
thanks @Mice I think I've fix my issue with this script thanks for the help..