Leaderboard


Popular Content
Showing content with the highest reputation on 10/06/20 in Posts
-
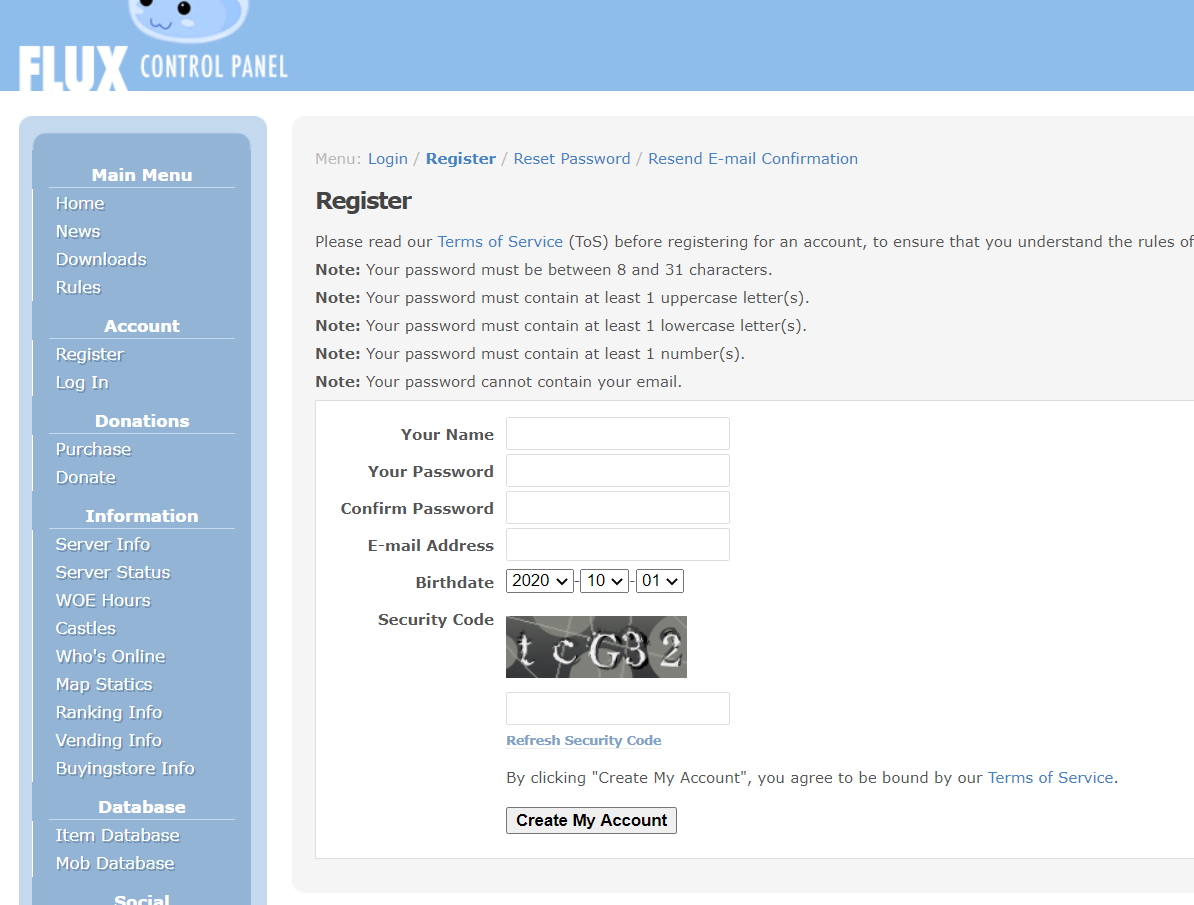
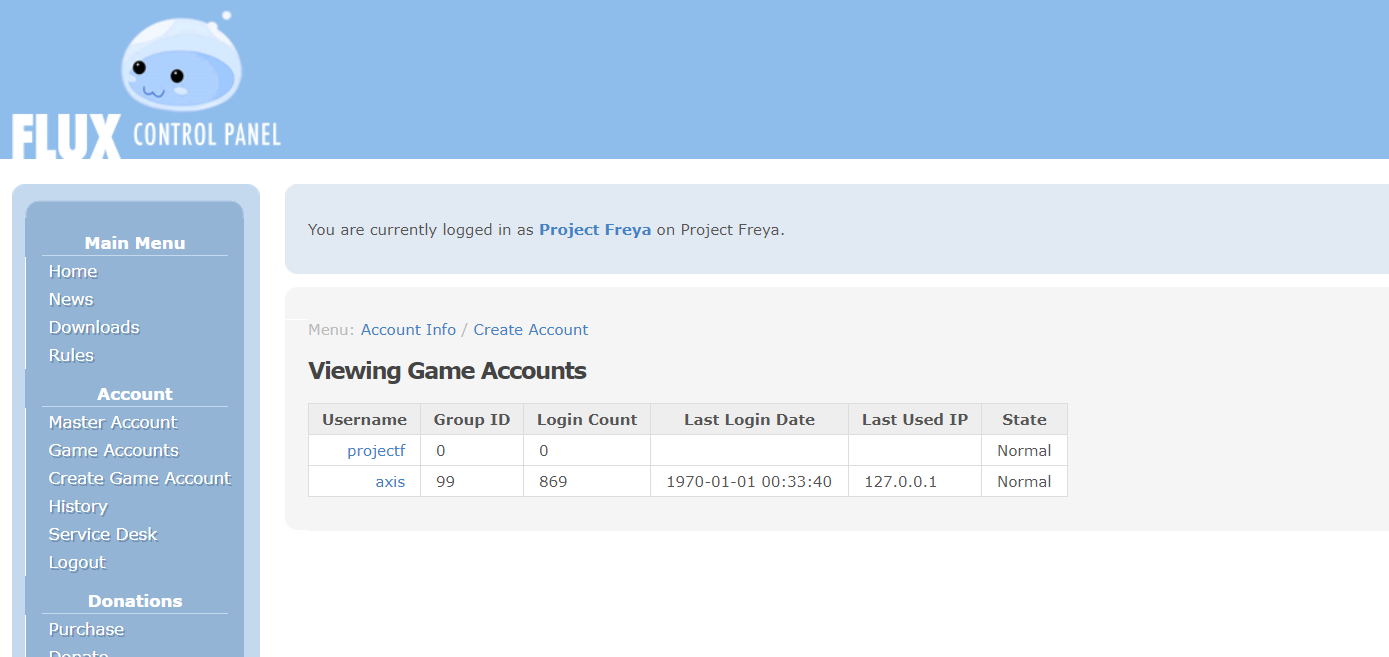
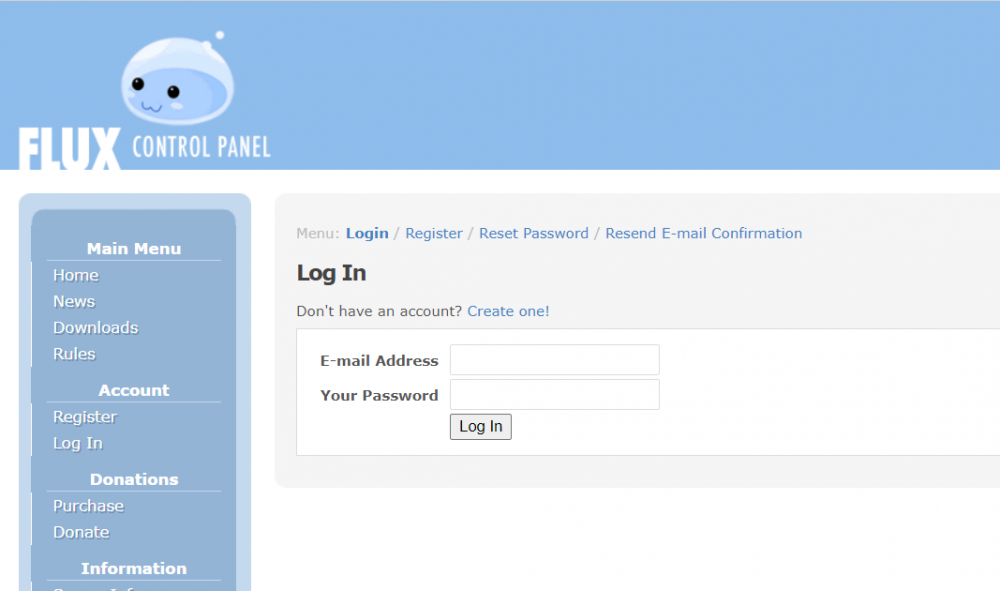
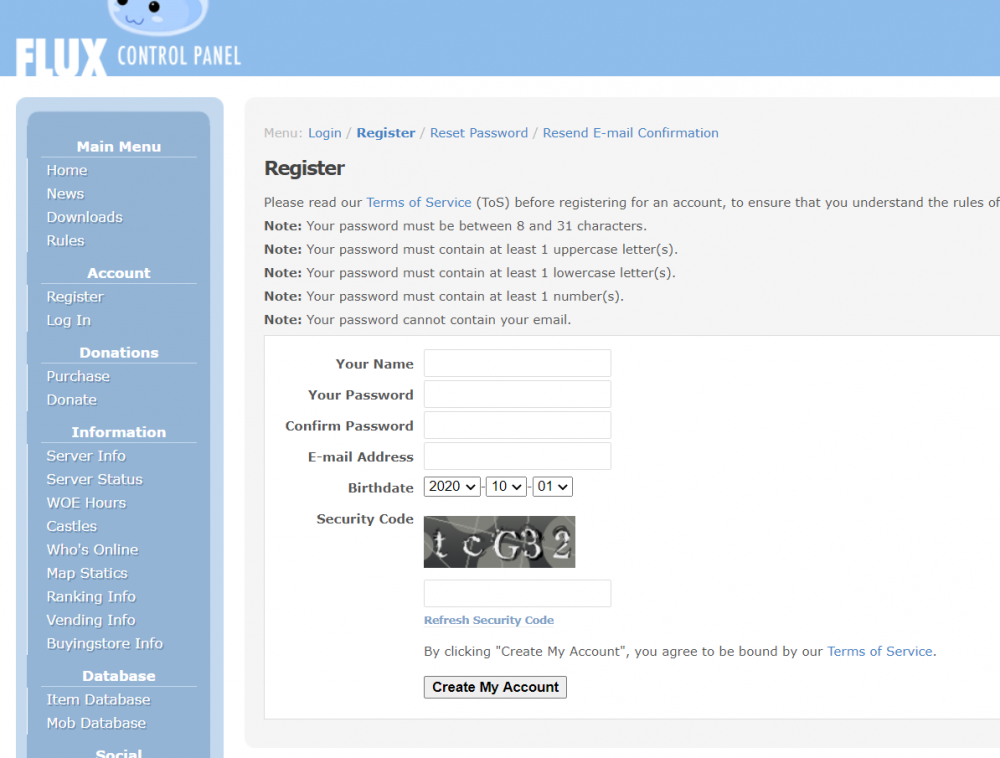
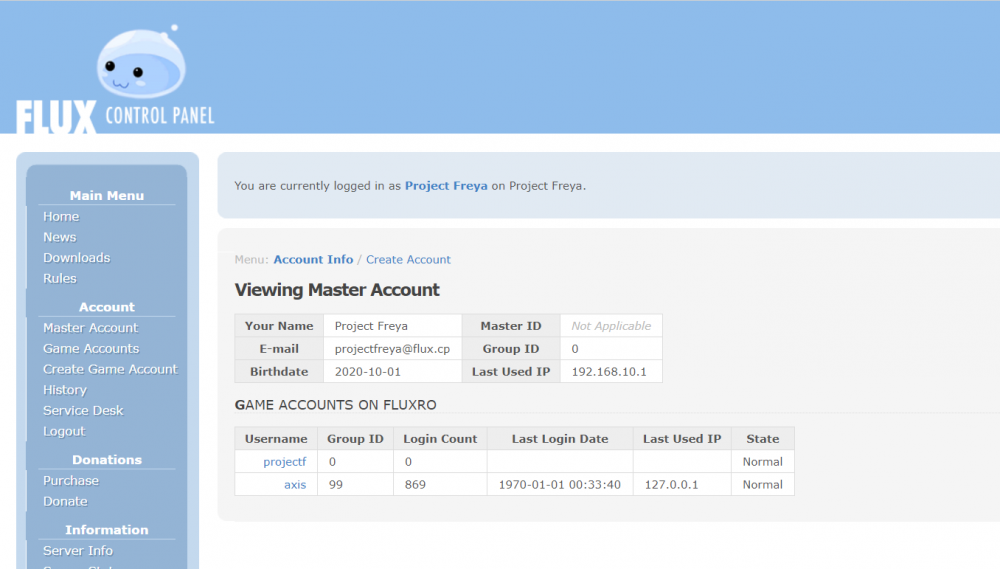
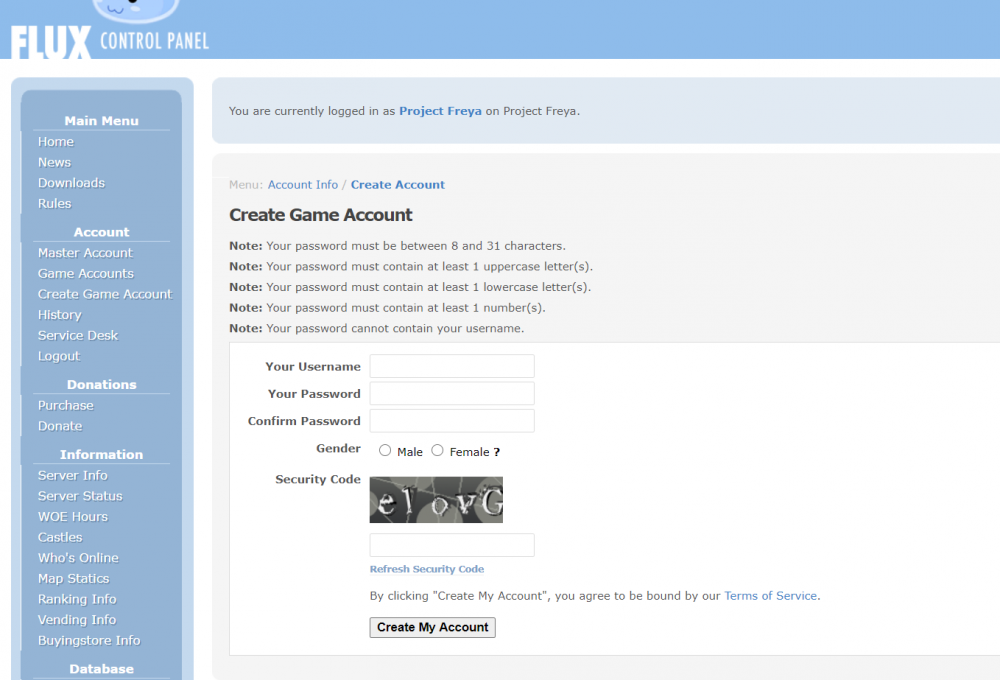
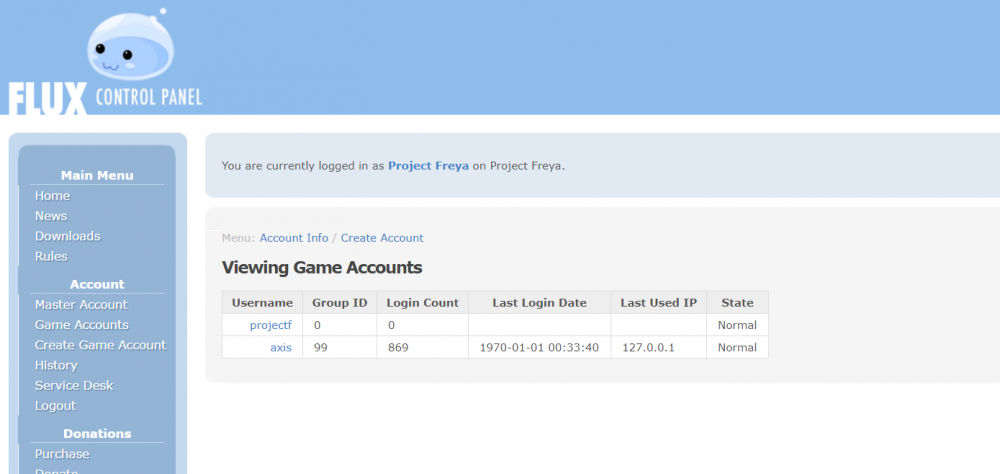
FluxCP with Master Account Integration Hi everyone! I want to share my Simple FluxCP with master account. I've been coding this for the last 2 days using my free time. I have seen a lot of people asking for FluxCP with Master account so I decided to share this. Originally I was planning to do this via addons but there are too many things needed to change. Please take note that this is version 1.0 so if you found any bugs please open an issue on github. I will also release next time the master account integrated with phpBB. Repository: https://github.com/acelabini/FluxCP-MasterAccount Clone: https://github.com/acelabini/FluxCP-MasterAccount.git Download: https://github.com/acelabini/FluxCP-MasterAccount/archive/master.zip How to install? Just clone or download the repository and follow this installation guide written by @Zack- Configuration Edit `config/application.php` 'MasterAccount' => true, // Enable master account feature, setting this to false will revert back to normal fluxCP 'MasterAccountPasswordHash' => 'bcrypt', // Master account password hashing algorithm, atm only bcrypt is available 'MasterAccountMaxAccounts' => 0, // Maximum game account per master account; 0 to disable If you have any question, feel free to post it here. Helpful? Buy me a coffee

 1 point
 -
Having error while updating and using a new client ? LAUNCHING CLIENT ERROR / Force Close Well the common error on this part is your system files lua or lub files is not same as you setup on your Diffing / Patching . To fix this kind of error you need to patch your unpacked client and use your specific system files name and its case-sensitive . Example : ItemInfo on diffing you should put what your System files name for item info . If your system files is using ItemInfo.lua then when diffing using nemo put ItemInfo.Lua too not "Iteminfo.lua, itemInfo.lua etc " Tools Needed : Nemo-Master After you login you will get error on Character Select The common error from this is you just dont have the file to support the character selection the basic thing to do here first is to update your KRO and Re-KRO using http://nn.ai4rei.net/dev/rsu/ Old Client Below 2018 Need to use clientinfo.xml with lang type 0 and American New Client 2018 Onwards Need to use sclientinfo.xml with lang type 1 and American Skill Tree Error Izlude Tiles Fix Geffenia Map Fix Current Translation https://github.com/llchrisll/ROenglishRE Note: All files can see at data.grf just copy and use it to your server.grf1 point
-
@Dark Lunacy Glad you like it @Xan Sietry Will do mate. Thanks Applied some fixes - Added password reset for master account and game account - Fixed issues #1 (Reported by @xVaan) - Fixed error when logging in if account is ban - Fixed loginbox account link1 point
-
He is always busy but definitely he'll reach you soon. Just be patient Brother.1 point
-
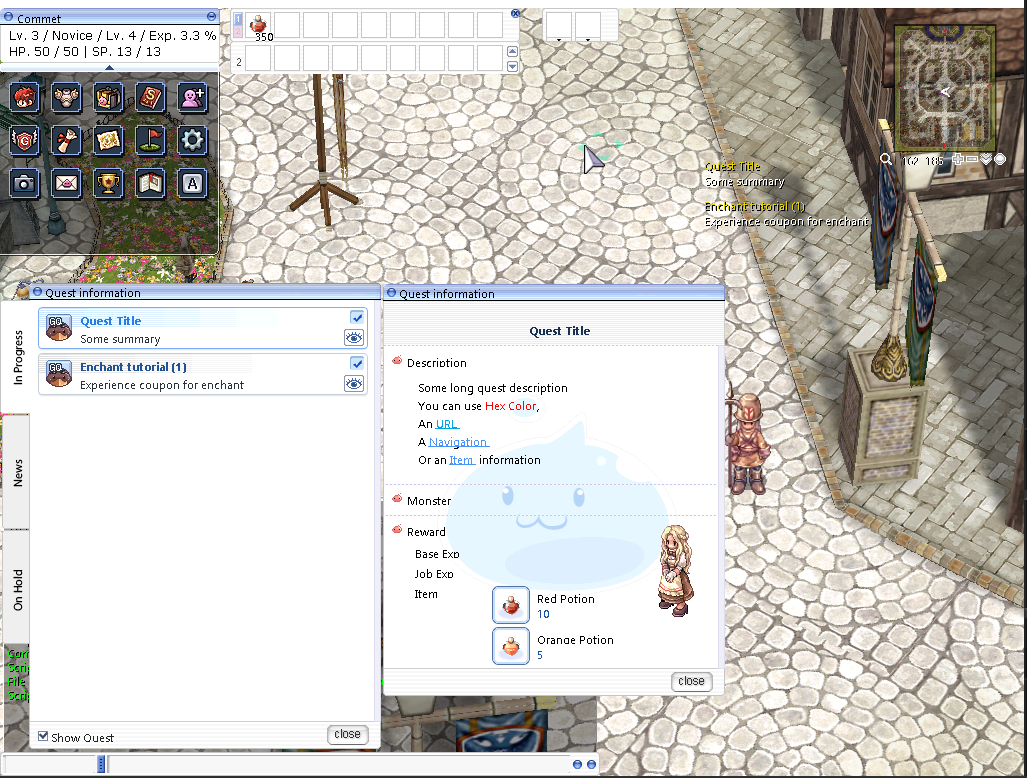
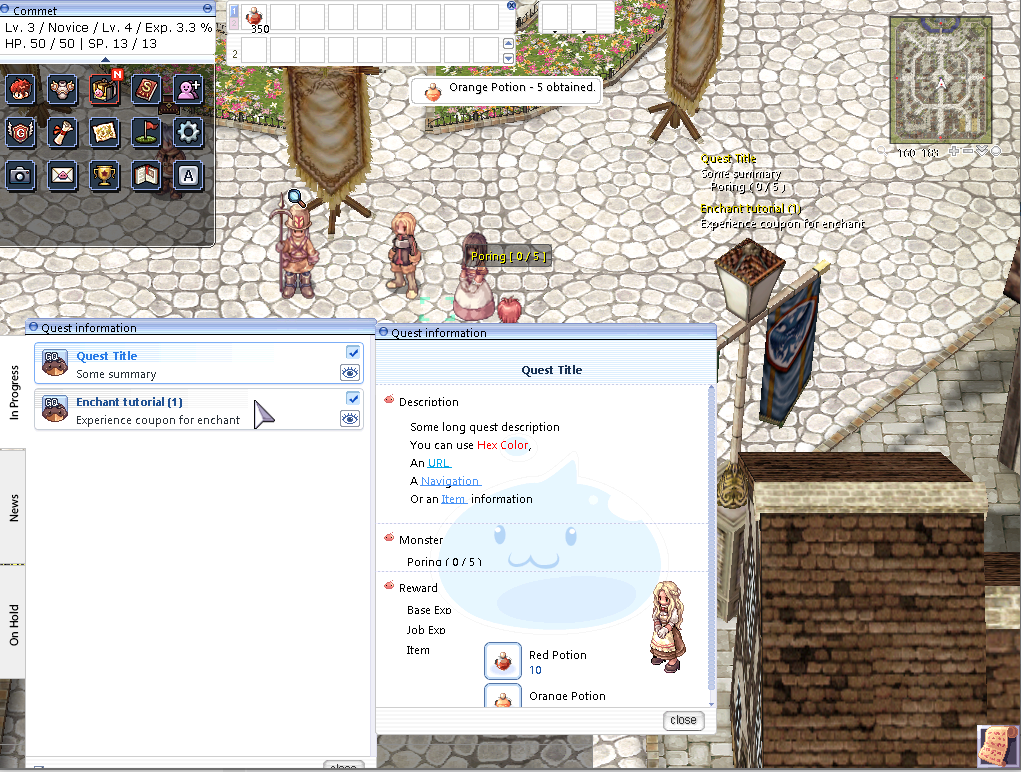
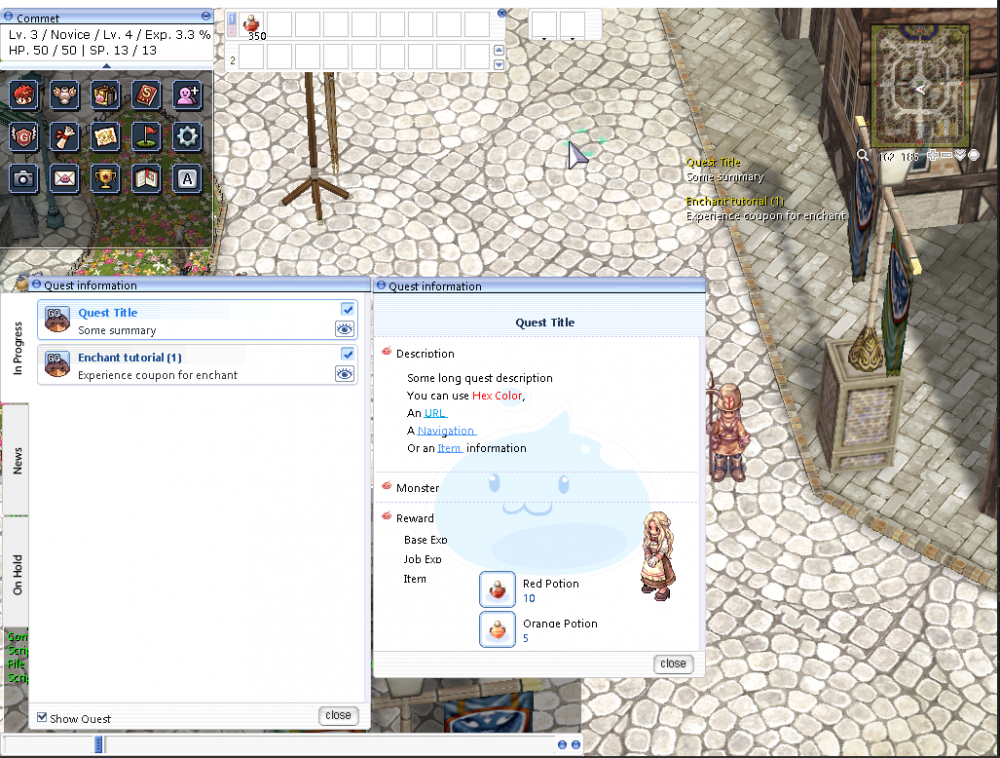
I think the correct one is, you should edit both Client and Server side. Doing so: In client side, just update System/OngoingQuestInfoList_Sakray.lub (You should decrypt with luadec into System/OngoingQuestInfoList_Sakray.lua Then, use below format: -- Example Quest Info List -- QuestList = { [1] = { -- This is the ID of the quest. Please remember/note it down. Title = "Quest Title", -- The quest title that shown on quest board. Description = { -- Quest description. "Some long quest description", "You can use ^FF0000Hex Color^000000,", "An <URL>URL <INFO>https://google.com</INFO></URL>", "A <NAVI>Navigation <INFO>WILOW,0,0,3,-222,0</INFO></NAVI>", "Or an <ITEM>Item <INFO>501</INFO></ITEM> information" }, Summary = "Some summary", -- Summary, -- Optional Properties IconName = "ico_gq.bmp", -- This is the quest icon displayed. It should reside on "data/texture/유저인터페이스/renew_questui/xxx.bmp" (Note for the file must be save with korean encoding) NpcSpr = "4_F_KHELLISIA", -- NPC Sprite name. Located at "data/sprite/npc/NPC_NAME" (Note: Input without .spr extension) NpcNavi = "prontera", -- Destination map name NpcPosX = 115, -- Destination npc X location NpcPosY = 181, -- Destination npc Y location RewardItemList = { -- Reward item list. You can have more items in it -- First Item { ItemID = 501, -- ItemID ItemNum = 10 -- Item quantity }, -- Second Item { ItemID = 502, -- ItemID ItemNum = 5 -- Item quantity } -- ...and so forth }, } } Next, you need to update your server side, by open and update these file: db/import/quest_db.yml And add your quest inside it: (Note the quest ID you've saved before) ... add after "Header:" Body: - Id:2 Title: Quest Title # Same as the "OngoingQuestInfoList_Sakray.lua" # Optional, if you want to add some monster, define here. (Please read the documation in the first fold of this .yml) Targets: - Mob: PORING Count: 5 Finally, you can adjust your quest in your NPC script, like this: prontera,159,186,4 script TestQuest 90,{ mes "Hello, this script just for testing quest"; next(); switch(select("Take quest", "Report Quest", "Bye")) { case 1: if (checkquest(2) == -1) { setquest 2; mes "Quest Taken"; } else { mes "Sorry, but you already have the quest"; } break; case 2: if (checkquest(2) == 0 || checkquest(2) == 1) { mes "Well done!"; mes "This is the rewards"; getitem 501,10; getitem 502,5; erasequest 2; } else if (checkquest(2) == 2) { mes "Sorry, you've completed the quest"; } else if (checkquest(2) == -1) { mes "It's look like you have not take the quest"; } break; case 3: mes "Bye..."; break; } end; } Last not least, don't forget to compile your lua file to lub using luac. That's some tutorial for update/creating a custom quest. So, in summary, you only need 3 things to setup, which is: Setup in client side -> Update OngoingQuestInfoList_Sakray.lub Setup in server side -> Update db/import/quest_db.yml Setup npc to trigger the quest === Screenshot - Without Monster Screenshot - With Monster === Hope this help ?
 1 point
 -
I have been fiddling around with it and found a way to actually make "ok" sprites with it This was my result: http://www.framecompare.com/image-compare/screenshotcomparison/91BFMNNU?fbclid=IwAR0nw7btJdrFkXcXkU7-nfEZ2YMDDu9nWb9CyGVk5KlfGbjEcvbRZyReokQ We should try training a model with ToS Sprites maybe? ---------> https://drive.google.com/drive/folders/0B92X6lQqXBPSbFBfQVdwcHpRaG8 Here are the models I used and the order.. there might be better ones or better order but wtv http://www.mediafire.com/file/vf04k6jz0amflzu/models.rar/file Can you please tell me which models did you use for rune knight? I have been playing around and I found that there are no Pixel res-upscalers that soften the edges which is what almost everyone wants im sure. So the only way I found is to re-pixelize it after it was upscaled to your desired size, these are my results Tests are here: http://www.framecompare.com/screenshotcomparison/7YLZLNNX EDIT: One of the most consistent ways of doing this that I've found is 1x_Alias_200000_G.pth > cartoonpainted_400000.pth after that sharpen the result in Photoshop with Smooth focus 300% 3pix Radius 100% Noise Reduction this usually works best with sprites so Its worth tryng it
 1 point
 -
I just tried on client 2018-06-21aRagexeRE thanks so much @melv0 1. How to change the maximum level of your server? https://gist.github.com/cydh/d82a06472f12c4ec7f38ab3de22fe86b 2. How to make the aura appear at a maximum level other than 99? data\luafiles514\lua files\service_korea\ExternalSettings_kr.lub & externalsettings_kr_sak.lub MaxLevelTable = { BaseLevel = 99, << Edit this part into 255 BaseLevel3rd = 185, BaseLevelExtend2 = 160, BaseLevelUpperJob = 185, BaseLevelHomun = 185, BaseLevelDoram = 185, JobLevelNovice = 10, JobLevelSuperNovice = 99, JobLevelBase = 50, JobLevel2nd = 70, JobLevel3rd = 65, JobLevelExtend2 = 50, JobLevelUpperJob = 60, JobLevelDoram = 55 } and that's it, see magic ingame ?1 point