
Rivers
-
Posts
245 -
Joined
-
Last visited
-
Days Won
8
6 Followers


Recent Profile Visitors
5934 profile views
.thumb.png.6c43ea6baae6b0e9403f4e72c339e9ce.png)

Rivers's Achievements
")


-
 Try using : subnet: 255.0.0.0:127.0.0.1:127.0.0.1 subnet: 255.0.0.0:IP_public:IP_public And Ensure the ports are allowed through the firewall(s).
 -
In this guide you will use the instruction: Replace 127.0.0.1 with your Public IPv4 address. You can easily find this in your network settings; if you're having issues there then Google "What's my IP?" and Google should tell you. (AI Response won't tell you the correct IP)
-
This can happen when you try to access the sql terminal using an un-authorized user. I'd recommend logging in on the "root" sql user and adjusting your "raguser" to have admin level privs. Access root using: sudo mysql -u root -p Grant privs and flush to take effect immediately: GRANT ALL PRIVILEGES ON ragserver. * TO 'raguser'@'localhost' WITH GRANT OPTION; GRANT ALL PRIVILEGES ON * . * TO 'raguser'@'%' WITH GRANT OPTION; GRANT ALL PRIVILEGES ON * . * TO 'raguser'@'localhost' WITH GRANT OPTION; FLUSH PRIVILEGES; If any command fails, such as '%' is no recognized, there's an alternative option. You can log into MySQL directly from the website as the 'root' user and manually alter the user database to allow your 'raguser' admin access.
-
Sometimes no. It really depends on the host that provided the address to you. If you don't have control over your host IP then your data is likely being shared with the host. I'd recommend trying t set this up on a simple device, such as a phone or alternate computer, to see if this problem occurs still.
-
This is an issue with the translation, I am almost certain. Make sure the English Translate files are set appropriately for your version.
-
You can indeed use your wifi. Sorry for the late reply. I could have sworn I sent this already. Either way, you'll need to allow the RO ports through your Wifi router. Access your wifi router and navigate to the Advanced settings where you can find Port forwarding or NAT settings. This is where you'll add a custom value for the three Ragnarok ports. Edit: Weird. It shows my reply now. Sorry.
-
When running through a wifi router all you need to do is provide the advanced PORT/NAT settings the appropriate ports to forward and it should accept your connection. This is all I do for my wifi network, that is.
-
Added some more security changes for the subnet settings. You can find information about this at i1.10.0.
-
Step Nine and Ten are for the windows emulator to test the server out since rathena doens't work too well in a Linux environment.
-
You're absolutely right. I just started going through the various vilnerabilities in my latest guides. Thanks for pointing this out! I have updated the guide to include a quick method to disallow anyone but the host(s) to have access to PMA.
-
Additionally, if the VBox is hosted by someone else and has some sort of limitations attached, you can (optionally) disable these two lines as well. Doing so will remove the single-user access initially set up.

-
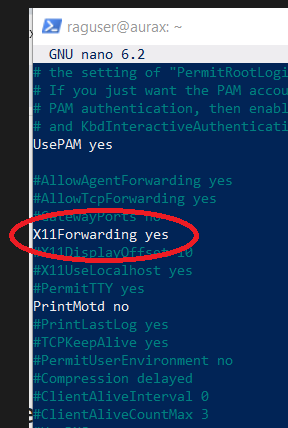
Good morning. Your IP address is set to a local host IP. You'll need to obtain your IPv4 (you can Google "What's my IP" from the device) and replace all the 198.x.x.x with that IPv4 address. There is also one minor discrepancy on the ssh config. You can remove, or comment out the X11Forwarding to say "no".
-
This has been tested by a couple others on VBox. You'll need to get the public IP of the VBox which will likely be different from your system's IP. Your Public IPv4 is what you want.
-
[Tutorial] Basics of Ragnarok Arting & Adding Custom Items
Rivers replied to Rivers's question in Graphics Support
I would recommend using the .lua files instead then. It's just as easy to add that and edit using Sublime or Notepad++. You'll need to diff the client executable with custom lua/lub paths though. -
Updated with how to patch and send patches on the webserver.