

Mina-chan
-
Posts
134 -
Joined
-
Last visited
-
Days Won
11
Content Type
Profiles
Forums
Downloads
Jobs Available
Server Database
Third-Party Services
Top Guides
Store
Crowdfunding
Posts posted by Mina-chan
-
-
Hii! They've updated the website with the guides
This is the current method we're using to convert a model from rsm2 to rsm
I think taking a look at the current steps may help you further advance with the program development >w<
https://browedit-fansite.blogspot.com/p/converting-rsm2-into-rsm.html-
 1
1
-
-
On 5/12/2021 at 9:30 AM, L1nkZ said:
Well, when converting back to RSM and including that model in an RSW there's a lot of things that can "wrong" when it comes to the exact position of the models' instances. I'd have to investigate to find out what goes wrong exactly.
According to what you (@Mina-chan) observed, the flipping could be due to the FBX -> RSM conversion itself.
Oh who knows! I'm not certain of the cause either
But what I'm doing for now is, after merging the vertices and assigning the textures that are repeated, I flip the models in Blender in the X and Y axis in the Global Scale mode (the other flip option changes the angle of the model, but not this one). Then in Object Edit mode, I press Ctrl + A and "Scale" to make the new orientation its "default orientation". Finally, when the model is exported , it comes out perfectly!
(I'm currently using RSM Converter for this last step, for the "two side" and "shading mode" functions)
Actually, someone made a guide of the full conversion process, based on our posts in Borf's Browedit discord, but currently the site isn't working. I'll post the link here when it's available though, it may help you have more insight in what's missing and what could be added >w< but so far, it's been an amazing program!!-
2
-
-
On 5/5/2021 at 2:48 AM, 312200492 said:
Hello, now I have successfully converted to RSM file through your software, but now there is a problem. After entering the game, most of the models are flipped vertically, and the height of some models is problematic
Model flipping:
The model is too high:
Model flipping:
Oh that's true. I noticed that if you view them in grf editor, it's as if they were mirrored in 2 axis, X and Y
This is a top view of this RSM2 mode, pglass_s_03.rsm2: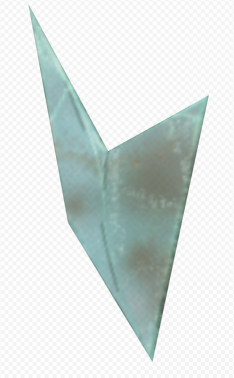
This is the same model converted into RSM. I used this program to convert it into a glb, then exported into a fbx and then exported into ro using rsm converter: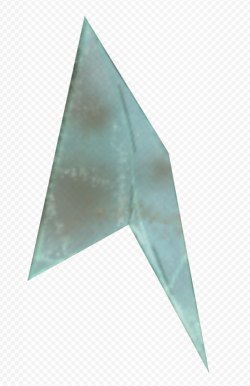
Apparently, they're flipped when they're converted with this program, because I can notice it's already flipped when I open the glbs in Blender. Please take a look into it >w< -
hii! I found another bug. But this is very strange.
When I convert one model, it's fine
but when I convert another model, the first one becomes broken, and it appears with the same shape as the second converted model
however, the modified date of the first model doesn't appear any different. so I suspect this has something to do with the other files, such as "tex_vertices.bin"
(maybe that's why it's not possible yet to convert several models at a time yet) -
Hii! I think I found a bug

I think I can't convert if the folder path has spaces in them, so it only catches "My".
Also, I have a suggestion: Since there are hundreds of new models, is it possible to have batch conversion in the future?
Thank you so much!!
Meanwhile, since I had not much idea about how to use this properly (I'm very nob ), someone very kind sent me this:
@echo off
for /r change\ %%i in (*.*) do (
echo %%i
rag2gltf.exe %%i
)
pause
It can be made in a text file, saved as "change.bat", and placed in the program's folder. So you only have to click on it for each conversion.
a single rsm2 file should be in "change", and texture folders in "data"-
1
-
-
Hii! I have some questions, because I don't really quite understand
There's a file that mentions these as requirements:
fire==0.4.0
gltflib==1.0.6
kaitaistruct==0.9
Pillow==8.1.2
PyGLM==1.1.7
Also, there's this other requisite:
## Prerequisites* Python >= 3.7Do I need to installall of these programs?
Additionally, it mentions something about a command line, but I was unaware of what that means until now.
Maybe it's because this is a rough release, as you mentioned. Are you going to make the program "standalone" and easier to use in the future? Like rsm converterBut for now for me it's a bit difficult to understand what to do, so maybe I'll wait for a final release x3 thank you!
Oh nvm, I got it x3 there's a rag2gltf.exe in the "windows" version -
On 4/8/2021 at 5:24 PM, L1nkZ said:
Alright, I pushed a very rough release as an exe for people to try it out (and give some feedback): https://github.com/L1nkZ/rag2gltf/releases/tag/v0.1.1
thank you soo much!
I'm finally free to give this program a try ; v ;
I'll let you know if I find anything or if I have a suggestion ^^-
1
-
-
OOOHHH!!!
Finally, something to convert RSM2 ; W ; !! THANK YOU!!
And for making a new converter! The other one is good, but has got some problems and often it doesn't convert the models x3
But I have a question: is glTF 2 better than fbx and obj? The tools that we currently have (rsm converter and Bromedit) can only import fbx and obj (as a mesh) respectively, to save them as rsm afterwards).
*I ask because it would be good to have those formats too, but maybe for later on! RSM2 is way more important right now >w<Oh by the way, is it possible for it to have an exe file later on? x3 thank you!
-
1
-
-
Oh, it's better to add the map into a grf (it can be main or custom), and then add that grf itself with mapcache.
Because only adding the gat doesn't read the map well. You may even make holy water anywhere if it's not added properly!
But you can test, and if it doesn't happen, then it's all fine! -
omg! * A *
is it going to have the option to add a sky map to any map, like Nemo? -
On 3/2/2021 at 1:19 PM, Tokei said:
Heya, fixed just now, in 1.8.4.1.
!!!
Thank you sooo much!!I'm going to test it now x3
Edit: It's working perfectly fine! -
uhmm... I think the problem could be in how the original Korean characters are translated into browedit, when the ro.xml file is modified and then saved
but I could be wrong.
this is how mine appears. the folder is: ¿öÅÍ
it works perfectly fine!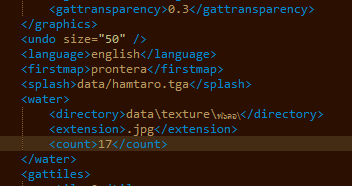

but if you notice, this is what appears to those who have a problem with the water texture:
it appears as ����
in my case, I allow notepad ++ to read the korean characters, and I have no problem upon saving: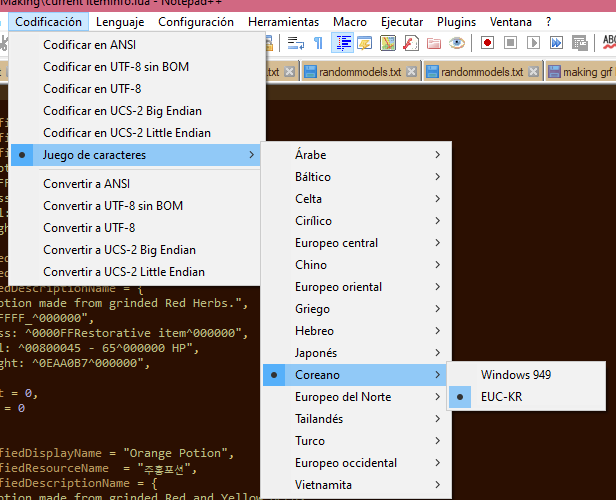
I hope this is helpful! -
6 hours ago, Tokei said:
Updated to 1.8.4.0:
- Added proper support for previewing RSM2 file format up to version 0x203.
-
Enabled animations for RSM2 models.
- Support translation animations.
- Support texture animations.
hi Tokei! Thank you so much for this update! it's a pleasant surprise to be able to see the animations of rsm2 models!

But now, I found a bug. Under "Extract Resources", some of the rsm2 models don't show the texture to be extracted. Rather, this is what happens:
the textures don't appear, and upon choosing the rsm2, this message appears
Copied exception:
Spoiler-------------- Message --------------
La clave proporcionada no se encontró en el diccionario.
-------------- Stack trace --------------
en GrfToWpfBridge.Application.DefaultErrorHandler._reportAnyManagedExceptions(String message, Exception exception, ErrorLevel errorLevel)
en GrfToWpfBridge.Application.DefaultErrorHandler.Handle(Exception exception, ErrorLevel errorLevel)
en GRFEditor.Tools.MapExtractor.MapExtractor._treeViewMapExtractor_SelectedItemChanged(Object sender, RoutedPropertyChangedEventArgs`1 e)
en TokeiLibrary.WPF.TkView.OnSelectedItemChanged(RoutedPropertyChangedEventArgs`1 e)
en TokeiLibrary.WPF.SelectedItemsList.Add(Object item, TkView parent)
en TokeiLibrary.WPF.TkTreeViewItem.set_IsSelected(Boolean value)
en TokeiLibrary.WPF.TkTreeViewItem._tkTreeViewItem_MouseLeftButtonDown(Object sender, MouseButtonEventArgs e)
en System.Windows.Input.MouseButtonEventArgs.InvokeEventHandler(Delegate genericHandler, Object genericTarget)
en System.Windows.RoutedEventArgs.InvokeHandler(Delegate handler, Object target)
en System.Windows.RoutedEventHandlerInfo.InvokeHandler(Object target, RoutedEventArgs routedEventArgs)
en System.Windows.EventRoute.InvokeHandlersImpl(Object source, RoutedEventArgs args, Boolean reRaised)
en System.Windows.UIElement.ReRaiseEventAs(DependencyObject sender, RoutedEventArgs args, RoutedEvent newEvent)
en System.Windows.UIElement.OnMouseDownThunk(Object sender, MouseButtonEventArgs e)
en System.Windows.Input.MouseButtonEventArgs.InvokeEventHandler(Delegate genericHandler, Object genericTarget)
en System.Windows.RoutedEventArgs.InvokeHandler(Delegate handler, Object target)
en System.Windows.RoutedEventHandlerInfo.InvokeHandler(Object target, RoutedEventArgs routedEventArgs)
en System.Windows.EventRoute.InvokeHandlersImpl(Object source, RoutedEventArgs args, Boolean reRaised)
en System.Windows.UIElement.RaiseEventImpl(DependencyObject sender, RoutedEventArgs args)
en System.Windows.UIElement.RaiseTrustedEvent(RoutedEventArgs args)
en System.Windows.UIElement.RaiseEvent(RoutedEventArgs args, Boolean trusted)
en System.Windows.Input.InputManager.ProcessStagingArea()
en System.Windows.Input.InputManager.ProcessInput(InputEventArgs input)
en System.Windows.Input.InputProviderSite.ReportInput(InputReport inputReport)
en System.Windows.Interop.HwndMouseInputProvider.ReportInput(IntPtr hwnd, InputMode mode, Int32 timestamp, RawMouseActions actions, Int32 x, Int32 y, Int32 wheel)
en System.Windows.Interop.HwndMouseInputProvider.FilterMessage(IntPtr hwnd, WindowMessage msg, IntPtr wParam, IntPtr lParam, Boolean& handled)
en System.Windows.Interop.HwndSource.InputFilterMessage(IntPtr hwnd, Int32 msg, IntPtr wParam, IntPtr lParam, Boolean& handled)
en MS.Win32.HwndWrapper.WndProc(IntPtr hwnd, Int32 msg, IntPtr wParam, IntPtr lParam, Boolean& handled)
en MS.Win32.HwndSubclass.DispatcherCallbackOperation(Object o)
en System.Windows.Threading.ExceptionWrapper.InternalRealCall(Delegate callback, Object args, Int32 numArgs)
en System.Windows.Threading.ExceptionWrapper.TryCatchWhen(Object source, Delegate callback, Object args, Int32 numArgs, Delegate catchHandler)
en System.Windows.Threading.Dispatcher.LegacyInvokeImpl(DispatcherPriority priority, TimeSpan timeout, Delegate method, Object args, Int32 numArgs)
en MS.Win32.HwndSubclass.SubclassWndProc(IntPtr hwnd, Int32 msg, IntPtr wParam, IntPtr lParam)
en MS.Win32.UnsafeNativeMethods.DispatchMessage(MSG& msg)
en System.Windows.Threading.Dispatcher.PushFrameImpl(DispatcherFrame frame)
en System.Windows.Threading.Dispatcher.PushFrame(DispatcherFrame frame)
en System.Windows.Application.RunDispatcher(Object ignore)
en System.Windows.Application.RunInternal(Window window)
en System.Windows.Application.Run(Window window)
en GRFEditor.GRFEditorMain.Main(String[] args)-------------- Exception --------------
System.Collections.Generic.KeyNotFoundException: La clave proporcionada no se encontró en el diccionario.
en System.Collections.Generic.Dictionary`2.get_Item(TKey key)
en GRF.FileFormats.RsmFormat.Mesh._generateMesh_Smooth(Vertex[] vert, Dictionary`2 shadeGroup, Dictionary`2 mesh)
en GRF.FileFormats.RsmFormat.Mesh.Compile(Rsm rsm, Matrix4 instance, Int32 forceShader, Int32 flag)
en GRF.FileFormats.RsmFormat.Rsm.Compile(Matrix4 matrix, Int32 shader, Int32 flag)
en GRFEditor.WPF.QuickPreview.Update(String file)
en GRFEditor.Tools.MapExtractor.MapExtractor._treeViewMapExtractor_SelectedItemChanged(Object sender, RoutedPropertyChangedEventArgs`1 e)

-
hii!
is there anything similar to this, or a more recent version available for newer clients? -
OMG it looks sooooooooo good!! It does look like a Magma Dungeon 3! Instead of what they did of simply having the same floor all over again
-
 1
1
-
-
It's a quite beautiful, mysterious and nostalgic mappino uwu
-
Soon: Post revamp!! ["Not Browedit 3"
 ]
]
The old guide can be found here:
Spoiler
Hii!
I'm Mina Rabbit, and I've been in Borf's Discord channel for quite some time now, since I made my first map, to learn from everyone and provide help whenever it's possible.
After having promised these guides for a long time, I've finally started to make them!
The guides will include:- Frequently asked questions or doubts that I've seen are common in Borf's server.
- Things to do and things to avoid when making maps and modifying models in Browedit and Bromedit.
- Things I've learnt about Browedit, Browedit 2 and Bromedit, that aren't present in any other guide that already exists.
For now, I'm going to start with Bromedit, because it's something that has been requested often in these past few months.
So far, I've only made a guide for a basic use of Bromedit, which is a program that Borf made for models and model animations.
However, the animations part, while usable to an extent, is still difficult to understand, and I won't be able to answer that part properly for now.
If I get to understand it well, I'll add it to the guide! So please be patient. Still, please post anything you've learnt and be constructive!
If you want the official link to the latest Browedit 2, or if you have any questions, leave them here or in Borf's Discord: https://discord.gg/PUy6DWh
Also, please avoid DMing me, ask the questions here or in the server for everyone to read! Thank you!
= BrowEdit 2 =
What is BrowEdit 2?
Borf simply calls it Browedit, but this is a newer version that he made from scratch. So, it's completely separate from the classic BrowEdit 1 versions (586 and 620) that most of us know.
What can I do with it?
I. What you can't do and have to pay attention to and consider first:
As it is right now, BrowEdit 2 is not capable of making a complete map. BrowEdits 1 have many more tools, that are completely necessary for us in order to finish a map.
Particularly, it can't save a map with the Quadtree properly, so you're going to see "Transparent Boxes with missing models and textures" appearing and disappearing randomly all around the map as you walk (please read "Saving a Map Properly" below for more info!).
Additionally, it's buggy in certain aspects. Problems known so far are:
a. Major Problems:- If you're not careful, slow and patient when adding walls so you add them on the necessary places only, saving the map afterwards can break it, and it will nor be recoverable. (Or simply avoid adding walls at all).
- NEVER ADD models to the map using Browedit 2. After a certain (unknown) number of models on the map, Browedit 586 won't be able to read it. Unless you can track back your steps and add/delete until you go back to the number of models the map had, you won't be able to use it. And Browedit 586 save is a MUST for the Quadtree.
- Other unknown bugs can also break the map. So, ALWAYS have a backup of your map!!
b. Minor Problems:- Moving models around can be very easy or very difficult, depending on what you want to do. Save before moving models around or it can be difficult to bring them back to where they were.
- It can't use the "Lightbulbs" of Browedit 586 or 620 properly. If you're going to add interior lights, don't add the lightbulbs before using Browedit 2, or Save a Copy and use Browedit 1's "Import - Export" functions in a smart way.
II. But then, WHY EVEN USE BROWEDIT 2? ; A ;
Well, this is the good part x3 Actually, if you have a backup of your map before using Browedit 2, you can do very amazing things with it that aren't possible with Browedit 586 or 620, such as:- Browedit 2 can make a very astounding "Sky Lightmap", which simply means the light from the Sun or the Moon. You can also call it "Shadowmap", as it casts the "light and dark" layer of lightmap (the other two layers being "Colored Lightmap" and "Color map"). It's very smooth and detailed, as in plenty of the official kRO and jRO maps, and not edged and rough as it occurs with Browedit 1. It doesn't need any "Lightbulb", you need nothing other than the Main Light's angle in the Map Properties.
- It can paint or erase Color on the ground (Color Map). This is something very common in official maps, but it's rare in custom maps, because Browedit 1 didn't have this feature! And if you place a texture on the groundin Browedit 2, it will not erase the color, unlike what happens when you do so in Browedit 1. This can also be used to add smooth black edges around the map or areas of the map, for a very neat final presentation.
- With it, you can edit and paint the Shadowmap itself (which is the shadows from the "Sky Light"). So, if you want to add a single model, but it doesn't have a lightmap, you don't need to recast it all over the map again, you can just paint it! Likewise,if you removed a model, you can simply erase its shadow, and voilà!
- Its manner of placing textures on the ground is very neat, it doesn't look bad or stretched depending on the resolution, and you can "Mirror" or "Flip" parts of the textures that would usually look very distorted if you tried in BrowEdit 1. (It doesn't rotate rectangular selections very well yet, though).- Its Height Edit tool is veeery useful to make natural looking and random looking landscapes, and you can even randomize the ground with a single key! This tool will save you a ton of time, even when compared to its equivalent tool in "fast mode" in BrowEdit 1.
- It can choose and move Groups of Models or rotate them very fast, and this is very useful to save time if you have certain features on your map. But be careful, as this can also be a "Minor Problem" if you're not careful and didn't save / have a backup ^^;
- If you're a fan of the Effect Tool (the Effect #974 that triggers a .lub file that has the map's name), BrowEdit 2 is your friend! x3 It will tell you the number of the effect according to its number in the lub file.
- It can edit an effect's size! Which will save you from tons of crashes in BrowEdit 1 (from copying effects from different maps) and headaches.
- As long as the map is created perfectly square (40x40, 100x100...), Browedit 586 will be able to make a quadtree properly for it. So you can make a map from scratch with BrowEdit 2, and it will be filled with the black texture already! You only need to make it, and immediately after (before adding models) save with BrowEdit 586, then Accept upon being asked to create a Quadtree.
As you can see, it has its pros and cons, but basically, it can be said that BrowEdit 2 is like an "extra tool" that can't do many things that BrowEdit 1 can, but it has additional features that Browedit 1 doesn't have and will make your map look every more beautiful.
Now that you're read all of this, you can more safely go directly to the guide:
Link to post: How to configure Browedit2
= BromEdit =This program was made by Borf. It comes alongside BrowEdit 2, and it's used to modify models and their textures, including the animations themselves. Personally, I prefer it much more over RSM Editor, as you don't need to add textures to rotextures.txt to use it.
Rabbit's Bromedit Guide (drive document)
But but, me brave! >:3 tell me where can I download BrowEdit 2 NAO.
You can find the link in Borf's Browedit Discord: https://discord.gg/BHDkKT8 , and also this same Discord link in Borf's Browedit FB: https://www.facebook.com/browedit/
I don't put the direct link to the download, because it tends to trigger false flag alarms with some antiviruses. So you can visit the channel and be sure that the pinned link is actually Borf's link.
The next guide is going to be How to configure Browedit 2 properly.
Stay tuned~ >:3
Frequently Asked Questions
(This is important to read whether you use Browedit 2 or not)
Saving a Map Properly
Only Browedit 586 (not 620, nor Brow 2) is capable of saving a map properly, as long as it has the proper height. Which means that Models, Textures and their Quadtree/Bounding Boxes have to necessarily be "above 0" in RO map terms. For instance, the water's height should be above 0, such as having a height of -20, -50, -80, -100 and so on, and never 20, 50, 80 and so on. Negative numbers mean above, positive mean below.
It's preferable to have a proper height for the map before adding sounds, effects and lightbulbs/light emitters, or you may need to increase them one by one!
Personally and from experience, I find it's way better to have a proper height for the map and saving it with BrowEdit 586 at the very end, instead of using the "Hex Edit". The hex edit produces disappearing stuff on the edges, although it can be used in case the Quadtree got bugged and needed a reset, for whatever reason!Model's Polygons /Triangles Faces Limit

RO models have a limited amount of triangles they can work with. I'm currently not certain if said number is 1700 or 2000, but I've always tried to make it below 1700. Still, the less faces a model has, the less laggy a map will be, so if you can make a model have 300 sides only, even better!
My map is lagging! * panics *

There can be a number of reasons why a map becomes slow. This even happens with original maps from the RO developers, specially with towns and some of the relatively new fields and dungeons! ><
A map can have 9000 models and not be slow. But it can also have 900 models only and be slow! How is it possible? Well, as mentioned in the previous point, there are models that have too many sides or that are too complex for RO. They can be official models, such as some of the plants from Malangdo. If this lagginess is a problem for you, you should test by removing the models and see which one is causing you more trouble.
Sometimes, it's not the map becoming slow, but the camera movements instead (rotation, scrolling up/down). If this is the case, there are likely too many faces or sides of models overlapping one another. The solution is to separate the models a bit. If it's a custom model, make sure that they don't have a "double face" (as in a side produced twice between the vertices in the 3D making program, NOT as in a texture showing from both sides, this is unrelated!), or make a version of said model without the sides, so you can add them side by side one next to the other.-
1
-
2
-
 4
4
-
Thank you so much for this guide
I'm going to try this soon -
hii!
You may usually have to remove one by one, by only using browedit.
However, there may be an alternative x3
You could simply make a transparent square model
You can use fuchsia color for the transparency:
Red: 255 | Green: 0 | Blue: 255, which is the same as RGB color #FF00FF
And use this guide to replace the leaves for that specific model:
However, if the lights aren't really that many, I recommend you to just remove them normally!
If it's an exterior map, you can use Browedit 2 to remake the lights
Later I'm going to post a guide for Browedit 2 skylight >:3 but for now, you can join this channel and ask there: https://discord.gg/4yHawf -
Hii Diana!
I think it may be a compilation problem. if not, it's a configuration problem.
please join the Borf's Browedit Discord channel, the very last compiled version is there in the turorials and resources channel.
https://discord.gg/BNNHeT
have a very nice day! o/ -
hii! yus, it's possible! only increase the gat with page up, and decrease it with page down. copy with c, paste with v. increase or decrease area with the buttons between zero and backspace (oh it depends on your keyboard but they should be around there)
also don't forget to watch Syouji's tutorials on Youtube ;3
you can also join the Browedit Discord if you'd like! https://discord.gg/BNNHeT
-
Oh it looks quite good and the possibility for that quest is also very interesting
-
1
-
-
On 6/25/2019 at 7:24 PM, OscarScorp said:
I didn't created the map so I'm basically opening the downloaded map and saving it in browedit 586 just as it is. Same problem remains. Should I tweak something? Lighting?
Here's a video of the problem
hii, did you ever solve this problem?
It seems like this happens with certain Nvidia cards. If you choose the card in the RO setup, it should be solved :3
But I'd like to know if there's any other cause, or if anyone knows anything else about it, and I'll report any findings to Borf in his Discord server (because this only seems to happen with maps saved with Browedit).-
1
-
-
Ohh it seems you just forgot to add lightbulbs for the lights. It's easy to solve!
You should follow Syouji's guide, which you can easily find in youtube x3
And also, I recommend you take a look at Sage's guide, specifically her link "How To Make Lightmaps Stop Looking Bad".
You should definitely join the Discord group that Sader provided, it's the same link as the one I replied to you earlier.
There you can find a link to download Browedit 2. HOWEVER, I see that yours is an interior map. I really don't recommend using Browedit 2 to render lightmaps of interiors AT ALL. At least not until Borf makes it possible to add and render with "lightbulbs".
[Guide] Mina Rabbit's Browedit and Bromedit Guides
in Maps & 3D Modeling Showcase
Posted
How to configure Browedit 2 (this will be inclided in the guide above later on)
Before we start, do not open browedit 2 before making this file
Step by step
1. Go to
browedit 2\assets\configs
2. Make a file called config.customname.json (where custonname is whatever you want!)
3. Copy and paste this into the file:
4. Customize your grf paths! But be careful to use "/" and not "\", and also that the last grf line doesn't have a comma "," at the end. Then, save the file
5. Finally, the first time you open Browedit 2, it will ask you to type a file name. Introduce the file name of your config file, config.customname.json or config.customname, and press Enter.
Voilá! It's done \o/
Congratulations! You can use Browedit 2 now.
But please, please read the first post.
I strongly recommend you to read it entirely! Specially "What you can't do and have to pay attention to and consider first"
Also, always make a backup of your map each time before you use Browedit 2! This is mandatory, not a sugggestion ùwu; or your map may break and it will all be sad and horrible.