In this section we are going to go through the steps to getting you set up with your very own server computer to run Ragnarok Online (and other games).
Requirements:
A Computer with at least 128 GB of space & 4 GB of RAM (8GB Recommended).
Very Minimum system requirements : Operating System : Windows 95 to 11 CPU : Pentium II, 400MHz (or better) Memory (RAM) : 128 MB (or higher) Hard Disk Space : 7.2 GB (after system installation) Monitor Resolution : 640 x 480 (or higher) Video Card : Any with 3D Acceleration & at least 16MB on-board RAM Sound Card : DirectSound (or compatible with 3D Sound Effect Support) Internet Connection : 56 kbps (or faster) DirectX : 8.1 (or newer)
Recommended System specifications : Operating System : Windows 10 CPU : Intel® Core™ i3-1305U Processor - 10M Cache, up to 4.50 GHz (or better) Memory (RAM) : 2 GB (or higher) Hard Disk Space : 128 GB (after system installation) Monitor Resolution : 1080x 720 (or higher) Video Card : Any with 3D Acceleration & at least 16MB on-board RAM Sound Card : DirectSound (or compatible with 3D Sound Effect Support) Internet Connection : 10 MB/ps (or faster) DirectX : 8.1 (or newer)
......
Now that we got a few things to get us moving let's get started...
Section 1 - Installation
STEP ONE: Making the Bootable (Rufus booter) i1.1.0
Once you've downloaded Rufus (here if still need) you will run it. You will a simple window with a basic user interface. Simple click "Boot selection" and make sure "Disk or ISO image" is selected. We will continue by clicking "SELECT" and choosing the Ubuntu disk image we downloaded earlier. The "Device" will be the USB drive we're making bootable:
The default "cluster size" we'll leave as default. The "Volume Label" is what we will name the USB (optional). With that we're ready to click "START"!
Here is what mine looks like at the end of it.
STEP TWO: Setting up the OS (Ubuntu 22.04) i1.2.0
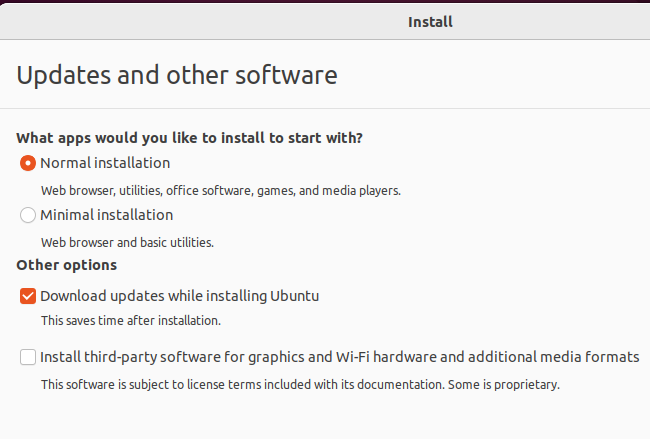
Upon booting up, you'll want to select "Try or Install Ubuntu". After this it will load up the start up interface. Follow the linear steps to install your new operating system. (NOTE: Ubuntu Pro is optional)
We will do a normal installation for our example.
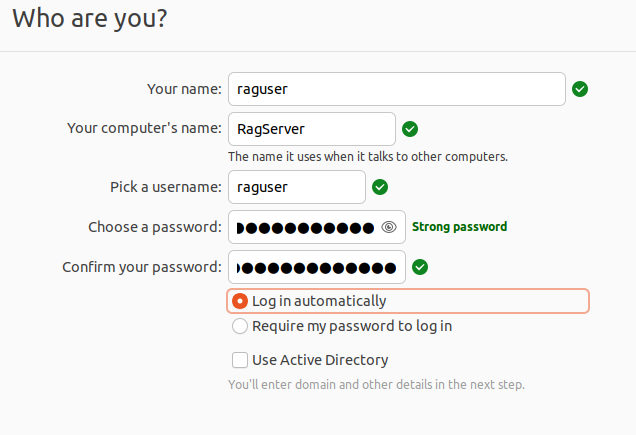
After selecting the driver and location, you will need to create your user account. This is very important as it will contain information used further into the guide. Make sure you can remember your credentials.
Getting used to the system will be beneficial for you. For this guide, we will navigate to your app menu located by default in the bottom left corner.
STEP THREE: Preparing the Server (Adding Utilities & Libraries) i1.3.0
Here we are going to download a few necessary packages and then we will be able to simply update them whenever we need to using our update and upgrade commands.
First thing's first. Let's update & upgrade our system. Type inside your terminal the following command:
sudo apt update && sudo apt upgrade -y
This will update and upgrade the system.
Next we will need to install some packaged to run the server. Still inside the terminal, we will enter the following commands:
From here we are ready to download rAthena.
(If you have it downloaded manually and have a custom directory already ready for it, go ahead and upload it now. If not, follow these next couple steps to download and set the directory.)
In this example, we are going to make the rAthena folder inside our Documents folder so we can find it easily. In your terminal enter in the following command to change to your documents directory: (replace the name with your user.)
cd /home/raguser/Documents
The terminal should now read something along the lines of:
raguser@RagServer:~/Documents$
This is where we will create the rAthena directory. We will pull the rAthena trunk to a custom location we will name using the terminal. To do this we must enter in:
This will now clone the rAthena repository to the directory we specified as rAthena inside the Documents folder.
Now we need to update the repo to make sure we have the latest files. Change directory using the cd command and entering in the new folder we just created:
cd rAthena
And pull the latest updates from the repository to ensure we have the correct version:
git pull
We now have a fully functional rAthena that is ready to be set up with our packet information, SQL database, our website, and more.
In the next section we will cover how to set up the SQL server using PMA (phpmyadmin) right from the desktop browser!
STEP FOUR: PMA & SQL (Setting up the database) i1.4.0
Now that we have a fresh rAthena installed, it's time to check MySQL to see if it installed correctly at the start. This may not be installed by default so follow the commands if you don't have it.
To check the status of MySQL enter in your terminal the following command:
service mysql status
This will tell you what the status of your MySQL is.
If this fails, install MySQL using:
sudo apt-get install php phpmyadmin mysql-server mysql-client git make gcc
You will want to select apache2 to install.
Now we will have full access to MySQL!
We need to start our first launch of SQL to get thigns started. To access SQL enter in:
sudo mysql -u root -p
This will access MySQL as the root user after you enter the password. (The password is the one you set up earlier when initially installing MySQL)
Once authenticated and inside we can create a database and populate it with our server account.
Creating the database is done using a few simple inputs. Enter in & modify the following details:
CREATE DATABASE ragserver;
CREATE USER 'raguser'@'localhost' IDENTIFIED BY 'StrongPassword';
CREATE USER 'raguser'@'%' IDENTIFIED BY 'StrongPassword';
GRANT ALL PRIVILEGES ON ragserver. * TO 'raguser'@'localhost' WITH GRANT OPTION;
GRANT ALL PRIVILEGES ON * . * TO 'raguser'@'%' WITH GRANT OPTION;
GRANT ALL PRIVILEGES ON * . * TO 'raguser'@'localhost' WITH GRANT OPTION;
This created the database 'ragserver' and added 'raguser' to the database with full access.
Next we need to make the logs and grant privileges to raguser on it. To do this enter in:
CREATE DATABASE log;
GRANT ALL ON log.* TO raguser@localhost;
Now we can leave by entering in:
quit
This next part of this step is a little more complicated, but very simple to do. rAthena has a database in their files that we are going to pull the columns and rows from so we don't have to manually construct it ourselves piece by piece. Thankfully we can execute it all in two simple commands:
mysql -u raguser -p ragserver < /home/raguser/rAthena/sql-files/main.sql
mysql -u raguser -p log < /home/raguser/rAthena/sql-files/logs.sql
And finally we are going to insert the first player account of our database. To do so we much enter & modify the following details. (This can always be changed later.)
(You can always change this later in the PMA window in the next steps.)
It's time to check our SQL to make sure it looks as good as we think. To do this we are going to need to go to your favourite web browser and enter in the following website ( your website! )
http://127.0.0.1/phpmyadmin/
And we're in!
Here inside PMA you will find all the accounts and database information. You can load item and mob databases directly to here and read from here instead of the traditional rAthena directory. There are many things to control inside here, especially if you're troubleshooting.
(You also have an App icon in your menu.)
STEP FOUR-2: PMA (Restricted Access) i1.4.1
Now that we've got PMA up and running we're going to want to restrict access to any users other than the host. To do this we will use our host address and only allow access to PMA using that address. Else, it will throw a forbidden page to the user.
And at the very bottom we will enter a new line for it to read:
<Directory/usr/share/phpmyadmin>
Order deny,allow
Deny from all
Allow from 111.222.33.444
</Directory>
Be sure to change the address to your machine's IP address.
Restart apache2 and you're ready to go!
sudo systemctl restart apache2
STEP FIVE: Getting Green (Online) i1.5.0
Great! You're this far. Not much more to do from here.
We're going to now navigate to your rAthena directory and edit the "char_athena.conf" script located in:
/home/raguser/rAthena/conf/char_athena.conf
Open the file with any text editor, the default one will work. Inside this file, near the top, will be the lines that show your Name & Password. These are for your Login database we set up earlier for phpMyAdmin (PMA).
Search for and change the values to a random name and password:
// Server Communication username and password.
userid: s1
passwd: p1
For this step it is recommended to use random password generator of some sort. This never needs to be entered in manually anywhere. You can copy-paste it everywhere in this guide.
In this example we are changing it to:
userid: 4Xy3NAKxnl3sk6Aj
passwd: 79y59S3m8lWmMDMS
Now the Server's username and password are set, we can change the "inter_athena.conf" file so that the server can read our database we set up. Navigate to:
/home/raguser/rAthena/conf/inter_athena.conf
This is where we are going to change some access information so the server can read through our MySQL login we made earlier. Find and change:
// MySQL Login server
login_server_ip: 127.0.0.1
login_server_port: 3306
login_server_id: raguser
login_server_pw: StrongPassword
login_server_db: ragserver
login_codepage:
login_case_sensitive: yes
ipban_db_ip: 127.0.0.1
ipban_db_port: 3306
ipban_db_id: raguser
ipban_db_pw: StrongPassword
ipban_db_db: ragserver
ipban_codepage:
// MySQL Character server
char_server_ip: 127.0.0.1
char_server_port: 3306
char_server_id: raguser
char_server_pw: StrongPassword
char_server_db: ragserver
// MySQL Map Server
map_server_ip: 127.0.0.1
map_server_port: 3306
map_server_id: raguser
map_server_pw: StrongPassword
map_server_db: ragserver
// MySQL Web Server
web_server_ip: 127.0.0.1
web_server_port: 3306
web_server_id: raguser
web_server_pw: StrongPassword
web_server_db: ragserver
// MySQL Log Database
log_db_ip: 127.0.0.1
log_db_port: 3306
log_db_id: raguser
log_db_pw: StrongPassword
log_db_db: log
log_codepage:
log_login_db: loginlog
The last location we need to navigate to are our map server configurations. For this we will navigate to:
/home/raguser/rAthena/conf/map_athena.txt
Change the username and password for the server. It's the same as earlier:
Time to start it up! (Make sure you're inside the rAthena directory)
To start the server:
sudo ./athena-start start
To stop the server:
sudo ./athena-start stop
To restart the server:
sudo ./athena-start restart
To check the status:
sudo ./athena-start status
We're online!
EXTRA STEPS (OPTIONAL)
STEP SIX: DNS. (Mask your IP) i1.6.0
So many of you, like myself, would like to mask your IP address and the best way to do this is to use a domain name service to mask our IP. But does this mean you can't find my IP?
No. This does not mean your IP is hidden completely. It just means people have an easier way of accessing your website on a more reliable and trusted connection. In this part of the guide we will go through the process of obtaining and setting up the DNS on your personal dedicated server. Let's start by understanding what DNS means. I'll be quick.
Quote
The Domain Name System is a hierarchical and distributed naming system for computers, services, and other resources in the Internet or other Internet Protocol networks.
It associates various information with domain names assigned to each of the associated entities.
What this is telling is, is that we can now take one thing (our IP) and mask it with another thing (domain name). That's short enough.
Now some might be wondering... "Don't I need a website and a host for all of that?"
The answer is Yes. We set that all up in the previous steps of this guide. You're all ready good to go.
The first step is to navigate to your favourite (and trusted) domain name service provider. There are many out there that a simple google search can discover. In this example we are going to use Domain.com. It's affordable, takes Paypal, and has everything we need neatly displayed.
Right in the middle of the landing page, you'll notice a search bar. It's large and ahrd to miss. This is where you will type your domain name you want to look for. Don't worry about attaching the endings onto it (.com, .net, etc) as it will give you a list of all the available ones.
Purchasing a domain will create an account for you using the details entered in during the billing process. The basic domain I purchased costs slightly more because it's a ".net", which holds a premium standard these days. You don't need to worry about protection and SSL either. We will be managing that all from the server computer as well. For free.
Once you find a domain name that fits what you want to achieve and your account was successfully created, it's time to navigate to your email and verify the website. This process is necessary to get the site online.
We are now authenticated and ready to move onto the next part of this step.
Now that we have a domain, what do we do now? How do we ge this domain name we now own onto mask your personal address? Keep following along. We're almost there!
To confirm we have everything, in case there was an issue before, we're going run, in the terminal, the command:
Now that we made some changes, it's always good to verify things are still where we left them. Let's verify PHP again to make sure it's the same version as before (8.2.2)
php -v
Earlier we made a web server. Now it is time to configure it!
Enter in and customise the name:
This creates a folder and gives us full ownership of it inside the webserver directory. The custom name is for security measures. This is where we will upload our website and all the web files later. First we need to make a configuration file to run it properly. To do that we must enter in and adjust the name of:
An empty screen will appear. This is what we want. Now we can populate it with all the information necessary to maintain the web server. I recommend pasting this into a notepad and changing the values as needed. You will need your web site name, user name,custom folder name we made moments ago and your public IP address (v4). Change the values and paste it in to the blank page:
Now the website is almost ready. We've given it instructions where to go. All we have to do now is verify it and enable scripts for the site to operate.
Let's start by reloading our web server.
sudo systemctl reload apache2
You may have to reload the apache2 service. If this appears simply run the command again:
sudo systemctl reload apache2
This will appear a couple times through this part.
Next we need to enable the default script. To do this we will run a command called "a2dissite". What this does is uses system links to run the website and disaables them when needed. Once enabled, we can set and forget even after reboots.
sudo a2dissite 000-default
Now we're going to do the same thing, except for the config file we just created above. The name must be exact:
sudo a2ensite customName
Let's test the config to see if it throws any errors:
sudo apache2ctl configtest
It looks like we got an error! It reads:
Quote
AH00558: apache2: Could not reliably determine the server's fully qualified domain name, using 127.0.1.1. Set the 'ServerName' directive globally to suppress this message
If you encounter this, it's a simple fix!
Enter the command to edit the following file:
sudo nano /etc/apache2/apache2.conf
Now we need to go to the bottom of the page and insert (at the very bottom) :
ServerName localhost
And now we want to reload the apache2 service one more time:
sudo systemctl reload apache2
Finally, we must route our public IP to the domain name. This is done in that DNS menu on our domain host website. Let's navigate back to Domain.com and set this up.
Here we want to edit (or add if it's not here) the "A record" that points to the host configured IP address. We will simply click edit to change the existing record and have it reflect (and edit to match your public IP) the values below:
A @ 127.0.1.1
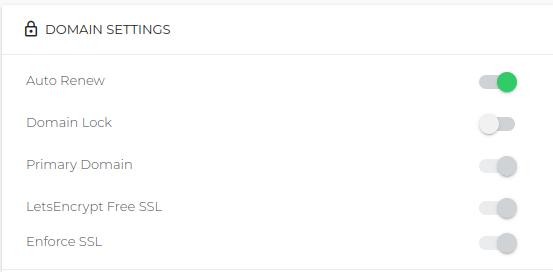
And to prepare things for the next steps, we are going to navigate to back to our basic domain settings and make sure the settings reflect the following: (Auto-renew optional)
This is telling us all the options are disabled. We won't be needing any of them supplied by the host.
That's it for this part! Our web server is ready for a website to be added and for the DNS to be redirected in our network settings. In the next step we will go through securing the website with a security certificate. It's free and easy to set up.
STEP SEVEN: Getting SSL Certified (HTTPS) i1.7.0
Quote
SSL, or Secure Sockets Layer, is an encryption-based Internet security protocol. It was first developed by Netscape in 1995 for the purpose of ensuring privacy, authentication, and data integrity in Internet communications. SSL is the predecessor to the modern TLS encryption used today.
In this step we're going to get that SSL set up. Currently when we access our website it says HTTP. We are going to make it say HTTPS.
Start by registering to SSL For Web. It's free and easy to set up.
After registering, we're going to go right to the top right and click the create button.
You will be given two options. DNS & HTTP. We are going to select DNS to continue. You'll also need to enter your domain name to continue.
This is where it gets a little more complicated, so follow closly.
You will be given two codes to enter into your DNS register. To find this, you will navigate to where you purchased the domain name and modify the existing DNS service to include these values. Simple, right?
In our example we used Domain.com. So we will continue using them.
Log in and navigate to your domain. On the left side panel you will have some options. Select the one that says DNS & Nameservers.
You will get a window like this:
We are going to click DNS Records.
This is where we will enter those values SSL generated for us. Go back to the SSL page and copy the first value on the left. This is a challenge domain for your domain name.
Go back to your DNS records and enter in a new record. The record type we want is TXT.
Paste inside the "Name" box the value we just copied.
Go back to SSL and copy the value on the left. This is going to be pasted in the "Content" box.
Set the value to 1/2 hour and hit confirm.
Finally go back and verify that it worked. (It can take up to 30 minutes to fully work, but is usually quicker dependingon the service.)
There is a status checker so you don't need to submit every time. Use the scroll bar to go to the right and check the status.
Now that we have the green light and a security certificate is added to the domain, we can download the certificates and add them to the server.
There are two main types of certificate for use and a bundled version. All we need in this example is the Certificate and Private Key. Now that we have them, how do we add them?
Leave this page open for now, as we will need it shortly, and navigate back to your terminal. We're going to enter a few commands to get things set up on our dedicate server.
Enter in to edit your certificate file: (rename to your website)
sudo nano /etc/ssl/certs/kingsman-gaming.net.crt
Then paste your certificate value that was given to you. We're looking for the Certificate.
It now looks good to save! (CTRL-X, then enter Y to confirm)
Now we must give it the key to the certificate. Enter in and edit the file:
We want to populate it with the key that SSLForWeb gave us. Go ahead and paste that in, then save the file.
The last certificate we're going to add is the CA bundle. This will be used in the later steps, but let's add it now since we're here. Create a new file and give it adifferent name. In this example we just added ca. to it:
<VirtualHost *:80> is set to a standard, non-secured, port. We updated this to a secure port to allow the security certificates through.
We added three lines to the top. These lines will be read first and indicate we are turning the SSL Engine ON, setting the Certificate Key file to our private ssl folder, and setting the Standard Certificate file to our certificate folder.
And at the bottom we added some additional options for some System Links, Overrides, and Permission granting. Now the server can read all the security changes we made!
Once we save that file we are going to enable the SSL scripts in the server. This was done simply with one command.
With all this done, we have only one more step left to complete before we can fully set up SSL on the server. We need to allow our SSL access through the firewall. We can do this very easily with the following commands:
sudo ufw allow 443
Your firewall should now appear with these ports for all of default Ragnarok services: (Check out open allowed services with sudo ufw status)
If you don't ahve an active firewall you can enable it with:
sudo ufw enable
With all this added, we are now going to check the syntax for the apache2 configuration to make sure it's still "OK" and restart the apache2 service:
sudo apache2ctl -t
sudo systemctl restart apache2
Common issue after this step:
Quote
AH00526: Syntax error on line 2 of /etc/apache2/sites-enabled/customName.conf:
Invalid command 'SSLEngine', perhaps misspelled or defined by a module not included in the server configuration
Action '-t' failed.
This is caused because the SSL scripts have to be passed through the system still. To do this we can enter in two commands to set this up:
sudo a2enmod ssl
sudo systemctl restart apache2
That's it for this step! We now have an SSL connection for our webserver.
In the next section we will go through various methods of setting up the File Transfer Protocol (FTP) for our webserver. This is great for setting up files from your server for others to download. Users can download files directly from the web server.
STEP EIGHT: File Trasnfer Protocol (FTP) i1.8.0
Quote
File transfer protocol (FTP) is a way to download, upload, and transfer files from one location to another on the Internet and between computer systems. FTP enables the transfer of files back and forth between computers or through the cloud. Users require an Internet connection in order to execute FTP transfers.
We're going to enable this on our server to allow users to download various files we set up in the download folder. Let's start by making that folder. Change directory to your web directory. We modified it earlier above:
cd /var/www/kingsman/
Now create a directory:
mkdir download
We now have a folder where we will be adding out downloadable files. Let's get the libraries ready for the web server.
Enter in:
It will be a linear installation. Once it completes we can check the status of it:
sudo systemctl status ssh
If it failed to start load it again with:
sudo systemctl start ssh
Once we set the configs we're all ready to go. Edit the file:
sudo nano /etc/ssh/sshd_config
These settings will be added at the very bottom of this document. Scroll to the bottom, add & edit the following values:
Match User raguser
ForceCommand internal-sftp
PasswordAuthentication yes
ChrootDirectory /var/www/kingsman/download
PermitTunnel no
AllowAgentForwarding no
AllowTcpForwarding no
X11Forwarding no
Save the document and exit. (CTRL + X then Y & Enter)
Restart SSH with:
sudo systemctl restart ssh
We now have a fully functional FTP server attached to the web server.
Now to get links for your files, you'll need to understand how the folders work in the web server.
This part is completely ignored in the link you will generate:
/var/www/kingsman/
Your link will be the default web address, so let's start with that:
https://kingsman-gaming.net/
That's the start. Now we need to add our download folder.
We know the default location is /var/www/kingsman/ directory, so this means kingsman-gaming.net is that location. To add the downloads folder we simply just separate it with a " / " and add the download directoy, exactly how it's spelt,in the file hierarchy:
So /var/www/kingsman/download becomes:
https://kingsman-gaming.net/download/
You can add as many directories as you can fit into the web address search bar and break off from the download folder to download other parts of the site.
You'll add the file name to the link for which ever file you want to download. For example, I want to download VLRO.zip:
https://kingsman-gaming.net/download/vlro.zip
Now we have a place players can download our server from. Simply upload your files inside this download folder and send the link to your players to download.
In the next step we will go through how to create a launchable version of Windows 10 wil your Ragnarok Online server set up on it. We will also go through various tools that will be useful to development.
QEMU is a machine emulator that can run operating systems and programs for one machine on a different machine. However, it is more often used as a virtualiser in collaboration with KVM kernel components.
Kernel-based Virtual Machine (KVM) is a software feature that you can install on physical Linux machines to create virtual machines.
In this step we will be going through how to build and run a virtual machine based on Windows 10 operating system with our Ragnarok Online server installed onto it.
Make sure to download Windows 10 ISO while we work. This will save some time later. You may also want to consider moving it to a new directory inside your Documents folder. We'll be doing this for our example moving forward, as well.
Start by check that your system is Virtualization Ready. Enter in the terminal:
egrep -c '(vmx|svm)' /proc/cpuinfo
If your system is Virtualization Ready it will appear with a number greater than 0. My number came out as 16, so we're good to check if the system is supported. To do this enter in:
kvm-ok
If the system does not have the checker, you can enter this command to enable it:
sudo apt install cpu-checker -y
Now that we found out we can support virtualization it's time to install it, along with the librarfies neeeded to run it. Enter the following command to run all of this in one go:
You can start the application in the application menu using the icon it supplies. (It can take a minute to populate)
If you can't find it, or it hasn't appeared yet, you can manually run it with the command:
sudo virt-manager
You should now have a window that looks like this:
If you experience an error trying to connect after finishing up to this part of the step and it reads something along the lines of:
Unable to connect to libvirt qemu:///system.Verify that the 'libvirtd' daemon is running.
Error: Failed to connect socket to '/var/run/libvirt/libvirt-sock': Permission denied
It is recommended to restart your computer and try connecting. Sometimes after the installation it won't have all permissions set properly. A full restart of the system can resolve this.
Now that we are set up, it's time to create a virtual machine!
Go ahead and click the New Machine button at the top left.
We're going to select Local install media from the list and select the ISO file we downloaded at the start of this step.
(If you didn't donwload it before, now is a good time to. While you're waiting you can reflect over the steps you've went through to get this far. It is good to understand the system and how you got here.)
We'll want to click "Browse..." and a new window will appear. Here we have our default filesystem directory. This is a default directory that is given with the application. We don't have files in this folder so we won't focus on this.
At the bottom left, there's green " + ". Click it.
Now we are presented with options for renaming the pool, changing the type of file it is, and setting the target path for where to read and write data. We are only going to focus on two of these options in this step. Name & Target Path.
We'll give it the name "DiskImages", though you can name it anything you want, and we want to select the path to be the folder we created inside our Documents which holds the Windows 10 ISO.
We now have a link to this folder inside the KVM.
If we select it, we can now see the Windows 10 64 bit ISO is there. We will click it and Choose Volume.
The applicatiion will likely guess that it is Windows 11, so we need to uncheck that box and change it from an 11 to a 10.
Change to
Press Forward and agree to the promt. You can click the Don't Ask button for future changes.
Now we must set the amount of RAM and Cores to use. We can change this any time after shutting the virtual machine down. For now, we will use the default 8G and 4 Cores. (Recommend: 3G RAM or more, 2 cores or more for this setup)
The next part of this step is to create the virtuale machine's hard drive. To do this we need to let the VMM do a rather long process to the 32 GB of space that will add a system file to a size we pre-determine, and it will allow us to boot Windows 10 off that space and dedicate it a hard drive to store files. It sounds complicated, but it's really simple to do. It just takes some time if you have larger spaces to work with.
Moving forward, we much select "Enable Storage for this virtual machine" and we will then go to the bottom and select "Create a dusk image for the virtual machine" and click "Forward".
If we get asked to grant search permissions for the path. Click YES.
Now we are ready to create the Windows 10 disk space. Double check the information is correct, mainly the Windows 10 operating system doesn't say Windows 11.
It will launch automatically for the first time on Finish.
You will now be able to set up your emulated Windows 10.
If you experience an error, roughly like the one I created above, it's possible that the QEMU user does not have access to this directory still. You can manuall add this access very easily. Enter in the command to check the permissions, first:
The output should look close to this:
This is showing us that our QEMU is not here on the list. Let's add it:
Finally, Restart the Virtualization library and you're ready to continue on to the next parts of this step:
sudo systemctl restart libvirtd
You should be ready to launch now!
We've got Windows 10 running and Updated as much as it can get. We're going to install a few necessary applications to run our programs and the game itself.
Download the following files from the following (trusted) sources:
With everything installed, and the system fully rebooted for good measure, we're ready to get started with the game installation.
STEP TEN: Setting up rAthena Source (Game Files) i1.10.0
Quote
“Rebirth always follows death.”
- Neil Gaiman
Now it's time to get rAthena set up so we can get players connecting to the server. First thing's first! Organise and familiarise yourself with the files. This is where you will be spending lots of your time. This will be an ongoing process once you complete these steps. In this guide, it will give you some organization pointers. Take your time with this and get used to how you lay things out. You will navigate back and forth a lot during a maintenance.
If you have not already downloaded rAthena we will go ahead and do that now. The following commands will change your directory to the root for your profile, next it will make a "Server" folder for you to operate in, and finally it will download the rAthena trunk to that directory. Finally we will enter that directory to process the remaining steps.
To update rAthena to the latest verison we need to process a git-pull while inside the rAthena diretory.
git pull
Now we've got rAthena's latest trunk and all the updates!
It is important to get a good, or at least an okay, understanding of how rAthena has all their files organized. Things are in a specific place and named specific things for a reason. If you move or rename a file or folder it will cause you many problems. Source files are where you will make changes that will affect the entire game and the way it functions. Be very careful when editing these files and stay within the lines of the cave if you don't know what you're doing. Config files are where you will make the majority of changes to your server. This is where things like Drop rates, EXP rates, and all your Server settings will be located. In the continued steps below, we will go through how to set up the remainder of the server.
It's time to create a database for all the player accounts to be saved to. To get started be sure you've followed the previous steps for setting up PMA (phpMyAdmin).
Now that we have access to MySQL we can start by entering in some commands to give us access to the databases involved.
Open the terminal and enter in the following: (Note: You set the username and password earlier)
CREATE DATABASE ragserver;
CREATE USER 'raguser'@'localhost' IDENTIFIED BY 'StrongPassword';
CREATE USER 'raguser'@'%' IDENTIFIED BY 'StrongPassword';
GRANT ALL PRIVILEGES ON ragserver. * TO 'raguser'@'localhost' WITH GRANT OPTION;
GRANT ALL PRIVILEGES ON * . * TO 'raguser'@'%' WITH GRANT OPTION;
GRANT ALL PRIVILEGES ON * . * TO 'raguser'@'localhost' WITH GRANT OPTION;
This created the database 'ragserver' and added 'raguser' to the database with full access.
Next we need to make the logs and grant privileges to raguser on it.
Enter in:
CREATE DATABASE log;
GRANT ALL ON log.* TO raguser@localhost;
Now we can leave by entering in:
quit
Majoirty of the database is set up now!
This next step is a little more complicated, but very simple to do. rAthena has a database in the server files that we are going to pull the columns and rows from so we don't have to manually construct it ourselves piece by piece. Thankfully we can execute it all in two simple commands:
mysql -u raguser -p ragserver < /home/raguser/rAthena/sql-files/main.sql
mysql -u raguser -p log < /home/raguser/rAthena/sql-files/logs.sql
Now we have an almost-fully functional database for the server. It's time to create the first account! Back to the terminal, we are going to enter and log in to MySQL again:
sudo mysql
In MySQL enter in: (Before submitting this to the database, we are going to change the Login Name, User Name, Password, & Email)
Inside this, near the top, will be the lines that show your Name and Password. These are for your Login database we set up earlier for PMA.
If you haven't changed these yet, do so now. I recommend a random generator for the values. A simple Google search for this will help.
Search for and change the values to a random name and password:
// Server Communication username and password.
userid: s1
passwd: p1
These values must reflect what is inside the login database or the server won't be able to connect. Do not share these values. With anyone.
Now the Server's username and password are set, we can navigate to:
/home/raguser/rAthena/conf/inter_athena.conf
This is where we are going to change some access information so the server can read through our MySQL login we made earlier.Find and change:
// MySQL Login server
login_server_ip: 127.0.0.1
login_server_port: 3306
login_server_id: raguser
login_server_pw: StrongPassword
login_server_db: ragserver
login_codepage:
login_case_sensitive: yes
ipban_db_ip: 127.0.0.1
ipban_db_port: 3306
ipban_db_id: raguser
ipban_db_pw: StrongPassword
ipban_db_db: ragserver
ipban_codepage:
// MySQL Character server
char_server_ip: 127.0.0.1
char_server_port: 3306
char_server_id: raguser
char_server_pw: StrongPassword
char_server_db: ragserver
// MySQL Map Server
map_server_ip: 127.0.0.1
map_server_port: 3306
map_server_id: raguser
map_server_pw: StrongPassword
map_server_db: ragserver
// MySQL Web Server
web_server_ip: 127.0.0.1
web_server_port: 3306
web_server_id: raguser
web_server_pw: StrongPassword
web_server_db: ragserver
// MySQL Log Database
log_db_ip: 127.0.0.1
log_db_port: 3306
log_db_id: raguser
log_db_pw: StrongPassword
log_db_db: log
log_codepage:
log_login_db: loginlog
The last locations we need to navigate to are our map server & subnet configurations.
Navigate to:
/home/raguser/rAthena/conf/map_athena.txt
Change the username and password for the server. It's the same as earlier:
And finally adjust the subnet to match your server's IP address.
This step can be a little tricky if you don't understand how a subnet works. So simply follow below and replace x.x.x.x with your server's IP address:
Time to start it up!
(Make sure you're inside the rAthena directory)
To start the server:
./athena-start start
To stop the server:
./athena-start stop
To restart the server:
./athena-start restart
To check the status:
./athena-start status
That's it for this step. If you followed up to here you'll have a all server files downloaded and ready on the server side with a database ready to accept logs and registrations.
In this next step we will go through the systemd.service files to get your server running automatically when the system restart or if it crashes.
STEP ELEVEN: Setting up UFW (Firewall) i1.11.0
When setting up the firewall, we want to make sure we know exactly what ports we are adding in before we add them. This will save us from having to deny thema ccess later. Let's gather the ports we know of for all the services we've set up thus far.
We know of our Web ports, which should be automatically added when installed, but sometimes this isn't the case. We've also got the FTP ports for the download servers, if we want to use them. There's also the PMA & SSH ports. Are you writing this down?
Sometimes you might still get some issues with the firewall blocking you. You may be required to let the firewall know what type of conneciton to allow, either TCP or UDP; but what is TCP/UDP you might ask? Very simply put... TCP means Transmission Control Protocol which runs a more reliable connection, however, it can lack in transfer speed. UDP means User Datagram Protocol and it has a much faster transfer rate of data, but can be unreliable in sending said data.
What does this mean for you?
You can choose to do UDP all accross the board since Ragnarok uses small packets of data compared to a much larger scale game. Just my recommendation. However, if you want absolute data transfer at the highest success rate to avoid lost packets and data, then do TCP. Still confused? Do both in the firewall.
An example of what the command will look like for adding TCP/UDP:
sudo ufw allow 5121/udp
sudo ufw allow 5121/tcp
Now that we've got an understanding of the firewall and the ports we have added we can now relax knowing the firewall will protect us from majority of threats.
I hate when the server crashes. But you know what's worse? When it doesn't come back up until an admin turns it on.
In this step we will go through the simple setup process to get your server ready to start when you load your system and reboot if it crashes.
Start by opening up the terminal and entering in the following command to create a new system.service file:
sudo nano /etc/systemd/system/ro-login.service
This will create a system service file which we will enable later to start automatically. Inside these service files will be a series of commands that will allow the server to boot up automatically when it experiences an outage for a speificied amount of time & when starts the system after a reboot.
Populate the file and edit the values to match your rAthena directory and User Login name:
You're set to boot up automatically after a crash and upon system restart. Well done!
Section 2 - After-Installation
Now that we've got everything set up this far, we can continue maintaining & updating what we've started.
Continue below to learn more on how to maintain the server after you've set it up.
Everyone needs to register somehow, right? We're mostly all aware of the high risks with enabling registration via "_M/_F", if you're not... In short: Don't use it if you're opening the server to the public. It can enable botters, spammers, & hackers the ability to just create infinite accounts and continue their schemes easier. With FluxCP we can help avoid this by limiting the amount of registrations allowed per person. Let's dive into it now.
Gather your resources!
You'll need to download the latest FluxCP by clicking that link. If you missed it, here's the link again:
This is where we will manage all the registrations to the game as well as many other fun functions we will get into later. For now download & extract this entire directory into your webserver. I put mine in the primary (root) directory of my webserver.
That's the folder we created earlier with the custom name we provided. In this example we used "kingsman" as the custom name. The folder path is:
/var/www/customName
Our final output will look like not include the folder. This means we must drag all the contents into the root directory of the webserver.
Now we should look like this at after extraction:
Enter the config folder first. This is where we will be doing all the work for setting up this control panel.
Inside the config folder you will have 31 files to select from. We're only going to work in two of these for this step. Open servers.php and you will see a set up similar to earlier where we added some settings for rAthena configs. They are the exact same configs. Go ahead and add that in there exactly as you did in the configs earlier.
Now that we have our config looking good, let's scroll down towards the bottom and edit our rates to reflect that of our server's. This will display the rates set up in your databse as well so players can use that to search drop rates on your server.
Change accordingly!
That's it for the servers.php! Save that & move to the next file.
Let's now open up application.php and edit the first few lines we see.
We want to change the base URI to be blank. This will set it to the root directory where we hold the control panel.
Server Address is going to remain localhost since we are running it on the localhost.
And finally we need a storng password to gain access to the administration panel to set it up.
'ServerAddress' => 'localhost', // This value is the hostname:port under which Flux runs. (e.g., example.com or example.com:80)
'BaseURI' => '', // The base URI is the base web root on which your application lies.
'InstallerPassword' => 'superduperstrongpassword,man', // Installer/updater password.
Save that and open your website now!
You'll likely get several permission errors. Copy waht they say for you to do, it will be a sudo chmod command giving access to the logs. This is necessary to proceed to the next part. Add sudo before each command or it won't work.
You'll need to enter your password into the control panel shown after granting permissions to FluxCP. After the password is successfully added it will update your PMA database with all the new information for FluxCP's registration and logins.
Your panel should look like this by default now:
You now have a palce where you can register and manage accounts!
Navigate through the application.php file to change some various settings like your control panel name and what is displayed. You can also adjust the ports if they are different during the previous set up.
STEP TWO: My First EXE (Making an Executable) i2.2.0
Now that we've got everything set up on the server-side of things it's time to work on the client-side of things now. Let us start first by making an executable. this will be the CustomRO.exe that players will use to run the game. Launch NEMO and give it a moment to load up.
In a compact form, this is waht you'll see.
What this is showing us is that we can Load a client, which we downloaded from the "Requirements" section above, we can apply patches, select the recommended patches, select previously loaded patches, load a pre-saved profile, and save an existing setup as a profile to load later.
for this example we are going to use the current recommended version in rAthena's trunk. This is version "2021-11-03".
We are presented with a file that will launch a terminal to download the latest executable. It will look similar to this:
Now we have the executable ready to be patched.
Back inside NEMO, we want to browse to that file we just downloaded and select it. You can change the saved outpute file name here or rename it anytime later. Here we will change it now.
Click "Load Client" and a list of patches will populate.
Now we want to "Select Recommended" patches given for for the executable.
To apply these patches simply click the "Apply Selected" button and it will pack it for you.
Brose the patches and select any patches that will help you or you might use in the future. For this example we are changing the Client Title name, the ItemInfo.lub or ItemInfo.lua and a majority of other changes that will allow the client to read LUA files over LUB files. Take your time going through the list. It will take a while the first time around.
With all the patches applied we now have en executable in our output folder.
But it came with other files, what do I do with those?
You only need the custom executable we made (CustomRO.exe). This is going to be sent to the players and the rest will be removed from the client folder
You're now ready to send this to other players!
STEP THREE: My First Patcher (Making a Patcher) i2.3.0
We've got a client executable and it's fully patched the way we like. This is a great start! Now it's tie to send players an update. Through the patcher. But we don't have one yet!
In this example we will go through the steps to creating a patcher using Thor Patcher from rAthena download section.
Your extracted package should reflect similar to this:
We want to enter the Configuration folder and edit the config.ini file located inside.
Inside this config file are the lines necessary to connect the client to the server and send files from the server to the client.
In the first few mines we'll edit the values to reflect our server values:
The IP can be our website, this example is just a localhost address.
Remote config file we will leave as default.
Status file we can name server.dat. This can be anything, however.
The custom GRF we have for our server, listed as number 0= in the data.ini.
Finally our custom client executable we made earlier.
Further down the page we have the title of the patcher. This can be anything.
And lastly our notice page which will have a brief text description for the updates on the patcher front page.
Save that and we're ready to launch the config generator.
Drag the config into your .../Thor_Patcher/Patcher folder and it you're ready to copy them to your CustomRO client files.
When compelte you'll have a patcher similar to this:
You're made your Patcher now, well done!
STEP FOUR: My First Patch (Making a Patch) i2.4.0
Keeping organised is key to staying sane.
Let's start off by making a couple folders. A Patches folder & a data folder. It should look like this now:
Patches/data
This should look familiar. It's the same set up as the GRF. We will now be able to drag all the files we want to patch into this directory.
One more folder we want to make is going to be the Output folder. This is where all the patches will be saved. There will be two more options to deal with. We want to set compression to HIGH and in the Options tab we want to set the file type to ACSII. It should reflect the below image.
Once that's set we can click "Generate" to make the first patch. It will be create in the Output folder we selected.
That's all there is too it! You've created your first patch.
STEP FIVE: Sending The Patch (Sending Patches) i2.5.0
We now have it all. The Patcher & The Patch. Things are great. But how do we send it to players withing them having to redownload the entire GRF?
Great question!
In this next step we will cover how to add the patch to the webserver and get it ready for players to recieve when they load their patchers.
In step i2.3.0 we covered how to set the patcher up in the web server. This is the file structure we will continue to follow moving forward. Let's open open up our file browser for accessing the server trunk, if needed, or it you're running your own system you can also navigate to the web server folder. The directories are the same either way.
/var/www/custom/patch/
This is the directory we wil be working in regarding the patcher.
It should now represent the image below:
Let's break this down first...
We have:
The data folder. This is where we will add the patches into after we name them.
The Background image. This will be a back ground image for the patcher to load. You can even leave this transparent if you want.
Our main.ini is where we will configure the settings for the patcher. We will go through this soon.
The notice page will be need to be updated with each news change. This is a very simple text edit. Keep it short and simple.
Our patch list text file is where we will add the patches. The format will be discussed soon.
Our Style sheet. This is the style arrangements for the pages. We usually don't need to modify this unless we know what we're doing.
First thing to do after we have a patch made is to give it a name. What do you ask? A very specific name. In this example we will follow a date format with a part value in the event of more than one patch in a day.
Our name in this example will be the date followed by a version number, or update number.
24012024-1
This well tell me that the patch was set for today and it's the first path released of that day.
Now we can edit the plist.txt and add this patch into the list. Inside the patch list we will enter in the exact namme of the patch. Including the ending.
Our names will start with an index number first. This is the order at which the patcher will read the patches. The index starts at 0 and is followed by a SPACE and then the item name.
1 24012024-1.thor
Save and it's ready to load through the patcher!
Finally we need to tell the website to send patches to players.
Open up the main.ini file with a text editor. We're going to modify the line that asks for a website address. Search for "file_url=" ad edit that to be your website.
Save and it's ready to go!
That's pretty much it for uploading patches to the server. You're all set to start updating players with new content!
Got a enw map you want to try out or is your current map not up to date with your pathing?
In this step we're going to add maps to the map_cache.dat, remove maps if needed and update the list with our new maps.
First start by downloading the Map Cache Editor from the trusted rAthena source: HERE
You'll be presented with a window that looks like this:
What we want to do next is download our map_cache.dat from the server trunk:
rAthena/db/map_cache.dat
Once downloaded it will be able to drag and drop that file into this window. We now are presented with a list of maps.
From here what we want to do is drag and drop all our map's .gat files from our GRFs into this window. this will update the walkable paths for the map. This is especially important when you cannot walk on certain maps due to old GAT configurations, It still thinks there are structures in the way.
To delete a map you can select it and click delete. Simple as that.
Save the Map Cache and reupload it to your server.
That's it! Nice and quick.
Section 3 - Optional Options
Things are running now, yeah? That's great to hear. Sometimes they may require additional software, maybe another step or two, or maybe you need something else for it all to work. Below are some steps that are completely optional but might just help you out in some situations.
STEP ONE: Forwarding a Router (Port Forwarding) o3.1.0
Quote
Port Forwarding sets up public services on your network such as web servers, FTP servers, e-mail servers, or other specialized Internet applications.
Understanding what port forwarding is will be an important start to not having your network breached. In this step we will go through the basics of forwarding your port through your router. The user interface (menus) will look different for each router brand, however, the concept will remain the same universally. Check your router software for updates before making any changes. Let's begin!
Accessing the Router
To access the router we want to first ensure we are connected to the internet using it.
Next we will open the trouter software through our web-browser. To access that page we will have to enter the local domain IP to gain access to the initial menu. In your address bar enter in:
192.168.1.1
If this DOES NOT work try entering in:
192.168.0.1
My basic Netgear modem has a menu that looks like this.
I'm going to want to click into Advanced Settings & open up the Port Forwarding option.
We are now presented with a window similar to this. It will give us all options for forwarding our ports.
Let's get an understanding of what's here before we continue...
We will select between Forwarding and Triggering. Since we don't need to trigger a port we will focus only on Forwarding it.
There are many types of services that might be precompiled in your router.
For our Ragnarok Online server will be making a custom service. It's not as hard as it sounds, don't worry!
The device IP we want to connect is a little different. It has to be exactly what device you have the server under.
Let's navigate to the device list on the router. This will be under the "basic" settings, usually.
It shows here I have 3 devices listed. An Amazon Fire stick, My cell phone and a PC I built specifcally for this guide. That's exactly what we are looking for, too!
It looks like the device I am forwarding resides under the IP ending with 7.
Okay, so we now understand where the ports are going to and waht device has them. So it's time to make that custom service we spoke of earlier.
This interface has a button, making it very convenient to start. We're going to go ahead and click the "Add Custom Service" button.
With the custom port window we can now add our ports for Ragnarok to run. We will need to process this 1 number of times as we have more than one port for Ragnarok Online services.
The ports we need to add are:
3306, 6900, 5121, 6121, 8888
Make sure to select the proper device for it to work as we want it to.
After they are all applied, it will represent something similar to this:
That's it! Your ports are now open & ready for users to connect through to. Make sure firewalls are enabled at all times.
STEP TWO: Automatic Server Backups (World Runner) o3.2.0
This script will automatically save your server to your server_backup folder every 24 hours. This time is completely adjustable in time and destination. I originally made this for Minecraft hence the name World Runner.
Open the terminal and enter in the command:
sudo nano /etc/systemd/system/worldrunner.service
This will create a service script we will set to run on start up. Inside this document we are going to add int the following script and change the destination values to match our back up folder destination:
[Unit]
Description=This will copy the Server folder to a back-up location
[Service]
Restart=always
RuntimeMaxSec=1d
User=raguser
ExecStart=cp -r /home/raguser/Server/rAthena /var/www/raguser/Documents/server_backups/
RemainAfterExit=yes
[Install]
WantedBy=multi-user.target
Now we want to enable it on start-up:
sudo systemctl enable worldrunner
If you're having issues with it executing properly we can simply grant permissions to the file to do so:
We now have the trunk backing up now, but what about the SQL server?
For that we need to edit a default file structure in Ubuntu called Cron. Cron can hold automated tasks on a timer, or schedule, just like what we want to do for backing up MySQL.
Enter in the terminal:
sudo nano /etc/crontab
You'll be presented with a window simial to this:
As you can see here they are displaying each value for the job. First digits represents Minutes and the second digits represents Hours. These are the two we'll primarily need for daily backups to occur. At the very bottom we are going to add the following line: (NOTE: Include your password after the -p. My password is "69SuperStrongPass69" so the password section will look like -p69SuperStrongPass69 )
This will set the back up time to be at Midnight each night using the PMA login we set up earlier, backing up our ragserver database into a zip file at the directory ~/Documents/Rag_SQL.
NOTE: Avoid use of these symbols in the password field: ) ( ' `
Finally we need to restart the service for it to take effect:
sudo /etc/init.d/cron restart
That's all there is to it!
Keep up to date with the latest changes & updates to this guide. Want to see something included? Suggest it below!


Question
Rivers
In this section we are going to go through the steps to getting you set up with your very own server computer to run Ragnarok Online (and other games).
Requirements :
Optional Requirements :
PRE-GAME SETUP
Very Minimum system requirements :
Operating System : Windows 95 to 11
CPU : Pentium II, 400MHz (or better)
Memory (RAM) : 128 MB (or higher)
Hard Disk Space : 7.2 GB (after system installation)
Monitor Resolution : 640 x 480 (or higher)
Video Card : Any with 3D Acceleration & at least 16MB on-board RAM
Sound Card : DirectSound (or compatible with 3D Sound Effect Support)
Internet Connection : 56 kbps (or faster)
DirectX : 8.1 (or newer)
Recommended System specifications :
Operating System : Windows 10
CPU : Intel® Core™ i3-1305U Processor - 10M Cache, up to 4.50 GHz (or better)
Memory (RAM) : 2 GB (or higher)
Hard Disk Space : 128 GB (after system installation)
Monitor Resolution : 1080x 720 (or higher)
Video Card : Any with 3D Acceleration & at least 16MB on-board RAM
Sound Card : DirectSound (or compatible with 3D Sound Effect Support)
Internet Connection : 10 MB/ps (or faster)
DirectX : 8.1 (or newer)
......
Now that we got a few things to get us moving let's get started...
Section 1 - Installation
STEP ONE: Making the Bootable (Rufus booter)
i1.1.0
Once you've downloaded Rufus (here if still need) you will run it. You will a simple window with a basic user interface. Simple click "Boot selection" and make sure "Disk or ISO image" is selected. We will continue by clicking "SELECT" and choosing the Ubuntu disk image we downloaded earlier. The "Device" will be the USB drive we're making bootable:
The default "cluster size" we'll leave as default. The "Volume Label" is what we will name the USB (optional). With that we're ready to click "START"!
Here is what mine looks like at the end of it.
STEP TWO: Setting up the OS (Ubuntu 22.04)
i1.2.0
Upon booting up, you'll want to select "Try or Install Ubuntu". After this it will load up the start up interface. Follow the linear steps to install your new operating system. (NOTE: Ubuntu Pro is optional)
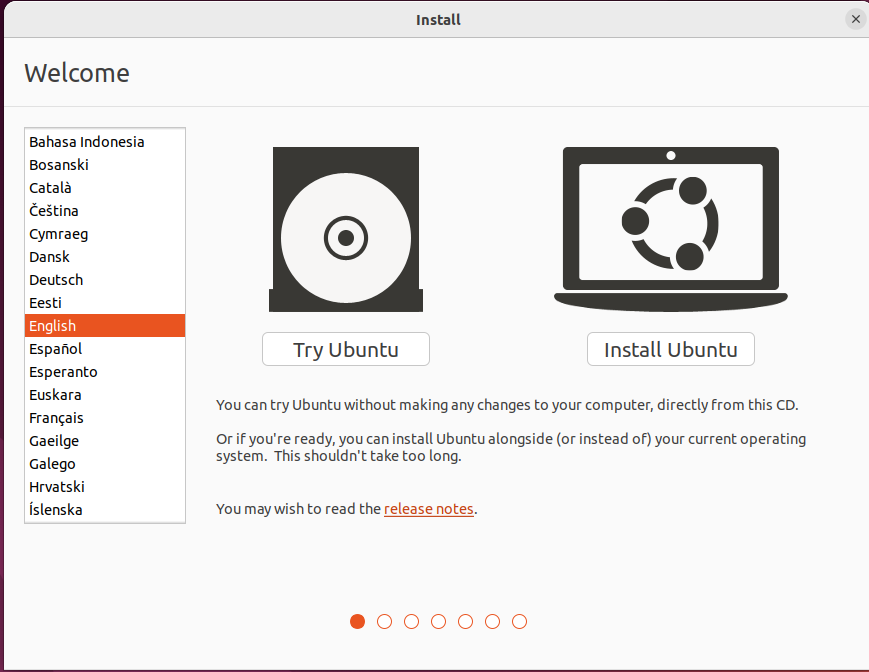
We will do a normal installation for our example.
After selecting the driver and location, you will need to create your user account. This is very important as it will contain information used further into the guide. Make sure you can remember your credentials.
Getting used to the system will be beneficial for you. For this guide, we will navigate to your app menu located by default in the bottom left corner.
STEP THREE: Preparing the Server (Adding Utilities & Libraries)
i1.3.0
Here we are going to download a few necessary packages and then we will be able to simply update them whenever we need to using our update and upgrade commands.
First thing's first. Let's update & upgrade our system. Type inside your terminal the following command:
sudo apt update && sudo apt upgrade -yThis will update and upgrade the system.
Next we will need to install some packaged to run the server. Still inside the terminal, we will enter the following commands:
sudo apt update && sudo apt upgrade -y

sudo apt install build-essential zlib1g-dev libpcre3-dev -y

sudo apt install libmariadb-dev libmariadb-dev-compat -y

sudo apt install software-properties-common apt-transport-https -y

sudo add-apt-repository ppa:ondrej/php -y

sudo apt-get install php phpmyadmin mysql-server mysql-client git make gcc libmysqlclient-dev zlib1g-dev libpcre3-dev -y

sudo apt-get install g++
From here we are ready to download rAthena.
(If you have it downloaded manually and have a custom directory already ready for it, go ahead and upload it now. If not, follow these next couple steps to download and set the directory.)
In this example, we are going to make the rAthena folder inside our Documents folder so we can find it easily. In your terminal enter in the following command to change to your documents directory: (replace the name with your user.)
cd /home/raguser/DocumentsThe terminal should now read something along the lines of:
raguser@RagServer:~/Documents$This is where we will create the rAthena directory. We will pull the rAthena trunk to a custom location we will name using the terminal. To do this we must enter in:
git clone https://github.com/rathena/rathena.git ~/rAthenaThis will now clone the rAthena repository to the directory we specified as rAthena inside the Documents folder.
Now we need to update the repo to make sure we have the latest files. Change directory using the cd command and entering in the new folder we just created:
cd rAthenaAnd pull the latest updates from the repository to ensure we have the correct version:
git pullWe now have a fully functional rAthena that is ready to be set up with our packet information, SQL database, our website, and more.
In the next section we will cover how to set up the SQL server using PMA (phpmyadmin) right from the desktop browser!
STEP FOUR: PMA & SQL (Setting up the database)
i1.4.0
Now that we have a fresh rAthena installed, it's time to check MySQL to see if it installed correctly at the start. This may not be installed by default so follow the commands if you don't have it.
To check the status of MySQL enter in your terminal the following command:
service mysql statusThis will tell you what the status of your MySQL is.
If this fails, install MySQL using:
sudo apt-get install php phpmyadmin mysql-server mysql-client git make gccYou will want to select apache2 to install.
Now we will have full access to MySQL!
We need to start our first launch of SQL to get thigns started. To access SQL enter in:
sudo mysql -u root -pThis will access MySQL as the root user after you enter the password. (The password is the one you set up earlier when initially installing MySQL)
Once authenticated and inside we can create a database and populate it with our server account.
Creating the database is done using a few simple inputs. Enter in & modify the following details:
CREATE DATABASE ragserver;
CREATE USER 'raguser'@'localhost' IDENTIFIED BY 'StrongPassword';
CREATE USER 'raguser'@'%' IDENTIFIED BY 'StrongPassword';
GRANT ALL PRIVILEGES ON ragserver. * TO 'raguser'@'localhost' WITH GRANT OPTION;
GRANT ALL PRIVILEGES ON * . * TO 'raguser'@'%' WITH GRANT OPTION;
GRANT ALL PRIVILEGES ON * . * TO 'raguser'@'localhost' WITH GRANT OPTION;
This created the database 'ragserver' and added 'raguser' to the database with full access.
Next we need to make the logs and grant privileges to raguser on it. To do this enter in:
CREATE DATABASE log;
GRANT ALL ON log.* TO raguser@localhost;
Now we can leave by entering in:
quitThis next part of this step is a little more complicated, but very simple to do. rAthena has a database in their files that we are going to pull the columns and rows from so we don't have to manually construct it ourselves piece by piece. Thankfully we can execute it all in two simple commands:
mysql -u raguser -p ragserver < /home/raguser/rAthena/sql-files/main.sql

mysql -u raguser -p log < /home/raguser/rAthena/sql-files/logs.sql
And finally we are going to insert the first player account of our database. To do so we much enter & modify the following details. (This can always be changed later.)
sudo mysql -u raguser -pInside MySQL enter the following lines:
INSERT INTO `ragserver`.`login` (`account_id`, `userid`, `user_pass`, `sex`, `email`, `group_id`, `state`, `unban_time`, `expiration_time`, `logincount`, `lastlogin`, `last_ip`, `birthdate`, `character_slots`, `pincode`, `pincode_change`, `vip_time`, `old_group`) VALUES ('20000000', 'admin', 'adminPassword', 'M', '[email protected]', '99', '0', '0', '0', '0', '2022-02-20 00:00:00', '', '2022-02-20', '9', '', '0', '0', '0');(You can always change this later in the PMA window in the next steps.)
It's time to check our SQL to make sure it looks as good as we think. To do this we are going to need to go to your favourite web browser and enter in the following website ( your website! )
http://127.0.0.1/phpmyadmin/And we're in!
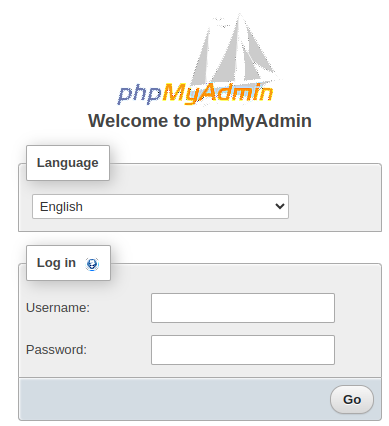
Here inside PMA you will find all the accounts and database information. You can load item and mob databases directly to here and read from here instead of the traditional rAthena directory. There are many things to control inside here, especially if you're troubleshooting.

(You also have an App icon in your menu.)
STEP FOUR-2: PMA (Restricted Access)
i1.4.1
Now that we've got PMA up and running we're going to want to restrict access to any users other than the host. To do this we will use our host address and only allow access to PMA using that address. Else, it will throw a forbidden page to the user.
Start by editing the following file:
sudo nano /etc/apache2/conf-available/phpmyadmin.confAnd at the very bottom we will enter a new line for it to read:
Be sure to change the address to your machine's IP address.
Restart apache2 and you're ready to go!
sudo systemctl restart apache2STEP FIVE: Getting Green (Online)
i1.5.0
Great! You're this far. Not much more to do from here.
We're going to now navigate to your rAthena directory and edit the "char_athena.conf" script located in:
/home/raguser/rAthena/conf/char_athena.confOpen the file with any text editor, the default one will work. Inside this file, near the top, will be the lines that show your Name & Password. These are for your Login database we set up earlier for phpMyAdmin (PMA).
Search for and change the values to a random name and password:
// Server Communication username and password.
userid: s1
passwd: p1
For this step it is recommended to use random password generator of some sort. This never needs to be entered in manually anywhere. You can copy-paste it everywhere in this guide.
In this example we are changing it to:
userid: 4Xy3NAKxnl3sk6Aj
passwd: 79y59S3m8lWmMDMS
Now the Server's username and password are set, we can change the "inter_athena.conf" file so that the server can read our database we set up. Navigate to:
/home/raguser/rAthena/conf/inter_athena.confThis is where we are going to change some access information so the server can read through our MySQL login we made earlier. Find and change:
// MySQL Login server
login_server_ip: 127.0.0.1
login_server_port: 3306
login_server_id: raguser
login_server_pw: StrongPassword
login_server_db: ragserver
login_codepage:
login_case_sensitive: yes

ipban_db_ip: 127.0.0.1
ipban_db_port: 3306
ipban_db_id: raguser
ipban_db_pw: StrongPassword
ipban_db_db: ragserver
ipban_codepage:

// MySQL Character server
char_server_ip: 127.0.0.1
char_server_port: 3306
char_server_id: raguser
char_server_pw: StrongPassword
char_server_db: ragserver

// MySQL Map Server
map_server_ip: 127.0.0.1
map_server_port: 3306
map_server_id: raguser
map_server_pw: StrongPassword
map_server_db: ragserver

// MySQL Web Server
web_server_ip: 127.0.0.1
web_server_port: 3306
web_server_id: raguser
web_server_pw: StrongPassword
web_server_db: ragserver

// MySQL Log Database
log_db_ip: 127.0.0.1
log_db_port: 3306
log_db_id: raguser
log_db_pw: StrongPassword
log_db_db: log
log_codepage:
log_login_db: loginlog
The last location we need to navigate to are our map server configurations. For this we will navigate to:
/home/raguser/rAthena/conf/map_athena.txtChange the username and password for the server. It's the same as earlier:
userid: 4Xy3NAKxnl3sk6Aj
passwd: 79y59S3m8lWmMDMS
Now add (or uncomment) the following lines:
char_ip: 127.0.0.1
char_port: 6121
map_ip: 127.0.0.1
map_port: 5121
In this part of the step we will configure the client to match your packet version.
First we need to ensure "make" is installed. Enter in:
sudo apt install makeWe'll need to give execution access to the configure file. Enter inside the rAthena directory (cd /home/raguser/rAthena) :
sudo chmod a+x ./configureThen we are going to configure the server packet to match the client we downloaded.
./configure --enable-packetver=YYYYMMDDThe YYYMMDD is your client version for your server.exe. Our example is going to be 20211103:
./configure --enable-packetver=20211103Once you've done that we're all ready to get the green light. Let's test it out!
Let's make a clean slate! Enter in the command while still inside your rAthena directory:
make cleanNow let's start constructing the server:
make serverAfter that's done loading, let's give execution access to the start files & servers:
sudo chmod a+x login-server && sudo chmod a+x char-server && sudo chmod a+x map-serverTime to start it up! (Make sure you're inside the rAthena directory)
To start the server:
sudo ./athena-start startTo stop the server:
sudo ./athena-start stopTo restart the server:
sudo ./athena-start restartTo check the status:
sudo ./athena-start statusWe're online!
EXTRA STEPS (OPTIONAL)
STEP SIX: DNS. (Mask your IP)
i1.6.0
So many of you, like myself, would like to mask your IP address and the best way to do this is to use a domain name service to mask our IP. But does this mean you can't find my IP?
No. This does not mean your IP is hidden completely. It just means people have an easier way of accessing your website on a more reliable and trusted connection. In this part of the guide we will go through the process of obtaining and setting up the DNS on your personal dedicated server. Let's start by understanding what DNS means. I'll be quick.
What this is telling is, is that we can now take one thing (our IP) and mask it with another thing (domain name). That's short enough.
Now some might be wondering... "Don't I need a website and a host for all of that?"
The answer is Yes. We set that all up in the previous steps of this guide. You're all ready good to go.
The first step is to navigate to your favourite (and trusted) domain name service provider. There are many out there that a simple google search can discover. In this example we are going to use Domain.com. It's affordable, takes Paypal, and has everything we need neatly displayed.
Right in the middle of the landing page, you'll notice a search bar. It's large and ahrd to miss. This is where you will type your domain name you want to look for. Don't worry about attaching the endings onto it (.com, .net, etc) as it will give you a list of all the available ones.
Purchasing a domain will create an account for you using the details entered in during the billing process. The basic domain I purchased costs slightly more because it's a ".net", which holds a premium standard these days. You don't need to worry about protection and SSL either. We will be managing that all from the server computer as well. For free.
Once you find a domain name that fits what you want to achieve and your account was successfully created, it's time to navigate to your email and verify the website. This process is necessary to get the site online.

We are now authenticated and ready to move onto the next part of this step.
Now that we have a domain, what do we do now? How do we ge this domain name we now own onto mask your personal address? Keep following along. We're almost there!
To confirm we have everything, in case there was an issue before, we're going run, in the terminal, the command:
sudo apt update && sudo apt upgrade -y && sudo apt install apache2 -yNext we'll need a couple library files for the server to read the data. The following command will give us those libraries:
sudo apt install php libapache2-mod-php php-mysql -yNow that we made some changes, it's always good to verify things are still where we left them. Let's verify PHP again to make sure it's the same version as before (8.2.2)
php -vEarlier we made a web server. Now it is time to configure it!
Enter in and customise the name:
sudo mkdir /var/www/customName
sudo chown -R raguser /var/www/customName
This creates a folder and gives us full ownership of it inside the webserver directory. The custom name is for security measures. This is where we will upload our website and all the web files later. First we need to make a configuration file to run it properly. To do that we must enter in and adjust the name of:
sudo nano /etc/apache2/sites-available/customName.confAn empty screen will appear. This is what we want. Now we can populate it with all the information necessary to maintain the web server. I recommend pasting this into a notepad and changing the values as needed. You will need your web site name, user name,custom folder name we made moments ago and your public IP address (v4). Change the values and paste it in to the blank page:
Now the website is almost ready. We've given it instructions where to go. All we have to do now is verify it and enable scripts for the site to operate.
Let's start by reloading our web server.
sudo systemctl reload apache2You may have to reload the apache2 service. If this appears simply run the command again:
sudo systemctl reload apache2This will appear a couple times through this part.
Next we need to enable the default script. To do this we will run a command called "a2dissite". What this does is uses system links to run the website and disaables them when needed. Once enabled, we can set and forget even after reboots.
sudo a2dissite 000-defaultNow we're going to do the same thing, except for the config file we just created above. The name must be exact:
sudo a2ensite customNameLet's test the config to see if it throws any errors:
sudo apache2ctl configtestIt looks like we got an error! It reads:
If you encounter this, it's a simple fix!
Enter the command to edit the following file:
sudo nano /etc/apache2/apache2.confNow we need to go to the bottom of the page and insert (at the very bottom) :
ServerName localhostAnd now we want to reload the apache2 service one more time:
sudo systemctl reload apache2Finally, we must route our public IP to the domain name. This is done in that DNS menu on our domain host website. Let's navigate back to Domain.com and set this up.
Here we want to edit (or add if it's not here) the "A record" that points to the host configured IP address. We will simply click edit to change the existing record and have it reflect (and edit to match your public IP) the values below:
A @ 127.0.1.1And to prepare things for the next steps, we are going to navigate to back to our basic domain settings and make sure the settings reflect the following: (Auto-renew optional)
This is telling us all the options are disabled. We won't be needing any of them supplied by the host.
That's it for this part! Our web server is ready for a website to be added and for the DNS to be redirected in our network settings. In the next step we will go through securing the website with a security certificate. It's free and easy to set up.
STEP SEVEN: Getting SSL Certified (HTTPS)
i1.7.0
In this step we're going to get that SSL set up. Currently when we access our website it says HTTP. We are going to make it say HTTPS.
Start by registering to SSL For Web. It's free and easy to set up.
After registering, we're going to go right to the top right and click the create button.
You will be given two options. DNS & HTTP. We are going to select DNS to continue. You'll also need to enter your domain name to continue.
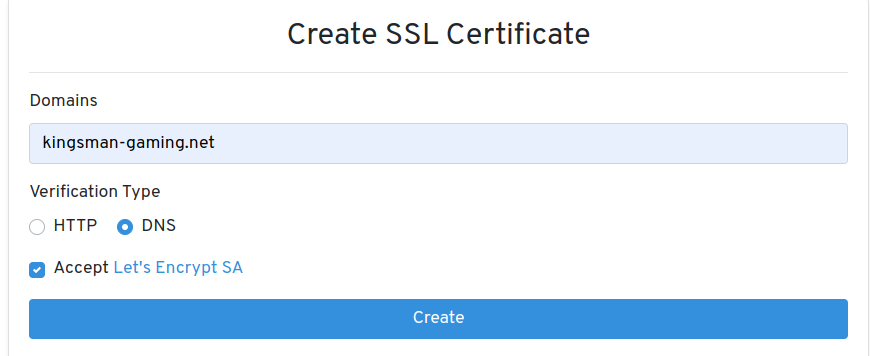
This is where it gets a little more complicated, so follow closly.
You will be given two codes to enter into your DNS register. To find this, you will navigate to where you purchased the domain name and modify the existing DNS service to include these values. Simple, right?
In our example we used Domain.com. So we will continue using them.
Log in and navigate to your domain. On the left side panel you will have some options. Select the one that says DNS & Nameservers.
You will get a window like this:
We are going to click DNS Records.
This is where we will enter those values SSL generated for us. Go back to the SSL page and copy the first value on the left. This is a challenge domain for your domain name.
Go back to your DNS records and enter in a new record. The record type we want is TXT.
Paste inside the "Name" box the value we just copied.
Go back to SSL and copy the value on the left. This is going to be pasted in the "Content" box.
Set the value to 1/2 hour and hit confirm.
Finally go back and verify that it worked. (It can take up to 30 minutes to fully work, but is usually quicker dependingon the service.)
There is a status checker so you don't need to submit every time. Use the scroll bar to go to the right and check the status.
Now that we have the green light and a security certificate is added to the domain, we can download the certificates and add them to the server.
There are two main types of certificate for use and a bundled version. All we need in this example is the Certificate and Private Key. Now that we have them, how do we add them?
Leave this page open for now, as we will need it shortly, and navigate back to your terminal. We're going to enter a few commands to get things set up on our dedicate server.
Enter in to edit your certificate file: (rename to your website)
sudo nano /etc/ssl/certs/kingsman-gaming.net.crtThen paste your certificate value that was given to you. We're looking for the Certificate.
It now looks good to save! (CTRL-X, then enter Y to confirm)

Now we must give it the key to the certificate. Enter in and edit the file:
sudo nano /etc/ssl/private/kingsman-gaming.net.keyWe want to populate it with the key that SSLForWeb gave us. Go ahead and paste that in, then save the file.
The last certificate we're going to add is the CA bundle. This will be used in the later steps, but let's add it now since we're here. Create a new file and give it adifferent name. In this example we just added ca. to it:
sudo nano /etc/ssl/certs/kingsman-gaming.net.ca.crtCertificates are added and ready to go. Here we will go back to our server config file we made earlier and set it up for SSL encryption. Open:
sudo nano /etc/apache2/sites-available/customName.confWe want to change the values to reflect:
Then enable SSL to run scripts:
sudo a2enmod sslLet's break that down....
<VirtualHost *:80> is set to a standard, non-secured, port. We updated this to a secure port to allow the security certificates through.
We added three lines to the top. These lines will be read first and indicate we are turning the SSL Engine ON, setting the Certificate Key file to our private ssl folder, and setting the Standard Certificate file to our certificate folder.
And at the bottom we added some additional options for some System Links, Overrides, and Permission granting. Now the server can read all the security changes we made!
Once we save that file we are going to enable the SSL scripts in the server. This was done simply with one command.
With all this done, we have only one more step left to complete before we can fully set up SSL on the server. We need to allow our SSL access through the firewall. We can do this very easily with the following commands:
sudo ufw allow 443Your firewall should now appear with these ports for all of default Ragnarok services: (Check out open allowed services with sudo ufw status)
443                       ALLOW       Anywhere
5121                      ALLOW       Anywhere
6121                      ALLOW       Anywhere
6900                      ALLOW       Anywhere
80                        ALLOW       Anywhere
22                        ALLOW       Anywhere
If you don't ahve an active firewall you can enable it with:
sudo ufw enableWith all this added, we are now going to check the syntax for the apache2 configuration to make sure it's still "OK" and restart the apache2 service:
sudo apache2ctl -tsudo systemctl restart apache2Common issue after this step:
This is caused because the SSL scripts have to be passed through the system still. To do this we can enter in two commands to set this up:
sudo a2enmod ssl
sudo systemctl restart apache2
That's it for this step! We now have an SSL connection for our webserver.
In the next section we will go through various methods of setting up the File Transfer Protocol (FTP) for our webserver. This is great for setting up files from your server for others to download. Users can download files directly from the web server.
STEP EIGHT: File Trasnfer Protocol (FTP)
i1.8.0
We're going to enable this on our server to allow users to download various files we set up in the download folder. Let's start by making that folder. Change directory to your web directory. We modified it earlier above:
cd /var/www/kingsman/Now create a directory:
mkdir downloadWe now have a folder where we will be adding out downloadable files. Let's get the libraries ready for the web server.
Enter in:
sudo apt-get update && sudo apt-get install openssh-serverIt will be a linear installation. Once it completes we can check the status of it:
sudo systemctl status sshIf it failed to start load it again with:
sudo systemctl start sshOnce we set the configs we're all ready to go. Edit the file:
sudo nano /etc/ssh/sshd_configThese settings will be added at the very bottom of this document. Scroll to the bottom, add & edit the following values:
Match User raguser
    ForceCommand internal-sftp
    PasswordAuthentication yes
    ChrootDirectory /var/www/kingsman/download
    PermitTunnel no
    AllowAgentForwarding no
    AllowTcpForwarding no
    X11Forwarding no
Save the document and exit. (CTRL + X then Y & Enter)
Restart SSH with:
sudo systemctl restart sshWe now have a fully functional FTP server attached to the web server.
Now to get links for your files, you'll need to understand how the folders work in the web server.
This part is completely ignored in the link you will generate:
/var/www/kingsman/Your link will be the default web address, so let's start with that:
https://kingsman-gaming.net/That's the start. Now we need to add our download folder.
We know the default location is /var/www/kingsman/ directory, so this means kingsman-gaming.net is that location. To add the downloads folder we simply just separate it with a " / " and add the download directoy, exactly how it's spelt,in the file hierarchy:
So /var/www/kingsman/download becomes:
https://kingsman-gaming.net/download/You can add as many directories as you can fit into the web address search bar and break off from the download folder to download other parts of the site.
You'll add the file name to the link for which ever file you want to download. For example, I want to download VLRO.zip:
https://kingsman-gaming.net/download/vlro.zipNow we have a place players can download our server from. Simply upload your files inside this download folder and send the link to your players to download.
In the next step we will go through how to create a launchable version of Windows 10 wil your Ragnarok Online server set up on it. We will also go through various tools that will be useful to development.
STEP NINE: Emulating Windows 10, Ragnarok & RO Tools (QEMU/KVM)
i1.9.0
In this step we will be going through how to build and run a virtual machine based on Windows 10 operating system with our Ragnarok Online server installed onto it.
Make sure to download Windows 10 ISO while we work. This will save some time later. You may also want to consider moving it to a new directory inside your Documents folder. We'll be doing this for our example moving forward, as well.
Start by check that your system is Virtualization Ready. Enter in the terminal:
egrep -c '(vmx|svm)' /proc/cpuinfoIf your system is Virtualization Ready it will appear with a number greater than 0. My number came out as 16, so we're good to check if the system is supported. To do this enter in:
kvm-okIf the system does not have the checker, you can enter this command to enable it:
sudo apt install cpu-checker -yNow that we found out we can support virtualization it's time to install it, along with the librarfies neeeded to run it. Enter the following command to run all of this in one go:
sudo apt install qemu-kvm virt-manager virtinst libvirt-clients bridge-utils libvirt-daemon-system -yWe're going to run two more commands to make sure we have the virtualization daemon. Enter in:
sudo systemctl enable --now libvirtd
sudo systemctl start libvirtd
Now check the status of to make sure it's online and everything is green:\
sudo systemctl status libvirtdEverything looks good so far!
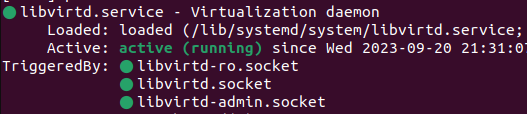
Before we can run the program we need to give our user specific permissions to access the daemon. To do this we will enter in:
sudo usermod -aG kvm $USER
sudo usermod -aG libvirt $USER
We are now ready to launch!
You can start the application in the application menu using the icon it supplies. (It can take a minute to populate)

If you can't find it, or it hasn't appeared yet, you can manually run it with the command:
sudo virt-managerYou should now have a window that looks like this:
If you experience an error trying to connect after finishing up to this part of the step and it reads something along the lines of:
Unable to connect to libvirt qemu:///system.Verify that the 'libvirtd' daemon is running.
Error: Failed to connect socket to '/var/run/libvirt/libvirt-sock': Permission denied
It is recommended to restart your computer and try connecting. Sometimes after the installation it won't have all permissions set properly. A full restart of the system can resolve this.
Now that we are set up, it's time to create a virtual machine!
Go ahead and click the New Machine button at the top left.
We're going to select Local install media from the list and select the ISO file we downloaded at the start of this step.
(If you didn't donwload it before, now is a good time to. While you're waiting you can reflect over the steps you've went through to get this far. It is good to understand the system and how you got here.)
We'll want to click "Browse..." and a new window will appear. Here we have our default filesystem directory. This is a default directory that is given with the application. We don't have files in this folder so we won't focus on this.
At the bottom left, there's green " + ". Click it.
Now we are presented with options for renaming the pool, changing the type of file it is, and setting the target path for where to read and write data. We are only going to focus on two of these options in this step. Name & Target Path.
We'll give it the name "DiskImages", though you can name it anything you want, and we want to select the path to be the folder we created inside our Documents which holds the Windows 10 ISO.
We now have a link to this folder inside the KVM.
If we select it, we can now see the Windows 10 64 bit ISO is there. We will click it and Choose Volume.
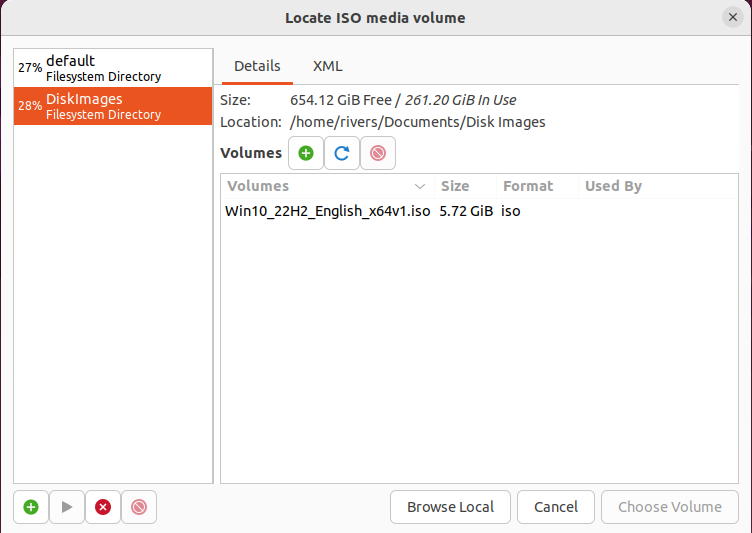
The applicatiion will likely guess that it is Windows 11, so we need to uncheck that box and change it from an 11 to a 10.
Change to
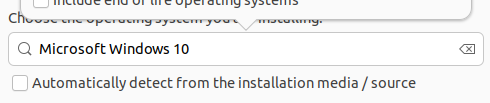
Press Forward and agree to the promt. You can click the Don't Ask button for future changes.
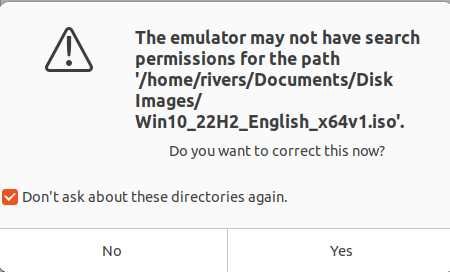
Now we must set the amount of RAM and Cores to use. We can change this any time after shutting the virtual machine down. For now, we will use the default 8G and 4 Cores. (Recommend: 3G RAM or more, 2 cores or more for this setup)
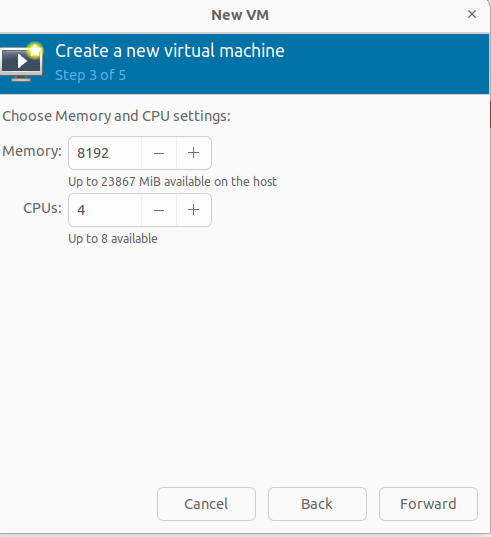
The next part of this step is to create the virtuale machine's hard drive. To do this we need to let the VMM do a rather long process to the 32 GB of space that will add a system file to a size we pre-determine, and it will allow us to boot Windows 10 off that space and dedicate it a hard drive to store files. It sounds complicated, but it's really simple to do. It just takes some time if you have larger spaces to work with.
Moving forward, we much select "Enable Storage for this virtual machine" and we will then go to the bottom and select "Create a dusk image for the virtual machine" and click "Forward".
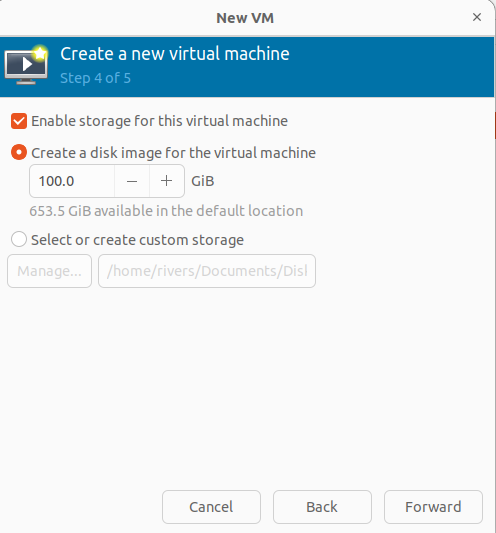
If we get asked to grant search permissions for the path. Click YES.
Now we are ready to create the Windows 10 disk space. Double check the information is correct, mainly the Windows 10 operating system doesn't say Windows 11.
It will launch automatically for the first time on Finish.
You will now be able to set up your emulated Windows 10.
(If you encounter...)
ERROR:
If you experience an error, roughly like the one I created above, it's possible that the QEMU user does not have access to this directory still. You can manuall add this access very easily. Enter in the command to check the permissions, first:
The output should look close to this:
This is showing us that our QEMU is not here on the list. Let's add it:
sudo setfacl -m u:libvirt-qemu:rx /home/raguser/RagDiskNow if we run the command to check it again:
sudo getfacl -e /home/raguser/RagDiskWe can see that the user is added successfully.
Finally, Restart the Virtualization library and you're ready to continue on to the next parts of this step:
sudo systemctl restart libvirtdYou should be ready to launch now!
We've got Windows 10 running and Updated as much as it can get. We're going to install a few necessary applications to run our programs and the game itself.
Download the following files from the following (trusted) sources:
-Microsoft Direct X Runtime
-Visual C++ Redistributable for Visual Studio 2015
-.NET 6.0 or 7.0
-(Optional) RO Tools List
With everything installed, and the system fully rebooted for good measure, we're ready to get started with the game installation.
STEP TEN: Setting up rAthena Source (Game Files)
i1.10.0
Now it's time to get rAthena set up so we can get players connecting to the server. First thing's first! Organise and familiarise yourself with the files. This is where you will be spending lots of your time. This will be an ongoing process once you complete these steps. In this guide, it will give you some organization pointers. Take your time with this and get used to how you lay things out. You will navigate back and forth a lot during a maintenance.
If you have not already downloaded rAthena we will go ahead and do that now. The following commands will change your directory to the root for your profile, next it will make a "Server" folder for you to operate in, and finally it will download the rAthena trunk to that directory. Finally we will enter that directory to process the remaining steps.
cdsudo mkdir Servergit clone https://github.com/rathena/rathena.git ~/rAthenacd rAthenaTo update rAthena to the latest verison we need to process a git-pull while inside the rAthena diretory.
git pullNow we've got rAthena's latest trunk and all the updates!
It is important to get a good, or at least an okay, understanding of how rAthena has all their files organized. Things are in a specific place and named specific things for a reason. If you move or rename a file or folder it will cause you many problems.
Source files are where you will make changes that will affect the entire game and the way it functions. Be very careful when editing these files and stay within the lines of the cave if you don't know what you're doing.
Config files are where you will make the majority of changes to your server. This is where things like Drop rates, EXP rates, and all your Server settings will be located. In the continued steps below, we will go through how to set up the remainder of the server.
It's time to create a database for all the player accounts to be saved to. To get started be sure you've followed the previous steps for setting up PMA (phpMyAdmin).
Now that we have access to MySQL we can start by entering in some commands to give us access to the databases involved.
Open the terminal and enter in the following: (Note: You set the username and password earlier)
CREATE DATABASE ragserver;
CREATE USER 'raguser'@'localhost' IDENTIFIED BY 'StrongPassword';
CREATE USER 'raguser'@'%' IDENTIFIED BY 'StrongPassword';
GRANT ALL PRIVILEGES ON ragserver. * TO 'raguser'@'localhost' WITH GRANT OPTION;
GRANT ALL PRIVILEGES ON * . * TO 'raguser'@'%' WITH GRANT OPTION;
GRANT ALL PRIVILEGES ON * . * TO 'raguser'@'localhost' WITH GRANT OPTION;
This created the database 'ragserver' and added 'raguser' to the database with full access.
Next we need to make the logs and grant privileges to raguser on it.
Enter in:
CREATE DATABASE log;
GRANT ALL ON log.* TO raguser@localhost;
Now we can leave by entering in:
quitMajoirty of the database is set up now!
This next step is a little more complicated, but very simple to do. rAthena has a database in the server files that we are going to pull the columns and rows from so we don't have to manually construct it ourselves piece by piece. Thankfully we can execute it all in two simple commands:
mysql -u raguser -p ragserver < /home/raguser/rAthena/sql-files/main.sql

mysql -u raguser -p log < /home/raguser/rAthena/sql-files/logs.sql
Now we have an almost-fully functional database for the server. It's time to create the first account! Back to the terminal, we are going to enter and log in to MySQL again:
sudo mysqlIn MySQL enter in: (Before submitting this to the database, we are going to change the Login Name, User Name, Password, & Email)
INSERT INTO `ragserver `.`login` (`account_id`, `userid`, `user_pass`, `sex`, `email`, `group_id`, `state`, `unban_time`, `expiration_time`, `logincount`, `lastlogin`, `last_ip`, `birthdate`, `character_slots`, `pincode`, `pincode_change`, `vip_time`, `old_group`) VALUES ('20000000', 'admin', 'adminPassword', 'M', '[email protected]', '99', '0', '0', '0', '0', '2022-02-20 00:00:00', '', '2022-02-20', '9', '', '0', '0', '0');Great! You're this far. Not much more to do from here.
Navigate in WinSCP/FileZilla (or other FTP access app) and go to your directory:
/home/raguser/Server/rAthena/conf/char_athena.confInside this, near the top, will be the lines that show your Name and Password. These are for your Login database we set up earlier for PMA.
If you haven't changed these yet, do so now. I recommend a random generator for the values. A simple Google search for this will help.
Search for and change the values to a random name and password:
// Server Communication username and password.
userid: s1
passwd: p1
These values must reflect what is inside the login database or the server won't be able to connect. Do not share these values. With anyone.
Now the Server's username and password are set, we can navigate to:
/home/raguser/rAthena/conf/inter_athena.confThis is where we are going to change some access information so the server can read through our MySQL login we made earlier.Find and change:
// MySQL Login server
login_server_ip: 127.0.0.1
login_server_port: 3306
login_server_id: raguser
login_server_pw: StrongPassword
login_server_db: ragserver
login_codepage:
login_case_sensitive: yes

ipban_db_ip: 127.0.0.1
ipban_db_port: 3306
ipban_db_id: raguser
ipban_db_pw: StrongPassword
ipban_db_db: ragserver
ipban_codepage:

// MySQL Character server
char_server_ip: 127.0.0.1
char_server_port: 3306
char_server_id: raguser
char_server_pw: StrongPassword
char_server_db: ragserver

// MySQL Map Server
map_server_ip: 127.0.0.1
map_server_port: 3306
map_server_id: raguser
map_server_pw: StrongPassword
map_server_db: ragserver

// MySQL Web Server
web_server_ip: 127.0.0.1
web_server_port: 3306
web_server_id: raguser
web_server_pw: StrongPassword
web_server_db: ragserver

// MySQL Log Database
log_db_ip: 127.0.0.1
log_db_port: 3306
log_db_id: raguser
log_db_pw: StrongPassword
log_db_db: log
log_codepage:
log_login_db: loginlog
The last locations we need to navigate to are our map server & subnet configurations.
Navigate to:
/home/raguser/rAthena/conf/map_athena.txtChange the username and password for the server. It's the same as earlier:
userid: 4Xy3NAKxnl3sk6Aj
passwd: 79y59S3m8lWmMDMS
Now add (or uncomment) the following lines:
char_ip: 127.0.0.1
char_port: 6121
map_ip: 127.0.0.1
map_port: 5121
And finally adjust the subnet to match your server's IP address.
This step can be a little tricky if you don't understand how a subnet works. So simply follow below and replace x.x.x.x with your server's IP address:
subnet: 255.0.0.0:127.0.0.1:127.0.0.1
subnet: 255.0.0.0:x.x.x.x:x.x.x.x
Excellent! You're near the end. It's time to configure the client to your packet version.
Let's give execution access to the configure file:
sudo chmod a+x ./configureThen we are going to configure the server:
./configure --enable-packetver=YYYYMMDDThe YYYMMDD is your client version for your server.exe. An example of how this looks is:
./configure --enable-packetver=20211103Congratulations on making it to the end of setting up your server. It's time to start it up now!
Let's make a clean slate!
Enter in:
make cleanThen let's start constructing that server.
Enter in:
make serverAfter that's done loading, let's give execution access to the start files & servers:
sudo chmod a+x login-server && sudo chmod a+x char-server && sudo chmod a+x map-serverTime to start it up!
(Make sure you're inside the rAthena directory)
To start the server:
./athena-start startTo stop the server:
./athena-start stopTo restart the server:
./athena-start restartTo check the status:
./athena-start statusThat's it for this step. If you followed up to here you'll have a all server files downloaded and ready on the server side with a database ready to accept logs and registrations.
In this next step we will go through the systemd.service files to get your server running automatically when the system restart or if it crashes.
STEP ELEVEN: Setting up UFW (Firewall)
i1.11.0
When setting up the firewall, we want to make sure we know exactly what ports we are adding in before we add them. This will save us from having to deny thema ccess later. Let's gather the ports we know of for all the services we've set up thus far.
We know of our Web ports, which should be automatically added when installed, but sometimes this isn't the case. We've also got the FTP ports for the download servers, if we want to use them. There's also the PMA & SSH ports.
Are you writing this down?
sudo ufw allow 443
sudo ufw allow 80
sudo ufw allow 20/tcp
sudo ufw allow 21
sudo ufw allow 22
sudo ufw allow 3306
sudo ufw allow 6900
sudo ufw allow 5121
sudo ufw allow 6121
sudo ufw allow 8888
Sometimes you might still get some issues with the firewall blocking you. You may be required to let the firewall know what type of conneciton to allow, either TCP or UDP; but what is TCP/UDP you might ask? Very simply put...
TCP means Transmission Control Protocol which runs a more reliable connection, however, it can lack in transfer speed. UDP means User Datagram Protocol and it has a much faster transfer rate of data, but can be unreliable in sending said data.
What does this mean for you?
You can choose to do UDP all accross the board since Ragnarok uses small packets of data compared to a much larger scale game. Just my recommendation. However, if you want absolute data transfer at the highest success rate to avoid lost packets and data, then do TCP. Still confused? Do both in the firewall.
An example of what the command will look like for adding TCP/UDP:
sudo ufw allow 5121/udp
sudo ufw allow 5121/tcp
Now that we've got an understanding of the firewall and the ports we have added we can now relax knowing the firewall will protect us from majority of threats.
STEP TWELVE: Setting & Forgetting (Auto-Start scripts)
i1.12.0
I hate when the server crashes. But you know what's worse? When it doesn't come back up until an admin turns it on.
In this step we will go through the simple setup process to get your server ready to start when you load your system and reboot if it crashes.
Start by opening up the terminal and entering in the following command to create a new system.service file:
sudo nano /etc/systemd/system/ro-login.serviceThis will create a system service file which we will enable later to start automatically. Inside these service files will be a series of commands that will allow the server to boot up automatically when it experiences an outage for a speificied amount of time & when starts the system after a reboot.
Populate the file and edit the values to match your rAthena directory and User Login name:
[Unit]
Description=Ragnarok Login-Server
After=syslog.target network.target mysqld.service

[Service]
WorkingDirectory=/home/raguser/rAthena
User=raguser
ExecStart=/home/raguser/rAthena/login-server

ExecReload=/bin/kill -HUP $MAINPID
KillMode=process
Restart=on-failure
RestartSec=15s

[Install]
WantedBy=multi-user.target
We are going to do this two more times. Once for Character Server & another for the Map Server.
sudo nano /etc/systemd/system/ro-char.servicePopulate with:
[Unit]
Description=Ragnarok Character-Server
After=syslog.target network.target mysqld.service

[Service]
WorkingDirectory=/home/raguser/rAthena
User=raguser
ExecStart=/home/raguser/Server/rAthena/char-server

ExecReload=/bin/kill -HUP $MAINPID
KillMode=process
Restart=on-failure
RestartSec=15s

[Install]
WantedBy=multi-user.target
And now:
sudo nano /etc/systemd/system/ro-map.servicePopulate with:
[Unit]
Description=Ragnarok Map-Server
After=syslog.target network.target mysqld.service

[Service]
WorkingDirectory=/home/raguser/rAthena
User=raguser
ExecStart=/home/raguser/Server/rAthena/map-server

ExecReload=/bin/kill -HUP $MAINPID
KillMode=process
Restart=on-failure
RestartSec=15s

[Install]
WantedBy=multi-user.target
We will now start them all and check their status:
sudo systemctl start ro-char
sudo systemctl start ro-map
sudo systemctl start ro-login
sudo systemctl status ro-char sudo systemctl status ro-map sudo systemctl status ro-loginOnce we have the Green light on the status we can go ahead and enable the scripts to automatically start on boot. Enter in:
sudo systemctl enable ro-char
sudo systemctl enable ro-map
sudo systemctl enable ro-login
That's it!
You're set to boot up automatically after a crash and upon system restart. Well done!
Section 2 - After-Installation
Now that we've got everything set up this far, we can continue maintaining & updating what we've started.
Continue below to learn more on how to maintain the server after you've set it up.
Requirements :
STEP ONE: FluxCP (Registration & Logins)
i2.1.0
Everyone needs to register somehow, right? We're mostly all aware of the high risks with enabling registration via "_M/_F", if you're not... In short: Don't use it if you're opening the server to the public. It can enable botters, spammers, & hackers the ability to just create infinite accounts and continue their schemes easier. With FluxCP we can help avoid this by limiting the amount of registrations allowed per person. Let's dive into it now.
Gather your resources!
You'll need to download the latest FluxCP by clicking that link. If you missed it, here's the link again:
https://github.com/rathena/FluxCP
This is where we will manage all the registrations to the game as well as many other fun functions we will get into later. For now download & extract this entire directory into your webserver. I put mine in the primary (root) directory of my webserver.
That's the folder we created earlier with the custom name we provided. In this example we used "kingsman" as the custom name. The folder path is:
/var/www/customNameOur final output will look like not include the folder. This means we must drag all the contents into the root directory of the webserver.
Now we should look like this at after extraction:
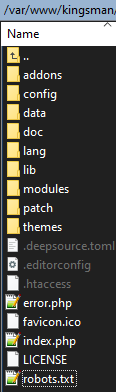
Enter the config folder first. This is where we will be doing all the work for setting up this control panel.
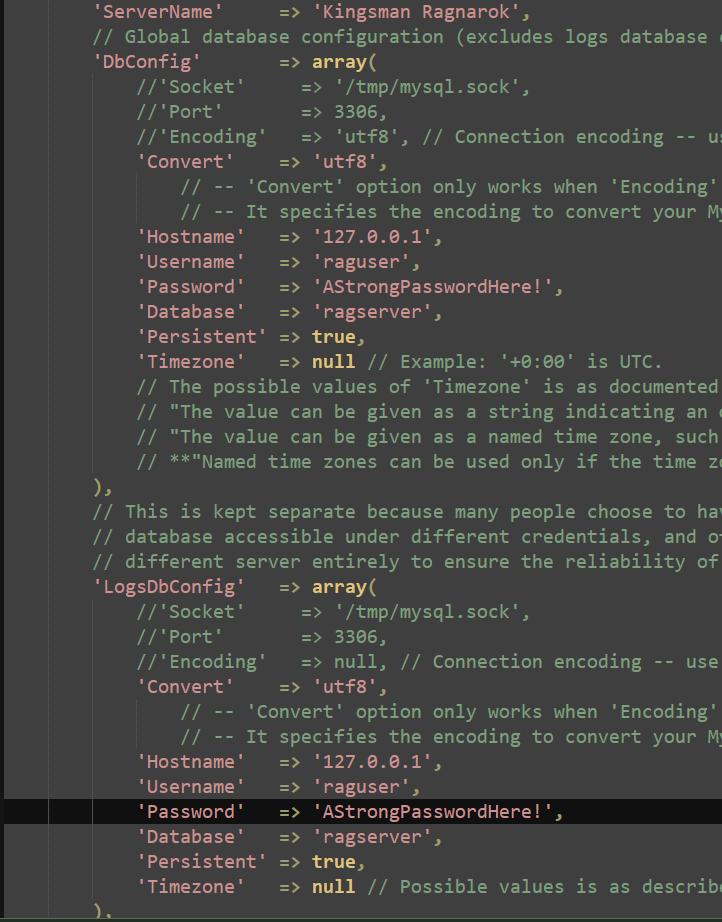
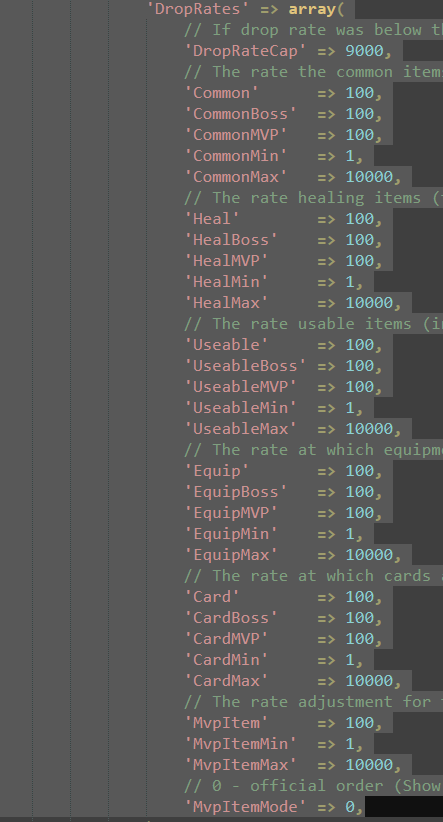
Inside the config folder you will have 31 files to select from. We're only going to work in two of these for this step. Open servers.php and you will see a set up similar to earlier where we added some settings for rAthena configs. They are the exact same configs. Go ahead and add that in there exactly as you did in the configs earlier.
Now that we have our config looking good, let's scroll down towards the bottom and edit our rates to reflect that of our server's. This will display the rates set up in your databse as well so players can use that to search drop rates on your server.
Change accordingly!
That's it for the servers.php! Save that & move to the next file.
Let's now open up application.php and edit the first few lines we see.
We want to change the base URI to be blank. This will set it to the root directory where we hold the control panel.
Server Address is going to remain localhost since we are running it on the localhost.
And finally we need a storng password to gain access to the administration panel to set it up.
	'ServerAddress'				=> 'localhost',					// This value is the hostname:port under which Flux runs. (e.g., example.com or example.com:80)
	'BaseURI'				=> '',						// The base URI is the base web root on which your application lies.
	'InstallerPassword'			=> 'superduperstrongpassword,man',		// Installer/updater password.
Save that and open your website now!
You'll likely get several permission errors. Copy waht they say for you to do, it will be a sudo chmod command giving access to the logs. This is necessary to proceed to the next part. Add sudo before each command or it won't work.
You'll need to enter your password into the control panel shown after granting permissions to FluxCP. After the password is successfully added it will update your PMA database with all the new information for FluxCP's registration and logins.
Your panel should look like this by default now:
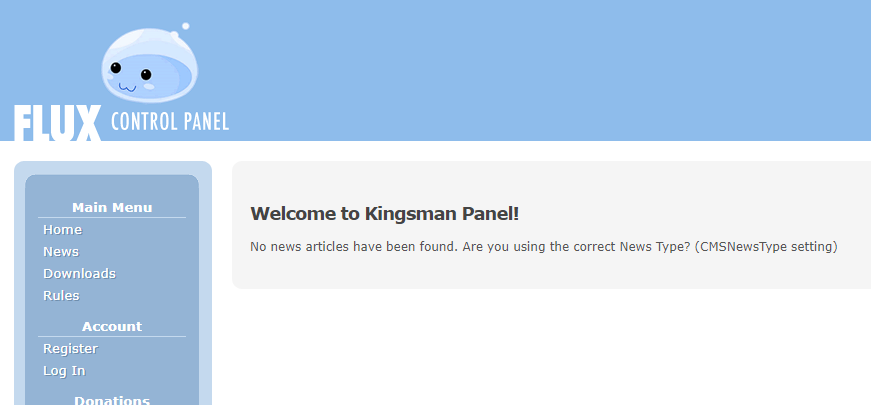
You now have a palce where you can register and manage accounts!
Navigate through the application.php file to change some various settings like your control panel name and what is displayed. You can also adjust the ports if they are different during the previous set up.
STEP TWO: My First EXE (Making an Executable)
i2.2.0
Now that we've got everything set up on the server-side of things it's time to work on the client-side of things now. Let us start first by making an executable. this will be the CustomRO.exe that players will use to run the game. Launch NEMO and give it a moment to load up.
In a compact form, this is waht you'll see.
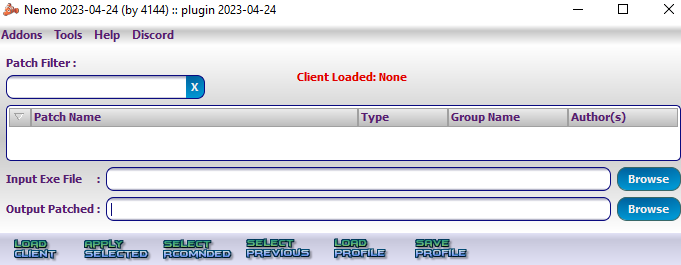
What this is showing us is that we can Load a client, which we downloaded from the "Requirements" section above, we can apply patches, select the recommended patches, select previously loaded patches, load a pre-saved profile, and save an existing setup as a profile to load later.
for this example we are going to use the current recommended version in rAthena's trunk. This is version "2021-11-03".
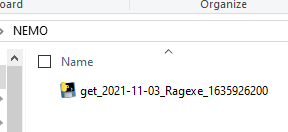
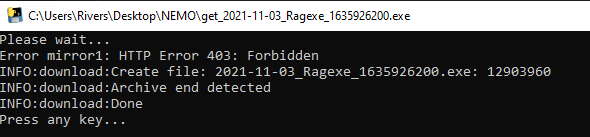
We are presented with a file that will launch a terminal to download the latest executable. It will look similar to this:
Now we have the executable ready to be patched.

Back inside NEMO, we want to browse to that file we just downloaded and select it. You can change the saved outpute file name here or rename it anytime later. Here we will change it now.

Click "Load Client" and a list of patches will populate.
Now we want to "Select Recommended" patches given for for the executable.
To apply these patches simply click the "Apply Selected" button and it will pack it for you.
Brose the patches and select any patches that will help you or you might use in the future. For this example we are changing the Client Title name, the ItemInfo.lub or ItemInfo.lua and a majority of other changes that will allow the client to read LUA files over LUB files. Take your time going through the list. It will take a while the first time around.
With all the patches applied we now have en executable in our output folder.
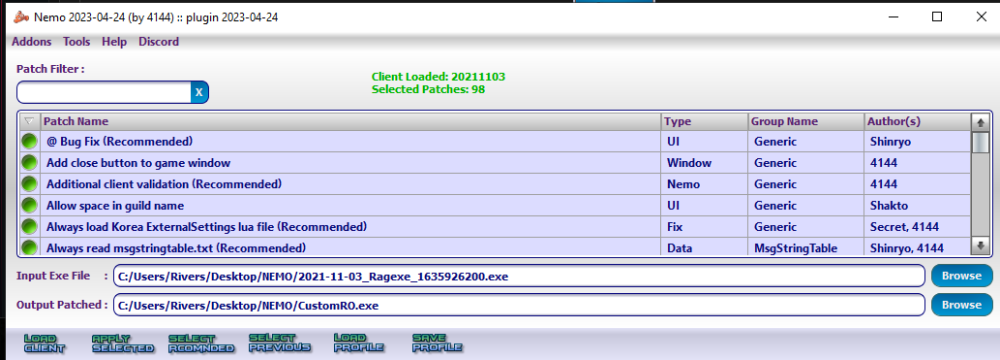
But it came with other files, what do I do with those?
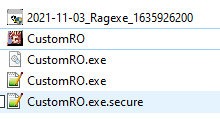
You only need the custom executable we made (CustomRO.exe). This is going to be sent to the players and the rest will be removed from the client folder
You're now ready to send this to other players!
STEP THREE: My First Patcher (Making a Patcher)
i2.3.0
We've got a client executable and it's fully patched the way we like. This is a great start! Now it's tie to send players an update. Through the patcher. But we don't have one yet!
In this example we will go through the steps to creating a patcher using Thor Patcher from rAthena download section.
Your extracted package should reflect similar to this:

We want to enter the Configuration folder and edit the config.ini file located inside.
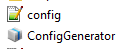
Inside this config file are the lines necessary to connect the client to the server and send files from the server to the client.
In the first few mines we'll edit the values to reflect our server values:
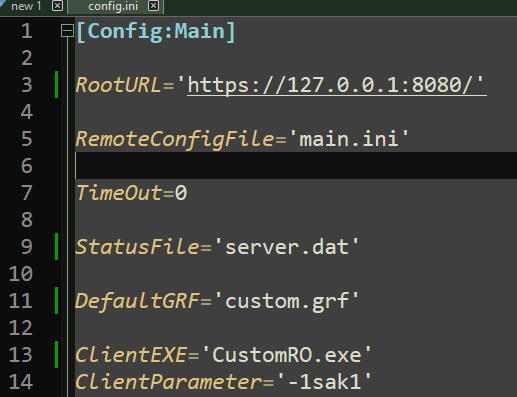
The IP can be our website, this example is just a localhost address.
Remote config file we will leave as default.
Status file we can name server.dat. This can be anything, however.
The custom GRF we have for our server, listed as number 0= in the data.ini.
Finally our custom client executable we made earlier.
Further down the page we have the title of the patcher. This can be anything.
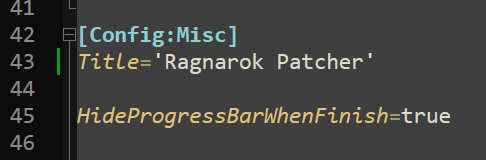
And lastly our notice page which will have a brief text description for the updates on the patcher front page.
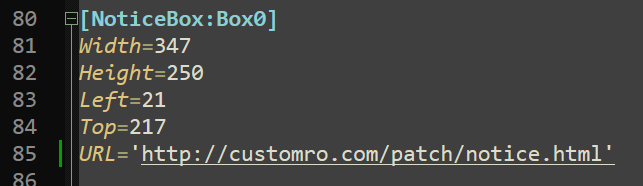
Save that and we're ready to launch the config generator.
Drag the config into your .../Thor_Patcher/Patcher folder and it you're ready to copy them to your CustomRO client files.

When compelte you'll have a patcher similar to this:
You're made your Patcher now, well done!
STEP FOUR: My First Patch (Making a Patch)
i2.4.0
Keeping organised is key to staying sane.
Let's start off by making a couple folders. A Patches folder & a data folder. It should look like this now:
Patches/dataThis should look familiar. It's the same set up as the GRF. We will now be able to drag all the files we want to patch into this directory.
One more folder we want to make is going to be the Output folder. This is where all the patches will be saved. There will be two more options to deal with. We want to set compression to HIGH and in the Options tab we want to set the file type to ACSII. It should reflect the below image.
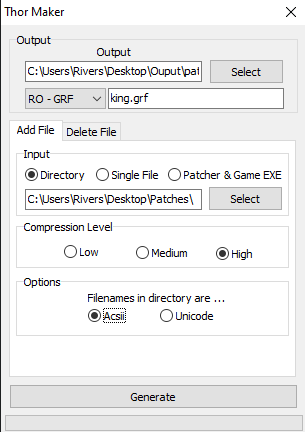
Once that's set we can click "Generate" to make the first patch. It will be create in the Output folder we selected.
That's all there is too it! You've created your first patch.
STEP FIVE: Sending The Patch (Sending Patches)
i2.5.0
We now have it all. The Patcher & The Patch. Things are great. But how do we send it to players withing them having to redownload the entire GRF?
Great question!
In this next step we will cover how to add the patch to the webserver and get it ready for players to recieve when they load their patchers.
In step i2.3.0 we covered how to set the patcher up in the web server. This is the file structure we will continue to follow moving forward. Let's open open up our file browser for accessing the server trunk, if needed, or it you're running your own system you can also navigate to the web server folder. The directories are the same either way.
/var/www/custom/patch/This is the directory we wil be working in regarding the patcher.
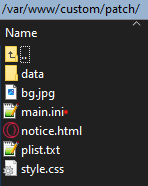
It should now represent the image below:
Let's break this down first...
We have:
First thing to do after we have a patch made is to give it a name. What do you ask? A very specific name. In this example we will follow a date format with a part value in the event of more than one patch in a day.
Our name in this example will be the date followed by a version number, or update number.
24012024-1This well tell me that the patch was set for today and it's the first path released of that day.
Now we can edit the plist.txt and add this patch into the list. Inside the patch list we will enter in the exact namme of the patch. Including the ending.
Our names will start with an index number first. This is the order at which the patcher will read the patches. The index starts at 0 and is followed by a SPACE and then the item name.
1 24012024-1.thorSave and it's ready to load through the patcher!
Finally we need to tell the website to send patches to players.
Open up the main.ini file with a text editor. We're going to modify the line that asks for a website address. Search for "file_url=" ad edit that to be your website.
Save and it's ready to go!
That's pretty much it for uploading patches to the server. You're all set to start updating players with new content!
STEP SIX: Adding/Removing Maps (map_cache.dat)
i2.6.0
Got a enw map you want to try out or is your current map not up to date with your pathing?
In this step we're going to add maps to the map_cache.dat, remove maps if needed and update the list with our new maps.
First start by downloading the Map Cache Editor from the trusted rAthena source:
HERE
You'll be presented with a window that looks like this:
What we want to do next is download our map_cache.dat from the server trunk:
rAthena/db/map_cache.datOnce downloaded it will be able to drag and drop that file into this window. We now are presented with a list of maps.
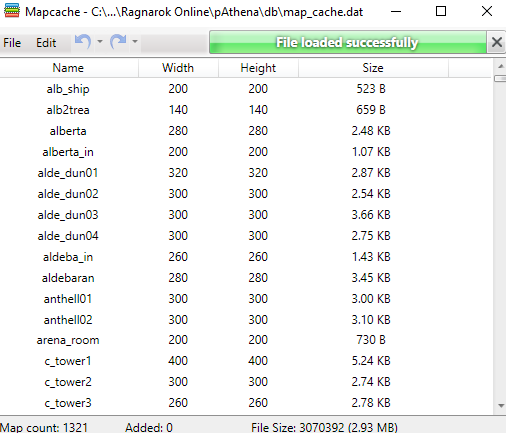
From here what we want to do is drag and drop all our map's .gat files from our GRFs into this window. this will update the walkable paths for the map. This is especially important when you cannot walk on certain maps due to old GAT configurations, It still thinks there are structures in the way.
To delete a map you can select it and click delete. Simple as that.
Save the Map Cache and reupload it to your server.
That's it! Nice and quick.
Section 3 - Optional Options
Things are running now, yeah? That's great to hear. Sometimes they may require additional software, maybe another step or two, or maybe you need something else for it all to work. Below are some steps that are completely optional but might just help you out in some situations.
STEP ONE: Forwarding a Router (Port Forwarding)
o3.1.0
Understanding what port forwarding is will be an important start to not having your network breached. In this step we will go through the basics of forwarding your port through your router. The user interface (menus) will look different for each router brand, however, the concept will remain the same universally. Check your router software for updates before making any changes. Let's begin!
Accessing the Router
To access the router we want to first ensure we are connected to the internet using it.
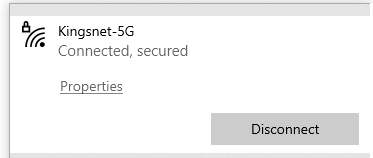
Next we will open the trouter software through our web-browser. To access that page we will have to enter the local domain IP to gain access to the initial menu. In your address bar enter in:
192.168.1.1If this DOES NOT work try entering in:
192.168.0.1My basic Netgear modem has a menu that looks like this.
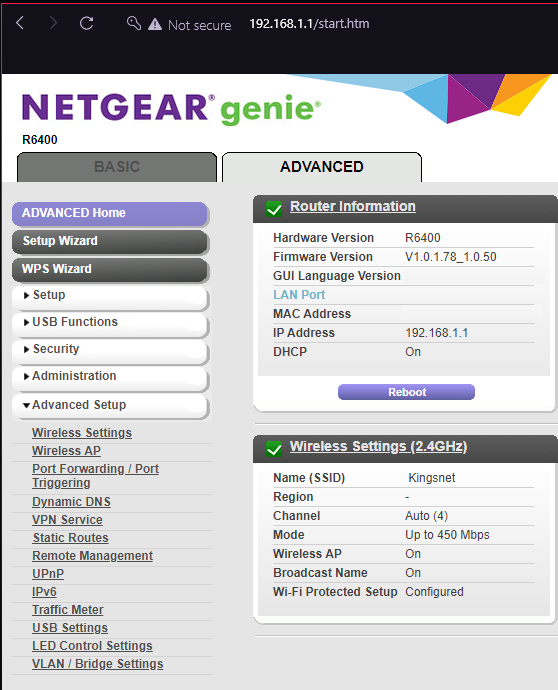
I'm going to want to click into Advanced Settings & open up the Port Forwarding option.

We are now presented with a window similar to this. It will give us all options for forwarding our ports.
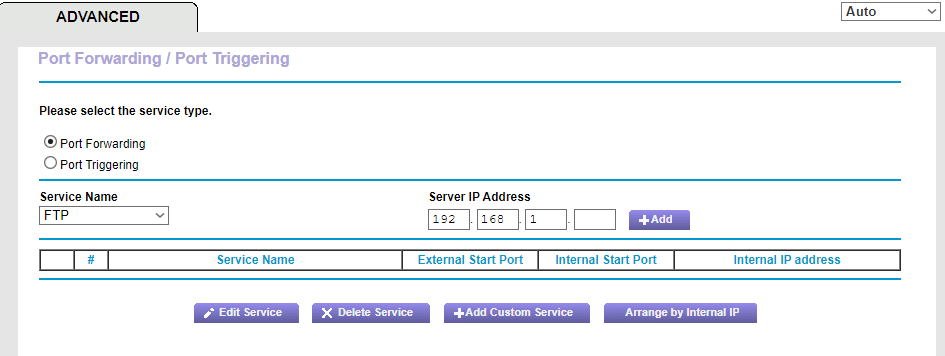
Let's get an understanding of what's here before we continue...
We will select between Forwarding and Triggering. Since we don't need to trigger a port we will focus only on Forwarding it.
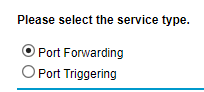
There are many types of services that might be precompiled in your router.
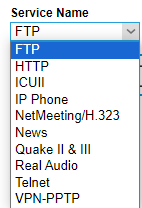
For our Ragnarok Online server will be making a custom service. It's not as hard as it sounds, don't worry!
The device IP we want to connect is a little different. It has to be exactly what device you have the server under.
Let's navigate to the device list on the router. This will be under the "basic" settings, usually.
It shows here I have 3 devices listed. An Amazon Fire stick, My cell phone and a PC I built specifcally for this guide. That's exactly what we are looking for, too!
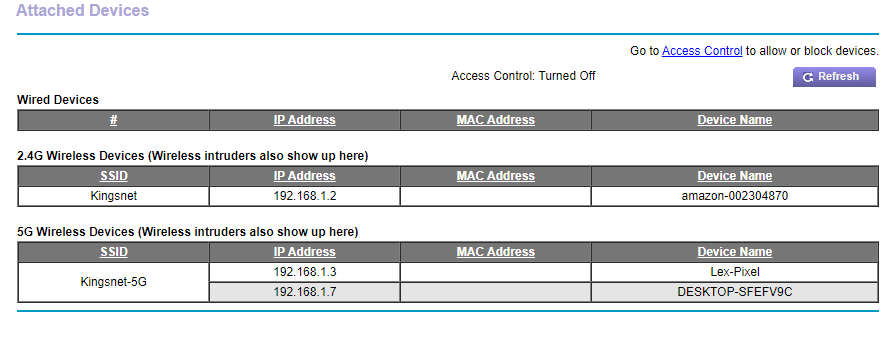
It looks like the device I am forwarding resides under the IP ending with 7.

Okay, so we now understand where the ports are going to and waht device has them. So it's time to make that custom service we spoke of earlier.
This interface has a button, making it very convenient to start. We're going to go ahead and click the "Add Custom Service" button.
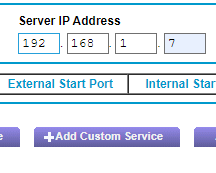
With the custom port window we can now add our ports for Ragnarok to run. We will need to process this 1 number of times as we have more than one port for Ragnarok Online services.
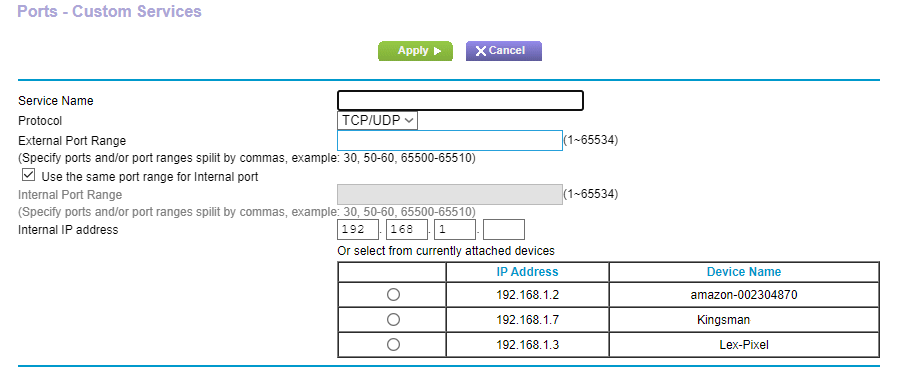
The ports we need to add are:
3306, 6900, 5121, 6121, 8888Make sure to select the proper device for it to work as we want it to.
After they are all applied, it will represent something similar to this:
That's it! Your ports are now open & ready for users to connect through to. Make sure firewalls are enabled at all times.
STEP TWO: Automatic Server Backups (World Runner)
o3.2.0
This script will automatically save your server to your server_backup folder every 24 hours. This time is completely adjustable in time and destination. I originally made this for Minecraft hence the name World Runner.
Open the terminal and enter in the command:
sudo nano /etc/systemd/system/worldrunner.serviceThis will create a service script we will set to run on start up. Inside this document we are going to add int the following script and change the destination values to match our back up folder destination:
[Unit]
Description=This will copy the Server folder to a back-up location

[Service]
Restart=always
RuntimeMaxSec=1d
User=raguser

ExecStart=cp -r /home/raguser/Server/rAthena /var/www/raguser/Documents/server_backups/

RemainAfterExit=yes

[Install]
WantedBy=multi-user.target
Now we want to enable it on start-up:
sudo systemctl enable worldrunnerIf you're having issues with it executing properly we can simply grant permissions to the file to do so:
sudo chmod 600 /etc/systemd/system/worldrunner.serviceWe now have the trunk backing up now, but what about the SQL server?
For that we need to edit a default file structure in Ubuntu called Cron. Cron can hold automated tasks on a timer, or schedule, just like what we want to do for backing up MySQL.
Enter in the terminal:
sudo nano /etc/crontabYou'll be presented with a window simial to this:
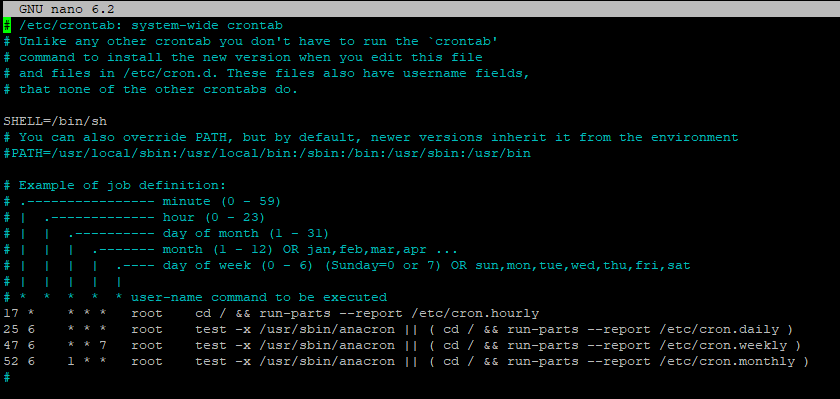
As you can see here they are displaying each value for the job. First digits represents Minutes and the second digits represents Hours. These are the two we'll primarily need for daily backups to occur. At the very bottom we are going to add the following line: (NOTE: Include your password after the -p. My password is "69SuperStrongPass69" so the password section will look like -p69SuperStrongPass69 )
0 0 * * * root mysqldump -u raguser -p69SuperStrongPass69 --all-databases | gzip > /home/raguser/Documents/Rag_SQL/ragserver_`date +%d%m%Y-%H:%M:%S`.sql.gzThis will set the back up time to be at Midnight each night using the PMA login we set up earlier, backing up our ragserver database into a zip file at the directory ~/Documents/Rag_SQL.
NOTE: Avoid use of these symbols in the password field:
) ( ' `
Finally we need to restart the service for it to take effect:
sudo /etc/init.d/cron restartThat's all there is to it!
Keep up to date with the latest changes & updates to this guide.
Want to see something included? Suggest it below!
Edited by RiversText edits
Link to comment
Share on other sites
Top Posters For This Question
38
18
5
3
Popular Days
Jan 14
11
Jan 9
8
Jan 10
8
Jan 12
5
Top Posters For This Question
Rivers 38 posts
HampasLupa 18 posts
Piamette 5 posts
Faiz 3 posts
Popular Days
Jan 14 2024
11 posts
Jan 9 2024
8 posts
Jan 10 2024
8 posts
Jan 12 2024
5 posts
Popular Posts
Rivers
In this section we are going to go through the steps to getting you set up with your very own server computer to run Ragnarok Online (and other games). Requirements : A Computer with
Rivers
Sorry, my mistake. You must enter the domain name you got here. That would be that happyragnarok.wuaze.com domain in that box.
Rivers
STEP SIX: DNS. (Mask your IP) i1.6.0 will help you through this step. Inside are details for eachs tep to masking your IP. If you need your IP address (IPv4) search on google "What's my IP" a
Posted Images
71 answers to this question
Recommended Posts
Join the conversation
You can post now and register later. If you have an account, sign in now to post with your account.