


someoneloveyou
-
Posts
31 -
Joined
-
Last visited
Content Type
Profiles
Forums
Downloads
Jobs Available
Server Database
Third-Party Services
Top Guides
Store
Posts posted by someoneloveyou
-
-
hello, I get a little problem about the number of players who can log in when choosing a char, when the player has reached 100 players who want to log in an error occurs, a rejected from server pop up appears.
-
On 2/22/2023 at 3:45 PM, Styx15 said:
i test and still can abuse unlimited reclaim ..helpppp....
try to change it in your database using phpmyadmin
reward_logs > structure > change last_ip
Change last_ip type and value become Type 'Varchar' Value '15'
and change this 'ragnarok_db' to your ragnarok db
query_sql "DELETE FROM `ragnarok_db`.`reward_codes` WHERE `promo` = '" + escape_sql(.@dcode$) + "'";
query_sql "DELETE FROM `ragnarok_db`.`reward_logs` WHERE `code` = '" + escape_sql(.@dcode$) + "'";
-
hi all, i have urgent, i cant warp to other map after @mapexit and restart the server anyone can help ?
-
On 6/30/2020 at 11:37 AM, LearningRO said:
Hi, I try to change Max Storage for VIP 800
and Normal account 600
and this is my setting
core.hpp
#ifdef VIP_ENABLE
	#define MIN_STORAGE 600 // Default number of storage slots. I increase this from 300 to 600 for make normal account have 600 slot and VIP 800
mmo.hpp
#define MAX_STORAGE 800 ///Max number of storage slots a player can have
Battle.cpp
#ifdef VIP_ENABLE
	{ "vip_storage_increase",               &battle_config.vip_storage_increase,          100,      0,      MAX_STORAGE-MIN_STORAGE, },
#else
	{ "vip_storage_increase",               &battle_config.vip_storage_increase,          300,      0,      MAX_STORAGE, },
I change into 100 from 300 coz I'll get warning when use @reloadbattleconf
warning like this][Warning]: Value for setting 'vip_storage_increase': 300 is invalid (min:0 max:200)! Defaulting to 100...
and last setting
on import/battle.com
// Storage slot increase. Setting to 0 will disable.
// Give more storage slots above the MIN_STORAGE limit.
// Note: MIN_STORAGE + vip_storage_increase cannot exceed MAX_STORAGE.
// Default: 300
vip_storage_increase: 100
My Issue is about the warning when try to use @reloadbattleconf
and the warning always said my value its 300 not 100(see my battle.conf)
did i miss some step??
maybe you miss in player.conf and change this
vip_storage_increase: 300 become vip_storage_increase: 200 -
may this can help you
bonus2 bDropAddRace,RC_All,10; // 10 is 10% you can change it -
On 10/6/2023 at 10:11 PM, millu said:
its no run, see my post about yml x mysql
the problem is i use ubuntu
-
hello, i try to import database in yaml but got this error after i run
./yaml2sql.bat: line 1: @ECHO: command not found
./yaml2sql.bat: line 2: CALL: command not found
i run in ubuntu, anyone can suggest me alternative or fix that issue ?
-
On 3/15/2022 at 7:12 AM, WhiteGoblin said:
[ Creating an Open-source Ragnarok Online Server with kRO & OpenKore Support ]
[ Table Of Contents ]- Introduction
- Master List: All The Required Downloads
- Microsoft Visual Studio 2022: Installation
- Laragon: Installing and Upgrading
- rAthena: Installing, Configuring, and Optimizing
- Flux Control Panel: Installing and Modifying
- The kRO Client: Updating, Diffing, Hexing, Translating, and Customizing
- The OpenKore Client: Packet Extraction, Configuration, and Field Updating
- Logging Into Your Server, Making a GM Account, and Playing!
- Troubleshooting The Situation
- Packaging It Up For Transportation
- Post Install House Cleaning
- Conclusion
[ Introduction ]
I'd like to walk you through the complete process of creating an up-to-date open-source server for Ragnarok Online using rAthena. This includes removing all of its security so that it can be accessed via multiple clients. Next, we'll install a web management control panel that users can create accounts on, submit tickets with, even research your servers’ unique stats and databases. Afterwards we're going to transform the latest official Korean client by diffing, hexing, translating, & heavily customizing it. Finally, we're going to configure the OpenKore client to work with our server. As well support interfacing with the official client through proxy.
We're going to be using the same packet structure across all aspects so that they can properly communicate with each other. This was selected by researching what the last fully developed version was for OpenKore. (2020-04-01b) Since this is running primarily open-source software, it slowly gets better overtime. This is actually ahead of the International Servers and many other countries not only in features but content. I've included the full process so that anyone can take the next or a different set of packets and reproduce these results. This is also completely portable. Ends with one folder, drag and drop. All software included is free, there is zero piracy endorsed.
[ Master List: All The Required Downloads ] [ 3.8GB ]
Compiling and Editing:
01.) Microsoft Visual Studio (link)
02.) Notepad++ (link)
Databases and Webserver:
03.) Laragon Portable (link)
04.) MariaDB Server 10.7.3 (link)
05.) PHP 7.4.28 (non thread safe) (link)
06.) Nginx 1.21.6 Mainline (link)
07.) HeidiSQL 11.3 (64 portable) (link)
Server Emulator and Web Management:
08.) rAthena (link)
09.) Flux Control Panel: (link)
Official Client:
10.) kRO (v20210406) (link)
11.) 2020-04-01bRagexe (link)
12.) ROenglishRE (link)
13.) RO Patcher Lite (link)
14.) RO OpenSetup (link)
15.) Nemo (link)
OpenKore Client:
16.) OpenKore (link)
17.) Winsock Packet Editor (link) (password: openkore)
Troubleshooting:
18.) Visual C++ Redistributable Runtimes All-in-One (link)
[ Microsoft Visual Studio 2022: Installation ] [ 7.62GB ]
01.) Execute "VisualStudioSetup.exe". (let it update)
02.) At the install screen, scroll down to the "Desktop & Mobile" section.
03.) Checkmark "Desktop development with C++".
04.) Then look on the right side under "Installation details", go to the "Optional" section.
05.) Uncheck "Just-In-Time debugger". (this will remove Live Share as well)
06.) Uncheck "C++ profiling tools".
07.) Uncheck "C++ CMake tools for Windows".
08.) Uncheck "C++ ATL for latest v143 build tools (x86 x64)".
09.) Uncheck "Test Adapter for Boost.Test".
10.) Uncheck "Test Adapter for Google Test".
11.) Uncheck "IntelliCode".
12.) Uncheck "C++ AddressSanitizer".
13.) Click Install. (in bottom right)
Note: Wow! Even stripped down, this is a massive 7.62GB installation. Depending on how you access the internet this might take a while. Also, consider how far into the future you are from the time of this post. The install size will be different given it's continually updated. Feel free to move on while this is running in the background. You won't actually need to compile anything until you reach Step 14 of the rAthena section.
14.) Install Notepad++ (execute npp.8.3.2.Installer.x64)
Note: Moving forward, I highly suggest using Notepad++ to create and edit files. Primarily so you can get a line count without needing to boot all of Visual Studio. This is a clean and lightweight solution.
[ Laragon: Installing and Upgrading ]
01.) Extract Laragon Portable.
02.) Delete "php-5.4.9-nts-Win32-VC9-x86" from "\laragon\bin\php".
03.) Extract "php-7.4.28-nts-Win32-vc15-x64" as a folder into "\laragon\bin\php".
04.) Delete "mysql-5.1.72-win32" from "\laragon\bin\mysql".
05.) Extract "mariadb-10.7.3-winx64" as a folder into "\laragon\bin\mysql".
06.) Delete "nginx-1.14.0" from "\laragon\bin\nginx".
07.) Extract "nginx-1.21.6" as a folder into "\laragon\bin\nginx".
08.) Delete all the contents of "\laragon\bin\heidisql".
09.) Extract "HeidiSQL_11.3_64_Portable" directly into "\laragon\bin\heidisql".
10.) Open Laragon. Click Start All.
11.) Grant MariaDB and Nginx firewall permissions when prompted.
12.) Close Laragon window, do not exit the program. Don't worry it's still running in your system tray.
[ rAthena: Installing, Configuring, and Optimizing ]
01.) Extract rAthena.
02.) Go to "\rathena\conf". Rename the "import-tmpl" folder to "import".
03.) Open: "\rathena\conf\import\char_conf.txt", add:// Server Communication username and password. userid: supercool passwd: coolsuper server_name: GoblinRO // Login Server IP // The character server connects to the login server using this IP address. // NOTE: This is useful when you are running behind a firewall or are on // a machine with multiple interfaces. login_ip: 127.0.0.1 // Character Server IP // The IP address which clients will use to connect. // Set this to what your server's public IP address is. char_ip: 192.168.1.130 // Starting point for new characters. start_point: iz_int,18,26 // Amount of time in seconds by which the character deletion is delayed. char_del_delay: 10 // Restrict character deletion by email address or birthdate. char_del_option: 1 // Restrict character deletion as long as he is still in a party or guild. char_del_restriction: 0 // Pincode system pincode_enabled: noNote: You're going to want to enter your own userid/passwd, server name, and server IP. (wan if going off network)
04.) Open: "\rathena\conf\import\inter_conf.txt", add: "use_sql_db: yes"
05.) Open: "\rathena\conf\import\log_conf.txt", add:// log_filter: 1 = logs ANY items log_filter: 1 // log_chat: 63 = logs everything log_chat: 6306.) Open: "\rathena\conf\import\login_conf.txt", add:
// Can you use _M/_F to make new accounts on the server?
// Note: This only works if client side password encryption is not enabled.
new_account: yes

// Ipban features
ipban_enable: no
07.) Open: "\rathena\conf\import\map_conf.txt", add:
// Server Communication username and password.
userid: supercool
passwd: coolsuper

// Character Server IP
// The map server connects to the character server using this IP address.
// NOTE: This is useful when you are running behind a firewall or are on
// a machine with multiple interfaces.
char_ip: 127.0.0.1

// Map Server IP
// The IP address which clients will use to connect.
// Set this to what your server's public IP address is.
map_ip: 192.168.1.130
Note: You're going to want to enter the same userid/passwd and IP used in char_conf.txt.
08.) Open: "\rathena\conf\import\packet_conf.txt", add:// IP rules // allow : Accepts connections from the ip range (even if flagged as DDoS) allow: 127.0.0.1 allow: 192.168.0.0/16Note: Change to match your network setup.
09.) Open: "\rathena\src\config\packets.hpp". Comment out lines: 44-62. (packet obfuscation)
10.) Open: "\rathena\src\custom\defines_pre.hpp". Line 12 add: "#define PACKETVER 20200401".
11.) Open: "\rathena\npc\re\warps\cities\izlude.txt". Comment out lines: 39-54.
12.) Open: "\rathena\npc\re\warps\fields\prontera_fild.txt". Comment out lines: 94-113.
Note: Why are removing these warps important? So these are the novice start areas to the game. Like any MMORPG these were the most populated maps 24/7/365. It got to the point where they became overflooded not just by new players but bots. You'd wonder around trying to find something to kill that wasn't already taken, to the point leveling actually became a nightmare. So what they did was implement multiple instances of the same maps. Putting players in different load balanced instances allowed everybody to breath and comfortably start the game with some people but not to many.
Though this had some downsides. Let's say you just started new characters so you could play with your friends. You might be loaded into prt_fild08a while your friends were loaded into b and c. Meaning there is zero crossover, you're all in your own unique world. You can't see each other, the monsters spawn differently, and that fun starting the game together experience is gone. Given we're setting up a small server here, there is no point in having multiple instances. So we're removing the extras and specifying a singular starting area.
13.) Create a new "compile.bat" file inside "\rathena" that contains:@echo off "C:\Program Files\Microsoft Visual Studio\2022\Community\Msbuild\Current\Bin\MSBuild.exe" -m pauseNote: Your install location might be different. Adjust accordingly.
14.) Execute compile.bat. Wait for it to finish. Check to make sure it's error free at the end.
15.) Convert all data files to SQL so you can use MariaDB via running "\rathena\yaml2sql.bat". (you will have to confirm with "Y" ten times during this process)
16.) Open "\rathena\sql-files", delete the following:item_db.sql item_db_equip.sql item_db_etc.sql item_db_usable.sql item_db2.sql mob_db.sql mob_db2.sql mob_skill_db.sql mob_skill_db2.sql readme.md17.) Open "\rathena\sql-files\compatibility" and move "item_db_re_compat.sql" and "item_db2_re_compat.sql" up one level to "\rathena\sql-files". You should now have 16 files (not including folders) inside "\rathena\sql-files".
18.) Open Laragon. Click Database. Click New. (bottom left)
19.) Under "Session Name", change "Unnamed" to "Laragon". Then click "Open".
20.) Click "manage user authentication and privileges" in the top bar.
21.) Click "Add". Change username to "ragnarok". Change password to "ragnarok". Checkmark the "Global Privileges" box. Click Save. Click Close.
22.) Right click "Laragon" in the top of the left column. Expand "Create new". Click "Database". Enter name "ragnarok". Click OK.
23.) Click "ragnarok" in the left column. Go to "File" in the top left. Expand and click "Run SQL File". Direct to "\rathena\sql-files\". Select all 16 .sql files. Click Open. Confirm auto-detect. (let finish)
24.) Click "refresh" in the top bar. (next to manage user authentication and privileges)
25.) Expand the "ragnarok" database in the left column. Click "login" which will bring it up on the right. Click the "data" tab.
26.) Change the account's userid and user_pass to match the server communication username and password created back in step 3.
27.) Close these windows. Get back to having Laragon running in your system tray.
28.) Open "kRO_FullClient_20210406.zip", extract "msvcr110.dll" into "\rathena".
29.) Go to "\rathena", execute "runserver.bat". Three consoles: the login, character, and map servers are going to open.
30.) As each part comes online you'll need to grant it firewall access.
Note: We're spinning up the server to make sure we're good before moving on. You should see all green status updates.
Note: If you plan on including WAN clients, then you'll need to open the: 5121, 6121, 6900, & 80 ports on your network firewall / router. Please consider this a large security risk! The scope of this document does not include properly securing an exposed server. Proceed with caution.
[ Flux Control Panel: Installing and Modifying ]
01.) Extract FluxCP into "\laragon\www" make sure it's the actual root contents and not just the folder that contains them. (replace index.php)
02.) Open "\laragon\www\config\application.php".
03.) Line 6: delete BaseURI. EX: 'fluxcp', becomes '',
04.) Line 7: change your Installer Password. EX: "secretpassword" becomes "supersecretpassword".
05.) Line 43: change MinPasswordLength to 6.
06.) Line 45: change PasswordMinUpper to 0.
07.) Line 46: change PasswordMinLower to 0.
08.) Line 47: change PasswordMinNumber to 0.
09.) Line 49: change GMMinPasswordLength to 6.
10.) Line 50: change GMPasswordMinUpper to 0.
11.) Line 51: change GMPasswordMinLower to 0.
12.) Line 52: change GMPasswordMinNumber to 0.
13.) Line 53: change GMPasswordMinSymbol to 0.
14.) Line 54: change RandomPasswordLength to 6.
15.) Line 60: change PincodeEnabled to false.
16.) Line 78: change ShowCopyright to false.
17.) Line 82: change UseCaptcha to false.
18.) Line 99: change AcceptDonations to false.
19.) Line 220: change CMSNewsType to 2. (this adds rAthena news) (not required)
20.) Line 225: change CMSNewsLimit to 2. (two articles fits the new layout well)
21.) Line 233: change SDEnableCreditRewards to false.
22.) Comment out lines 251 - 260. (removes fluff from web navigation)
23.) Comment out lines 269 - 272. (removes donations from web navigation)
24.) Comment out lines 288 - 291. (removes social media from web navigation)
25.) Comment out line 305. (removes send email button)
26.) Comment out line 307. (removes cash shop button)
27.) Comment out lines 329-331. (removes transfer credits and cart)
28.) Comment out line 348. (removes cash points)
29.) Comment out line 360. (removes paypal)
30.) Comment out lines 376 - 380. (removes donations)
31.) Save and close file.
32.) Open Laragon. Click Database. Click "Open" in the new window. Click "manage user authentication and privileges" in the top bar.
33.) Click "Add". Change username to "fluxcpuser". Change password to "fluxcppass". Checkmark the "Global Privileges" box. Click Save. Click Close. Close database window.
34.) Open "\laragon\www\config\servers.php".
35.) Line 7: change your Server Name to something friendly. EX: "FluxRO" becomes "GoblinRO".
36.) Line 17: change your Username from "ragnarok" to "fluxcpuser".
37.) Line 18: change your Password from "ragnarok" to "fluxcppass".
38.) Line 38: change your Username from "ragnarok" to "fluxcpuser".
39.) Line 39: change your Password from "ragnarok" to "fluxcppass".
40.) Line 55: change your Server Name to the new one from Line 7.
41.) Save and close file.
42.) Open Laragon. Click Menu. Expand PHP. Expand Extensions. Click tidy.
43.) Click Menu. Expand Nginx. Expand sites-enabled. Click 00-default.conf.
44.) Line 9: change "127.0.0.1;" to "all;". Save file. Close file.
45.) Open Laragon. Click "Reload" on the Nginx line next to the open port (80).
46.) Click Web. The installer should now pop-up in your browser.
47.) Enter your installer password changed in Step 4. Click Authenticate.
48.) Click "Install or Update Everything". (it's in bold) Confirm process.
49.) Once the new site pops up, change the URL from localhost to the IP address of the machine hosting the server. Press enter.
50.) Confirm it works and bookmark this page as it's your new control panel, ticket system, and server information tool. (you can click around for fun if you like)
Note: You can login via any account on the server or make a new one! During account creation a working email address is NOT required but input of one is. ([email protected], etc.) Accounts flagged as GM in the database will have Admin access in the control panel.
[ The kRO Client: Updating, Diffing, Hexing, Translating, and Customizing ]
01.) Extract kRO_FullClient_20210406.
02.) Extract RO Patcher Lite into "\client".
03.) Execute "rsu-kro-rag-lite-x64.exe" and wait for it to finish updating the client.
04.) Extract RO OpenSetup into "\client".
05.) Extract ROenglishRE.
06.) Open "ROenglishRE\Renewal". Copy everything into "\client". (override already present files)
07.) Open "ROenglishRE\Client Support\Renewal\2020-09". Copy "data" folder into "\client". (override as well)
08.) Extract Nemo. Execute "NEMO.exe".
09.) Look for "Input Exe File" at the bottom. Click "Browse". Direct towards "2020-04-01bRagexe.exe".
10.) Look for "Output Patched" at the bottom. Click "Browse". Direct towards "\client\2020-04-01bRagexe_patched.exe".
11.) Create a new "profile.log" file (any location) that contains:3 Chat Flood Remove Limit 9 Disable 1rag1 type parameters (Recommended) 14 Disable Hallucination Wavy Screen (Recommended) 16 Disable Swear Filter 20 Extend Chat Box 21 Extend Chat Room Box 22 Extend PM Box 23 Enable /who command (Recommended) 24 Fix Camera Angles (Recommended) 32 Increase Zoom Out Max 34 Enable /showname (Recommended) 35 Read Data Folder First 36 Read msgstringtable.txt (Recommended) 38 Remove Gravity Ads (Recommended) 39 Remove Gravity Logo (Recommended) 41 Disable Nagle Algorithm (Recommended) 44 Translate Client (Recommended) 46 Use Normal Guild Brackets (Recommended) 47 Use Ragnarok Icon 48 Use Plain Text Descriptions (Recommended) 49 Enable Multiple GRFs (Recommended) 50 Skip License Screen 53 Use Ascii on All LangTypes (Recommended) 64 @ Bug Fix (Recommended) 65 Load Custom lua file instead of iteminfo*.lub (Recommended) 73 Remove Hourly Announce (Recommended) 74 Increase Screenshot Quality 84 Remove Serial Display (Recommended) 88 Allow space in guild name 90 Enable DNS Support (Recommended) 91 Disconnect to Login Window 213 Disable Help Message on Login (Recommended) 215 Increase Map Quality 216 Hide Cash Shop 226 Disable Walk To Delay. 230 Always load Korea ExternalSettings lua file (Recommended) 231 Remove hardcoded address/port (Recommended) 232 Restore old login packet (Recommended) 233 Hide SNS Button 242 Disable kRO Site Launch 244 Disable Cheat Defender Game Guard (Recommended) 248 Remove wrong chars from cash shop 253 Skip some hidden menu icon buttons 270 Change AchievementList*.lub path 272 Change Towninfo*.lub path 273 Change PetEvolutionCln*.lub path 274 Change Tipbox*.lub path 275 Change CheckAttendance*.lub path 276 Change OngoingQuestInfoList*.lub path 277 Change RecommendedQuestInfoList*.lub path 278 Change PrivateAirplane*.lub path 279 Fix item description bug 284 Copy patched Cheat Defender Game Guard 289 Fix Homunculus attack AI 313 Change MapInfo*.lub path 322 Case-Insensitive Storage Search 323 Restore Songs Effect 326 Disable OTP Login Packet (Recommended) 328 Enable 44.1 kHz Audio Sampling Frequency 334 Remove Hardcoded HTTP IP 338 Additional client validation (Recommended) 347 Disable OS Privileges execution level 348 Send client flags to server (Recommended) 351 Translate arrows buttons text from korean to english 362 Fixes the Korean Job name issue with LangType (Recommended) 399 Set high priority class for active client 400 Set normal priority class for inactive client 404 Use borderless mode in full screen (Recommended) 416 Fix Tetra Vortex 427 Check is servertype in xml file was set to correct value (Recommended)12.) Click the "Load Client" button at the bottom.
13.) Click the "Load Profile" button to the right of it. Select and open the "profile.log" file just created.
14.) Some modifications require input. As each prompt appears, edit them as follows:DATA.INI System/itemInfo_EN.lua 100 System\achievement_list_EN.lub System/Towninfo_EN.lub System\PetEvolutionCln_true_E.lub System/tipbox_EN.lub System/CheckAttendance_EN.lub System\OngoingQuestInfoList_True_EN System\RecommendedQuestInfoList_True_EN System\PrivateAirplane_T_EN.lub System\mapInfo_true_EN.lub Using wrong servertype in clientinfo/sclientinfo xml. Please change servertype to correct one.Note: You'll notice how two of them don't ask for a file extension, which is why we leave it off. That is not erroneous.
15.) You should have 70 enabled patches when finished. Click "Apply Selected". Close Nemo.
16.) Clean up the "\client" directory by deleting the following no longer required files:\AI_sakray \AuthModuleCache \client \db \doc \HShield \PatchClient 2020-04-01bRagexe_patched.exe.db 2020-04-01bRagexe_patched.exe.txt 2020-04-01bRagexe_patched.exe.secure.txt aossdk.dll ASPLnchr.exe bz32ex.dll CDResFileList.dat dbghelp.dll FORMAT.CFG GameGuard.des IFU13.inf IFU19.inf IFU7A.inf IFUEC.inf Init.exe KOR_LANG.CFG lua.exe mirrors.json NPCHK.DLL NPCIPHER.DLL npkcrypt.dll npkcrypt.sys npkcrypt.vxd npkcusb.sys npkeysdk.dll npkpdb.dll NPPSK.DLL NPSCAN.DES npupdate.dll NPUPDATE0.DLL NPX.DLL opensetup.ini.sample Patch.inf patchRE.inf Patchup.exe Patchup_RE.exe Ragexe.exe RagexeRE.exe RagHash.dat RagnarokKR.inf rsu-kro-rag-lite.exe rsu-kro-rag-lite.ini rsu-kro-renewal-lite.exe rsu-kro-renewal-lite.ini SavePath_Rag.exe SavePath_Sak.exe Setup.exe suipre.dll supdate.log v3hunt.dllNote: This should leave you with 58 files inside "\client". (8 folders + 50 misc)
17.) Go to "\client\data". Open "clientinfo.xml". Change it too:<?xml version="1.0" encoding="euc-kr" ?> <clientinfo> <desc>Ragnarok Client Information</desc> <servicetype>korea</servicetype> <servertype>primary</servertype> <connection> <display>GoblinRO</display> <address>192.168.1.130</address> <port>6900</port> <version>55</version> <langtype>0</langtype> </connection> <connection> <display>OpenKore</display> <address>127.0.0.1</address> <port>6901</port> <version>55</version> <langtype>0</langtype> </connection> </clientinfo>
Note: Inside the first <connection> block, change the <display> name and <address> to match your server. If WAN, you can use services like No-IP.
18.) Go to "\client". Execute "opensetup.exe". (decline Telemetry prompt) Change the options to match your wants and needs. (graphics device, resolution, etc)
Note: I personally like 1280x720 when playing in a window. Specifically while using X-Kore which we'll cover later.
[ The OpenKore Client: Packet Extraction, Configuration, and Field Updating ] [ Best Client ]
Note: Steps 1 and 2 are educational. Worth learning but can be skipped as I've already done this for you.
01.) Extract Winsock Packet Editor (WPE). Allow the executable if Windows Defender or your anti-virus software flags it.
02.) Using "WPE PRO - modified.exe" follow the Openkore Wiki Connectivity Guide to obtain master version and version number. (screenshot)
03.) Extract OpenKore.
04.) Go to "\openkore\tables" then open "servers.txt". Find "[Localhost]" towards the bottom. Replace with:[Localhost] ip 192.168.1.130 port 6900 private 1 master_version 0 version 128 charBlockSize 155 serverType kRO_RagexeRE_2020_04_01b serverEncoding Western addTableFolders kRO/RagexeRE_2020_04_01b;translated/kRO_english;kRONote: Change the IP address to match your server. If WAN, you can use services like No-IP.
05.) Go to "\openkore\fields". You'll notice inside are a number of folders labelled by episode number. You're going to want to take all the files out of each of these episodic folders and move them up a directory. Overriding the ones currently in your "\openkore\fields" folder.
Note: We're doing this so that the bot can understand the map layouts of the newer content. The rAthena emulator is always improving but currently at the time of posting goes all the way to Episode 18. You might notice the bot is currently only developed up to Episode 17.1. If you play that far then you'll probably have a good idea on making the bot work in uncharted waters. For now, don't worry about it one bit. You're good for a loooooong time. Hell they'll probably have it included by the time you make it there.
[ Logging Into Your Server, Making a GM Account, and Playing! ]
Note: Even if you want to go straight to using OpenKore, we're going to use the kRO client to finish off the server and make our first accounts. While these steps can be done in OpenKore, it's easier to just follow along using a visual interface for now. If you've picked this project up at a later date, then make sure you've started the rAthena servers. (go to "\rathena", execute "runserver.bat")
Using the kRO Client:
01.) Go to "\client" and execute "2020-04-01bRagexe_patched.exe".
02.) Select "GoblinRO" when prompted. (the server name you entered previously)
03.) At the login screen type "admin_M" to make a new account on the server. You need to enter a 6+ digit password as well. (123456)
Note: The first account is always a GM account. This has a different set of sprites used that are not compatible with actually wanting to play the game. They look cool because on the off chance you actually crossed one it needed to be unique. Generally you only saw one if you were about to get banned for botting or hacking so it was quite the event to casually see an admin. LOL!
04.) Make a new character you're going to use to pwn rule breakers. Once in game, hit escape, then click "exit to windows".
05.) Open Laragon. Click Database. Click "Open" in the new window.
06.) Expand the "ragnarok" database. Click "login" again like we did in Step 25 of setting up rAthena. Click the "data" tab.
07.) Look for the newly created admin account under the server account. Change it's "group_id" to 99. (now has full GM powers)
08.) Close these windows. Go back to having Laragon running in your system tray.
09.) Once again head to "\client" and execute "2020-04-01bRagexe_patched.exe".
10.) At the login screen let's make a real account to actually play on. Once again, "yourname_M" or "yourname_F" (male or female) to make a new account on the server.
Note: The sex you select here is only used for account management and does not effect the sex of your characters you make in game. It's pretty much pointless.
11.) Spend extra time picking the right hair style, color, sex, and race. This is your new character!!
12.) Play the game!
Note: Future logins do not require the _M or _F after your account name. This is only done the first time to register a new account on the server from inside the client. You can also register accounts with the Flux Control Panel if you like. If you ever want to delete a character, it'll ask you for your email address as a security check to confirm. Accounts created in client automatically get registered with "[email protected]" as their email address in the database.
Using the OpenKore Client:
01.) Go to "\openkore\control". Open "config.txt".
02.) Line 6: add "Localhost".
03.) Line 7: add "0".
04.) Line 8: add "Goblin". (your username) (do not add _M or _F)
05.) Line 9: add "123456". (your password)
06.) Line 11: add "0". (number / position of your character)
07.) Save file.
08.) Go to "\openkore" and execute "wxstart.exe". (wait for it to process maps and finish loading)
09.) Play the game!
Note: OpenKore does not currently support the new character start maps. It'll just throw errors in the console about not being able to navigate. Use the kRO client to at least get out of the introduction area. You can walk directly through the beginning and board the ship to Izlude. It's not required to interact with anything if you don't want to. There is stuff to do though, up to you.
Using OpenKore inside kRO via X-Kore:
01.) Go to "\openkore\control". Open "config.txt".
02.) Line 23: change "0" to "3".
03.) Line 30: change "ragexe.exe" to "2020-04-01bRagexe_patched".
04.) Save file.
05.) Go to "\openkore" and execute "wxstart.exe". (wait for it to finish loading)
06.) Go to "\client" and execute "2020-04-01bRagexe_patched.exe".
07.) Select "OpenKore" when prompted.
08.) Login via your normal username and password for the account.
09.) Select your character at the next screen.
10.) Play the game with two clients at once!
Note: I highly suggest running kRO in windowed mode for ease of use. This way you can bounce back and forth between the clients effortlessly. You do not need to keep the kRO or OpenKore windows as a focused priority. You can literally open other applications on top of both without any pause to the botting. You'll hear it in the background still playing the game while you're reading the wiki, checking email, or just doing whatever you please.
[ Troubleshooting The Situation ]
Note: Having an odd problem loading software at any point? Getting an error and not sure why? I'm not sure why either so give this a whirl.
01.) Extract "Visual-C-Runtimes-All-in-One-Feb-2022.zip"
02.) Execute "install_all.bat".
03.) Wait for it to finish.
04.) ??? Try Again ???
05.) Probably Success.
[ Packaging It Up For Transportation ]
01.) Make a new folder called "GoblinRO". (or whatever you like)
02.) Place your "\laragon", "\rathena", "\client", & "\openkore" folders inside it.
03.) Make a new folder inside called "troubleshooting".
04.) Copy "Visual-C-Runtimes-All-in-One-Feb-2022.zip" into "\troubleshooting".
05.) Compress your "GoblinRO" folder. (zip/rar)
Note: Transportation or not, I suggest you make a backup like this once you're finished. Always a good idea! Also compressing it greatly helps transfer times to things like USB drives or across networks. Not only is the file size reduced from around 5.5GB to 3.9GB but the fact that it doesn't have to work with the insane amount of small files present is a life saver. Remember you can always just extract the /client or /openkore folder if you're on computers that aren't running the server.
[ Post Install House Cleaning ]
01.) Delete the Master List of downloaded files required for install. (18 files, 3.8GB)
02.) Uninstall Microsoft Visual Studio 2022 Community Edition. (7.62GB)
Note: You will lose your ability to compile the server again if you make future changes.
[ Conclusion ]
Alright! Way to make it to the end! I spent a week constructing this. Across that time, I reached out to a lot of the related discord servers and forums. Mainly making sure my instructions were correct and up to date. At most stops I was met with silence then a private message with a price tag. Anywhere from $10-100 an hour, just for their working knowledge of an old MMORPG. For truly custom work I do understand it, but for basics? It really only motivated me more to put this out.
I'd like to help remove the ridiculous paywall that has slowly started to surround this information. Sure, this has been a deep dive into an esoteric world. This game is over twenty years old at this point. Though it saddens me to see information omitted or even removed in order to sell it back to people as a service. I think that's not only harmful but gating something we have all enjoyed for decades. This is just information, there is nothing deserving of your currency. Everyone should be able to do this, for free.
I hope you have found this both helpful and educational! Feel free to translate into your local language and distribute. I have done three trial runs across different machines and have not had a problem. If you're experiencing issues check that you haven't missed a step. Need support? Check the forum, wiki, github, and discord for both rAthena and OpenKore. Still can't find a solution? Post here! I cannot guarantee a timely response but I will check back in occasionally and try to help out as much as I can. Thanks for reading! /cheersgot error like this, did you knew why ?
-
after i change client become 2022 client got this error, anyone can help me about this section ?

-
4 hours ago, Chaos92 said:
https://github.com/llchrisll/ROenglishRE/pull/53/files
I read about this a few minutes ago, maybe related to your issue, try to disable that 2 line.3 hours ago, iostream said:take a look here.
now is work fine, thank you so much all u help me full
-
1 minute ago, Chaos92 said:
this is weapontable error. did u edit weapontable then since u use Chris Translation ?
nope, i dont edit anything, this default by chris
-
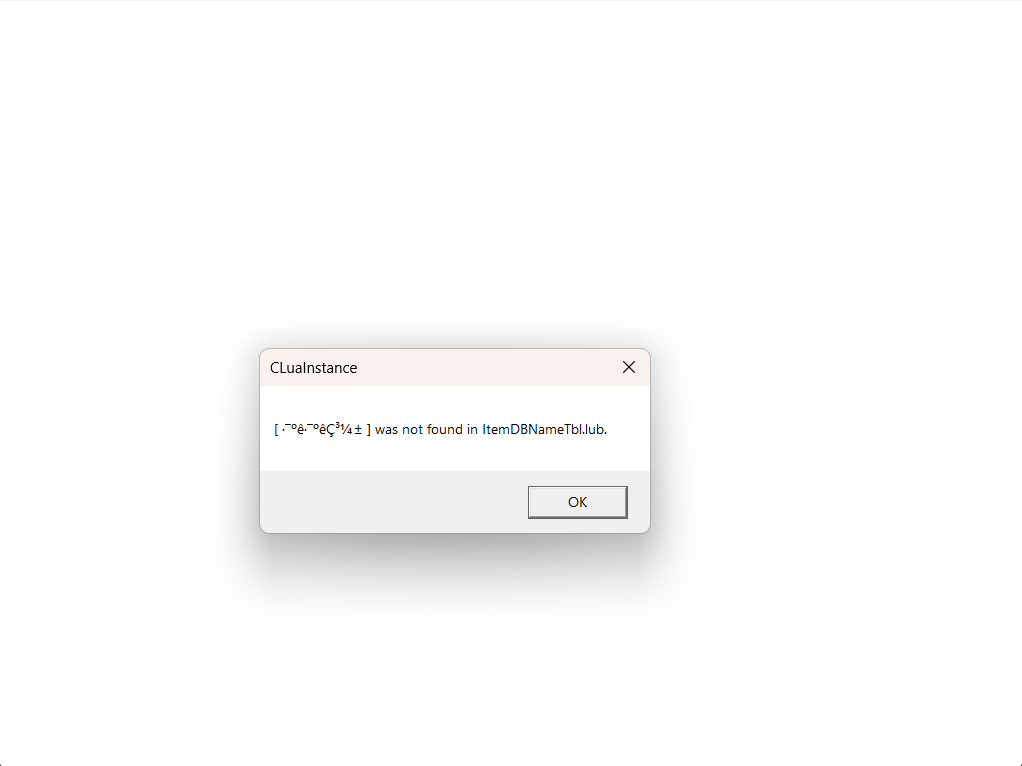
did you know why this ?, i try to search but not found....
anyone can help me ?, i use latest version of Rathena & EnglishRe by IIIChrisIII, and using client 20200401.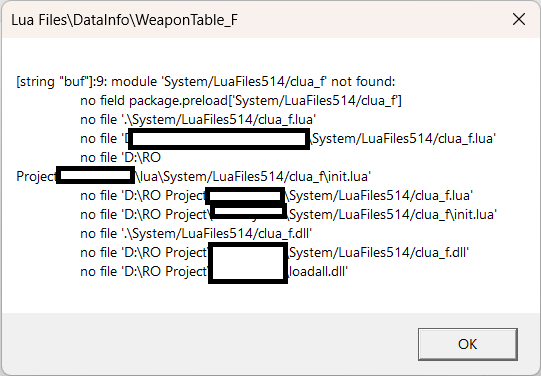
-
Hi all i need you suggestion what is the stable ragexe for lastest version of rathena, i try to use version 20200601 isnt stable. and always crash.
i use translation by IIcrishII so many file missing... did you have suggestion ? -
On 8/13/2023 at 10:38 AM, Rynbef said:
Can u record a video so I can see how fast it is and on which case?
Which client and rAthena version ur using?
Renewal or pre-renewal?
Rynbef~
all done btw, already fix

-
19 hours ago, Rynbef said:
U can add a delay, act delay or cooldown.
Rynbef~
yes i done add delay and cooldown
-
Hello guys, did you know how to set sonic blow spam limit, cause this so OP without spam limit in 1 time.
-
11 hours ago, Winterfox said:
  - Id: 6010
    AegisName: Pickaxe
    Name: Pickaxe
    Type: Armor
    Buy: 10
    Weight: 10
    Attack: 10
    Range: 1
    Classes:
      Normal: true
      Upper: true
      Baby: true
    Gender: Female
    Locations:
      Both_Hand: true
    Script: |
      bonus bAspd,-30; bonus bCritical,100; bonus bAtkRate,-100; autobonus "{ callfunc \"Minner_Main\",1; }",10000,1,BF_WEAPON;
    EquipScript: |
      callfunc "Minner_Main",0;
    UnEquipScript: |
      callfunc "Minner_Main",2;
According to the csv2yaml tool, your item should look like above. I can't check it, since I can't find the documentation of the old rathena text format.
But without knowing the details of the item, it seems weird that it gets typed as armor and female only.i will try, huge thanks, little confused if i get old script and i use latest rathena version
-
On 7/30/2023 at 12:42 AM, Winterfox said:
What happened is that rAthena uses a new format for the databases since the release of the script you are using.
For the first, I assume the 200 is the ID to make sure it doesn't collide with upcoming instances.- Id: 200 Name: Emperium Test Breaker TimeLimit: 3600 Enter: Map: job3_arch01 X: 26 Y: 28For the mob db you could simply copy the original Emperium und use the ID 3002 for the copy. But beware: You can't add 3002 if you use renewal, since a mob is already defined at this ID. In this case you would have to take an ID that is higher and match the script and mob avail accordingly.
You mixed the order up in your mob avail:- Mob: 3002 Sprite: 1288The first ID is the mob, the second is the sprite it should use, in this case the sprite of the emperium. The client doesn't know what sprite to show for your mob, so you have to tell the server to send it a known ID the client can use to show the mob.
done thank, it work fine. but i still confused with this script
6010,Pickaxe,Pickaxe,4,10,,10,10,,1,0,0xFFFFFFFF,7,0,34,0,0,0,0,{ bonus bAspd,-30; bonus bCritical,100; bonus bAtkRate,-100; autobonus "{ callfunc \"Minner_Main\",1; }",10000,1,BF_WEAPON; },{ callfunc "Minner_Main",0; },{ callfunc "Minner_Main",2; }

i try to add like this

  - Id: 300061
    AegisName: neun_pickaxe
    Name:  Neun Pickaxe
    Type: Weapon
    View: 2488
    Locations:
      Both_Hand: true
    ArmorLevel: 1
    EquipLevelMin: 1
    Script: |
      bonus bAspd,-30;
      bonus bCritical,100;
      bonus bAtkRate,-100;
      autobonus "{ callfunc \"Minner_Main\",1; }",10000,1,BF_WEAPON; },{ callfunc "Minner_Main",0; },{ callfunc "Minner_Main",2; }
i think will be error cause auto bonus, well did oyou knew what i must do with this script ?
-
hello guys, i try to learn how to make ragnarok online, and in 2 weeks everything worked but when I wanted to add an emperium test breaker, I was very confused because the source code was different from the one in my rathen.
 db/import/instance_db.txt
 200,Emperium Test Breaker,3600,1,job3_arch01,26,28

and in my rathena like that

  - Id: 4
    Name: Nidhoggur's Nest
    TimeLimit: 14400
    Enter:
      Map: 1@nyd
      X: 32
      Y: 36
    AdditionalMaps:
      2@nyd: true

i try make like that, thats wrong ?

  - Id: 5
    Name: Emperium Test Breaker
    TimeLimit: 3600
    Enter:
      Map: job3_arch01
      X: 26
      Y: 28
and where i can put 200 ?
and i very confused when i adding mob db
my mob_db source code like that
  - Id: 1288
    AegisName: EMPELIUM
    Name: Emperium
    Level: 90
    Hp: 68430
    Attack: 60
    Attack2: 71
    Defense: 40
    MagicDefense: 50
    Agi: 17
    Vit: 80
    Int: 50
    Dex: 26
    Luk: 20
    AttackRange: 1
    SkillRange: 10
    ChaseRange: 12
    Size: Small
    Race: Angel
    RaceGroups:
      Gvg: true
    Element: Holy
    ElementLevel: 1
    WalkSpeed: 300
    AttackDelay: 1288
    AttackMotion: 288
    DamageMotion: 384
    Class: Boss

and i must put in the source code like that
3002,EMPELIUM,Emperium,Emperium,90,68430,0,0,0,1,60,71,40,50,1,17,80,50,26,20,10,12,0,8,26,0x6200000,300,1288,288,384,0,0,0,0,0,0,0,0,0,0,0,0,0,0,0,0,0,0,0,0,0,0,0,0,0,0,0
and my mob avail like that
  # iRO Halloween Event 2009
#  - Mob: EP14_3_DEATH_B_MOB2
#    Sprite: WHISPER
#  - Mob: EP14_3_DEATH_B_MOB3
#    Sprite: DARK_LORD

and i must put in like that
 3002,1288,0 // Emperium Test Breaker

and i try to put in like that
// Emperium Test Breaker
  - Mob: 1288
    Sprite: 3002

that is wrong ?
i use this script Instanced Emperium Test Breaker + Ranker/Ladder 1.0.0 by Mubuhay
anyone can help me ?, thanks alot advance if you guys want to help me
-
hello, i try to watch how to add automatically adding item in rathena when i add any item and emblem in game but i cant find that tutorial, did you'll know why database cant add automatically ?
-
i got this error

-
i got error when i trying to restart server and npc how showing
[Error]: status_set_viewdata (NPC): Invalid view data 20570 -
hello, i try to find how to add npc and i cant find best solution for fix this problem, anyone can help me ?
i already add this in datainfo
Jobname.lub
	[jobtbl.JT_ZOMBIE] = "Zombie",
	[jobtbl.JT_ZOMBIE_DRAGON] = "dragon_5.gr2",
	[jobtbl.JT_ZOMBIE_GUARD] = "ZOMBIE_GUARD",
	[jobtbl.JT_ZOMBIE_H] = "ZOMBIE_H",
	[jobtbl.JT_ZOMBIE_MASTER] = "ZOMBIE_MASTER",
	[jobtbl.JT_ZOMBIE_PRISONER] = "ZOMBIE_PRISONER",
	[jobtbl.JT_ZOMBIE_SLAUGHTER] = "ZOMBIE_SLAUGHTER",
	[jobtbl.rumin] = "rumin",
NPCidentify.lub
	JT_MD_ED_LGTHIGHGUARD = 20541,
	JT_MD_ED_LGTGUARD = 20542,
	JT_MD_ED_M_SCIENCE = 20543,
	JT_HIDDEN_MOB8 = 20562,
	JT_MISSING_OCTOPIG = 20569,
	rumin = 20570
npc.hpp
	JT_NEW_NPC_3RD_END = 20570,
	NPC_RANGE3_END, // Official: JT_NEW_NPC_3RD_END=20570

	// Unofficial
	JT_INVISIBLE = 32767,
	JT_FAKENPC = -1
};

// Old NPC range
#define MAX_NPC_CLASS NPC_RANGE2_END
// New NPC range
#define MAX_NPC_CLASS2_START NPC_RANGE3_START
#define MAX_NPC_CLASS2_END NPC_RANGE3_END 100000
conts.yml
Body:
    - Name : rumin
      Value : 20570
      Parameter :false
\db\import\item_cash.yml
Header:
  Type: ITEM_CASH_DB
  Version: 1

Body:
 - Tab                     New
   Items:
     - Item                Diabolus Wings
       Price               10
anyone can help me ?, i tired to find this from yesterday...
-
10 minutes ago, imat1 said:
Did you patch your client with walk to delay patch? I suggest you to remove that or set the value not any lower than 200 i think.
i disable walk to delay in nemo patch
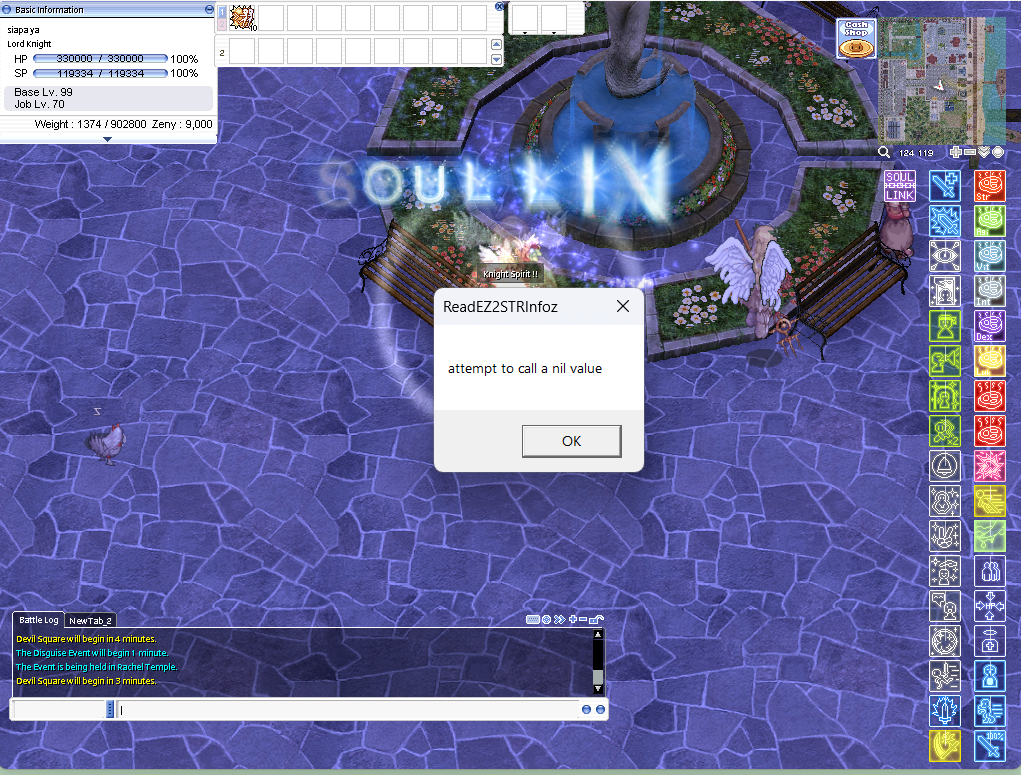
Reject Server when player active 100
in General Support
Posted
ahh i forget about it, thanks it solved