Leaderboard

Popular Content
Showing content with the highest reputation on 03/25/21 in all areas
-
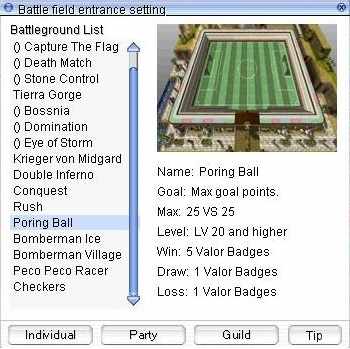
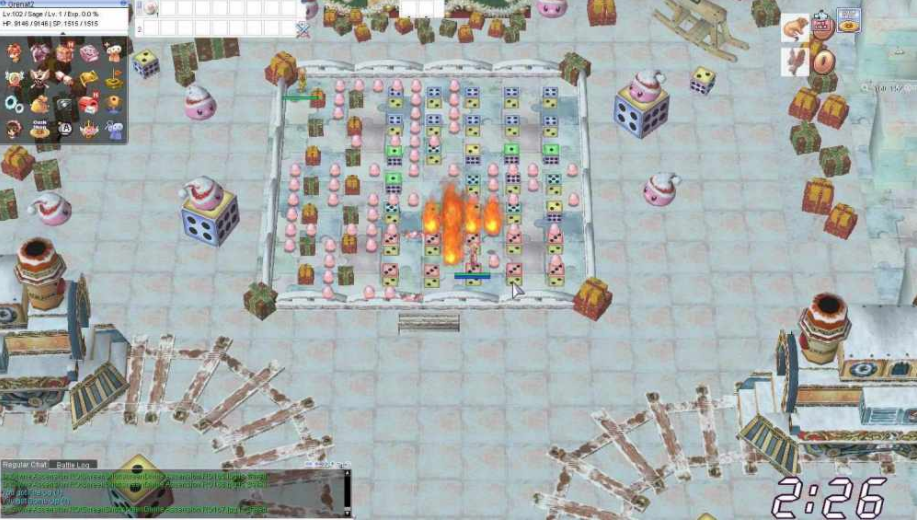
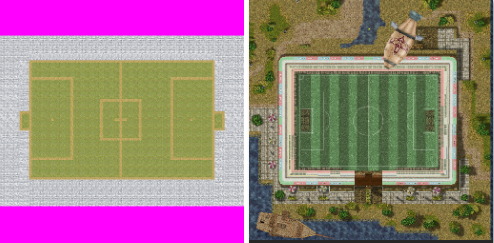
View File Battleground Extended 2020 ! With Bomberman/Poring Ball Mystic Project is about to open its last opus. For the occasion, Mystic Project has decided to make a gift to the community of rAthena and release one of its contents ! We've chosen the Battleground Extended, a memorable feature created by the eAmod and adapted for the new version of rAthena 2020. What are Battleground Extended ? They are an upgrade of the official Battleground made by the eAmod years ago and enhanced overtime. Battleground guide Name Description Flavius Same as official. The Goal is to destroy each's crystal. Flavius Capture The Flag The objective of the Flavius Battle CTF is to score 3 points before your enemy, by capture their Flag. To capture a Flag you need to take the enemy flag, and bring it to your base flag. If your base flag is captured too, you need to kill the flag carrier and take the flag back to your base. Flavius Death Match Each team has a certain number, Kill all the enemy players to let their Team without points. Protect your army. Flavius Stone Control Take the Stones in the middle of the battlefield and put in on your base, in the Stone Points. Each Stone will give points to your team. First team reach 99 points wins the game. Protect your stones from to be captured by the enemy. Tierra Eye of Storm There are two bases, North and South which teams can capture by holding position on the Base more than the other team. Each base will give you points each 5 seconds of Domination. If your Team control both bases the amount of points increases. To get additional points, in the middle there is a Flag spawn, capture it and put it on any of your team Bases. The first Team reach 99 points wins the match. Tierra Bossnia Attack the enemy base and destroy each MVP Guardian. To do damage to the guardian your team must capture the Balance Flag in the middle base. Each team have 5 guardian to be protected or killed. Tierra Domination There are three bases, North, Center and South which teams can capture by holding position on the Base more than the other team. Each base will give you points each 5 seconds of Domination. The first Team reach 99 points wins the match. Krieger Von Midgard (KVM) Same as official, regular PVP. Double Inferno There are 2 teams in the battlefield, your team and the opposite enemies. Kill the enemy players, collect the skulls and bring them to the Sacrifice Totem to win points. You can collect your own team skulls and bring then to your Sacrifice Totem to avoid other teams to score but it won't count as points. If you get killed all your skulls will be drop to the floor, including your own skull. First Team to get 80 points wins the battle. Conquest If you are Attacking, destroy the enemy defenses and it's Flag. If you are Defending, protect your castle defenses and the Flag. Rush Fight to capture the Castle and organize your team to defend it. If you fail on the first capture, kill the defender and take it for your team. Poring Ball It is a soccer game, a poring (the ball) will be in the middle of the field. The match lasts 5min. The team that has the most goals win the game. Super Bomberman The classic game specially made in Ragnarok Online. The goal is to defeat the enemies by putting bombs that will explode on them. It is a 2vs2 version of the game. Peco Peco Racer Coming soon... Mario Kart - RO version : New Battleground Queue System Battleground Commands @joinbg will warp you only to the battleground room. (Use interface UI Battleground to join any running BG or create one) @leavebg will warp you out of the the current battleground you're in. @listenbg display or not the battleground explanations. @order is only for the leader, an huge announce will be displayed to the team. @reportafk is only for the leader, expulsing someone who is AFK. @bginfo will display all curent running BGs + amount of players + scores for each team and remaining time of the BG Battleground Skills @bgskill is used by the leader. I left it there as a memory but you better use the guild interface alt + g -> guild skill tree The leader can use the following skills: - Emergency Recall: Warp everyone from the team to the leader. - Battle Orders: All guild members visible on the guild leader screen will receive +5 STR, DEX, INT. (Now having a status icon on the right) - Regeneration: All guild members visible on the guild leader screen will increase their HP and SP regen rate. (Now having a status icon on the right) - Restore: All guild members visible on the guild leader screen will have their HP and SP restored to 90% of the respective maximum. - Chargeshout Flag: The leader will summon a guild flag. - Chargeshout Beating: Anyone in the guild can use this skill, it will warp to the guild flag IF you are on the same map as the flag. - Emergency Move: All guild members visible on the guild leader screen will receive the effect of speed potion, increasing walking speed by 25%. Kill Count Each person killed on a battlefield will be counted in your guild information. This is like a rank. In bg_common.txt, you will find this. If you already use OnPCKillEvent, I recommend you to remove this code and add it to yours. Red / Blue Teams Upon your arrival on the battlefield, you are going to see yourself in a clan (alt + g) and a guild (ctrl + g). Blue Team : http://mysticprojectro.com/wiki/images/d/d1/Clan_emblem01.jpg Red Team : http://mysticprojectro.com/wiki/images/a/a9/Clan_emblem02.jpg Each team-mate will have this emblem by their character's name. Enemies will be displaying the opposite emblem. Some battlefields will change your cloth dye as well for the attributed color but don't worry, you will get yours back as soon as the game is over. You can communicate with your team through the guild chat. When you leave the battlefield, the clan will be removed and you will be back in your actual guild. Battleground Happy Hours Battleground happy hours happen everyday from 4pm to 8pm during which, rewards obtained are increased by 60%. (Configurable in npc/battleground/bg_common.txt) Battleground Rewards Telma/Erundek NPCs from the official battleground are there to exchange Consumables / Stuff. However, some of you rather customize the rewards. It's up to you to remove Telma/Erundek. If you want to customize Rewards, here is a frame (located in bg_common.txt) made to buy stuff directly with badges. Poring Ball Youtube Video Demonstration : Ragnarok Online - DaRO : BattleGround Extended + - YouTube The original Poring Ball Map was created by us 14 years ago. (On the left). At the time, we had poor experience in mapping so my apologies if you don't find it attractive. However, you can always purchase the beautiful rework done by Olrox (on the right): https://olroxgraphics.com/index.php?/store/product/107-soccer-stadium/ Depending on which map you will pick, you need to configurate the Poring Ball. I assume you already have Olrox's map so by default, it is this configuration. If you want the free map that is included in this pack, you need to comment /* */ Olrox Poring Ball Map and remove the comment of Grenat Poring Ball Map (See orange sign) Bomberman Video Demonstration : Super Bomberman Ragnarok Online YouTube Video I've read a lot of times people asking about it ! We are releasing the new Bomberman Battleground Version with 3 bomberman maps (two of them are made by us) In bg_bomberman.txt, you will find this code. Make sure to remove it and add it to your OnPCStatCalcEvent, otherwise just leave it there. Some newer rAthena version doesn't have OnPCStatCalcEvent anymore, you may need to reinstall it. Installation : In this package, you will find : - BattlegroundExtended.diff : You will need to apply this patch. (cmd -> cd rathena -> git apply BattlegroundExtended.diff ) It has been created in 2020 and work with the latest rAthena. (Possibly working on previous version from 2018+). - NPC folder: I strongly recommend to delete all BG NPCs and only install the ones that are in this folder. It is compatible with the new BG Queue Systeme. Please review Poring Ball.txt to configurate your poring ball as well as bg_common for the happy hour rate. - DB: I did put items in txt and yml files since I don't know which version you guys are using. DO NOT copy paste in your db folder. Only take what's inside each files. - Client: Contains items/maps/texture/files/lua (for the new BG queue system)/bomberman music etc... Extract the contents inside your RO client folder. This patch modifies a lot of files, you may need to install the diff manually depending on your rAthena version. Once installed, please recompile your map_cache with the client data installed in the directory/grf the server reads to compile it. Configuration : Your server might be different than ours. This is why, it is important to configurate well the system. conf/battle/battleground.conf -> Search for battleground eAmod and configure them. db/battleground.xml -> "Color" represents the clothes palette given upon arrival on the battlefield. The player's Palette will come back to the original one when the BG is over. If you don't want players to have different cloth color, just put 0 or do not put anything at all. In our server, Color : 6 is blue, and 22 is red. Therefore, this is our configuration. I let you configure yours. Additional New Script Commands : * getnpcinfo <type>{,<char_id>} type: NPC_X: X, NPC_Y: Y * setporingball; (When activated, it would be like an OnClickedCell, almost ;), it calls a script for the poring ball (Or other things if you want to add things there). * getporingballx() / getporingbally(); (Get coordination of a clicked cell) * removeporingball; (Remove poring ball mode (Clickable cell calling a script) * getunitdir <unit_id/account_id>; (Get direction the unit is looking) * ispcsit <account_id> (Get information if a pc is sit or not) * unitpush <unit_id/account_id>,<dir>,<cells>; (Push (knockback) a specific target in a specific direction) * areaeffect( effect id, x, y); Any Questions ? You can contact me on Discord: Grenat#5220 for support regarding the installation. Support post : Release: Battleground Extended 2020 ! With Bomberman/Poring Ball - Source Releases - rAthena Team Mystic Project. Submitter grenat50 Submitted 02/04/2021 Category Source Modifications Video Content Author Grenat
 1 point
 -
View File @AnalyzeItem count item in your server @aitem this command allows you to check how many of the item in the server command @aitem2 allows you to check also who have the items @aitem is fast, but @aitem2 will take some time to finish the time depend on how big your database is! Keep in mind that this script work with sql , so if you got an item you will need to wait xtime(default 30 sec) to save in sql so you can see it with the command (or relogin or any act in the server that force you data to be saved , it's all depends on your server setting and your usage) you should wait until the command is done , do not logout/talk to npc/ anything until you get the results! '@AnalyzeItem' return the count of the item in the server. '@AnalyzeItem2' return the count of the item and the lst of who have it in the server (take more time). USAGE: @AnalyzeItem <ITEM_ID> @AnalyzeItem2 <ITEM_ID> OR @AItem <ITEM_ID> @AItem2 <ITEM_ID> Wait until you get the results in your chat to add more tables (like other storages) check the array .@tables$ and .@id$ F_GET_REAL_OWNER_NAME(<"string table">,<id>) get the name for id Submitter sader1992 Submitted 06/22/2020 Category Utilities Video Content Author sader19921 point
-
View File Theme - TH1 Built with Bootstrap 5 for ease of data view and manipulation, this theme is light-weight with extra features! Modifications There are a multitude of config options in the config file that you can change to easily modify this theme. However, there are no wacky extra configs that essentially duplicate the code from /config/application.php like some "designers" do - there's no need and they shouldn't do it. Item & Monster Image - Ready All the item and monster images (like the images displayed on the db pages) will show automatically as they're served from II's image repository, updated once per week. There is code in the config file that explains how to display specific images for items and mobs elsewhere on the site. Character Sprites - Ready This theme uses II's chargen that is regularly updated to display character images. It's used primarily on the Server Info page where the number of each class is listed, with a selection of random hats. Refresh the page to force the chars to swap hats! Updated Facebook Page Plugin Most themes still use the now deprecated Page Like code. For ease of customisation, this theme uses the shiny new Page Plugin with various options in the theme's config file. You will need to create a Facebook App to use this plugin and can be disabled via the config file. Sliders! There are two carousel sliders in this theme: Firstly, in the Right Sidebar to display offers. Easily customised in the config file. Secondly, the screenshots box on the homepage that expands to display the image in a modal. These can also be customised in the theme config. Upload as many as you like! Top 3 Killed MVPs This is also using the hosted chargen to display MVP images on-the-fly so you don't have to do anything! You can easily edit the number if you want to display more. World Boss Sidebar Box If you've installed my World Boss code, the remaining kills will be displayed in a Sidebar Box. It's a small snippet to display the number so you can easily customise this box however you like! It can also easily be disabled via the config file. Footer Social Icons These icons will only display if you insert the links into the config file. You can also copy/paste (and swap the names) to easily create your own footer icons! License You are not allowed to redistribute this theme or any files associated with it. They are for your use only. Price Structure Now to explain the price. This theme costs $10 to download and install, and you can download all updates for the first 4 months. 4 months after purchasing, the rAthena forums will issue an invoice for a renewal charge of $10. You do not have to pay the extra $10 if you don't want to! If you choose not to renew, you will no longer be able to download new fresh updates. The renewal charge simply allows you re-download the file and it's updates after 4 months have elapsed. I will be actively developing new features for this theme (like Facebook Login in the next release, and integration with roBrowser) and other features that you can only download if you have an active subscription to this theme. If you chose not to renew, and then in 7 months time a really cool feature is added to this theme, you will have to settle the renewal invoice before you can download updates. Hope that clears up how the pricing structure works! Submitter Akkarin Submitted 05/02/20 Category Fully Coded Themes Video Content Author Akkarin1 point
-
Go to src/map/atcommand.cpp then hanapin mo tong line na to : Then replace mo yung gusto mong coordinates then Recompile1 point
-
Veja, Se a skill aparece pro cliente, e ele tem a opcao de clicar nela. A parte do cliente provavelmente esta certa. Quando o cliente clica na skill, o servidor vai verificar as configuracoes para ver se batem. Se nao batem ele nao vai dar a skill. Em outras palavras, se na configuracao do servidor diz que a Skill precisa de uma certa skill e na pasta data diz que precisa de outra skill, nao vai funcionar. Entao, provavelmente, é algo com a skill_tree.txt. De repente erro de digitacao ou esta alterando o arquivo errado (Por ex. se o servidor nao for Renewall e voce esta alterando a skill_tree da pasta "re"). No caso, tenha certeza que voce editou o arquivo certo, que no caso seria dentro da pasta Import.1 point
-
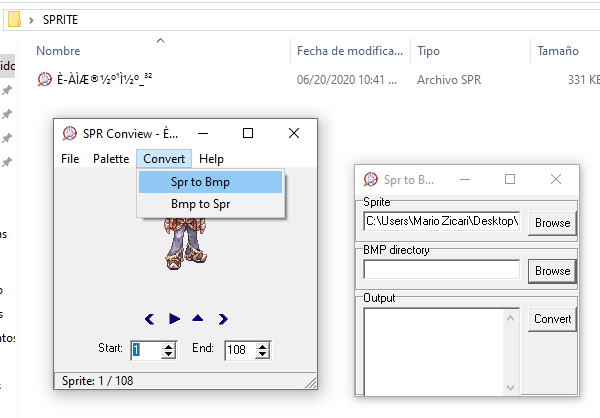
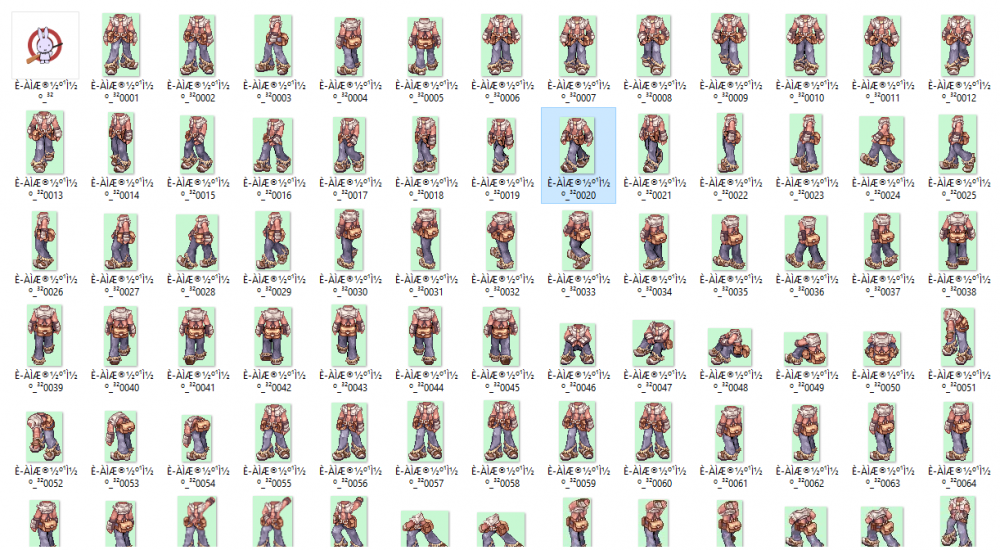
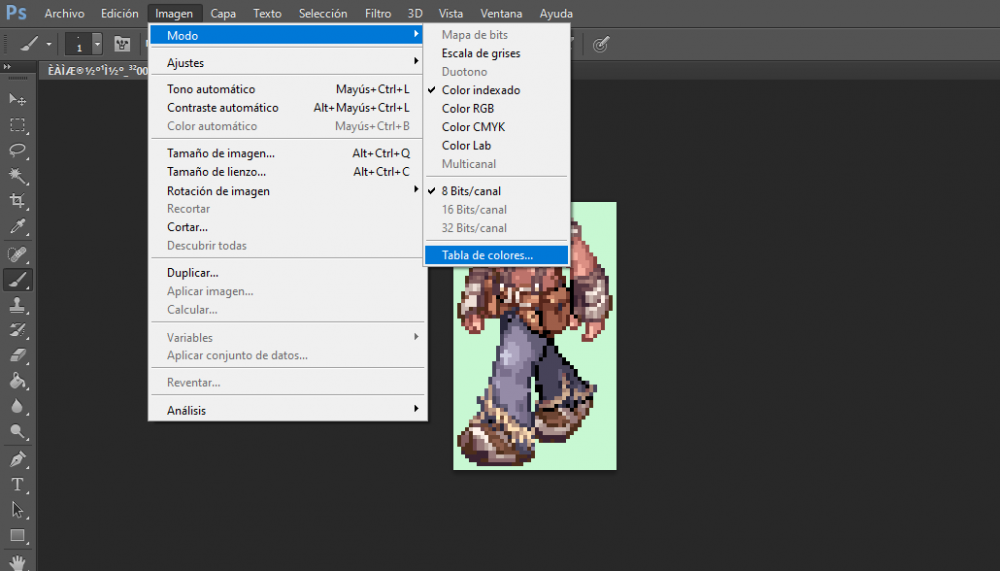
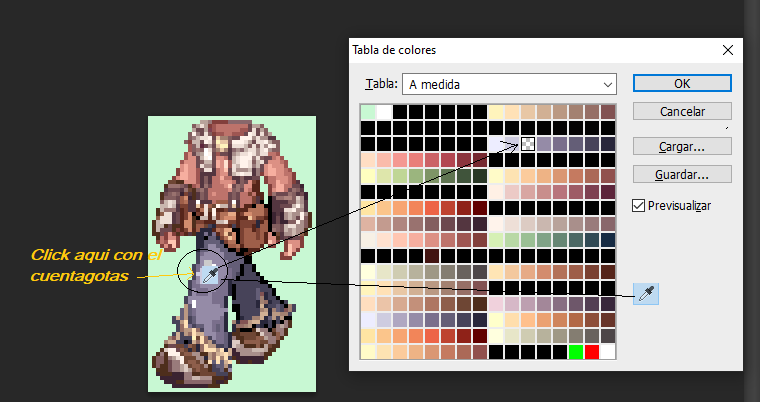
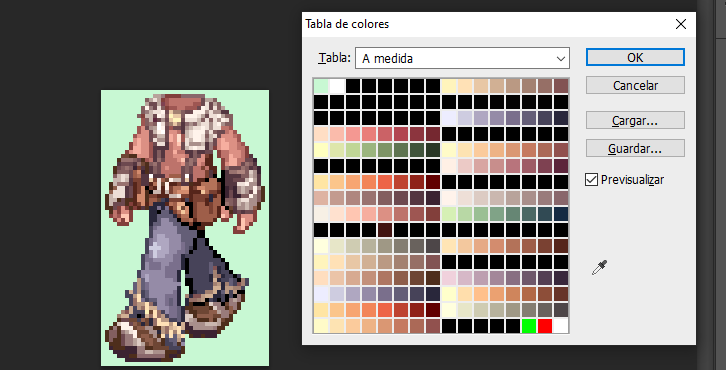
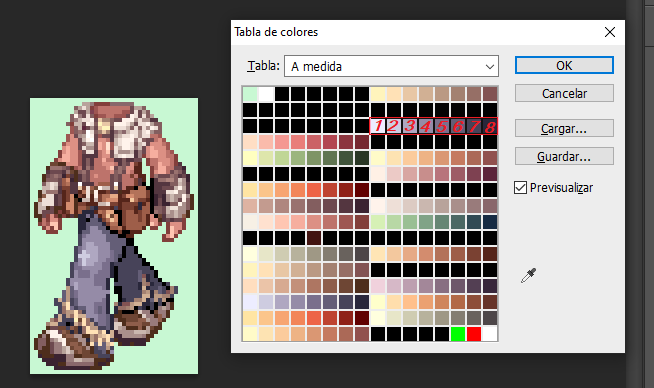
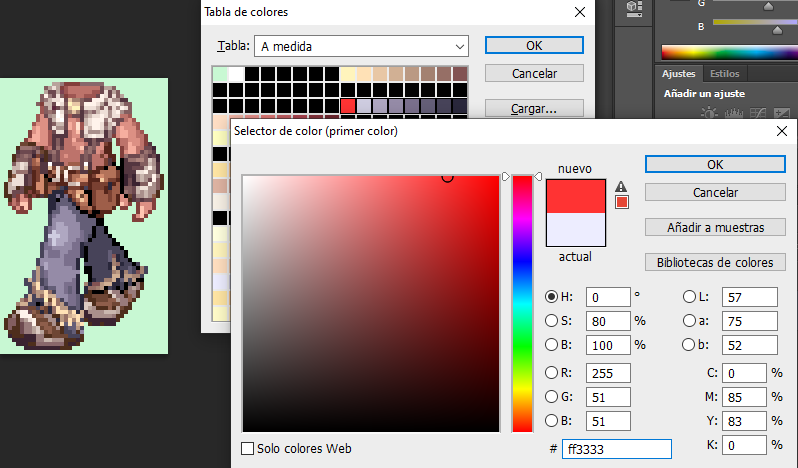
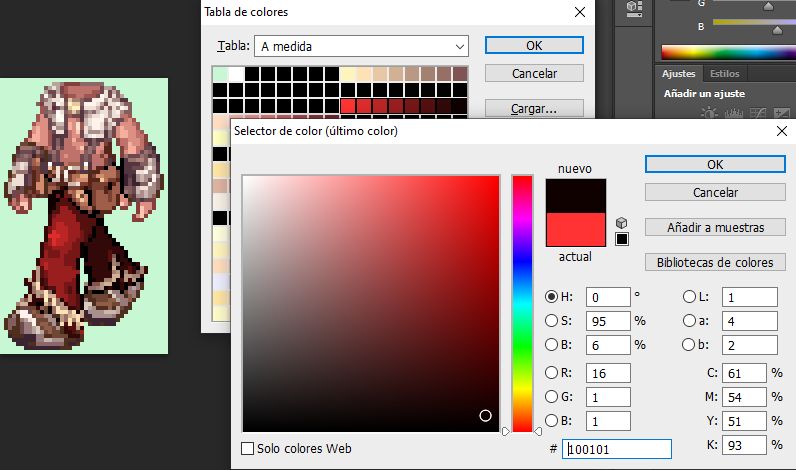
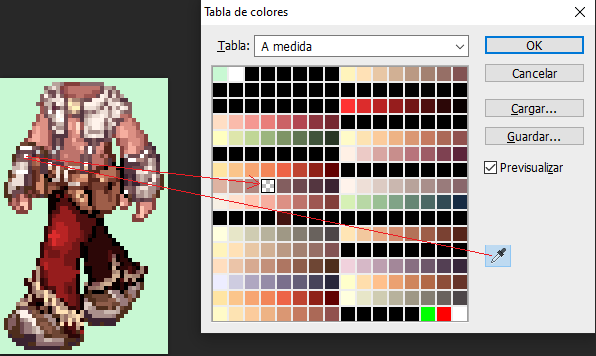
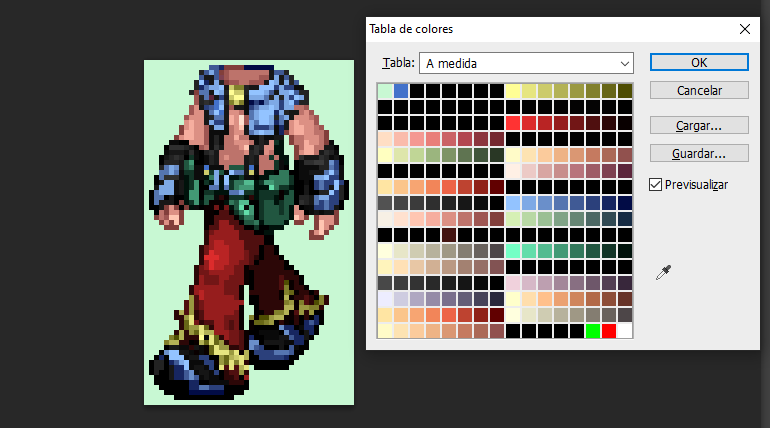
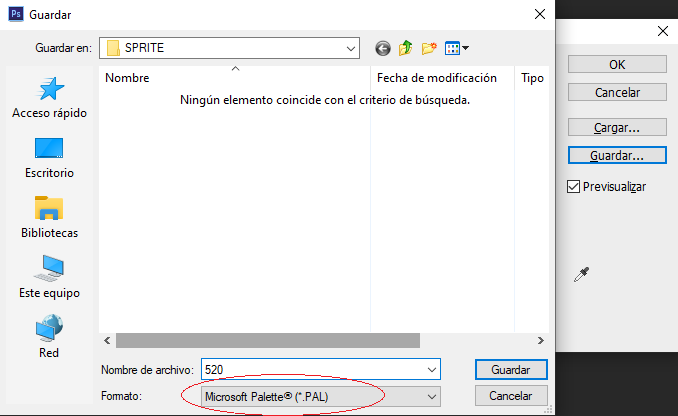
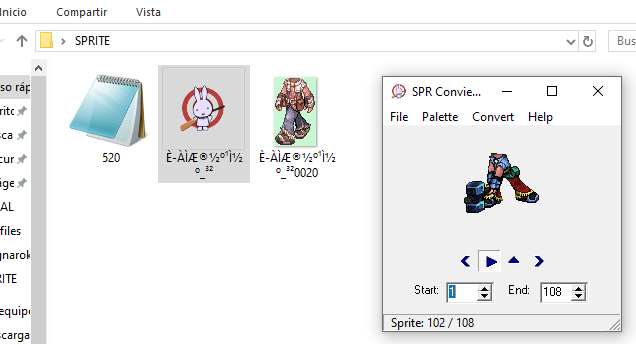
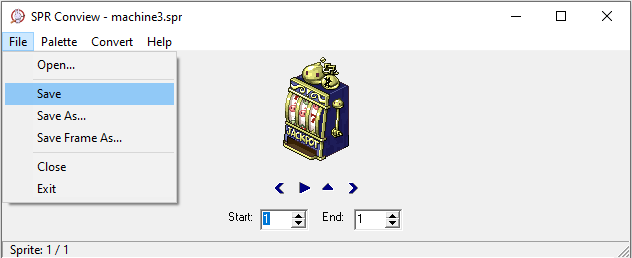
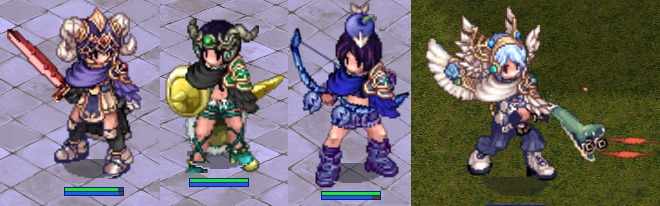
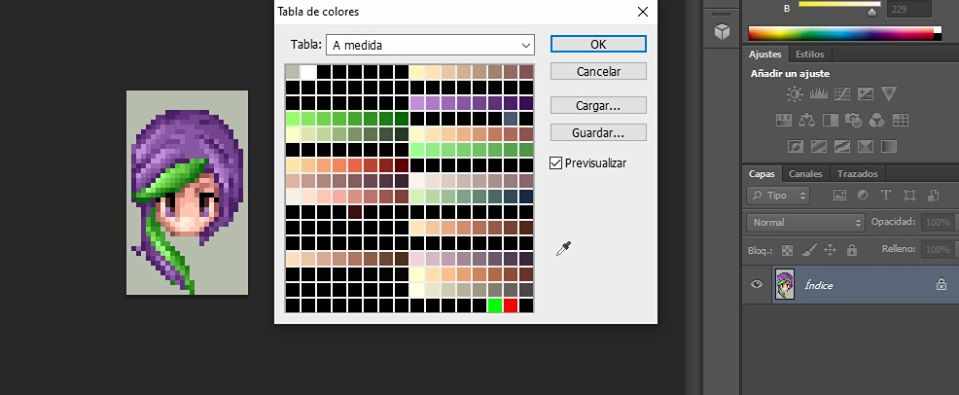
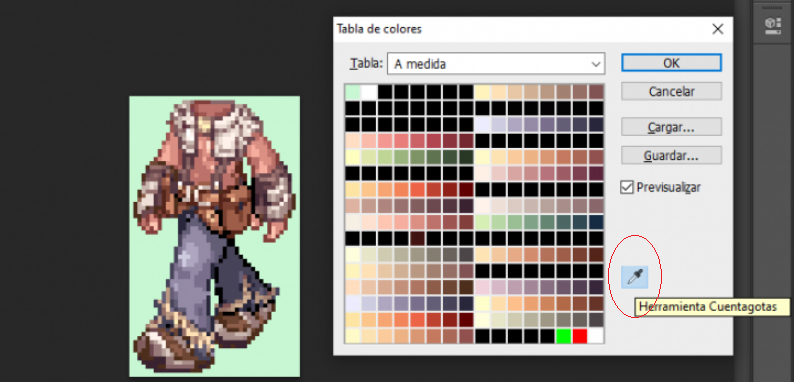
- Necesitaremos el GRF EDITOR para extraer del GRF el sprite que queramos modificar - Extraemos unicamente el SPR del objeto a editar, Aislaremos nuestro SPRITE en una carpeta, lo rompemos (extraemos todos los bitmaps) con el programa SPRCONVIEW, para hacer esto tenemos que darle a la opción convert Spr to Bmp. En el primer boton Browse que muestra la imagen, eliges el sprite que descargaste y le das a convert. las imagenes que se van a extraer de este sprite van a ir a parar en la misma carpeta donde esta ubicado el sprite, por lo que no elegimos BMP directory. Se recomienda tener el sprite aislado en una carpeta nueva.... no queras llenar tu escritorio con mas de 100 iconos de bitmaps ? Elegimos nuestra imagen Modelo, Preferiblemente una donde se vean todas las cualidades del objeto que vamos a RECOLOREAR, ELIMINAMOS EL RESTO El BITMAP elegido lo debemos abrir con el programa ADOBE CS6, Yo uso el portable Una vez abierto el Adobe CS6. Nos vamos a la parte que dice Archivo, y le damos a Abrir, ahí elegimos el bitmap que habíamos seleccionado, y una vez abierto nos vamos a la barra superior y elegimos imagen, Luego Modo, y por ultimo TABLA DE COLORES Cuando se Abre la Tabla de Colores Elegimos la Cuenta Gotas, le Damos un solo Click Buscamos la Porción de color que querramos editar! Y le damos SOLAMETE UN CLICK con el cuentagotas, Esto nos indicara de que cuadrante de la paleta procede el color que elegimos. YO CLICKIE EL PANTALON DEL WHITESMITH PARA SABER DONDE ESTABAN ESOS COLORES MUY IMPORTANTE A LA HORA DE EDITAR PALETAS, Es que no podemos editar lo que nos de la gana, NO PODEMOS ELEGIR UN SOLO CUADRITO! Tienes que elegir los 8 Cuadros de la regla donde se descubrió el color que acabas de clickear con el cuentagotas, PARA SELECCIAR LOS COLORES DEBES VOLVER A CLICKEAR EN EL CUENTAGOTAS PARA DESACTIVAR LA HERRAMIENTA. SI TE FIJAS EN LA IMAGEN AL VOLVER A CLICKEAR EL CUENTAGOTAS YA NO ESTARA EN HILIGHT! y ya con esto puedes seleccionar la rama de colores que descubriste Seleccionamos la regla de colores que habíamos descubierto, SIEMPRE TIENES QUE ELEGIRLA desde el Extremo Izquierdo hasta el Derecho, MANTENIENDO PRESIONADO EL CLICK Y ARRASTRANDO EL CURSOR A LO LARGO DE ESOS 8 BITS.. ASEGURARTE DE SELECCIONAR UNICAMENTE ESOS 8 DONDE DESCUBRISTE EL COLOR CON EL CUENTAGOTAS, No puedes pasarte porque editarias otra porcion del dibujo que no quisieras. CUANDO LO TIENES SELECCIONADO SUELTA EL CLICK DEL MOUSE Y SALDRA LA PANTALLA DE EDICIÓN DE COLORES ELIGES EL PRIMER COLOR Y LE DAS OK CUANTO ELIGES EL PRIMER COLOR, SE ABRIRÁ EL SELECTOR DEL ULTIMO COLOR, Cuando vas seleccionando el ultimo color vas a ir viendo como va cambiando el color de regla que elegiste... Lo que conseguimos con haber seleccionado los 8bits de la regla del color es un efecto mate que se ira aplicando en el color que descubrimos con el cuentagotas. La clave de un buen paletaje es Elegir Un primer color claro, y un ultimo color oscuro. Pero tu podrás hacerlo como mas te guste. Volvemos a utilizar nuestro cuentagotas para ver que mas podemos encontrar, esta vez seleccione los guantes del Whitesmith y descubri la regla de colores del Guante Repetiré el paso anterior, Desmarcare el gotero, Luego elegiré los 8 bits de la regla de colores donde encontré el color del guante! Usare un gris claro como primer color y un negro oscuro como ultimo color, para ver que me resulta. Descubrí que esta regla no solo abarca los guantes, si no que también comparte el color de los sujetadores de la camisa de nuestro Withesmith, y aquí es donde hago valido lo que dije anteriormente, QUE NO PODEMOS EDITAR LO QUE NOS DE LA GANA A VOLUNTAD. Solo podemos cambiar el matiz de la regla de colores. Tras experimentar mas con el gotero, encontramos varias reglas de colores que pudimos editar en nuestro whitesmith y este es el resultado final, Felicidades pues poseemos un color que ni el mismo Kamishi y su popular pack de paletas ha hecho. Le damos a guardar, y lo guardamos como MICROSOFT PAL Ya tenemos nuestro Archivo PAL, Para visualizarlo deberemos abrir el SPRITE! ojo el spr no el bitmap. Y en la pestaña Palette ponemos OPEN PALETE y seleccionamos la que recien guardamos. Podras ver el objeto en accion con la nueva gama de colores que le aplicaste Ese archivo pal puedes enviarlo al grf donde tenga las palettes siempre y cuando utilizes el nombre correspondiente de job, y el numero de paleta en la cual quieres que se muestre ese color. Debo aclarar que para que esas paletas se muestren correctamente en el cliente deberás abrir el archivo y remover la firma, ESTO APLICA UNICAMENTE PARA PALETAS DE COLOR DE PELO Y COLOR DE ROPA DE JOBS. La firma que debes borrar es la que muestro seleccionada aqui en la imagen. ----------------------------------------------------------------------------------------------------------------------------- SI EN LUGAR DE UN JOB, EDITASTE UN ITEM, UN MONSTRUO O UN NPC, ARMA ETC, SIMPLEMENTE ABRE EL SPRITE, CARGA LA PALETA Y DALE SAVE, aqui no hace falta remover firmas. Con el tiempo y dedicación seras un experto, podrás crear armas nuevas a bases de recolor, Podrás generar nuevos colores de cabello Podrás reparar las caras de algunos sprites donde los tintes o paletas manchan la cara Podrás crear tus propios escudos y armas, insertando y modificando imágenes y armando los sprites a partir de bitmaps. s

 1 point
 -
230 downloads
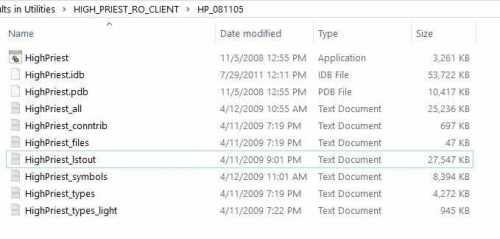
We are familiar of a Ragnarok Client HighPriest_081105 and its corresponding PDB file. This resource is invaluable for understanding the Ragnarok Client and was used on projects involved in diffing or original RO client development. I've been asked if I had a link for it by many potential developers so I thought it was very important to share and keep it live on rAthena.Free1 point